
A/C compressor clutch issue?


Joined: Jul 2013
Posts: 5,736
Likes: 633
Pins 1 & 2, the very top ones that are stacked, as opposed to the lower ones side by side. When you jump them you should hear the compressor click. It is a bypass but it's really just to check, you don't want to have constant compressor operation. More important is that there's continuity to the thermal protector, because that's the compressor fuse in a way.
So just to re-cap your ac doesn't work at all anymore?
So just to re-cap your ac doesn't work at all anymore?
Thread Starter

Joined: Apr 2006
Posts: 322
Likes: 3
From: Tampa, FL
Pins 1 & 2, the very top ones that are stacked, as opposed to the lower ones side by side. When you jump them you should hear the compressor click. It is a bypass but it's really just to check, you don't want to have constant compressor operation. More important is that there's continuity to the thermal protector, because that's the compressor fuse in a way.
So just to re-cap your ac doesn't work at all anymore?
So just to re-cap your ac doesn't work at all anymore?
So I just went out and jumped the pins.
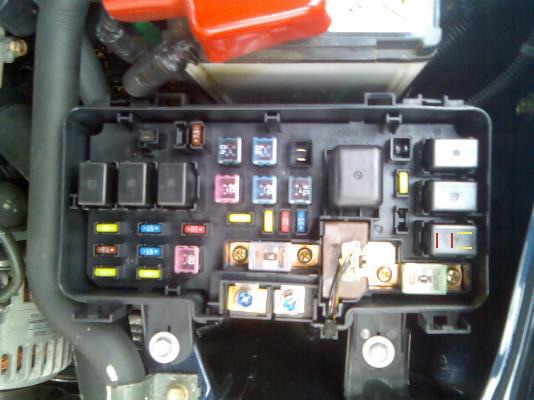
It looks like the picture that I grabbed from the internet is from a RHD car, but the fuse box orientation is the same. The yellow hash marks are the ones that I jumped first. They were towards the engine side of the fuse box. Turning on the A/C with these jumped got me a loud beep, but no compressor movement or clutch click. Jumping the red set didn't seem to do anything.
...and yes, to re-cap, the A/C is non-functional. This was before the system was touched in any way and the refrigerant was evacuated and refilled to its current (underfilled) level. It went from working flawlessly, to working sporadically when first turned on, to not working at all.
Thread Starter
Joined: Apr 2006
Posts: 322
Likes: 3
From: Tampa, FL
Thread Starter
Joined: Apr 2006
Posts: 322
Likes: 3
From: Tampa, FL
That seems to be the issue. After digging into the engine bay to get at that stupid thermal protector, it showed zero continuity at about 85-90 degrees that it is outside. Unless there's another as yet unseen issue, I assume replacing the part should solve this? Any recommendation on how to actually get the damn thing out? Was able to get to the wires by removing the alternator, but the actual protector is tucked in there.
Joined: Jul 2013
Posts: 5,736
Likes: 633
Unfortunately you have to remove the compressor to do it. I would get a new $22 drier and $24 expansion valve, since you're going to have to drain and recharge the system to replace the protector. You can get a shop to do it(drain and recharge), and do all the ac part work yourself it's actually not too hard.
Joined: Jul 2013
Posts: 5,736
Likes: 633
For the drier it's one screw that holds it in its cage and two bolts holding the line on. The exp valve you have to remove the air box to detach the low side from its tabs otherwise you can't move the line, the high side should come out as it's thinner. It s held on by a pair of Allen bolts to the evaporator. I think it's a 4mm but might be a 5. The compressor sits on a bracket, they both need to come off to remove the compressor from the bottom, along with an electrical connection for the field coil. I think this is better than having to remove the alternator. Just plug the lines with paper towel after you disconnect them. I would also replace the o rings of any line you disconnect. The proper oil for the compressor is pag-46 oil, 46 being the viscosity. An o-ring kit for r-134 lines costs around $10.
Thread Starter
Joined: Apr 2006
Posts: 322
Likes: 3
From: Tampa, FL
For the drier it's one screw that holds it in its cage and two bolts holding the line on. The exp valve you have to remove the air box to detach the low side from its tabs otherwise you can't move the line, the high side should come out as it's thinner. It s held on by a pair of Allen bolts to the evaporator. I think it's a 4mm but might be a 5. The compressor sits on a bracket, they both need to come off to remove the compressor from the bottom, along with an electrical connection for the field coil. I think this is better than having to remove the alternator. Just plug the lines with paper towel after you disconnect them. I would also replace the o rings of any line you disconnect. The proper oil for the compressor is pag-46 oil, 46 being the viscosity. An o-ring kit for r-134 lines costs around $10.
After waiting two weeks for the part to come in, and another week to have the time to work on the car, the job is done. The thermal protector was exactly the cause of the problem. You are my hero. No more seatbelt sweat marks from a drive home from work.
