
Starter Replacement DIY


Thread Starter
Former Sponsor
Joined: Feb 2011
Posts: 499
Likes: 3
After reading the appalling Starter DIY that is already on here, I had to post. The process was ridiculous, and there were no pictures. There is no need to remove the intake manifold and go in from the top. Save your time. This is straight from the process an ASE certified tech would use.
Removal
**Steps 2 and 3 have different methods for MY00-05 than MY06-09**
1. Disconnect battery.
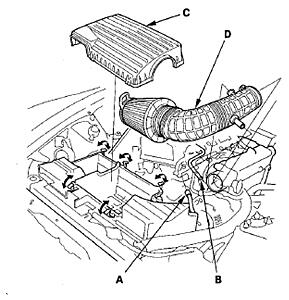
2. MY00-05: Disconnect the air hose (A) and the breather pipe (B), then remove the air
cleaner housing cover (C) and the air cleaner assembly (D).
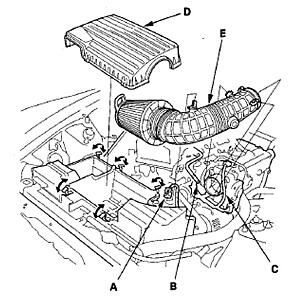
2. MY06-09: Disconnect the intake air temperature (IAT) sensor connector (A) and the
breather pipe (B), remove the manifold absolute pressure (MAP) sensor harness (C)
from the holder, then remove the air cleaner housing cover (D) and the air cleaner
assembly (E).
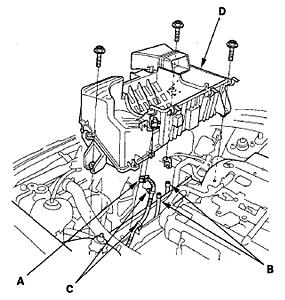
3. MY00-05: Disconnect the air control solenoid valve connector (A) and the vacuum
hoses (B), remove the harness clamps (C), then remove the air cleaner housing (D).
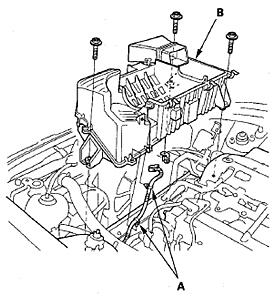
3. MY06-09: Remove the IAT sensor harness clamps (A), then remove the air cleaner
housing (B).
4. Remove the drive belt.
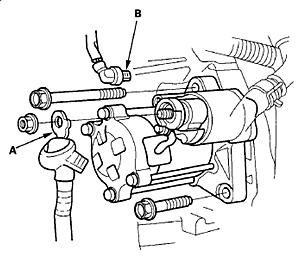
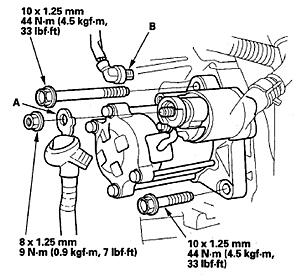
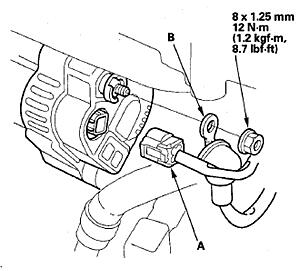
5. Disconnect the 4P connector (A) and the positive alternator cable (B) from the alternator.
6. Remove the mounting bolts, then remove the alternator.

**BE CAREFUL NOT TO DAMAGE THE KNOCK SENSOR FROM HERE ON OUT. IT IS VERY CLOSE TO THE STARTER AND EASILY BREAKABLE**
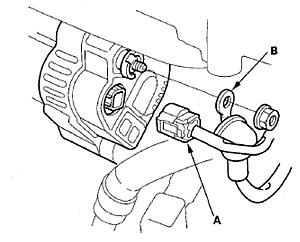
7. Disconnect the positive starter cable (A) and the BLK/WHT wire (B) from the starter.
8. Remove the two bolts holding the starter, then remove the starter.
Installation
1. Install the starter, then connect the positive starter cable (A) and the BLK/WHT wire (B) to
the starter. Make sure the crimped side of the ring terminal faces away from the starter
when you connect it.
2. Install the alternator.
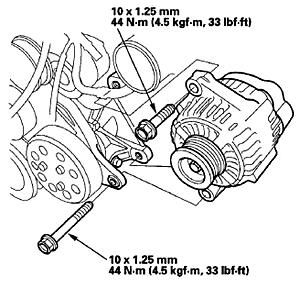
3. Connect the 4P connector (A) and the positive alternator cable (B) to the alternator.
4. Install the drive belt.
5. Install your respective air intake system. No torque specs.
6. Reconnect battery.
7. Make sure care starts.
8. MY00-05: Do the ECU idle learn procedure.
Removal
**Steps 2 and 3 have different methods for MY00-05 than MY06-09**
1. Disconnect battery.
2. MY00-05: Disconnect the air hose (A) and the breather pipe (B), then remove the air
cleaner housing cover (C) and the air cleaner assembly (D).

2. MY06-09: Disconnect the intake air temperature (IAT) sensor connector (A) and the
breather pipe (B), remove the manifold absolute pressure (MAP) sensor harness (C)
from the holder, then remove the air cleaner housing cover (D) and the air cleaner
assembly (E).

3. MY00-05: Disconnect the air control solenoid valve connector (A) and the vacuum
hoses (B), remove the harness clamps (C), then remove the air cleaner housing (D).

3. MY06-09: Remove the IAT sensor harness clamps (A), then remove the air cleaner
housing (B).

4. Remove the drive belt.
5. Disconnect the 4P connector (A) and the positive alternator cable (B) from the alternator.

6. Remove the mounting bolts, then remove the alternator.

**BE CAREFUL NOT TO DAMAGE THE KNOCK SENSOR FROM HERE ON OUT. IT IS VERY CLOSE TO THE STARTER AND EASILY BREAKABLE**
7. Disconnect the positive starter cable (A) and the BLK/WHT wire (B) from the starter.

8. Remove the two bolts holding the starter, then remove the starter.
Installation
1. Install the starter, then connect the positive starter cable (A) and the BLK/WHT wire (B) to
the starter. Make sure the crimped side of the ring terminal faces away from the starter
when you connect it.

2. Install the alternator.

3. Connect the 4P connector (A) and the positive alternator cable (B) to the alternator.

4. Install the drive belt.
5. Install your respective air intake system. No torque specs.
6. Reconnect battery.
7. Make sure care starts.
8. MY00-05: Do the ECU idle learn procedure.
Registered User
Joined: Apr 2012
Posts: 1,097
Likes: 1
Mine started the "cold start skreech" around 75k. It was still working but since I had to rebuild my head anyways I just went ahead and replaced it. It had a lot more power than my OEM one so I imagine my OEM one was about to go out in a year or so.
Joined: Sep 2010
Posts: 508
Likes: 2
Replaced mine with a rebuilt Denso and it's been doing great.
Definitely the correct steps, but the following step should not be underestimated:
8. Remove the two bolts holding the starter, then remove the starter.
That top bolt is something else.
Definitely the correct steps, but the following step should not be underestimated:
8. Remove the two bolts holding the starter, then remove the starter.
That top bolt is something else.

Registered User
Joined: Sep 2010
Posts: 132
Likes: 0
I removed the dead starter from my car yesterday. I unknowingly unbolted the motor and solenoid from the housing and removed them first and then removed the housing. I had a tough time getting the housing out through the tangle of wires and hoses between the fender and throttle body. What is the best way to get the new starter back in?


Trending Topics


Registered User
Joined: Sep 2010
Posts: 132
Likes: 0
I got it in through the bottom after disconnecting the two ground wires and a fuel line bracket. When I was manuevering it into place I lightly touched the knock sensor with the back of my hand and it broke. I was able to get a 24mm deep socket on it and it is coming out tonight.