
How to: Centre Console Upgrade


Thread Starter
Registered User
Joined: Aug 2012
Posts: 233
Likes: 0
I've been in the process of upgrade my centre console for a little while and said I'd put a 'how to' on here to show primarily how to re-wire the heated rear window switch. Credit for investigating the wiring has to go to maniatis on the Greek sub-forum, this is just a 'how to' following his guide.
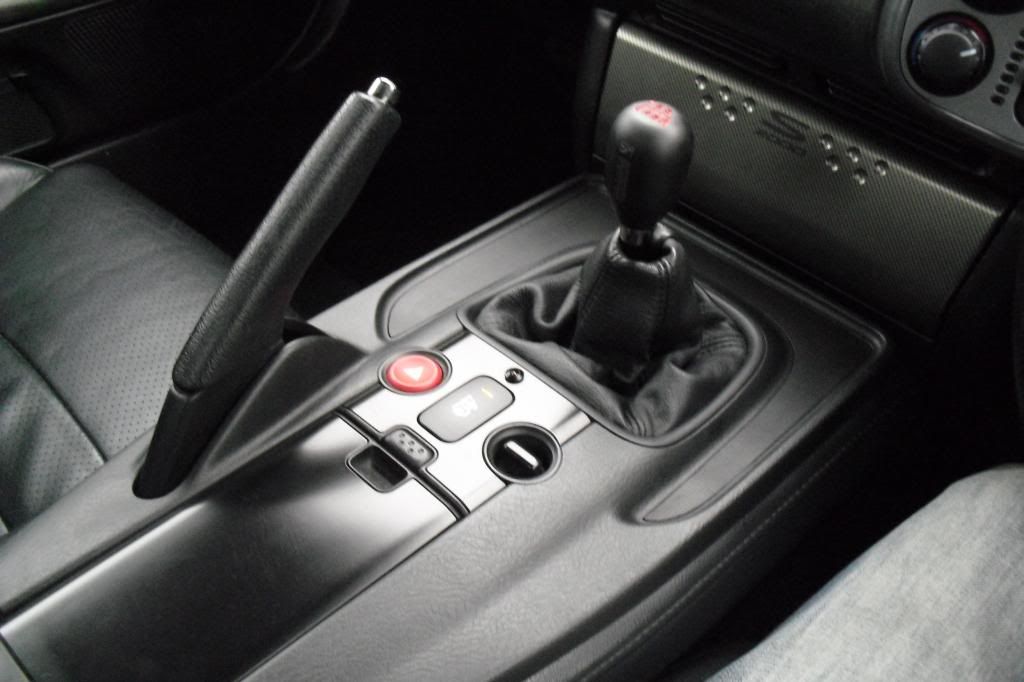
First off, you need to remove the gear knob and then pull up on the edges of the old console to release the clips holding it in. Unclip the 3 wiring connections, and push the alarm LED down and out of the console. Remove the console from the car.
Next we need to remove the heated rear window switch from the new console and prepare it for modifying. This is the switch:


A cut needs to be made to the switch to break one of the contacts. You can see the slot I cut in the following picture, it's to the left of the blue circular bulb base

Next step is to solder wires to each of the 5 pins on the switch, plus one to make the contact at the bulb, the following pictures show it better than I can describe it


Moving on to the car, we need to identify the HRW connector block and cut it off (leave enough wire on the plug so that you can fit it back on if you ever want to go back to standard)


And then, using the wiring diagram above, make the connections. I used these connector blocks as a temporary measure as I need to take the console out again for some further changes I'm planning. Once it goes back permanently I'll be soldering the connections.


Connect up the roof and hazzard switches, and insert the alarm LED into its bezel from below - I forgot to mention earlier that you need to drill a new hole in your chosen location for the LED. Then offer up the console to the correct location, give it a whack to clip it in place and re-fit the gearknob. Job done!
First off, you need to remove the gear knob and then pull up on the edges of the old console to release the clips holding it in. Unclip the 3 wiring connections, and push the alarm LED down and out of the console. Remove the console from the car.
Next we need to remove the heated rear window switch from the new console and prepare it for modifying. This is the switch:
A cut needs to be made to the switch to break one of the contacts. You can see the slot I cut in the following picture, it's to the left of the blue circular bulb base
Next step is to solder wires to each of the 5 pins on the switch, plus one to make the contact at the bulb, the following pictures show it better than I can describe it
Moving on to the car, we need to identify the HRW connector block and cut it off (leave enough wire on the plug so that you can fit it back on if you ever want to go back to standard)
And then, using the wiring diagram above, make the connections. I used these connector blocks as a temporary measure as I need to take the console out again for some further changes I'm planning. Once it goes back permanently I'll be soldering the connections.
Connect up the roof and hazzard switches, and insert the alarm LED into its bezel from below - I forgot to mention earlier that you need to drill a new hole in your chosen location for the LED. Then offer up the console to the correct location, give it a whack to clip it in place and re-fit the gearknob. Job done!


Joined: May 2008
Posts: 1,796
Likes: 3
From: Stoke
Sorry was that the pre facelift male connecter in the photo? I thought it was the face connector that goes in the facelift switch as you have choc blocked the wires in.
If its the old male connector ignore my comment above
If its the old male connector ignore my comment above
Trending Topics
Thread Starter
Registered User
Joined: Aug 2012
Posts: 233
Likes: 0
Dan, I much prefer the look of the newer model centre console, plus it has better storage than the pre-facelift model. This thread shows how to connect the newer console's HRW switch to the older models wiring loom, as the connector plugs are different.
Jimmy, yes the green connector is the pre-facelift one, just pictured to show folks which one they're cutting off. The choc-blocked pictures are showing the wires after the original connector has been cut off.
Jimmy, yes the green connector is the pre-facelift one, just pictured to show folks which one they're cutting off. The choc-blocked pictures are showing the wires after the original connector has been cut off.
