
Oxygen Sensor Replacement DIY


Thread Starter
Registered User
Joined: Jun 2013
Posts: 7
Likes: 1
From: Utah
Replaced my O2 sensor today (before CAT). I ordered a Denso234-4124 from RockAuto and received my part via US Priority Mail (like $2 shipping) in just 3 business days. Recommend RockAuto- this was my first and only experience with them so far. I believe in giving good publicity and bad publicity- which while I'm at it, careful with Jiffy Lube (aka Iffy Lube). Got emissions done yesterday and they were a little shady- that's all I'm going to say about that.
On with the DIY:
Some of the tools you may need:
7/8 wrench (I didn't need an O2 wrench, in fact a box wrench worked best)
Hammer (dead-blow would be ideal)
Wire cutters
Light (I prefer a good headlamp)
cable-ties
floor jack
tire iron
wood planks
Step 1- Get a new O2 sensor (duh). Make sure your exhaust is cool before you begin. The transmission can also be hot enough to burn you. Be careful! Ideally give your car a couple hours at least if you drove recently.
Step 2- You will need to jack up your car on level ground. **IMPORTANT!! **Make sure you safely jack up your car with parking brake in place, rear driver side tire chalked, and transmission in gear. Use a jack stand!!** I was able to do this job with only the front- passenger side of the car jacked up.
Tip- Drive front wheels onto boards so your jack will fit at the jack point. Break lug nuts loose before jacking up car, but keep them tight enough to still hold wheel securely in place.
Step 3- Get to know the area you will be working in. It's very tight, but as long as you don't have big forearms or meat-hooks, you should be able to manage this job.
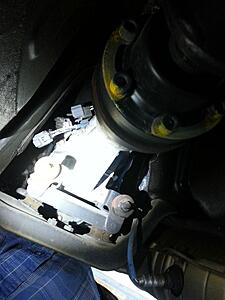
This is the area where both oxygen sensors are located. The view is from behind the transmission looking down the tranny tunnel. You can see the catalytic converter on the bottom right as well as the post-CAT O2 sensor- this is not the one being replaced in this DIY. On the top left you can see the connectors (shown already un-clipped).
Step 4- Break the O2 sensor loose. I used a 7/8 box wrench and a hammer. Lucky me, my car has very little weathering underneath and 4-5 whacks knocked the sensor loose.
Step 5- Disconnect the connector(s). I disconnected the rear O2 connector as I found it gave me more space to disconnect the front O2 connector above it.
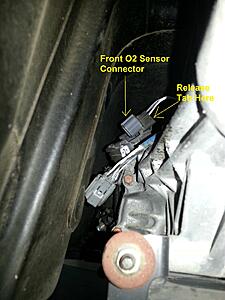
Step 6- Remove the connector from the sheet metal mount by pressing on the release tab as shown in the picture above. Refer to your replacement O2 sensor if you have purchased one like the original.
Step 7- Remove the O2 sensor and cable assembly. I determined that removing the factory wire ties would be more trouble than it was worth. I therefore cut the old sensor at the connector and at the sensor and pulled the cable through the wire ties, leaving the wire ties intact. Be careful to not let pieces of the old sheath fall into the O2 sensor hole.
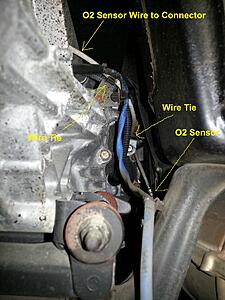
Step 8- Thread new wire tires through existing wire ties and zip to first notch. Leave loop sufficiently large enough to thread connector of new sensor through.
Step 9- Compare your old sensor to your new sensor. Make sure the threads are the same and that it looks the same size etc. Clean threads in exhaust if needed with proper tap. Apply anti-seize to the threads of your new O2 sensor. DON'T get any anti-seize on the sensor bulb!
Step 10- Carefully thread O2 sensor into hole and make finger tight. Do what is necessary to not twist wires to connector while threading sensor.
Step 11- Feed the connector through the wire tie loops along the same path of the sensor being replaced. Cinch up wire ties (I left enough slack to cut in the future). Trim excess wire tie to length.
Step 12- Re-connect all connectors and attach to metal mount.
Step 13- If you are satisfied with the job, tighten the O2 sensor. I don't know how tight, I just made it a scosche more than snug. I don't recommend Schwarzeneggering it though! Wouldn't want to break your new O2 sensor, but you don't want it rattling out either.
Step 14- Clean up all of your tools, replace wheel on car, tighten properly blah blah blah, and you're done.
After doing this my car ran noticeably better. I will post elsewhere some of the symptoms that led me to replacing the sensor. After replacement today I noticed smoother idle, quicker response to changes in throttle, and smoother driving in all gears. Particularly noticeable was response at low RPM after letting off the gas. Before when in neutral if I pressed the gas and raised RPM to ~3000 and let off, the RPM would drop below 1000 and the engine would lull, almost dying in response. After replacement doing the same thing the needle would only drop to about 800 RPM (engine was warm the whole time) and quickly go back up to idle RPM- no lull.
Hope this helps anyone. I will try to respond/ update this as feedback comes in. Also, I have more pictures and comments if there is a need.
Cheers
 Awesome job. I added it to the FAQ.


Joined: Sep 2011
Posts: 1,894
Likes: 162
From: Fremont, CA


Joined: Apr 2017
Posts: 12
Likes: 0
Replaced my O2 sensor today (before CAT). I ordered a Denso234-4124 from RockAuto and received my part via US Priority Mail (like $2 shipping) in just 3 business days. Recommend RockAuto- this was my first and only experience with them so far. I believe in giving good publicity and bad publicity- which while I'm at it, careful with Jiffy Lube (aka Iffy Lube). Got emissions done yesterday and they were a little shady- that's all I'm going to say about that.
On with the DIY:
Some of the tools you may need:
7/8 wrench (I didn't need an O2 wrench, in fact a box wrench worked best)
Hammer (dead-blow would be ideal)
Wire cutters
Light (I prefer a good headlamp)
cable-ties
floor jack
tire iron
wood planks
Step 1- Get a new O2 sensor (duh). Make sure your exhaust is cool before you begin. The transmission can also be hot enough to burn you. Be careful! Ideally give your car a couple hours at least if you drove recently.
Step 2- You will need to jack up your car on level ground. **IMPORTANT!! **Make sure you safely jack up your car with parking brake in place, rear driver side tire chalked, and transmission in gear. Use a jack stand!!** I was able to do this job with only the front- passenger side of the car jacked up.
Tip- Drive front wheels onto boards so your jack will fit at the jack point. Break lug nuts loose before jacking up car, but keep them tight enough to still hold wheel securely in place.
Step 3- Get to know the area you will be working in. It's very tight, but as long as you don't have big forearms or meat-hooks, you should be able to manage this job.

This is the area where both oxygen sensors are located. The view is from behind the transmission looking down the tranny tunnel. You can see the catalytic converter on the bottom right as well as the post-CAT O2 sensor- this is not the one being replaced in this DIY. On the top left you can see the connectors (shown already un-clipped).
Step 4- Break the O2 sensor loose. I used a 7/8 box wrench and a hammer. Lucky me, my car has very little weathering underneath and 4-5 whacks knocked the sensor loose.
Step 5- Disconnect the connector(s). I disconnected the rear O2 connector as I found it gave me more space to disconnect the front O2 connector above it.

Step 6- Remove the connector from the sheet metal mount by pressing on the release tab as shown in the picture above. Refer to your replacement O2 sensor if you have purchased one like the original.
Step 7- Remove the O2 sensor and cable assembly. I determined that removing the factory wire ties would be more trouble than it was worth. I therefore cut the old sensor at the connector and at the sensor and pulled the cable through the wire ties, leaving the wire ties intact. Be careful to not let pieces of the old sheath fall into the O2 sensor hole.

Step 8- Thread new wire tires through existing wire ties and zip to first notch. Leave loop sufficiently large enough to thread connector of new sensor through.
Step 9- Compare your old sensor to your new sensor. Make sure the threads are the same and that it looks the same size etc. Clean threads in exhaust if needed with proper tap. Apply anti-seize to the threads of your new O2 sensor. DON'T get any anti-seize on the sensor bulb!
Step 10- Carefully thread O2 sensor into hole and make finger tight. Do what is necessary to not twist wires to connector while threading sensor.
Step 11- Feed the connector through the wire tie loops along the same path of the sensor being replaced. Cinch up wire ties (I left enough slack to cut in the future). Trim excess wire tie to length.
Step 12- Re-connect all connectors and attach to metal mount.
Step 13- If you are satisfied with the job, tighten the O2 sensor. I don't know how tight, I just made it a scosche more than snug. I don't recommend Schwarzeneggering it though! Wouldn't want to break your new O2 sensor, but you don't want it rattling out either.
Step 14- Clean up all of your tools, replace wheel on car, tighten properly blah blah blah, and you're done.
After doing this my car ran noticeably better. I will post elsewhere some of the symptoms that led me to replacing the sensor. After replacement today I noticed smoother idle, quicker response to changes in throttle, and smoother driving in all gears. Particularly noticeable was response at low RPM after letting off the gas. Before when in neutral if I pressed the gas and raised RPM to ~3000 and let off, the RPM would drop below 1000 and the engine would lull, almost dying in response. After replacement doing the same thing the needle would only drop to about 800 RPM (engine was warm the whole time) and quickly go back up to idle RPM- no lull.
Hope this helps anyone. I will try to respond/ update this as feedback comes in. Also, I have more pictures and comments if there is a need.
Cheers
On with the DIY:
Some of the tools you may need:
7/8 wrench (I didn't need an O2 wrench, in fact a box wrench worked best)
Hammer (dead-blow would be ideal)
Wire cutters
Light (I prefer a good headlamp)
cable-ties
floor jack
tire iron
wood planks
Step 1- Get a new O2 sensor (duh). Make sure your exhaust is cool before you begin. The transmission can also be hot enough to burn you. Be careful! Ideally give your car a couple hours at least if you drove recently.
Step 2- You will need to jack up your car on level ground. **IMPORTANT!! **Make sure you safely jack up your car with parking brake in place, rear driver side tire chalked, and transmission in gear. Use a jack stand!!** I was able to do this job with only the front- passenger side of the car jacked up.
Tip- Drive front wheels onto boards so your jack will fit at the jack point. Break lug nuts loose before jacking up car, but keep them tight enough to still hold wheel securely in place.
Step 3- Get to know the area you will be working in. It's very tight, but as long as you don't have big forearms or meat-hooks, you should be able to manage this job.
This is the area where both oxygen sensors are located. The view is from behind the transmission looking down the tranny tunnel. You can see the catalytic converter on the bottom right as well as the post-CAT O2 sensor- this is not the one being replaced in this DIY. On the top left you can see the connectors (shown already un-clipped).
Step 4- Break the O2 sensor loose. I used a 7/8 box wrench and a hammer. Lucky me, my car has very little weathering underneath and 4-5 whacks knocked the sensor loose.
Step 5- Disconnect the connector(s). I disconnected the rear O2 connector as I found it gave me more space to disconnect the front O2 connector above it.
Step 6- Remove the connector from the sheet metal mount by pressing on the release tab as shown in the picture above. Refer to your replacement O2 sensor if you have purchased one like the original.
Step 7- Remove the O2 sensor and cable assembly. I determined that removing the factory wire ties would be more trouble than it was worth. I therefore cut the old sensor at the connector and at the sensor and pulled the cable through the wire ties, leaving the wire ties intact. Be careful to not let pieces of the old sheath fall into the O2 sensor hole.
Step 8- Thread new wire tires through existing wire ties and zip to first notch. Leave loop sufficiently large enough to thread connector of new sensor through.
Step 9- Compare your old sensor to your new sensor. Make sure the threads are the same and that it looks the same size etc. Clean threads in exhaust if needed with proper tap. Apply anti-seize to the threads of your new O2 sensor. DON'T get any anti-seize on the sensor bulb!
Step 10- Carefully thread O2 sensor into hole and make finger tight. Do what is necessary to not twist wires to connector while threading sensor.
Step 11- Feed the connector through the wire tie loops along the same path of the sensor being replaced. Cinch up wire ties (I left enough slack to cut in the future). Trim excess wire tie to length.
Step 12- Re-connect all connectors and attach to metal mount.
Step 13- If you are satisfied with the job, tighten the O2 sensor. I don't know how tight, I just made it a scosche more than snug. I don't recommend Schwarzeneggering it though! Wouldn't want to break your new O2 sensor, but you don't want it rattling out either.
Step 14- Clean up all of your tools, replace wheel on car, tighten properly blah blah blah, and you're done.
After doing this my car ran noticeably better. I will post elsewhere some of the symptoms that led me to replacing the sensor. After replacement today I noticed smoother idle, quicker response to changes in throttle, and smoother driving in all gears. Particularly noticeable was response at low RPM after letting off the gas. Before when in neutral if I pressed the gas and raised RPM to ~3000 and let off, the RPM would drop below 1000 and the engine would lull, almost dying in response. After replacement doing the same thing the needle would only drop to about 800 RPM (engine was warm the whole time) and quickly go back up to idle RPM- no lull.
Hope this helps anyone. I will try to respond/ update this as feedback comes in. Also, I have more pictures and comments if there is a need.
Cheers
I noticed when I took the old sensor out that the element was loose and I could hear rattling when the engine was running.
Here is what I did to fix it: (sorry no pictures)
Removed the old broken sensor
Removed the heat shield bottom
Removed the 2 front bolts attaching the cat to the exhaust pipe.
Removed the wire clip from the rubber exhaust pipe hanger (no tools necessary to do this)
This drops the cat down so you can work on it
Push the element forward as far as you can with a probe or screwdriver but be careful not to damage the honeycomb
I used a ball joint press (basically a big C clamp) to squeeze the cat just behind the element. It left a dent in the cat about the size of a quarter
I did this so there were dents at 12 3 6 and 9 o'clock
I tried to push the honeycomb from the hole at the front of the cat backwards with the wood end of a hammer so as not to damage the honeycomb
I adjusted the dents so that the honeycomb became immobile at the front of the cat and would no longer slide back and touch the oxygen sensor tip
This also eliminated the rattle in the cat.
I placed the top of the heat shield back on the cat
lifted the cat back into place and pushed the exhaust hanger clip into the rubber hanger
installed the two bolts on the front of the cat
bolted the bottom part of the heat shield to the top
installed the new oxygen sensor as shown on the original post
cleared the codes
Took it for a rip and it sounds much better without the cat rattle.
Last edited by Jim Dwyer; Jun 5, 2019 at 03:17 PM.
Trending Topics


Joined: Apr 2004
Posts: 1,151
Likes: 118
From: Center of the Sun (Phoenix)
If the honeycomb element has come loose that means it's already compromised and broken. I don't know enough about the internal mechanics, but if the honeycomb is loose it has been touching other things inside, compromising the integrity of the material.
I've had the honeycomb loose and destroy an O2 sensor, but this is the first I've heard that you can force that piece back in there.
This could be an interesting technical discussion that could save owners a lot of money in not having to replace a Cat and instead just 'push the honeycomb back into place'.
Any Cat converter experts want to chime in here?
p.s. It's 5:17 AM in Phoenix and I'm literally heading into the garage right now, to beat the heat and replace the O2 sensor.


Joined: Aug 2012
Posts: 8,773
Likes: 1,877
First off, regarding the ancient portion of this thread, please, please don't replace your o2 sensor with something generic that requires cutting off the factory connector! Buy a sensor that just plugs in. No mutilation of car is required.
Now on to the cat honeycomb. Its just a bunch of material that will cause a chemical reaction to catalyze molecules in the exhaust, converting them from one substance, to another. This catalyzing material does not have to be secured to the converters walls to still function.
However its true that if its been rattling around, likely some of that catalyzing material has broken off, and perhaps been shot out the exhaust, or maybe shot into the mufflers. So likely there is less of that material that is actively interacting with much exhaust flow, so cat is probably now a bit less effective at its chemical conversion task.
The idea to wedge the material to one end of converter by gravity and strategic localized compression of the outer hull is intriguing and clever. Brilliant really. I don't see a reason this wouldn't work.
However this may just be prolonging the inevitable. if the material is still able to move around a bit (maybe now it is restricted from forward aft movement, but perhaps it can still move up and down some), it will eventually smash itself to bits again as the movement allows for sudden deceleration and excessive G's.
But its entirely possible this technique can prolong a cat for the remaining life of the vehicle. Certainly it will prolong the cats serviceable lifespan by a significant amount.
Joined: Apr 2017
Posts: 12
Likes: 0
I inspected the honeycomb element from both ends and it was intact and looked good. Nothing bent or flaking. The exhaust gases are going to push a loose element into the sensor and burn it up but now the element will be pushed into the dents on the cat body if it comes loose again but it is very tight now. I had cat rattle on start up that went away when the cat warmed up and now it is gone as well. I bought a NTK sensor that plugged in and had the wire hangers and the heat shield as well for $60 CDN.