Saaboteur's build
 02-08-2011, 02:34 PM
#1
Registered User

Thread Starter
Join Date: Aug 2006
Location: Edmonton, Alberta, Canada
Posts: 1,740
Likes: 0
Received 0 Likes
on
0 Posts
I've read a few 'build' threads, but never had one of my own for my S2000. A post on mbworld for my other car turned into a 'build' thread, so I figured I should have one for my S2k too. So here goes...
I bought my ’01 AP1 in October 2006, with about 105,000km on it. It was my first Honda, and indeed, my first Japanese car. Up to that point, as you can tell from the screen name, I drove almost Saabs exclusively. You can see more about my Saabs here: http://members.shaw.ca/saaboteur
The car I had right before the S2k was an ’02 MINI Cooper S with the factory supplied, expensive ($5,000) John Cooper Works package fitted by the previous owner, my buddy’s uncle. (To put expensive into perspective, JCW specific spark plugs were $65 each! Apparently, Formula One spark plugs are in the $50-$100 range!)
After about 9 months with the MINI, I got a bit tired of it and wanted something even more focused, and got into the S2000. After reading s2ki for every tidbit of info, and then looking at lots of cars, I found the one.
Car was originally from California, but made its way to me via an owner in Ontario, and then another one or two in Calgary, Alberta. Clearly, the car had to be certified for Canada and at some point must have had daytime running lights fitted, but when I test drove and bought the car, it had no such thing. I’ve left it.
I actually didn’t want Silverstone, was set on Berlina, but after driving behind the seller in the car, I mellowed on that.
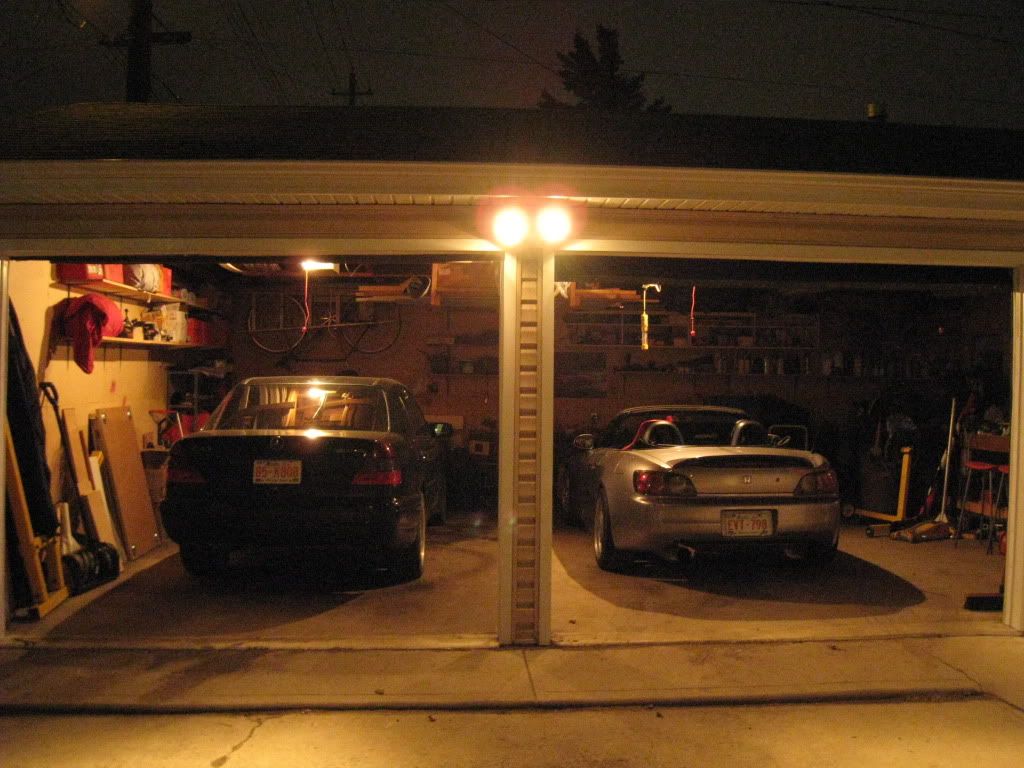
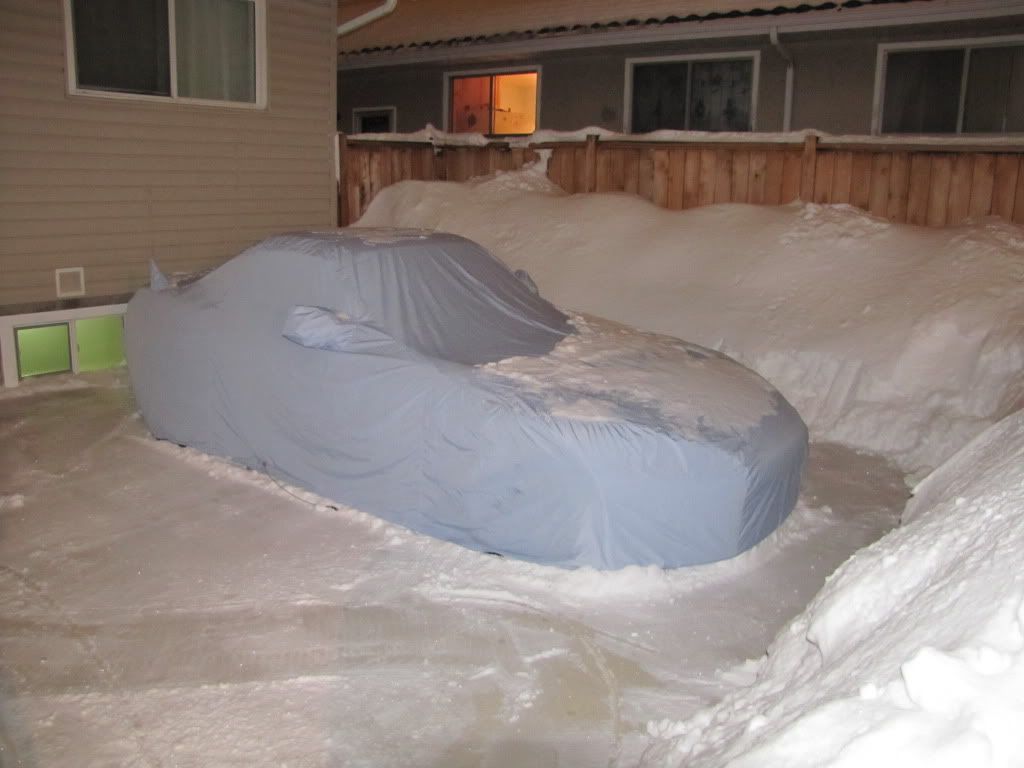
Here’s a pic on the day I picked up the car in Calgary. Drove it back to Edmonton that day (about 2.5 hours) and was hopeful I would have a couple weeks of clear roads before the winter came, but that same night we had a huge dump of snow. Boo. Didn’t really get to drive the car until spring.
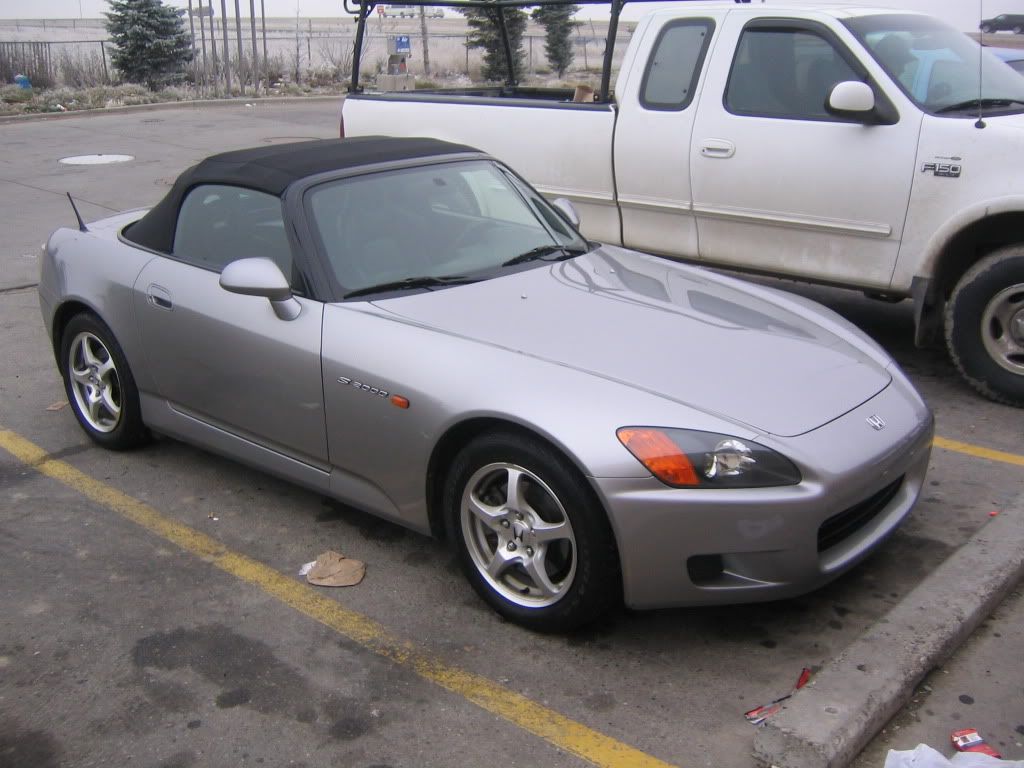
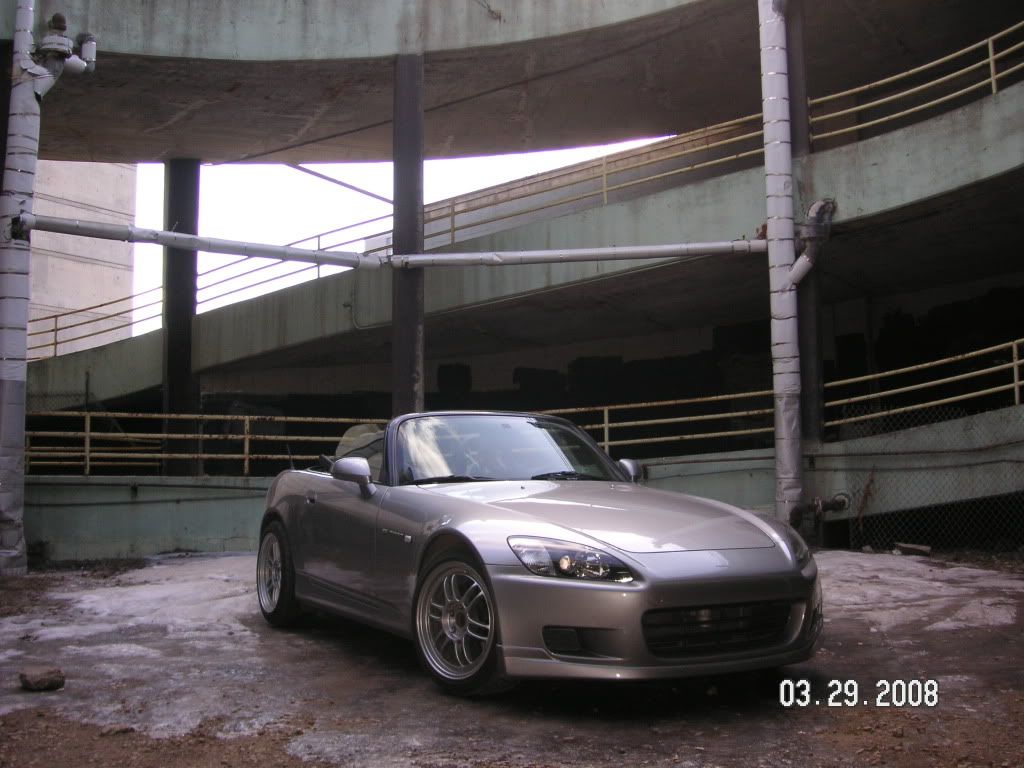
One of the first mods was a set of AP2 v.1 wheels. Shortly after, picked up a replica OE front lip.
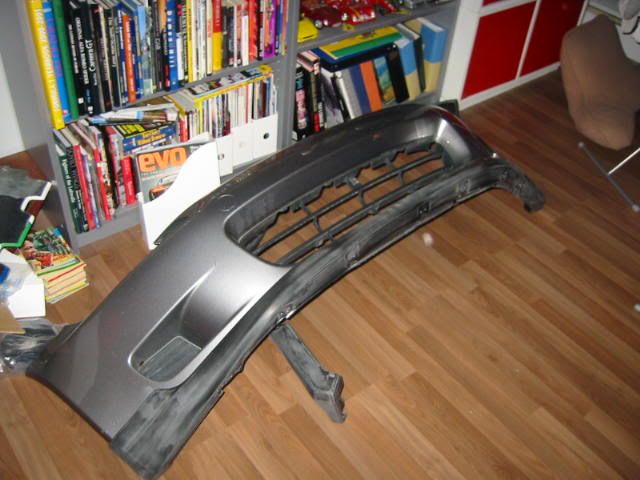
When I bought the car, the previous owner had rubbed the front bumper up against a yellow concrete pillar. Repainted the front bumper, but also shaved the front emblem.
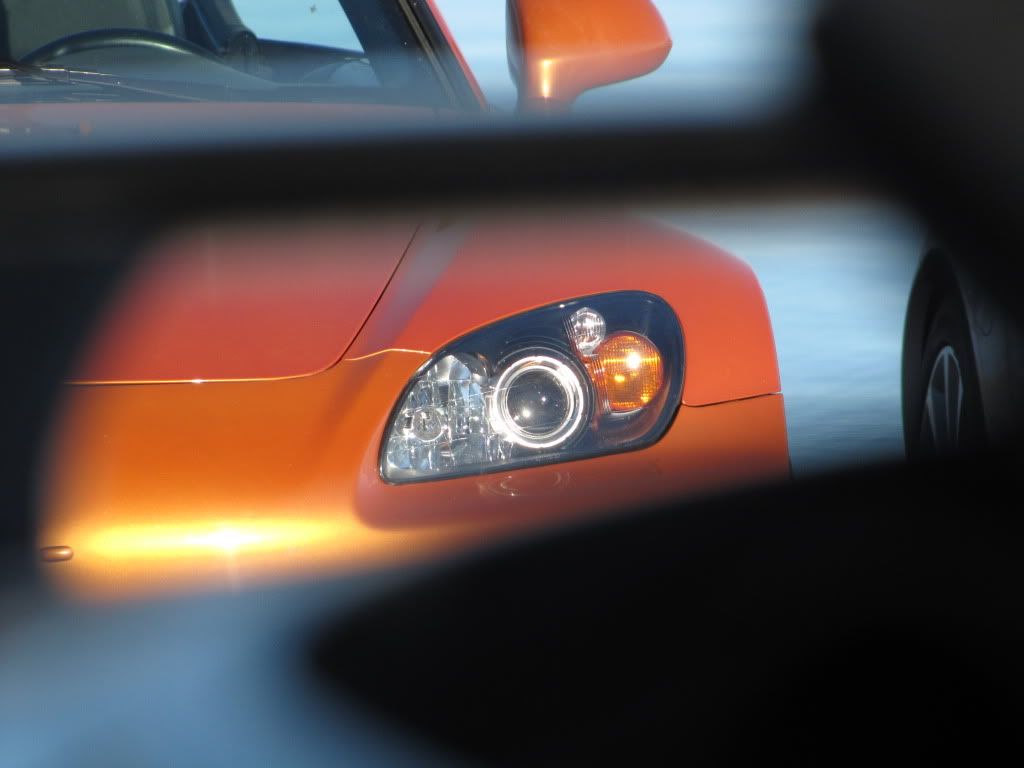
Picked up a set of headlights with the Rick’s clear diffusers installed.
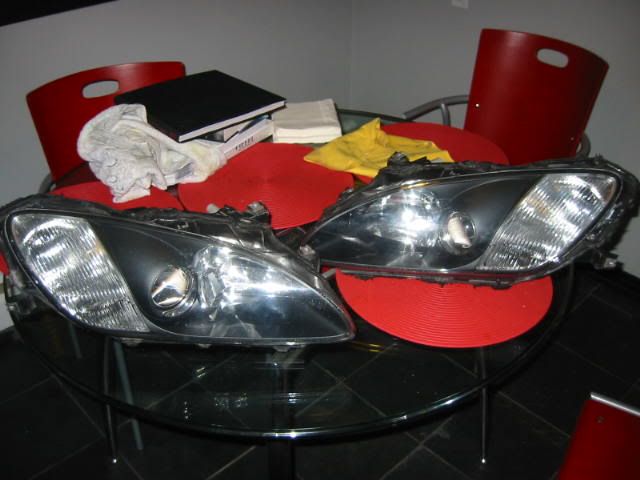
They were kinda crap though, so I bought a set of real JDM assemblies later on. These were slightly scratched, but after I polished them up and 3M’d, you can’t see the scratches anymore. Clear side markers too.
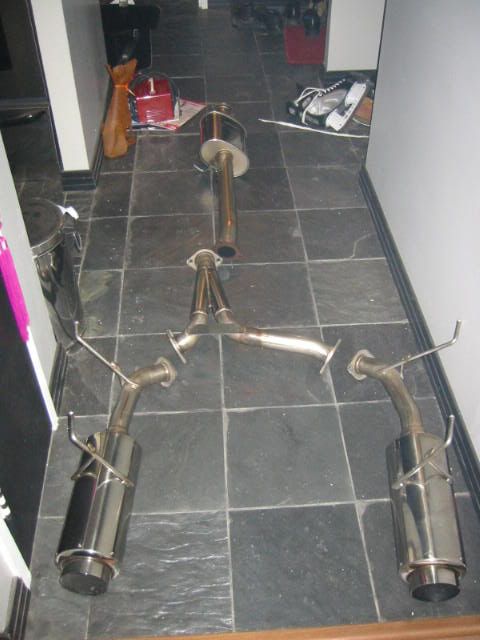
Then I picked up a Tanabe exhaust, but it was waaaaaay too loud, even with silencers installed. Picked up another, more quiet Tanabe exhaust instead. Put on a test pipe too.
Hardwired the V1 and mounted with a slightly modified Blendmount.
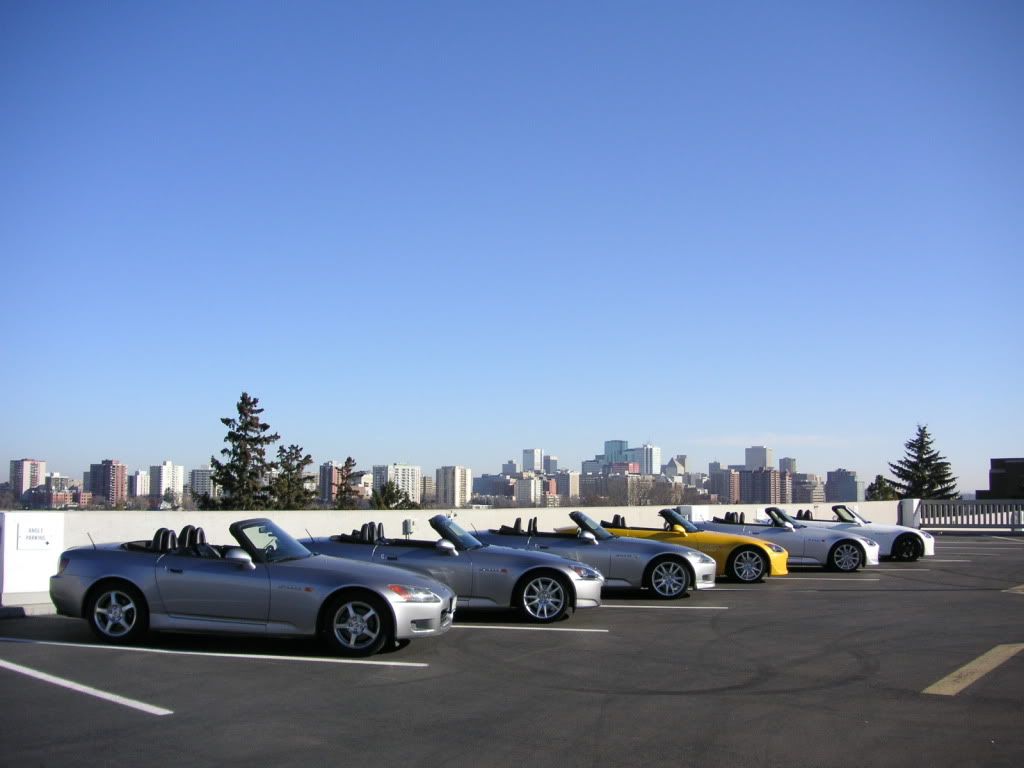
Some pix with the E46 M3 that my buddy owned at the time, and at a local meet up in the fall.

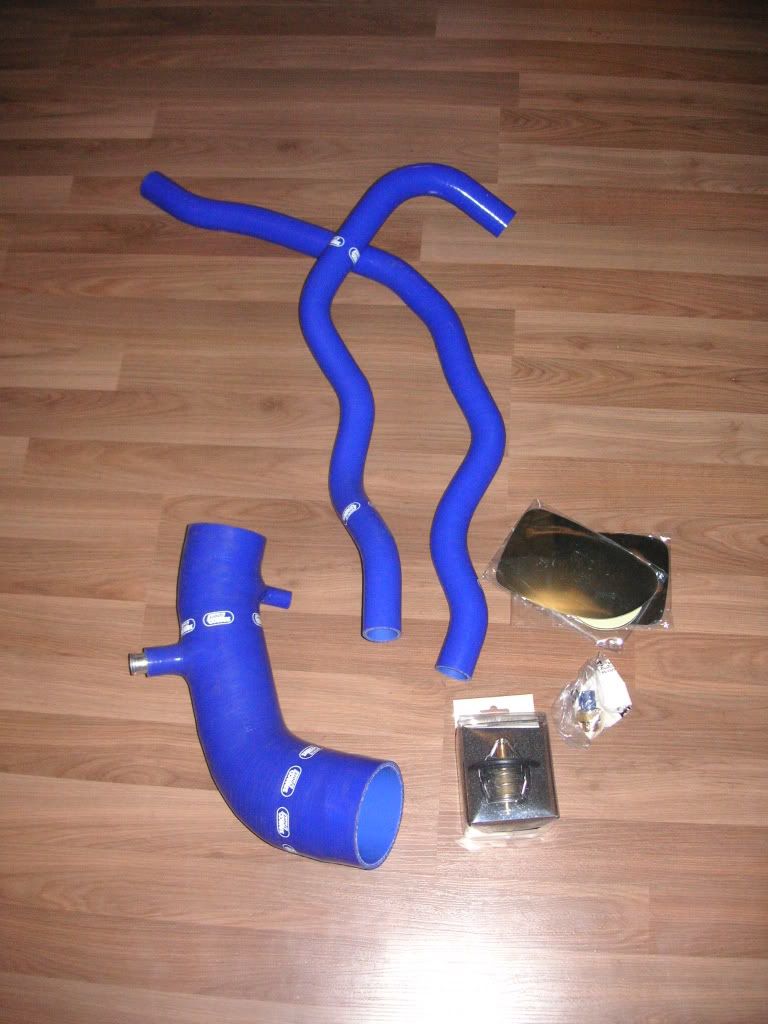
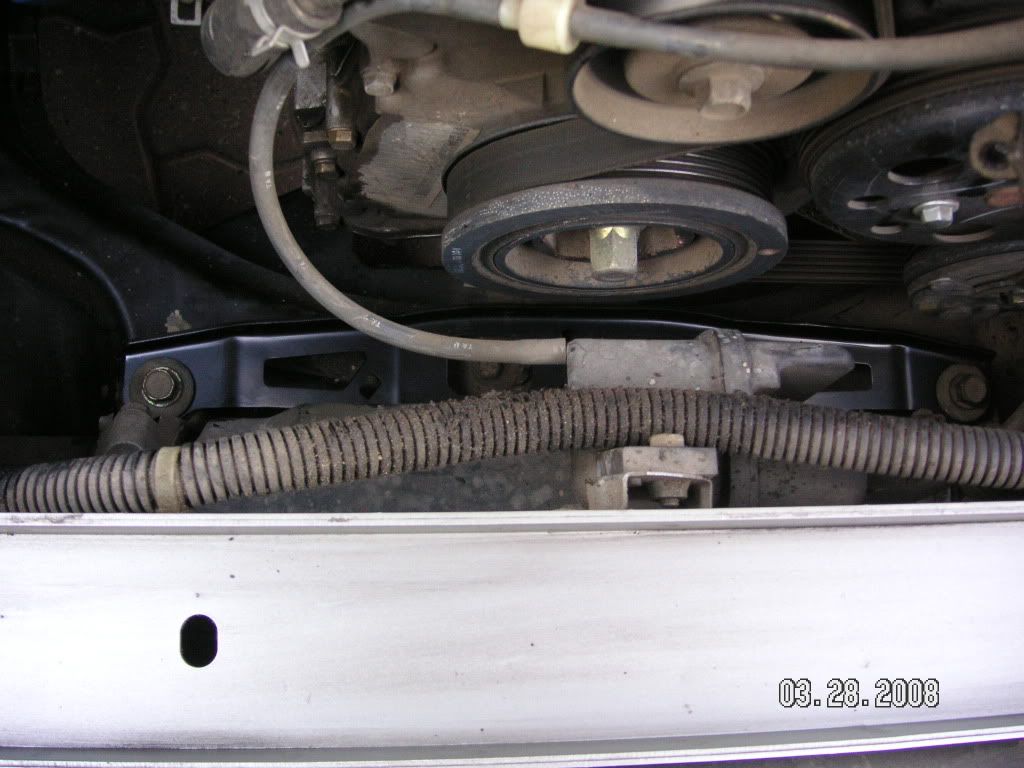
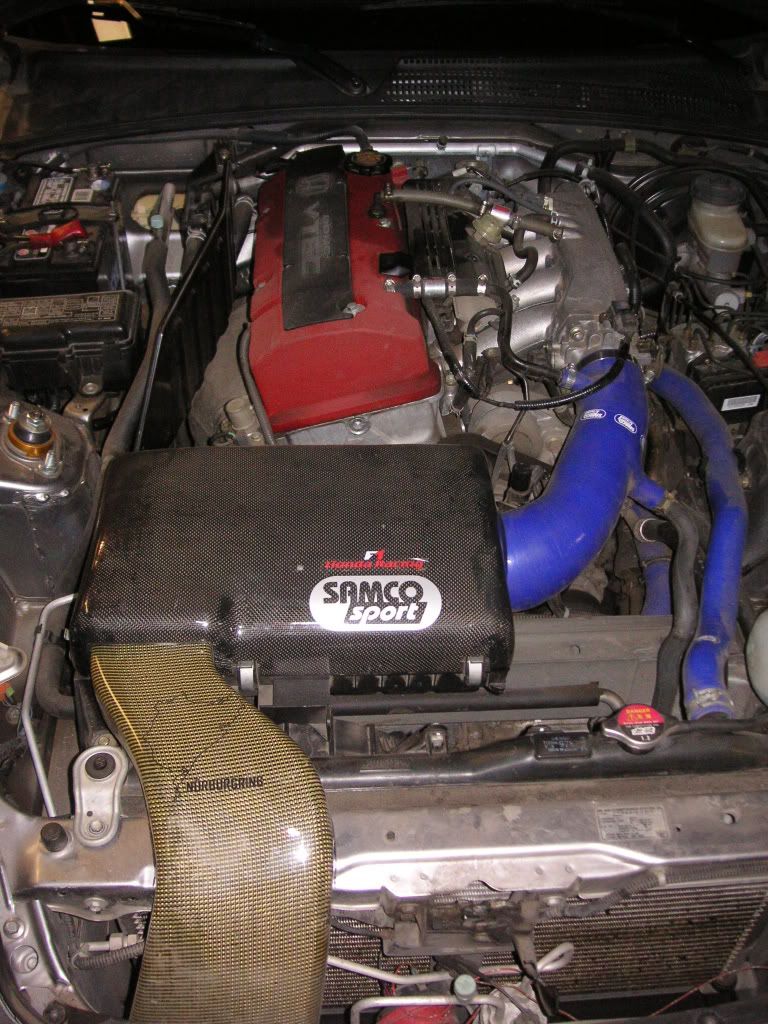
Did some reliability / ‘mods for the sake of doing mods’ mods – Mugen thermostat and fan switch, Samco hoses and intake elbow. Noticed absolutely no difference. Scratched the hell out of my hands getting into the tight confines of the engine bay to sort out the upper rad hose.
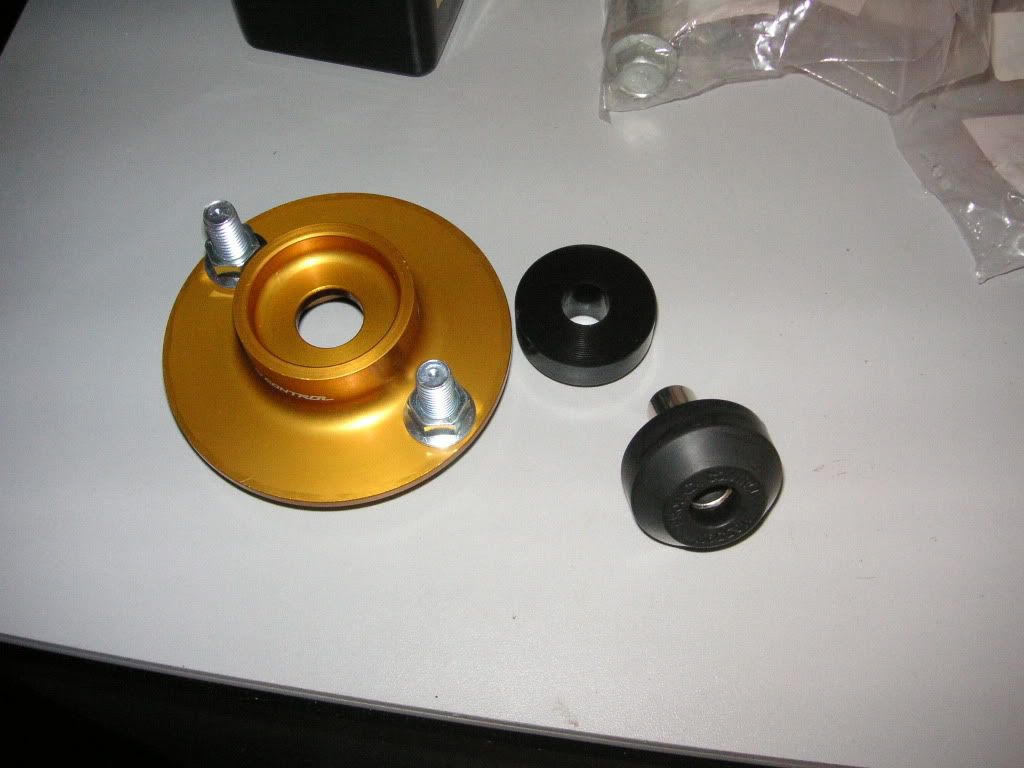
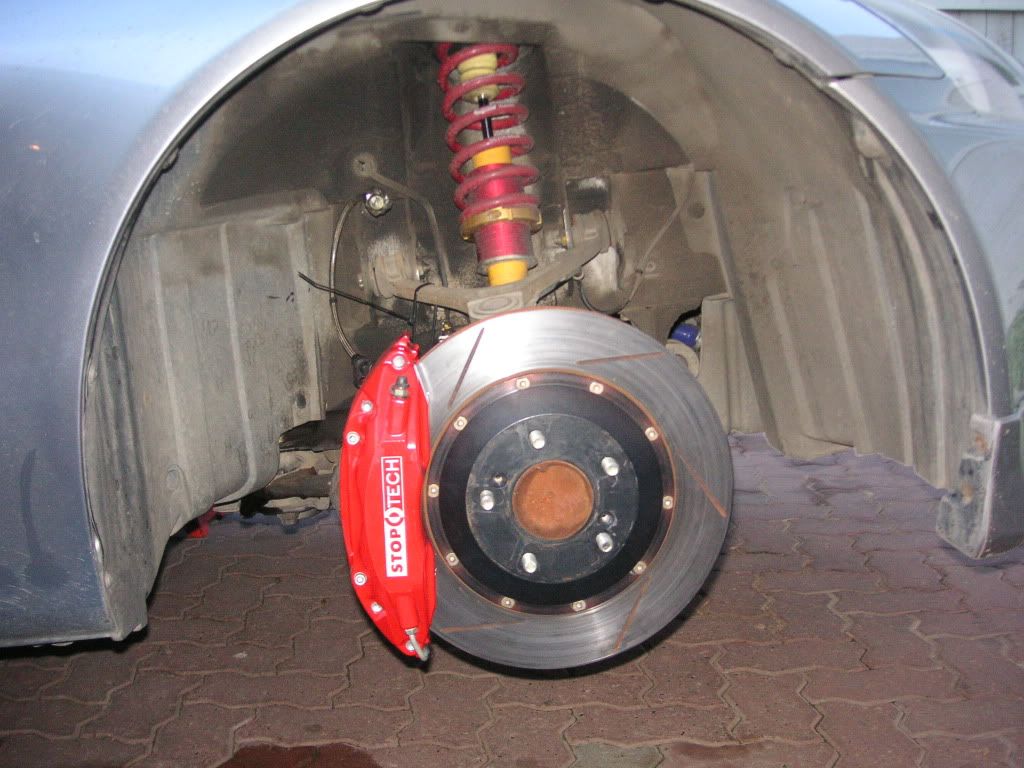
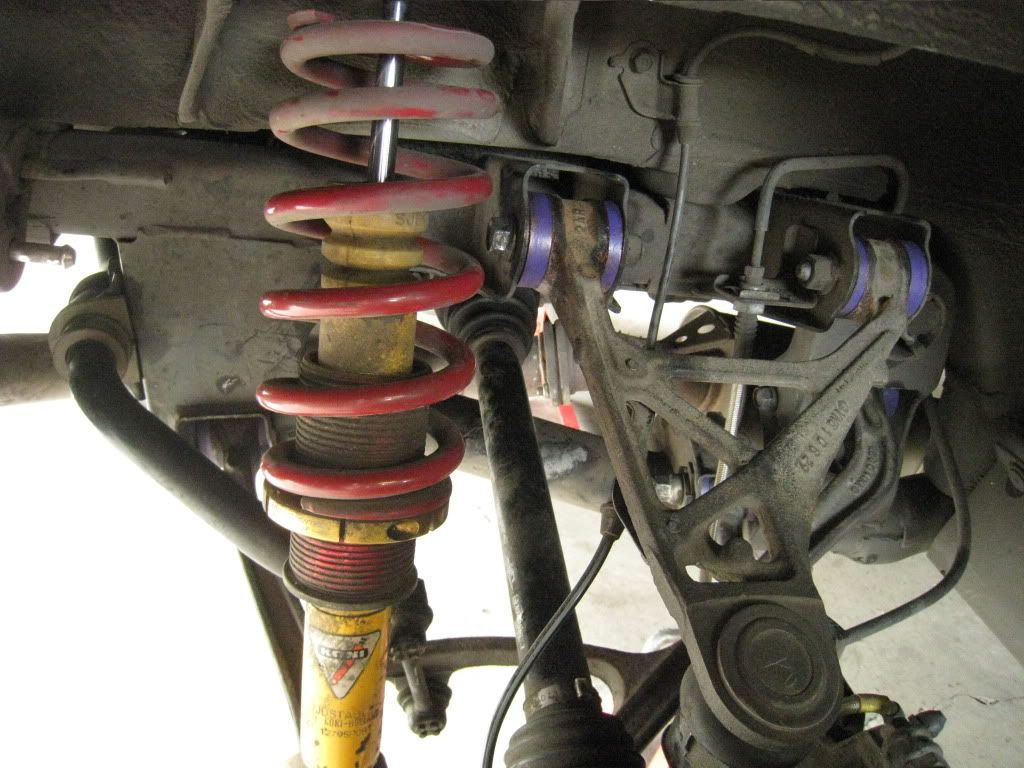
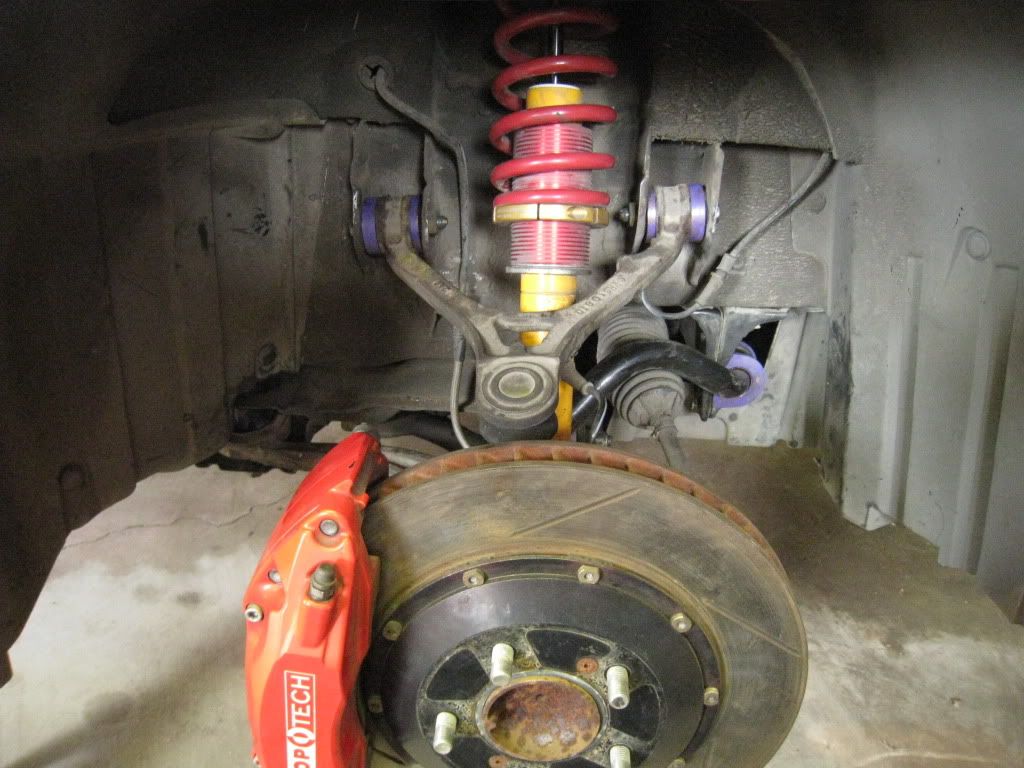
Then I got a set of Konis with Ground Control adjustable ride height springs, along with Ground Control top mounts.
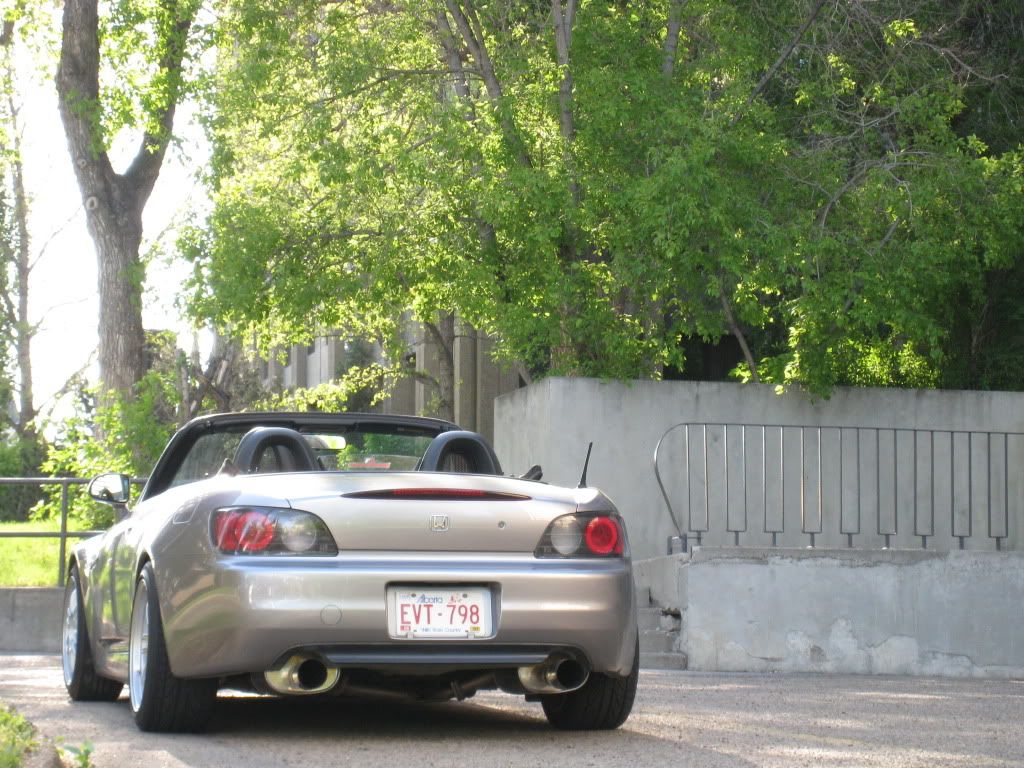
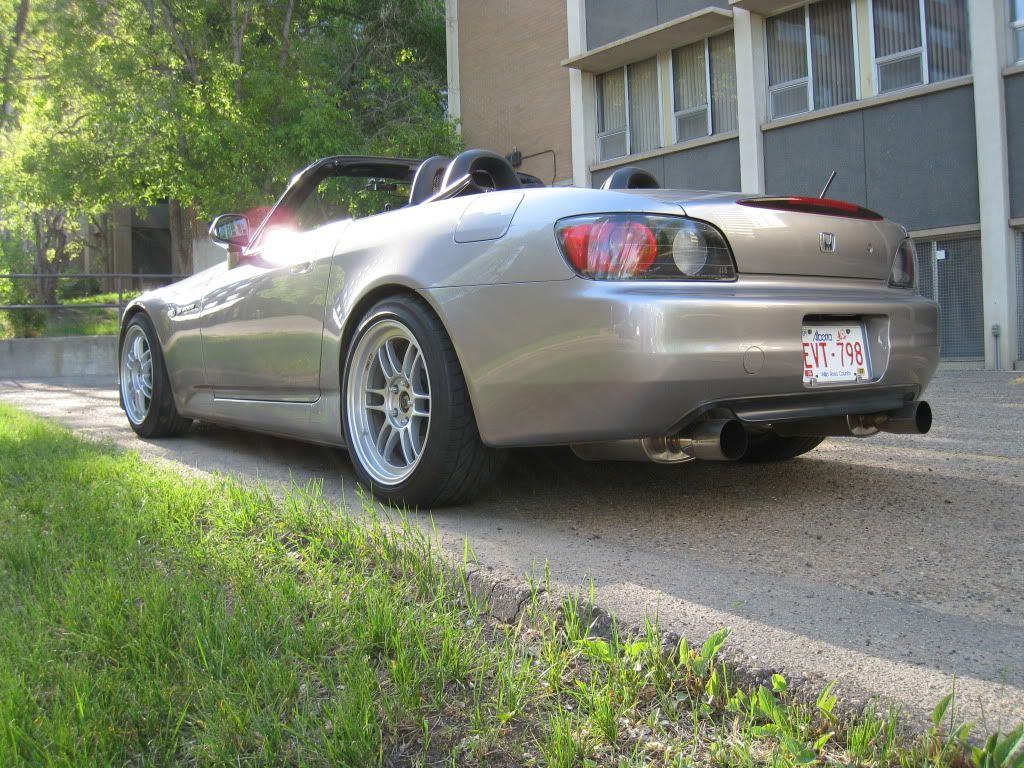
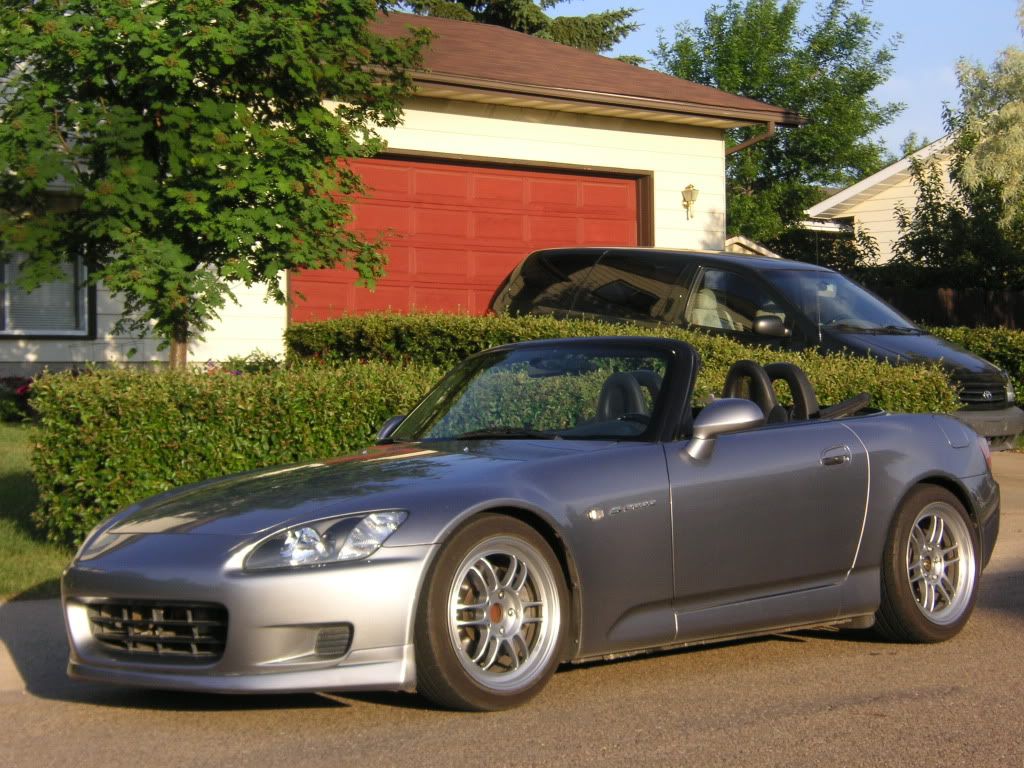
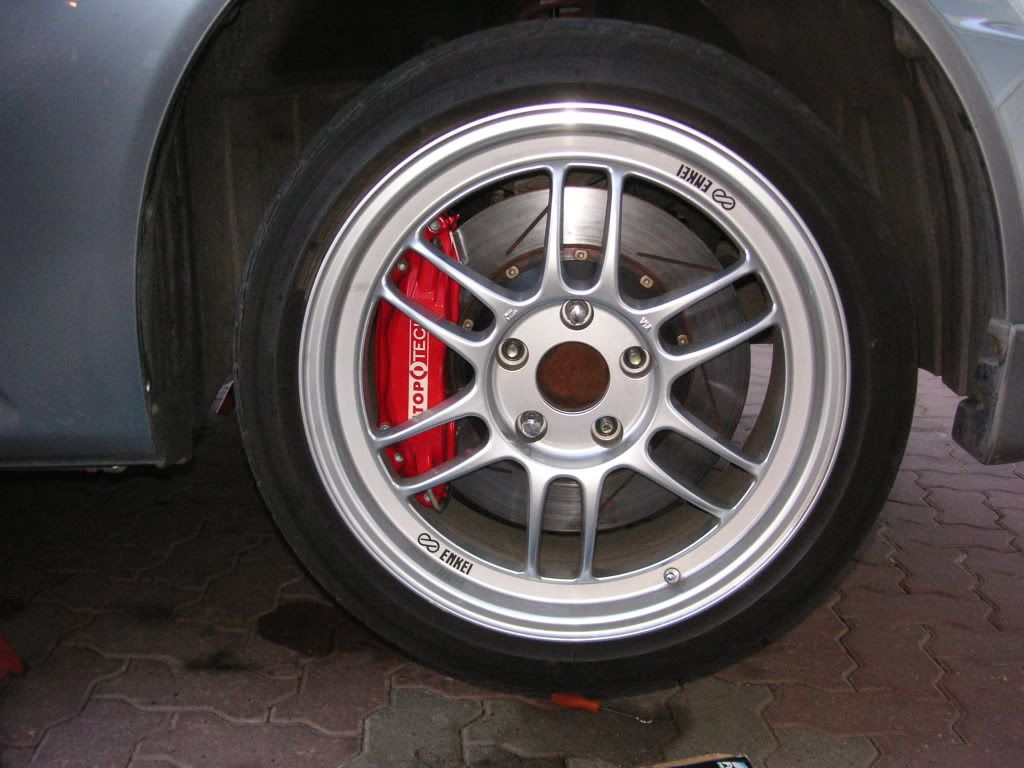
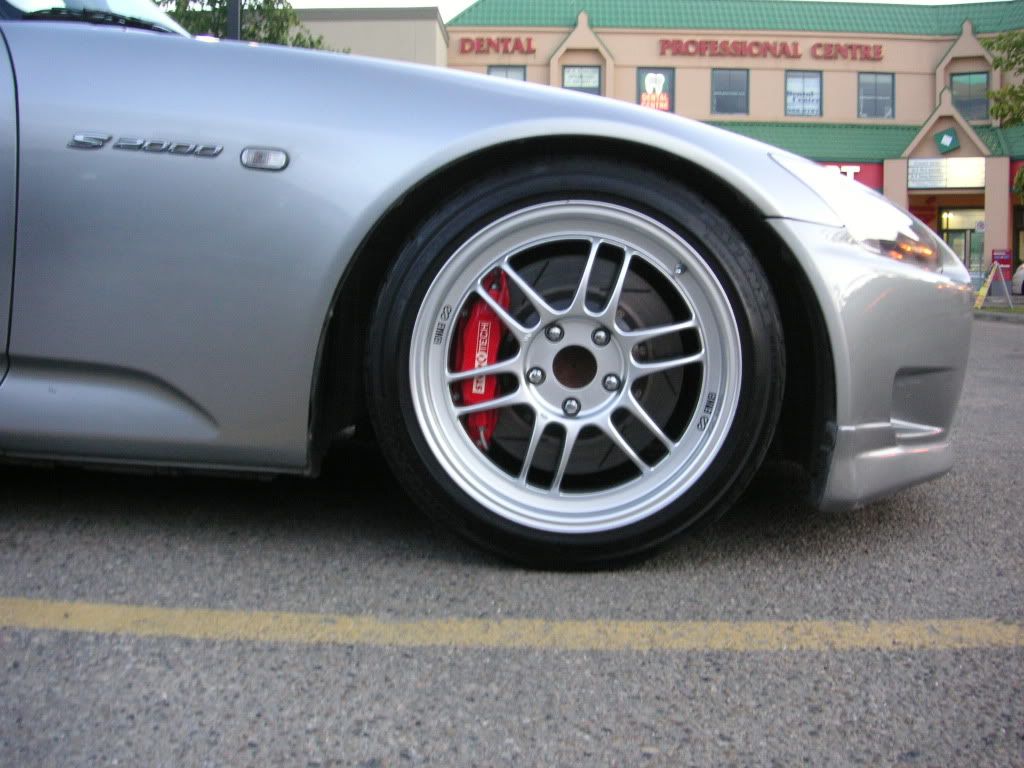
Enkei RPF1s (17x8, 17x9, +45 all around) were next, along with the required fender rolling and bumper tab cutting, etc.
Put in the CR steering rack stiffening pieces too.
Picked up a used Stoptech 328mm big brake kit in red, used from Go Tuning. Wanted black, but hey, used and cheap is fine!
Got JPM to wrap a wheel for me, black ultrasuede with red stitching, very Honda. Matched the center console cover and handbrake too. Put in a CR radio door while I was at it.
Picked up a titanium, weighted shift knob.
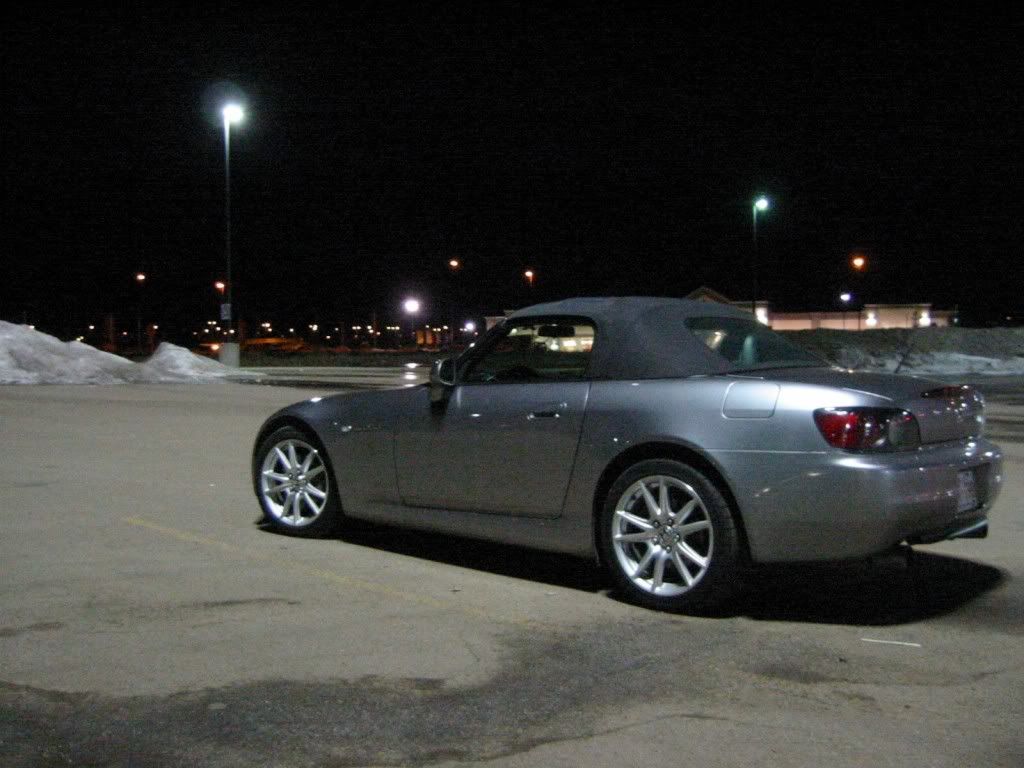
Got sick of the worn out, scratched up rear plastic window and picked up a mildly used softtop from an ’08. Nice. Haven’t bothered to wire up the rear defroster.
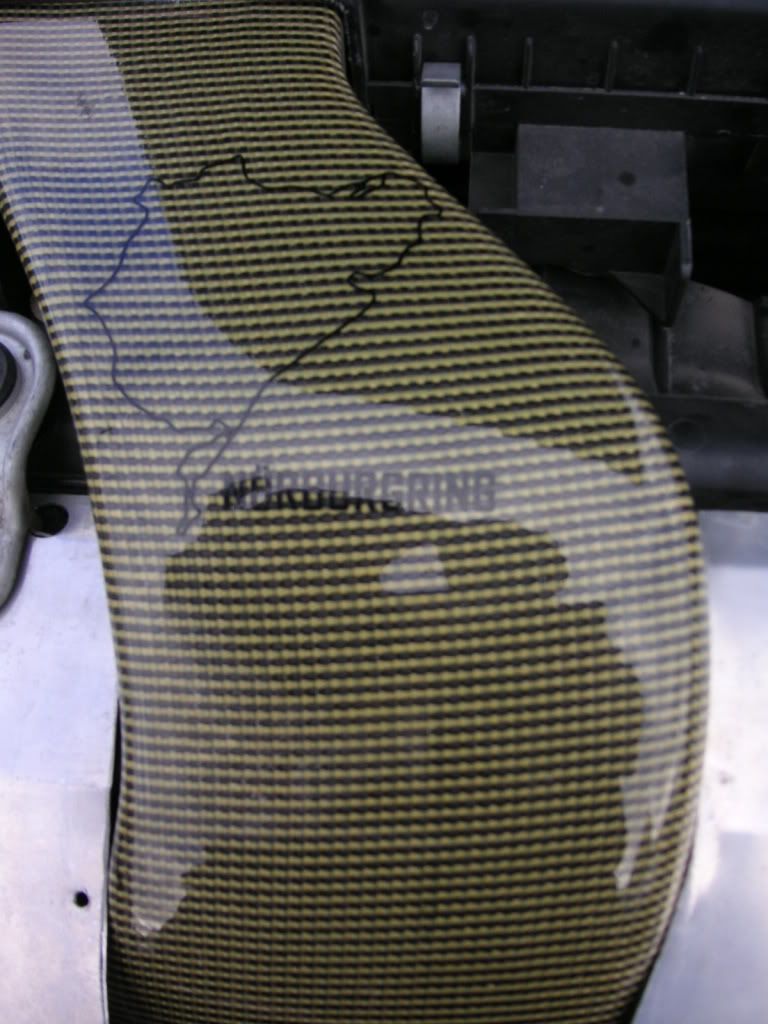
Did some stuff under the hood – carbon airbox cover, Spoon-style intake snorkel, +50hp Nurburgring sticker. (Note on the Nurburgring sticker – a buddy had the same one on his old ’04 M3, put it on his intake box too. Sold the car shortly after. A couple months ago, he saw the car for sale locally. The ad said: ‘Nurburgring Edition M3’ and ‘lady seller’. Hah!)
Got a Rick’s rear wind screen, tinted. Also got the Rick’s headrest wind blockers too.
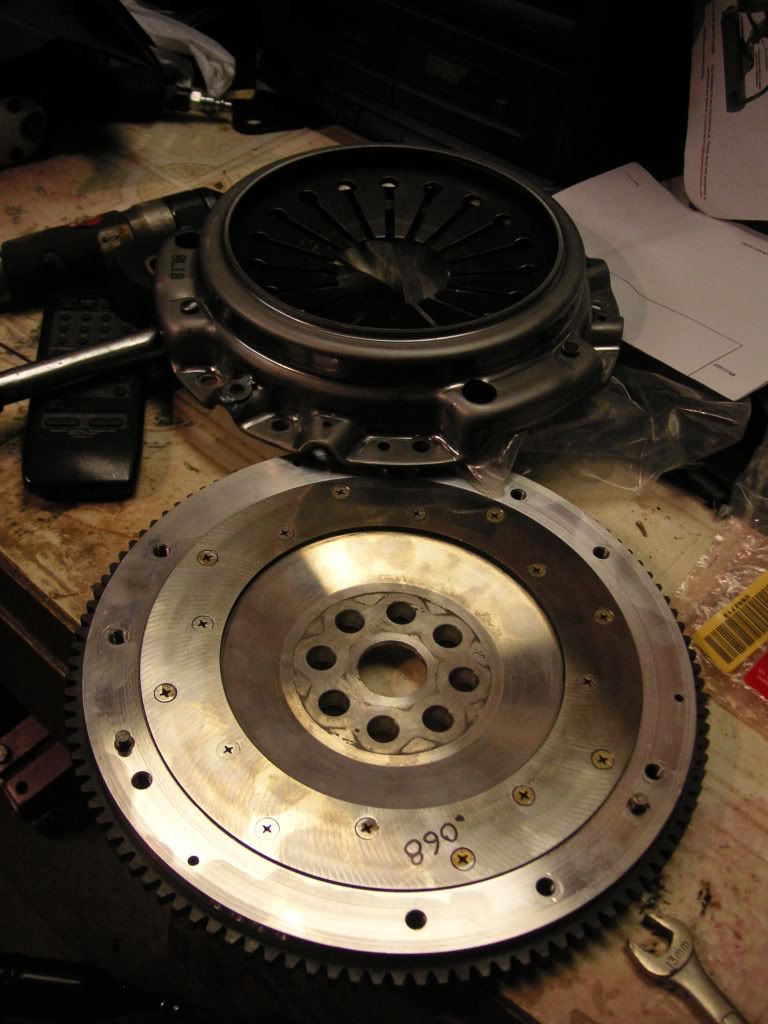
Got a 4.56 gear set, but it made too much noise for my taste, and felt a bit ‘short’. After much deliberation, went with a set of 4.44s instead. Then I combined that with an AP2 transmission and a Fidanza aluminum flywheel. Nice.
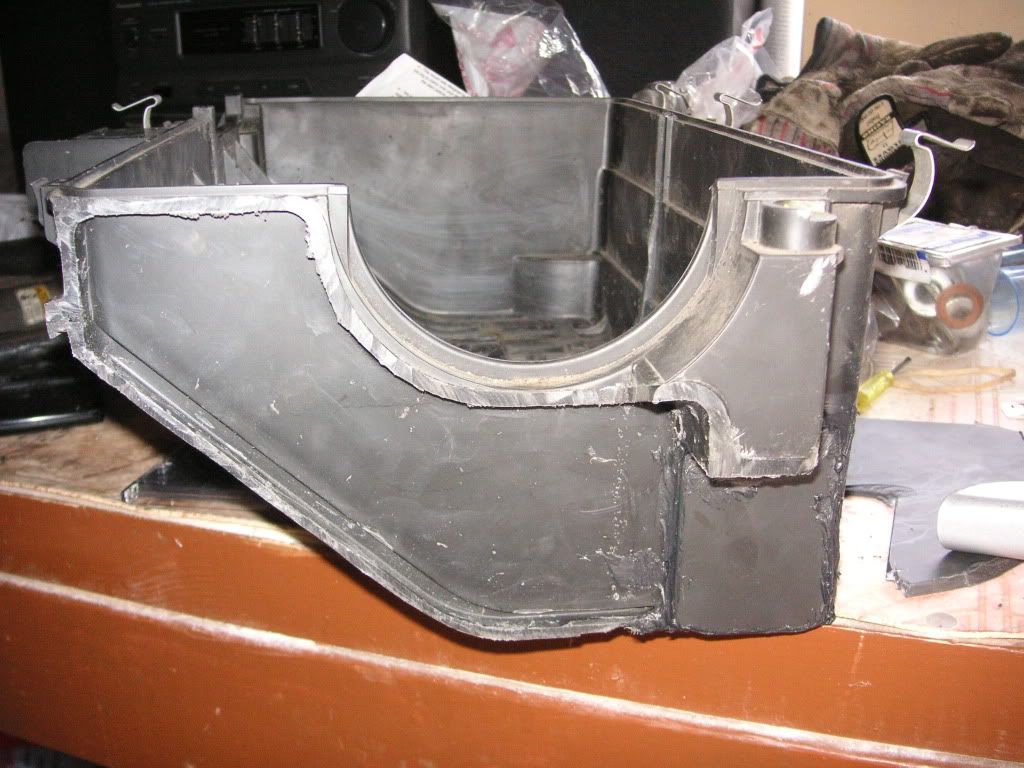
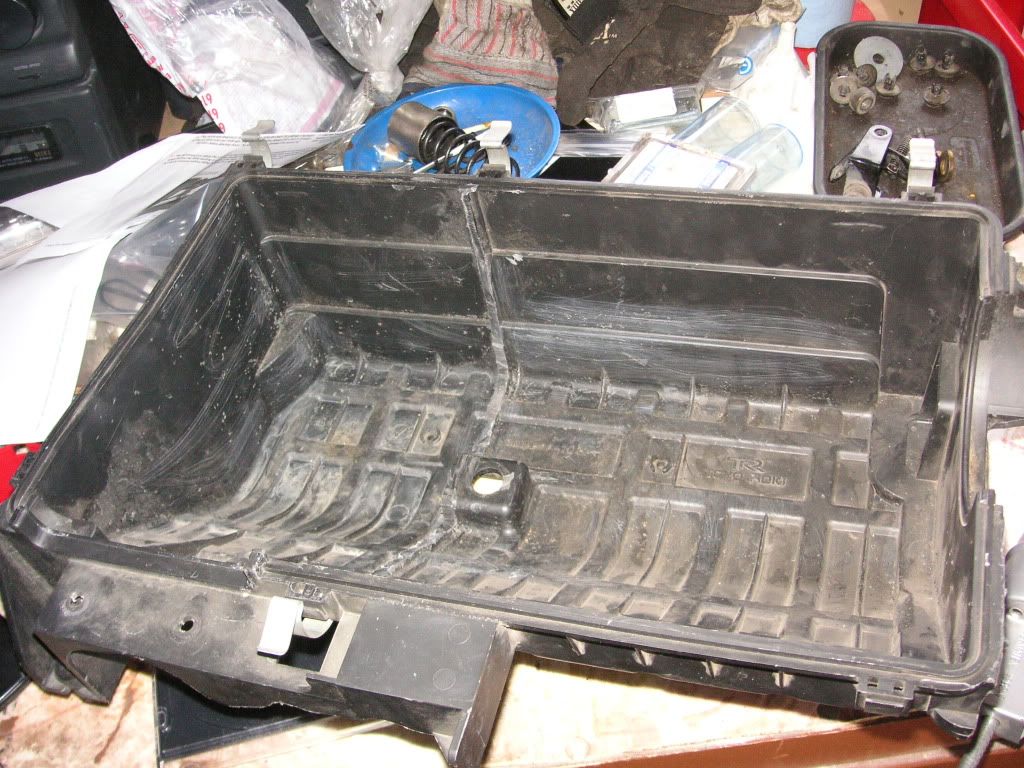
Then I ‘Spoon’d’ the intake box and chopped off the resonator and sealed it with a piece of plastic.
Got a set of OE centre caps that fit the RPF1s. Needed a bit of help with the dremel for the rears, to clear the axle nut.
Put on an replica OE spoiler, in carbon. Had it painted so that only a bit of carbon showed at the rear.
Bought, then sold, a Comptech adjustable front sway bar. Wasn’t tracking the car sufficiently to make use of it, sold it to someone who would!
Picked up a Cobra seat in red leather. The seat is a one-off, made to show at SEMA, but never sold, even when the shop did some cutthroat pricing. Fitted with a Buddy Club seat rail.
Decided to debadge the fender badges.
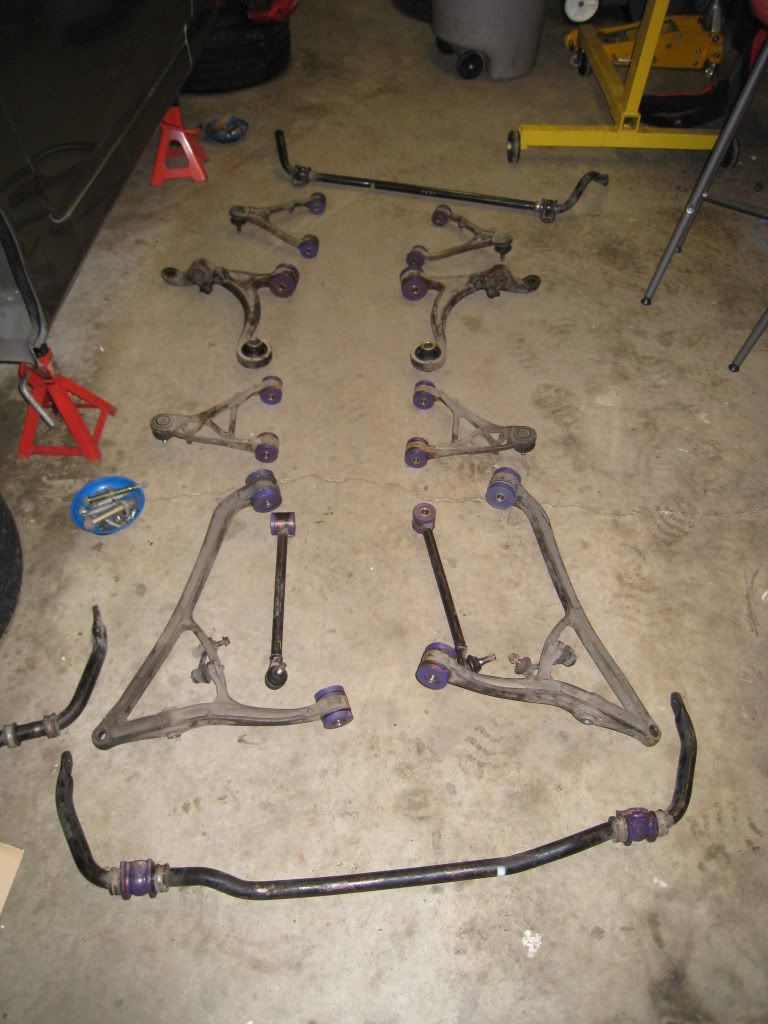
Figured I wanted to sort out the suspension, and got all Powerflex poly bushings. The only ones not supplied were the lower shock bushings and the ‘front compliance bushing’, ie. the rear bushing on the front lower control arms. Bought Mugen for those instead. Part numbers on the Mugen bushings matched the numbers on the bushings that came out! Wondering if Mugen is actually stiffer rubber or repacked OE.
Noticed that the forward bushing on the front lower control arms seemed to be out of place, thus allowing some movement with the control arm and leading to clicking noises at low speed. Discussed with Powerflex, they said the bushing was out of place and I should remove it, re-lube, and re-install. Doing so, however, would mean another alignment, and possible another one afterwards if the bushing moved out of place again. Picked up the bushing by Mugen instead, should stay in place.

Bought a Mercedes C43 AMG for an alternative / winter driver, but my fiancée/wife drove it last summer. More on the Benz here: http://www.mbworld.org/forums/c36-amg-c43-...down-paint.html
A few pix from a local meet in October 2010:
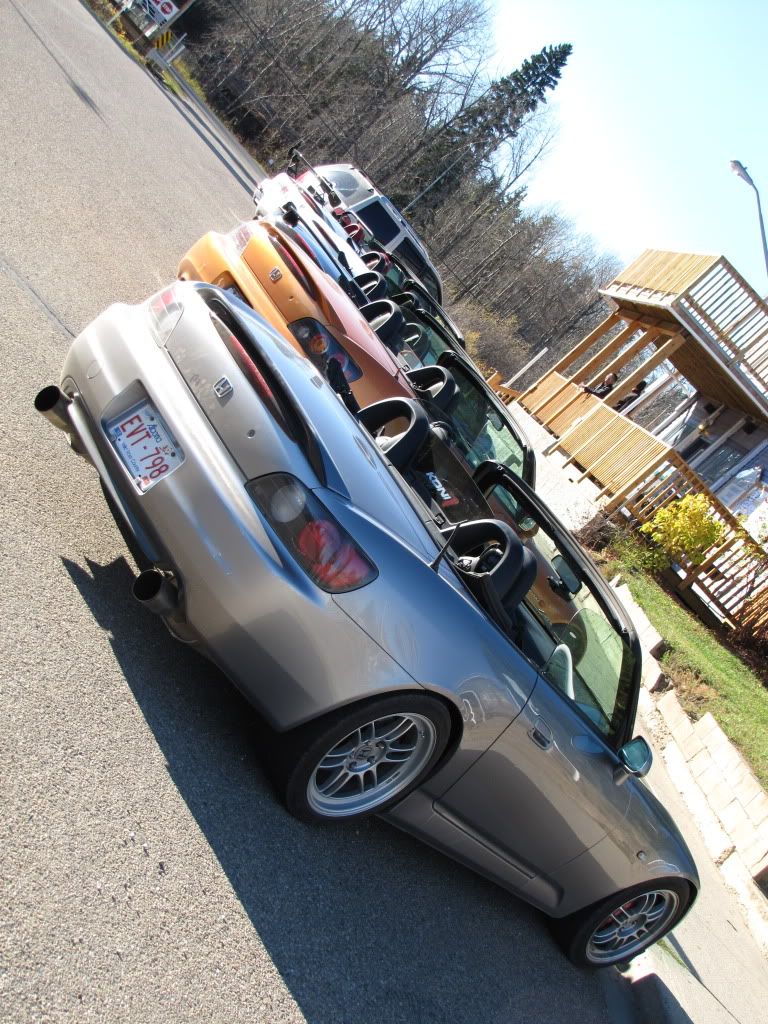
Not actually my car, but a nice shot I thought!
Picked up a dead F22C motor from a guy who had it stuffed into an AE86 Corolla. Condition unknown, just wanted the block and the head. Sold all the rotating assembly, going to swap the intake retainers and the improved piston oil squirters into my F20C. Had to buy a crank pulley holder tool as even my impact could get the bolt off.
Wife bought me a red Honda trunk badge for Christmas.
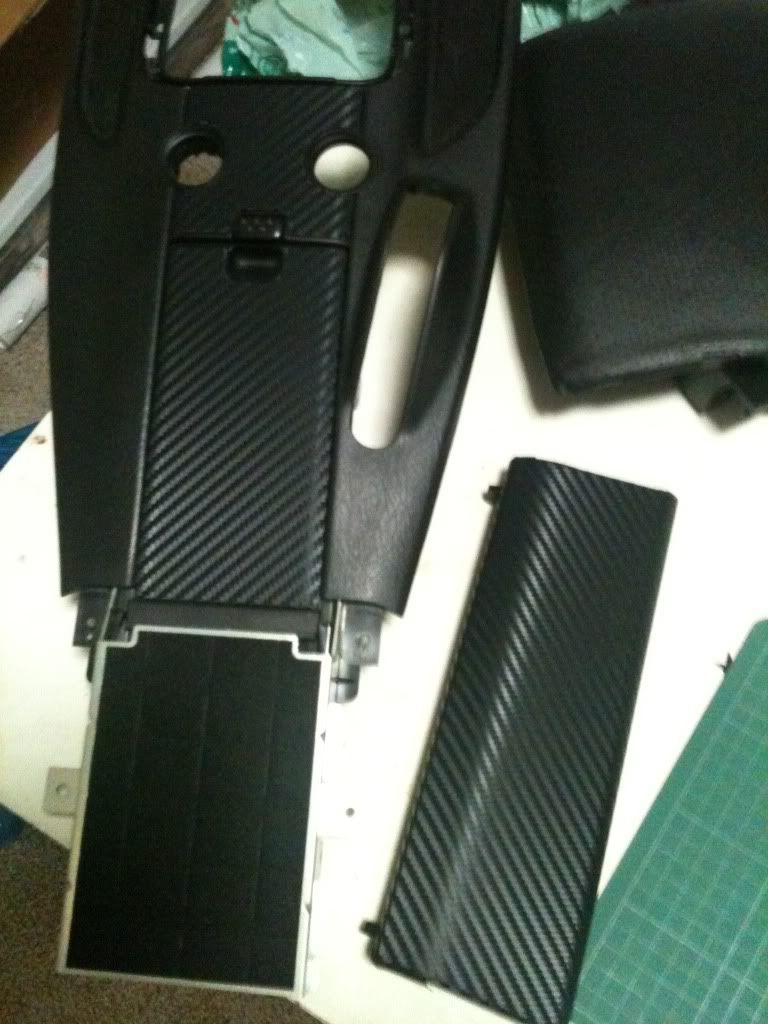
Picked up an AP2 centre console and some carbon fibre vinyl to wrap it all up.
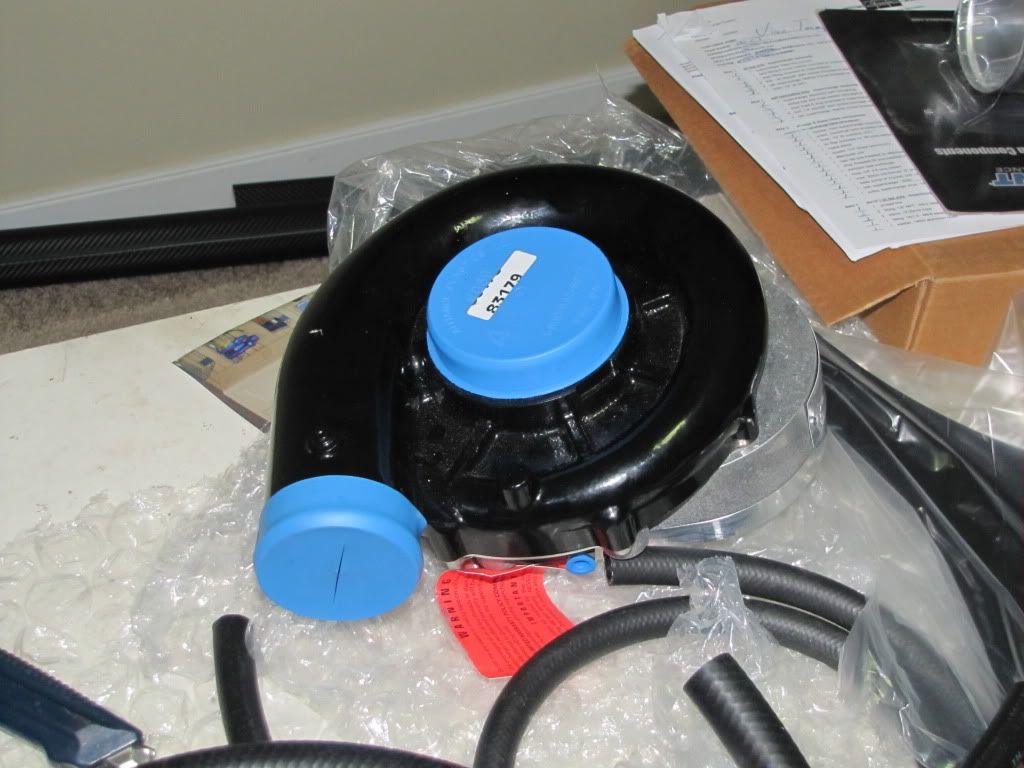
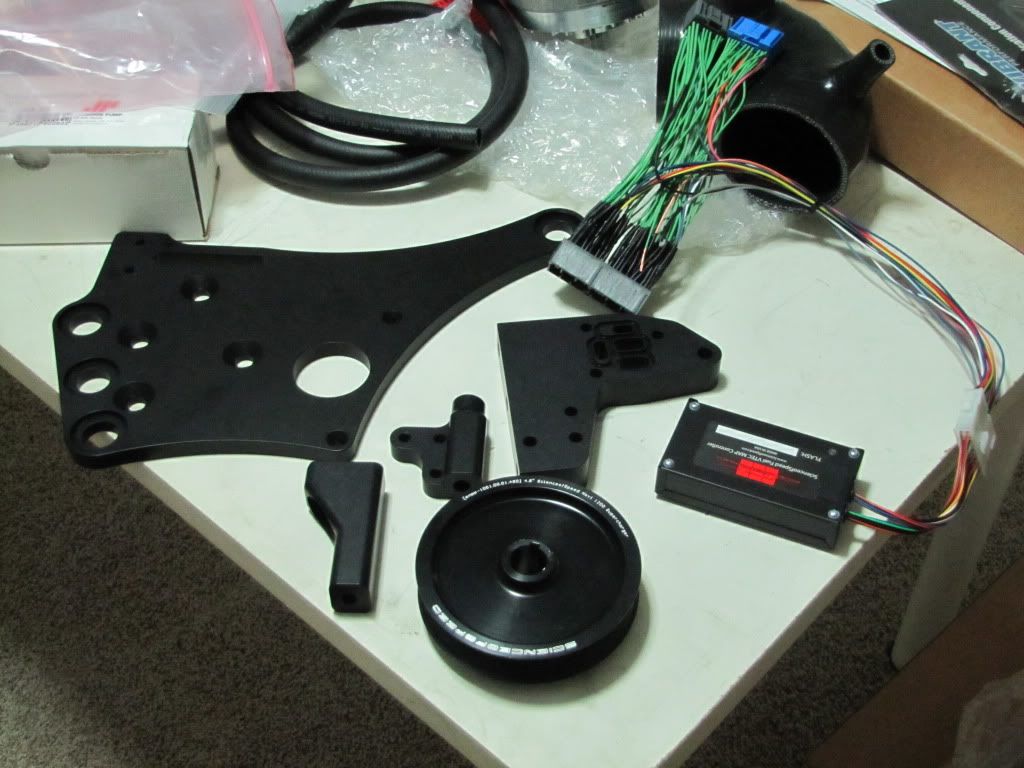
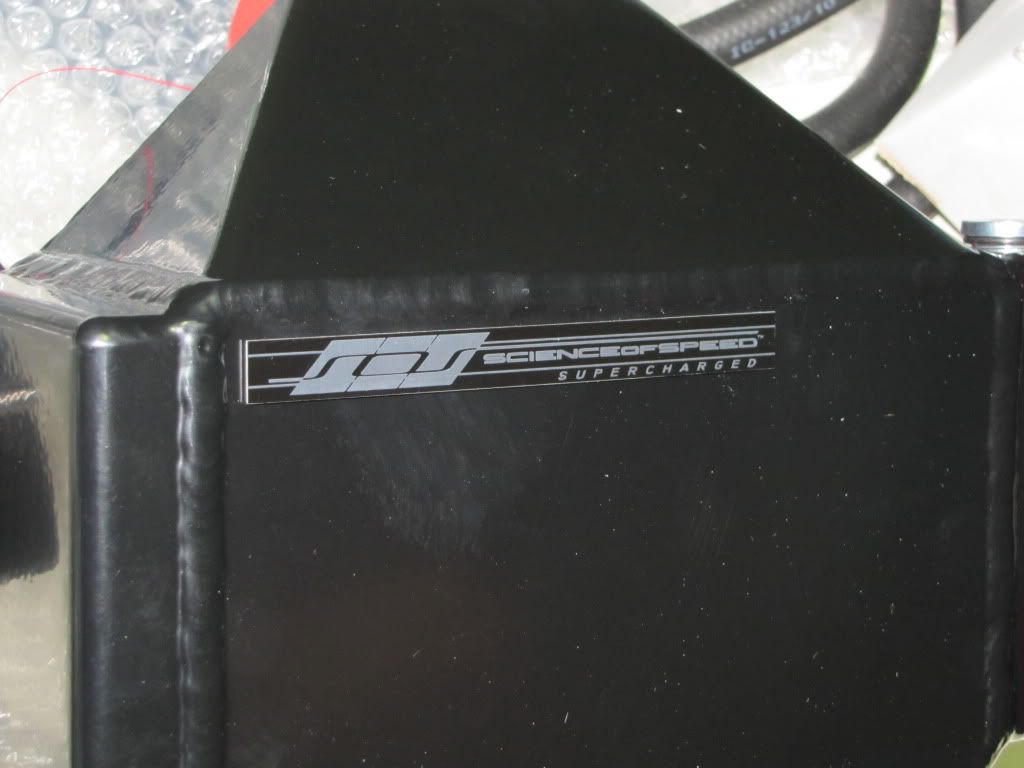
And now, the piece de resistance – SOS stage 1 supercharger kit. Also picked up a PLX Devices Multigauge – going to run wideband and boost.
Patiently waiting for spring…
Nothing really unique about the car, nothing bespoke other than the steering wheel. Bolt-ons with Hondas are easy, so much variety – seemed like everything for my Saabs was custom or adapted. In the case of the AMG, everything is more expensive and not so much variety. I built and will continue to build the S2k for fun, for me half the enjoyment is bolting everything together. I just want to have a nice, fun, summer car that might see some track time. More later when the snow melts and the charger is bolted on.
So a quick summary:
Ground Control and Konis
17" Enkei RPF1s
mix of Powerflex and Mugen bushings
328mm Stoptech big brakes
AP2 trans
4.44 gears
Tanabe exhaust
SOS supercharger waiting for snow to melt
I bought my ’01 AP1 in October 2006, with about 105,000km on it. It was my first Honda, and indeed, my first Japanese car. Up to that point, as you can tell from the screen name, I drove almost Saabs exclusively. You can see more about my Saabs here: http://members.shaw.ca/saaboteur
The car I had right before the S2k was an ’02 MINI Cooper S with the factory supplied, expensive ($5,000) John Cooper Works package fitted by the previous owner, my buddy’s uncle. (To put expensive into perspective, JCW specific spark plugs were $65 each! Apparently, Formula One spark plugs are in the $50-$100 range!)
After about 9 months with the MINI, I got a bit tired of it and wanted something even more focused, and got into the S2000. After reading s2ki for every tidbit of info, and then looking at lots of cars, I found the one.
Car was originally from California, but made its way to me via an owner in Ontario, and then another one or two in Calgary, Alberta. Clearly, the car had to be certified for Canada and at some point must have had daytime running lights fitted, but when I test drove and bought the car, it had no such thing. I’ve left it.
I actually didn’t want Silverstone, was set on Berlina, but after driving behind the seller in the car, I mellowed on that.
Here’s a pic on the day I picked up the car in Calgary. Drove it back to Edmonton that day (about 2.5 hours) and was hopeful I would have a couple weeks of clear roads before the winter came, but that same night we had a huge dump of snow. Boo. Didn’t really get to drive the car until spring.
One of the first mods was a set of AP2 v.1 wheels. Shortly after, picked up a replica OE front lip.
When I bought the car, the previous owner had rubbed the front bumper up against a yellow concrete pillar. Repainted the front bumper, but also shaved the front emblem.
Picked up a set of headlights with the Rick’s clear diffusers installed.
They were kinda crap though, so I bought a set of real JDM assemblies later on. These were slightly scratched, but after I polished them up and 3M’d, you can’t see the scratches anymore. Clear side markers too.
Then I picked up a Tanabe exhaust, but it was waaaaaay too loud, even with silencers installed. Picked up another, more quiet Tanabe exhaust instead. Put on a test pipe too.
Hardwired the V1 and mounted with a slightly modified Blendmount.
Some pix with the E46 M3 that my buddy owned at the time, and at a local meet up in the fall.
Did some reliability / ‘mods for the sake of doing mods’ mods – Mugen thermostat and fan switch, Samco hoses and intake elbow. Noticed absolutely no difference. Scratched the hell out of my hands getting into the tight confines of the engine bay to sort out the upper rad hose.
Then I got a set of Konis with Ground Control adjustable ride height springs, along with Ground Control top mounts.
Enkei RPF1s (17x8, 17x9, +45 all around) were next, along with the required fender rolling and bumper tab cutting, etc.
Put in the CR steering rack stiffening pieces too.
Picked up a used Stoptech 328mm big brake kit in red, used from Go Tuning. Wanted black, but hey, used and cheap is fine!
Got JPM to wrap a wheel for me, black ultrasuede with red stitching, very Honda. Matched the center console cover and handbrake too. Put in a CR radio door while I was at it.
Picked up a titanium, weighted shift knob.
Got sick of the worn out, scratched up rear plastic window and picked up a mildly used softtop from an ’08. Nice. Haven’t bothered to wire up the rear defroster.
Did some stuff under the hood – carbon airbox cover, Spoon-style intake snorkel, +50hp Nurburgring sticker. (Note on the Nurburgring sticker – a buddy had the same one on his old ’04 M3, put it on his intake box too. Sold the car shortly after. A couple months ago, he saw the car for sale locally. The ad said: ‘Nurburgring Edition M3’ and ‘lady seller’. Hah!)
Got a Rick’s rear wind screen, tinted. Also got the Rick’s headrest wind blockers too.
Got a 4.56 gear set, but it made too much noise for my taste, and felt a bit ‘short’. After much deliberation, went with a set of 4.44s instead. Then I combined that with an AP2 transmission and a Fidanza aluminum flywheel. Nice.
Then I ‘Spoon’d’ the intake box and chopped off the resonator and sealed it with a piece of plastic.
Got a set of OE centre caps that fit the RPF1s. Needed a bit of help with the dremel for the rears, to clear the axle nut.
Put on an replica OE spoiler, in carbon. Had it painted so that only a bit of carbon showed at the rear.
Bought, then sold, a Comptech adjustable front sway bar. Wasn’t tracking the car sufficiently to make use of it, sold it to someone who would!
Picked up a Cobra seat in red leather. The seat is a one-off, made to show at SEMA, but never sold, even when the shop did some cutthroat pricing. Fitted with a Buddy Club seat rail.
Decided to debadge the fender badges.
Figured I wanted to sort out the suspension, and got all Powerflex poly bushings. The only ones not supplied were the lower shock bushings and the ‘front compliance bushing’, ie. the rear bushing on the front lower control arms. Bought Mugen for those instead. Part numbers on the Mugen bushings matched the numbers on the bushings that came out! Wondering if Mugen is actually stiffer rubber or repacked OE.
Noticed that the forward bushing on the front lower control arms seemed to be out of place, thus allowing some movement with the control arm and leading to clicking noises at low speed. Discussed with Powerflex, they said the bushing was out of place and I should remove it, re-lube, and re-install. Doing so, however, would mean another alignment, and possible another one afterwards if the bushing moved out of place again. Picked up the bushing by Mugen instead, should stay in place.
Bought a Mercedes C43 AMG for an alternative / winter driver, but my fiancée/wife drove it last summer. More on the Benz here: http://www.mbworld.org/forums/c36-amg-c43-...down-paint.html
A few pix from a local meet in October 2010:
Not actually my car, but a nice shot I thought!
Picked up a dead F22C motor from a guy who had it stuffed into an AE86 Corolla. Condition unknown, just wanted the block and the head. Sold all the rotating assembly, going to swap the intake retainers and the improved piston oil squirters into my F20C. Had to buy a crank pulley holder tool as even my impact could get the bolt off.
Wife bought me a red Honda trunk badge for Christmas.
Picked up an AP2 centre console and some carbon fibre vinyl to wrap it all up.
And now, the piece de resistance – SOS stage 1 supercharger kit. Also picked up a PLX Devices Multigauge – going to run wideband and boost.
Patiently waiting for spring…
Nothing really unique about the car, nothing bespoke other than the steering wheel. Bolt-ons with Hondas are easy, so much variety – seemed like everything for my Saabs was custom or adapted. In the case of the AMG, everything is more expensive and not so much variety. I built and will continue to build the S2k for fun, for me half the enjoyment is bolting everything together. I just want to have a nice, fun, summer car that might see some track time. More later when the snow melts and the charger is bolted on.
So a quick summary:
Ground Control and Konis
17" Enkei RPF1s
mix of Powerflex and Mugen bushings
328mm Stoptech big brakes
AP2 trans
4.44 gears
Tanabe exhaust
SOS supercharger waiting for snow to melt
 02-08-2011, 02:57 PM
#3

I look forward to seeing this beautiful build in spring saab, and maybe we will end up at one of the same meets yet! I don't believe i met you last year.
I also might need to bug you for a ride once the sos is all installed as I was planning to go mase, but after much reading I'd rather keep my reliability so I can take those spur of the moment drives to the mountains and not worry about a thing. So now I'm looking at SOS stage 1 or 2, not exactly sure yet.
I also might need to bug you for a ride once the sos is all installed as I was planning to go mase, but after much reading I'd rather keep my reliability so I can take those spur of the moment drives to the mountains and not worry about a thing. So now I'm looking at SOS stage 1 or 2, not exactly sure yet.


 02-08-2011, 03:43 PM
#7
Registered User
Thread Starter
Join Date: Aug 2006
Location: Edmonton, Alberta, Canada
Posts: 1,740
Likes: 0
Received 0 Likes
on
0 Posts
I actually meant to post a pic of the gauges, but must have missed it. Here it is:
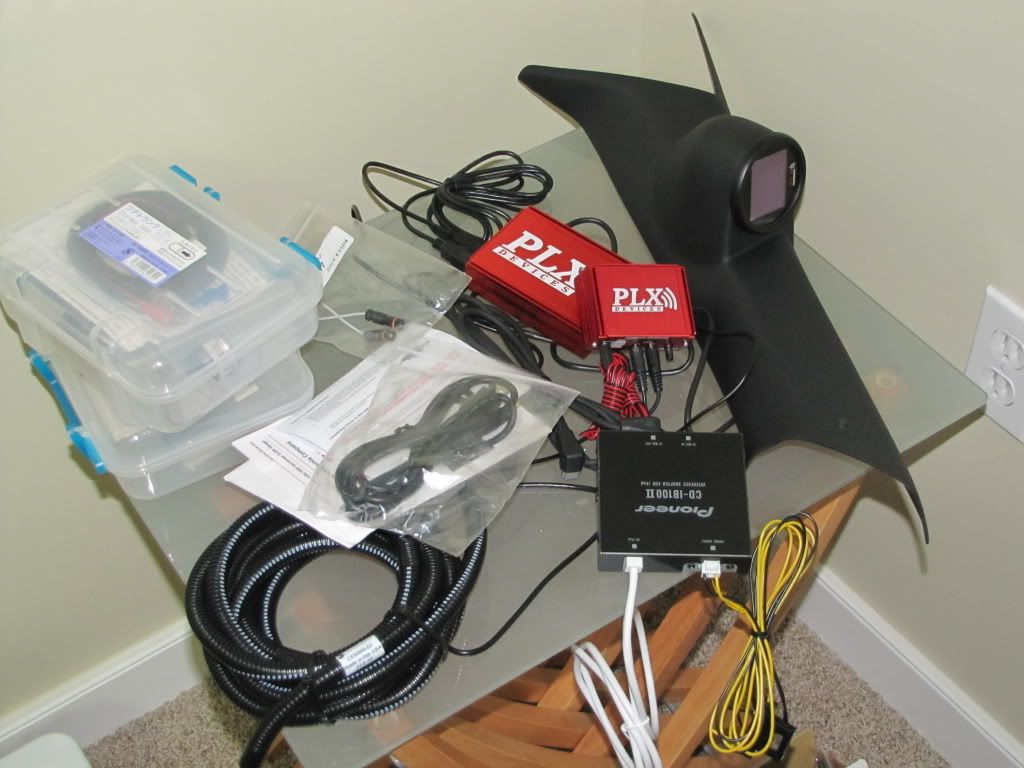
I haven't installed it yet, so I can't provide any comments. But I did visit the PLX Devices stand at SEMA a few years back, and was impressed with their product. I went with the SOS single pod, but in 60mm, so the gauge is quite large. The ability to customize the display is attractive, because I really did not want analog needle gauges, but digital to match the stock display.
The Multigauge isn't exactly cheap, especially when you add in more and more sensor modules. Going to have to figure out where to stash those too, as there are now three modules (one for the Multigauge, one each for boost and wideband), and while they aren't huge, neither is the car!
Trending Topics
02-08-2011, 03:45 PM
#8
Registered User
Thread Starter
Join Date: Aug 2006
Location: Edmonton, Alberta, Canada
Posts: 1,740
Likes: 0
Received 0 Likes
on
0 Posts
Originally Posted by civichx97,Feb 8 2011, 04:35 PM
very nice! That last pic is really cute, all tucked in and waiting for the thaw.... it gives me the warm fuzzies.


