
Killercom's Turbo Build!

Thread Starter


Joined: Feb 2010
Posts: 746
Likes: 3
From: Dutchess County
Since 2010, when I purchased my car, I've always wanted boost (had a B5 Audi S4 prior). I'm going to document my progress of this winter's progress and all prior documentation for the car and it's LONG journey over the years! This year's build will include a Full Race kit, 9180 EFR, wire tuck, abs relocation, etc.
Somewhere in 2009, I met the previous owner and immediatly fell in love with the car. I never liked the S2000 prior to seeing this car. I had a full conversation about the car and told him that I'd be interested in the car if it were to ever become availble. In February 2010 the car went up for sale and I wasted no time making the purchase. The car was in amazing condition with only 44k miles and some small tasteful mods.
-Buddyclub N+ coilovers
-Authentic Mugen header
-Berk testpipe
-OEM AP2 wheels
-K&N FIPK intake
-Other minor things


Later in 2010 I purchased a set of 18" CE28's for a great price. Unfortunately, the wheels were spray painted blue and needed to be refinished.
Back from being sandblasted!

Finally coated a very, very close match to Volk Diamond Black.


Somewhere in 2009, I met the previous owner and immediatly fell in love with the car. I never liked the S2000 prior to seeing this car. I had a full conversation about the car and told him that I'd be interested in the car if it were to ever become availble. In February 2010 the car went up for sale and I wasted no time making the purchase. The car was in amazing condition with only 44k miles and some small tasteful mods.
-Buddyclub N+ coilovers
-Authentic Mugen header
-Berk testpipe
-OEM AP2 wheels
-K&N FIPK intake
-Other minor things
Later in 2010 I purchased a set of 18" CE28's for a great price. Unfortunately, the wheels were spray painted blue and needed to be refinished.
Back from being sandblasted!
Finally coated a very, very close match to Volk Diamond Black.
Last edited by KillerCom; Jul 17, 2017 at 03:01 PM.
Thread Starter
Joined: Feb 2010
Posts: 746
Likes: 3
From: Dutchess County
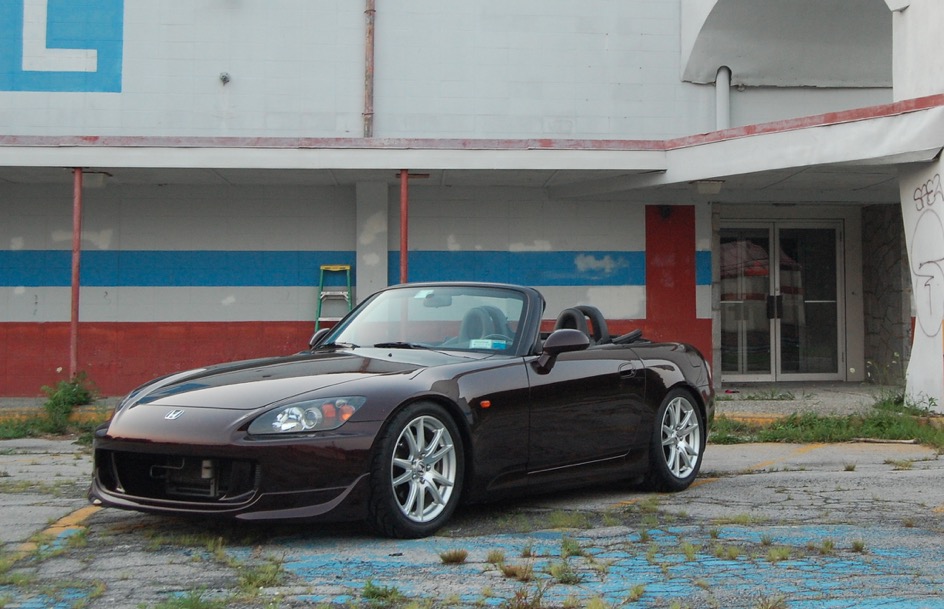
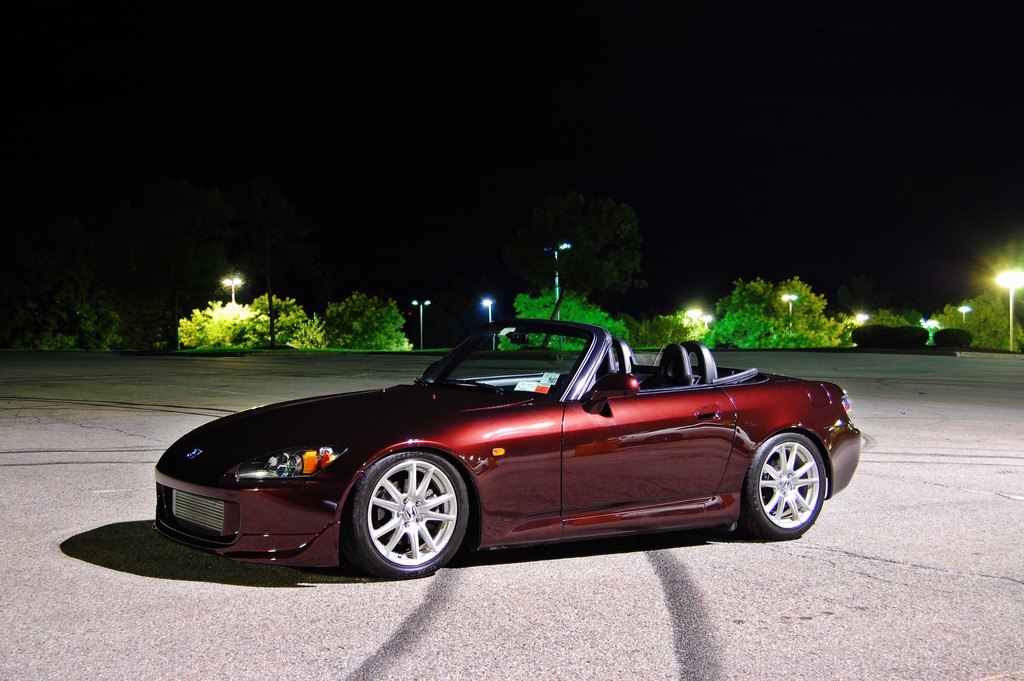
2011 came around and I was up for a paint job. A good buddy of mine owned a body shop local to me and started convincing me on a full color change. We went back and forth on what color to go with. First plan was to paint the car Ferrari Grigio Silverstone, this was ideal to me since I would spray the jams and leave the bay oem silverstone. Second choice was to paint the car Laguna Blue Pearl. We ended up deciding against both of those options and went with a burgundy metallic. We went ahead and did a full color change. All moldings, clips, door panels, etc. were removed to make sure there was no silverstone left on this car. I also made the switch to an Ap2 oem bumper, oem front lip, and both Ap2 fender liners brand new from Honda, I also picked up a set of headlights and tail lights out of a 2009 car that had super low miles. Unfortunately money got tight and we spent more time doing a proper color change so I couldn't afford to spray the bay at this time. For the color change alone we had over 120 hours into the car. Lots of work.
by
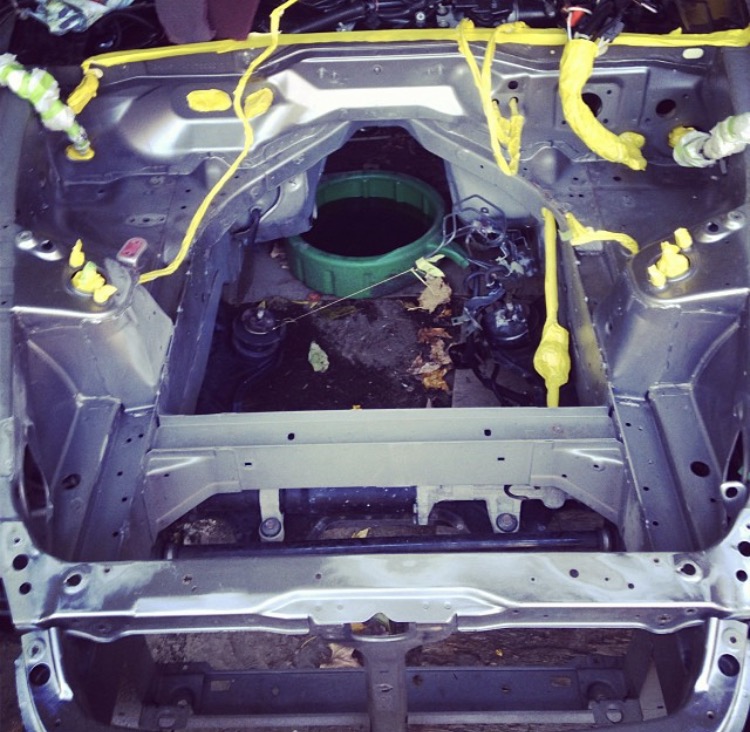
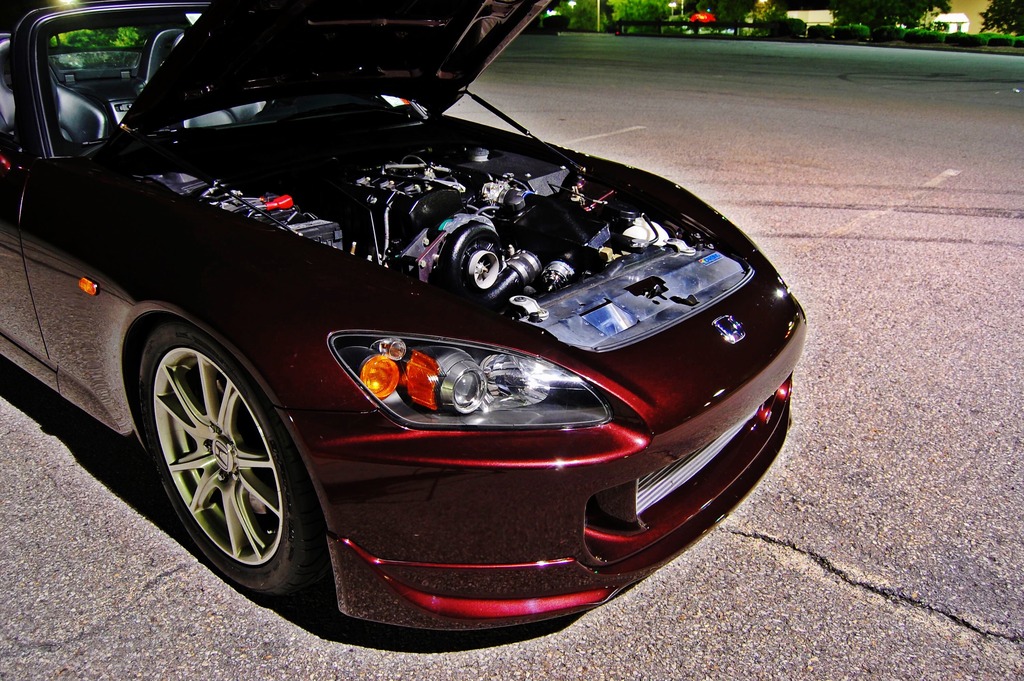
Fast forward to September 2013. Another buddy of mine who does really good paint work was talking me into letting him take care of the engine bay since it was still silverstone and ugly. He gave me a price that I absolutely could not say no to. This price included me giving him a running car, him removing everything out of the bay, painting the bay, and re-installing everything back to a running car. During this process I purchased a Vortech supercharger kit and we went ahead and started the install on that. Couple shots of the bay!
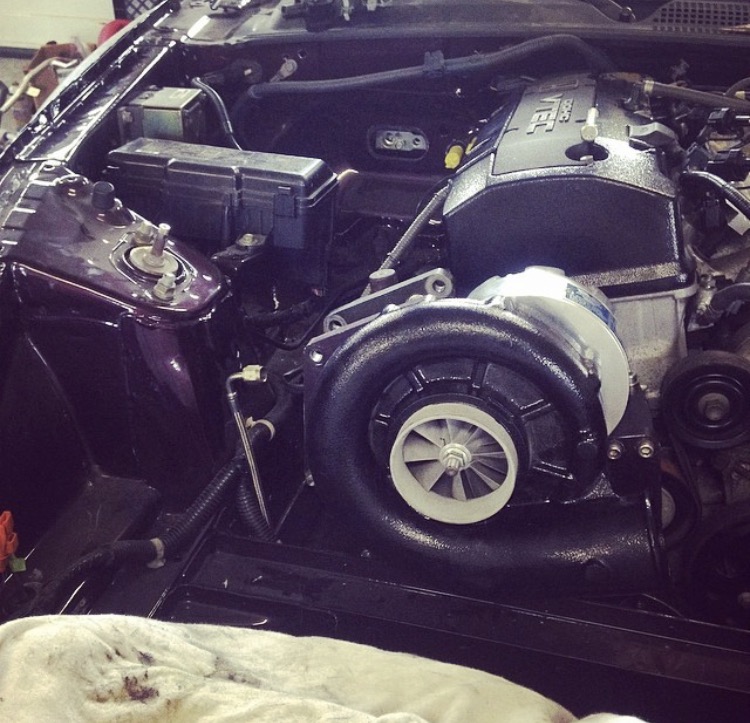
As for the Vortech kit, I wanted to make some great power with the intentions of using E85. I knew a stock vortech kit wouldn't get me 430whp+ without some mods! I went ahead and got a high boost pulley (18psi), a larger heat exchanger from Frozen Boost that measured larger than the Science of Speed core, a Bosch water pump for the after cooler/ heat exchanger, Injector Dynamics 1000cc injectors, a 255lph Walbro fuel pump, and some one step colder NGK plugs.

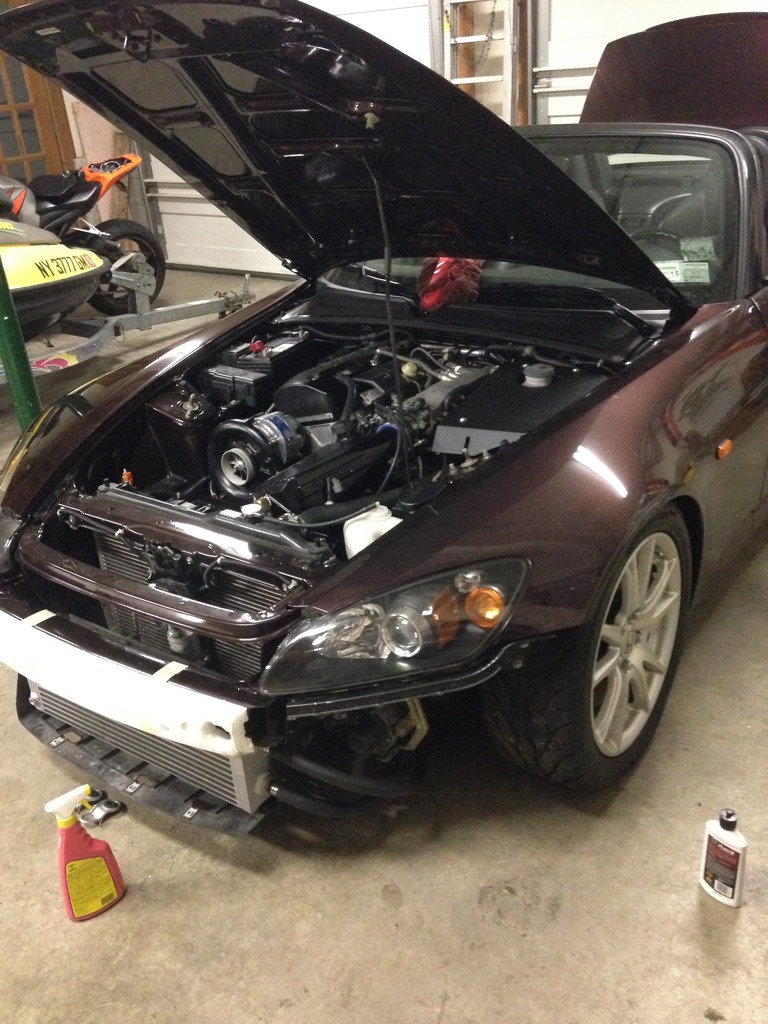
Everything was together and running! This was time to get with Jeff over at Evan's Tuning!!
Got over to Evan's at 9AM on July 18, 2014.. Tuning was going to be for a 93 octane tune and an E85 tune! I was looking for 400whp on 93 and 450whp on E85. Jeff and his magic made 403whp on 93 and 465 on E85. I was extra happy, the car ripped for what I was used to!
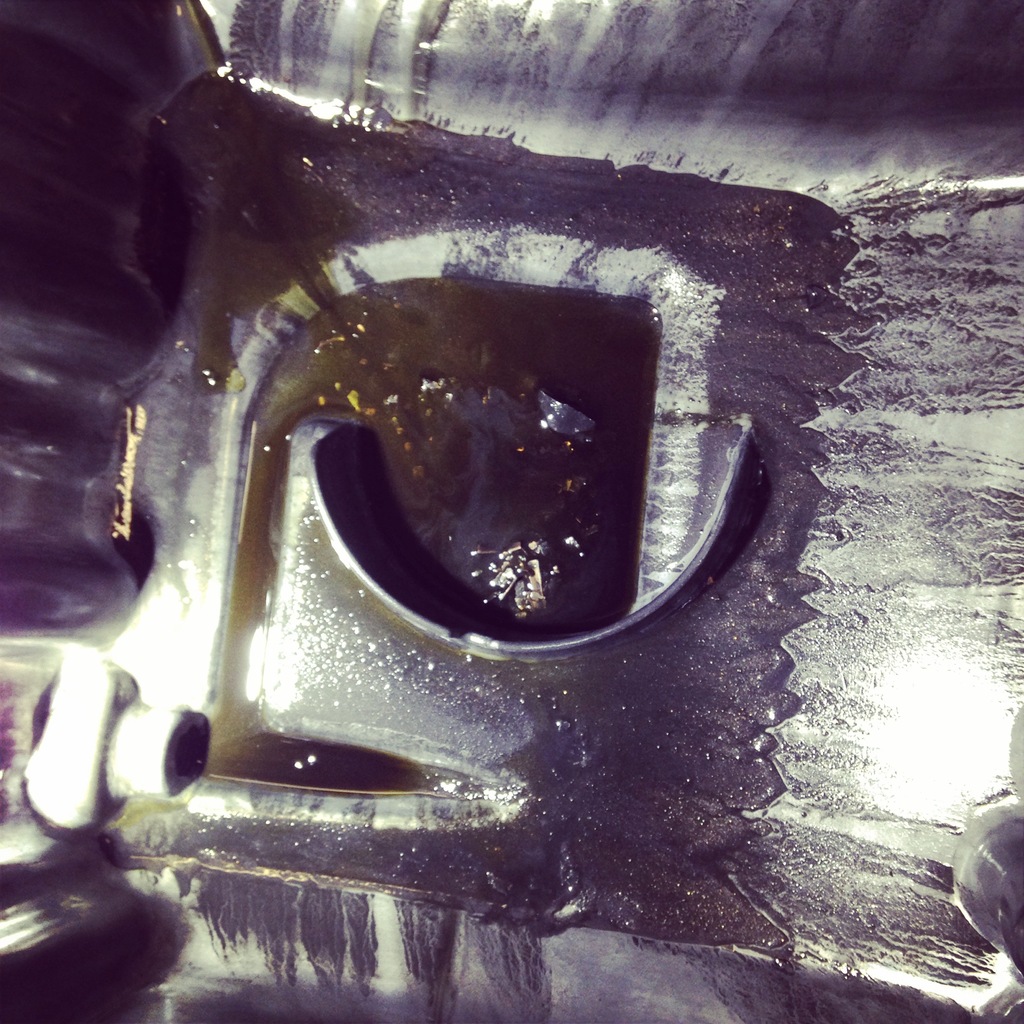
Unfortunately, the following Monday while at a car meet I noticed a strange noise coming from the car. I assumed it was the throw out bearing and was in contact with Competition Clutch already. I thought nothing of it and on my way home from that Monday night meet, (meet was called Monday's suck meet), my oil light started flickering. GREAT! I now knew what that noise was and it wasn't my throw out bearing. I decided against shutting the car down since I figured it was already too late and the damage was done. I headed for home with no intentions on stopping. I made it maybe 3 miles from home and the knocking became horrible so I shut the car down and called a buddy for a tow. We got the car back to my house safe and sound and the tear down began in the morning.
First look!

Fast forward to September 2013. Another buddy of mine who does really good paint work was talking me into letting him take care of the engine bay since it was still silverstone and ugly. He gave me a price that I absolutely could not say no to. This price included me giving him a running car, him removing everything out of the bay, painting the bay, and re-installing everything back to a running car. During this process I purchased a Vortech supercharger kit and we went ahead and started the install on that. Couple shots of the bay!


As for the Vortech kit, I wanted to make some great power with the intentions of using E85. I knew a stock vortech kit wouldn't get me 430whp+ without some mods! I went ahead and got a high boost pulley (18psi), a larger heat exchanger from Frozen Boost that measured larger than the Science of Speed core, a Bosch water pump for the after cooler/ heat exchanger, Injector Dynamics 1000cc injectors, a 255lph Walbro fuel pump, and some one step colder NGK plugs.


Everything was together and running! This was time to get with Jeff over at Evan's Tuning!!

Got over to Evan's at 9AM on July 18, 2014.. Tuning was going to be for a 93 octane tune and an E85 tune! I was looking for 400whp on 93 and 450whp on E85. Jeff and his magic made 403whp on 93 and 465 on E85. I was extra happy, the car ripped for what I was used to!

Unfortunately, the following Monday while at a car meet I noticed a strange noise coming from the car. I assumed it was the throw out bearing and was in contact with Competition Clutch already. I thought nothing of it and on my way home from that Monday night meet, (meet was called Monday's suck meet), my oil light started flickering. GREAT! I now knew what that noise was and it wasn't my throw out bearing. I decided against shutting the car down since I figured it was already too late and the damage was done. I headed for home with no intentions on stopping. I made it maybe 3 miles from home and the knocking became horrible so I shut the car down and called a buddy for a tow. We got the car back to my house safe and sound and the tear down began in the morning.
First look!

Last edited by KillerCom; Apr 16, 2020 at 10:46 AM.
Thread Starter
Joined: Feb 2010
Posts: 746
Likes: 3
From: Dutchess County
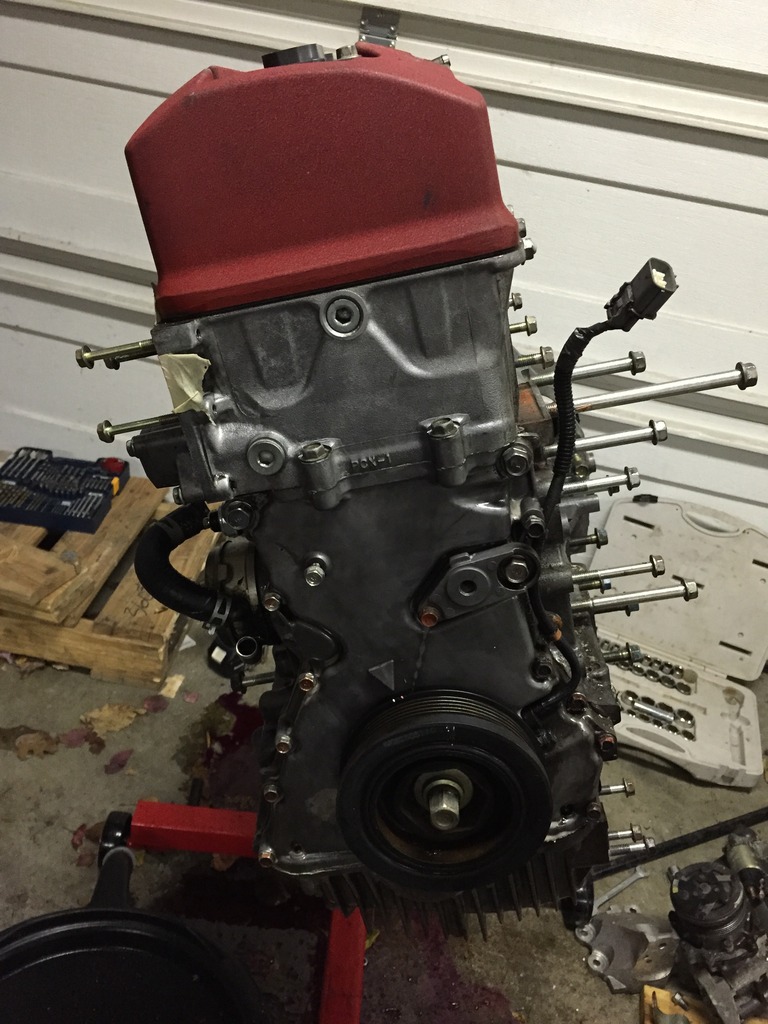
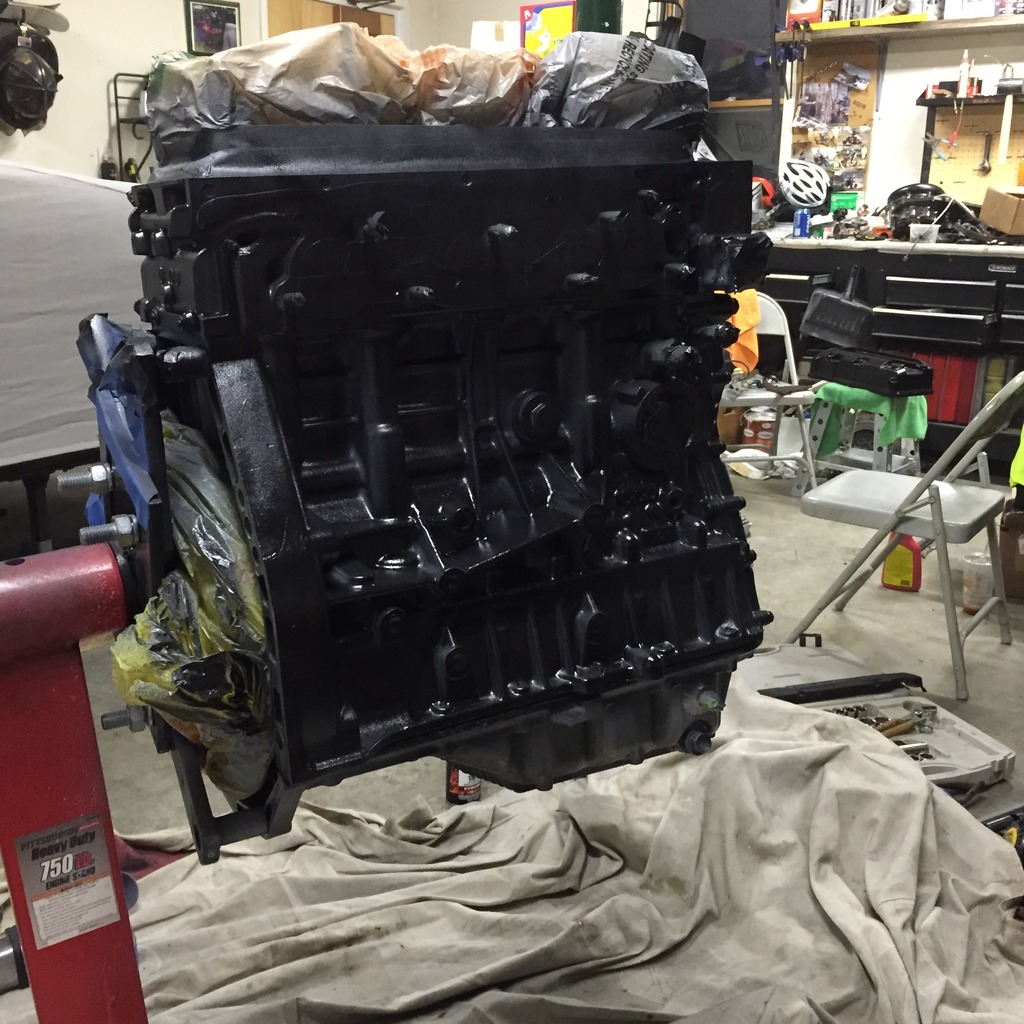
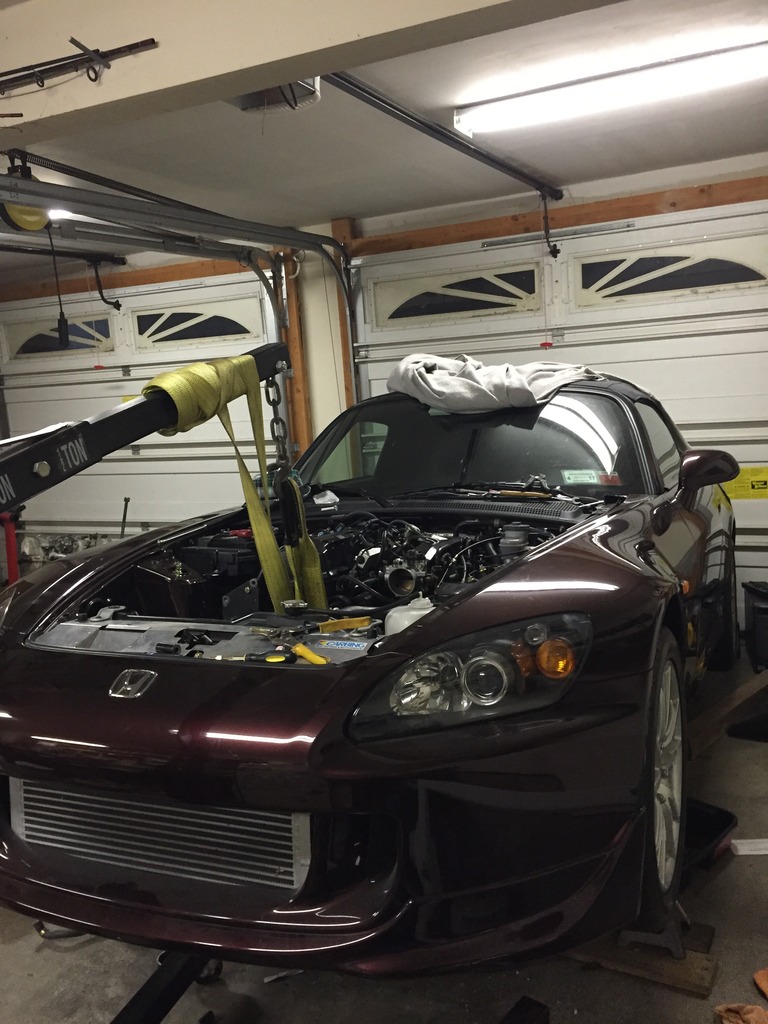
So I tore into the motor and realized I spun my mains. Don't know how, don't know why.. So out with the old and in with the new. I went ahead and began to pull the Ap1 motor out and the search began for a used motor.
Fast forward to the winter of 2014/2015. I ended up finding a low mileage f22c complete long block for a great price shipped to me from the Carolinas. The ap1 motor was already out so the car was patiently waiting for a heart transplant.
The f22 when I received it!
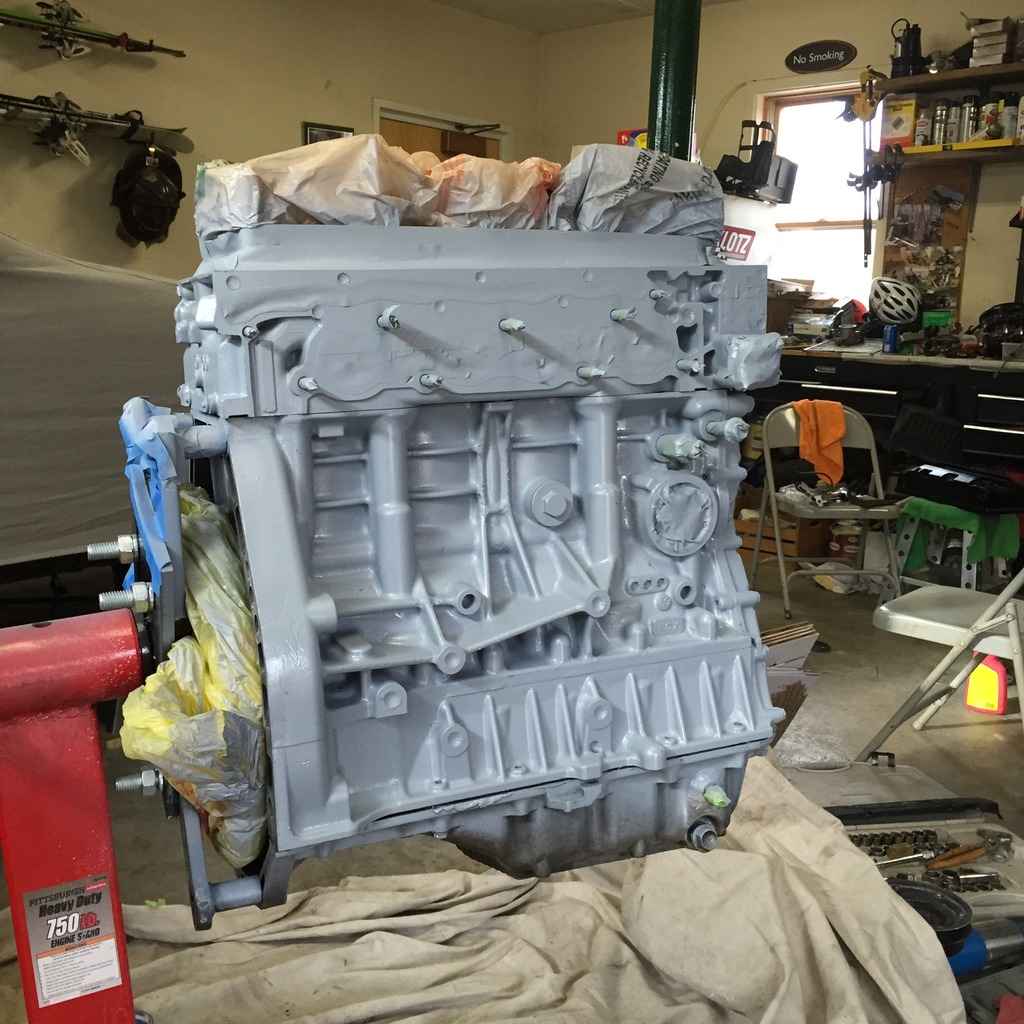
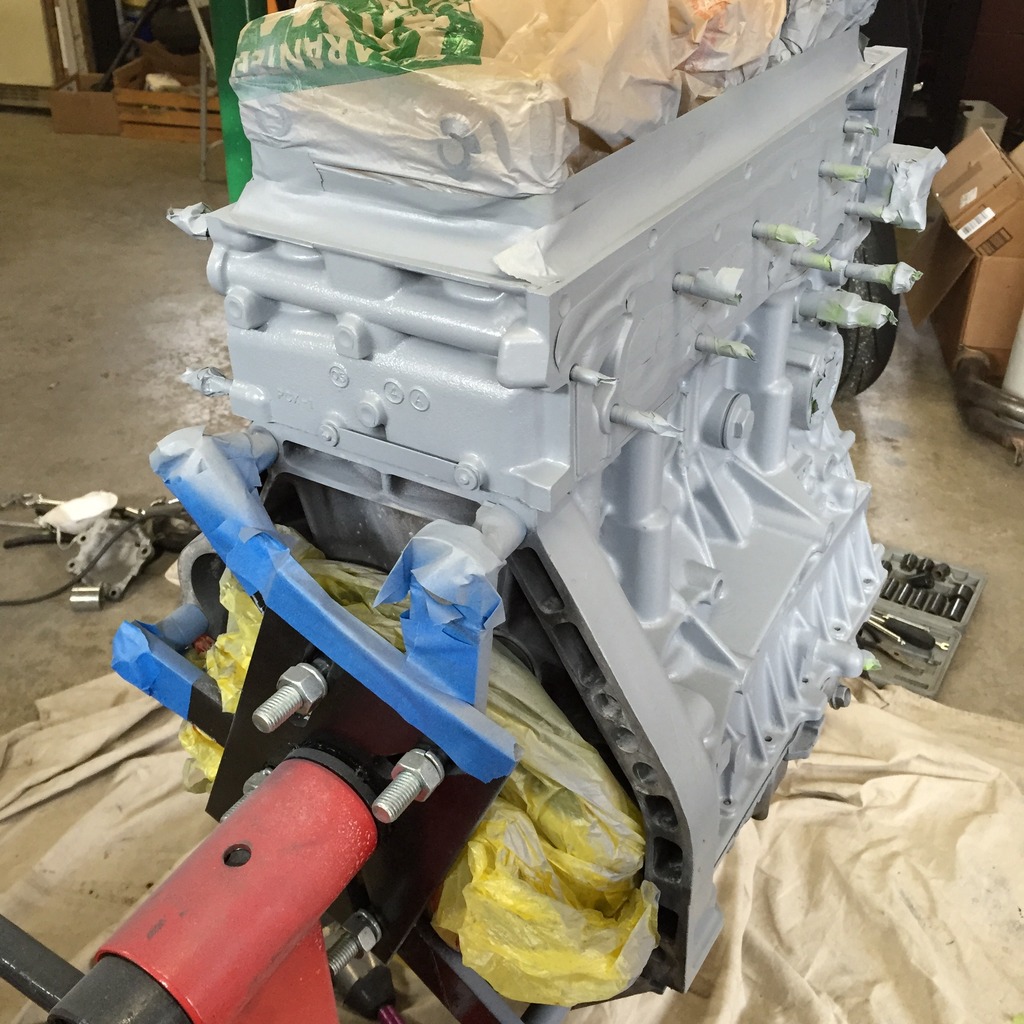
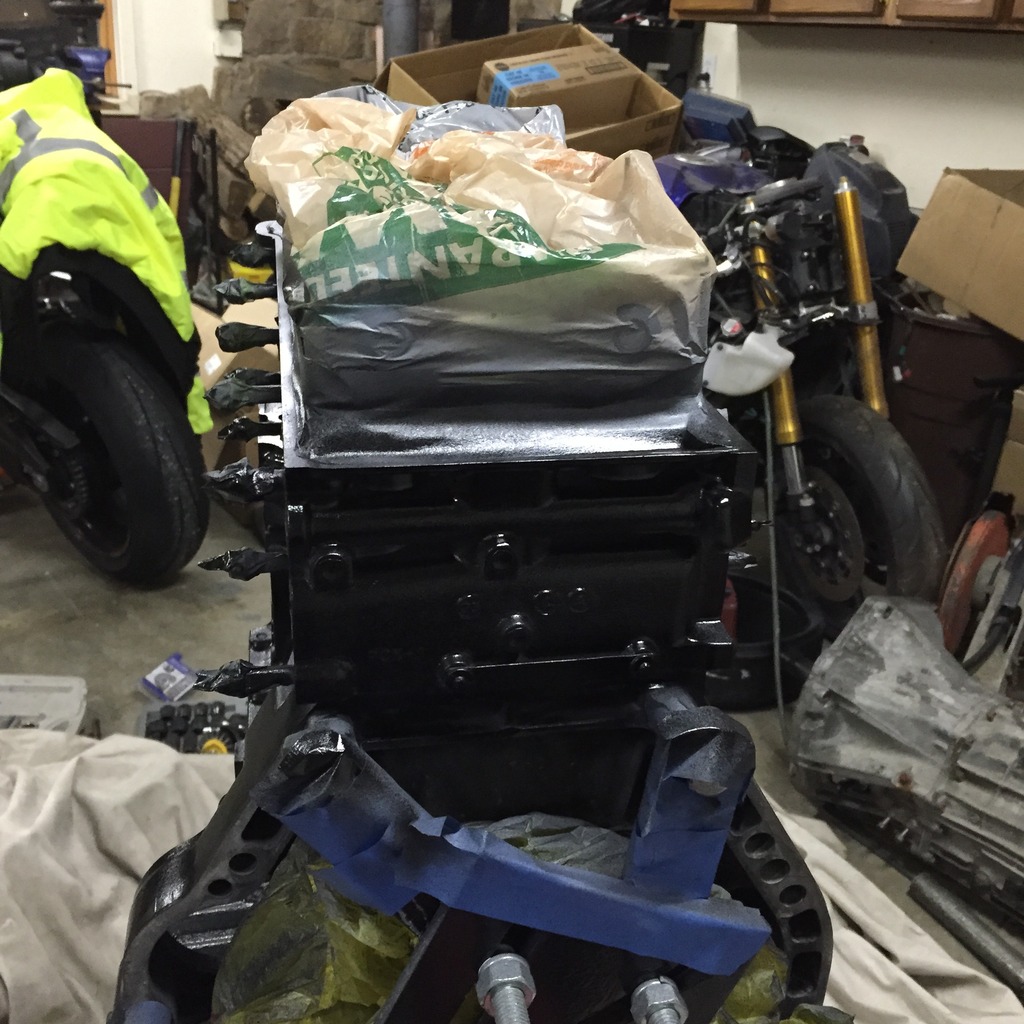
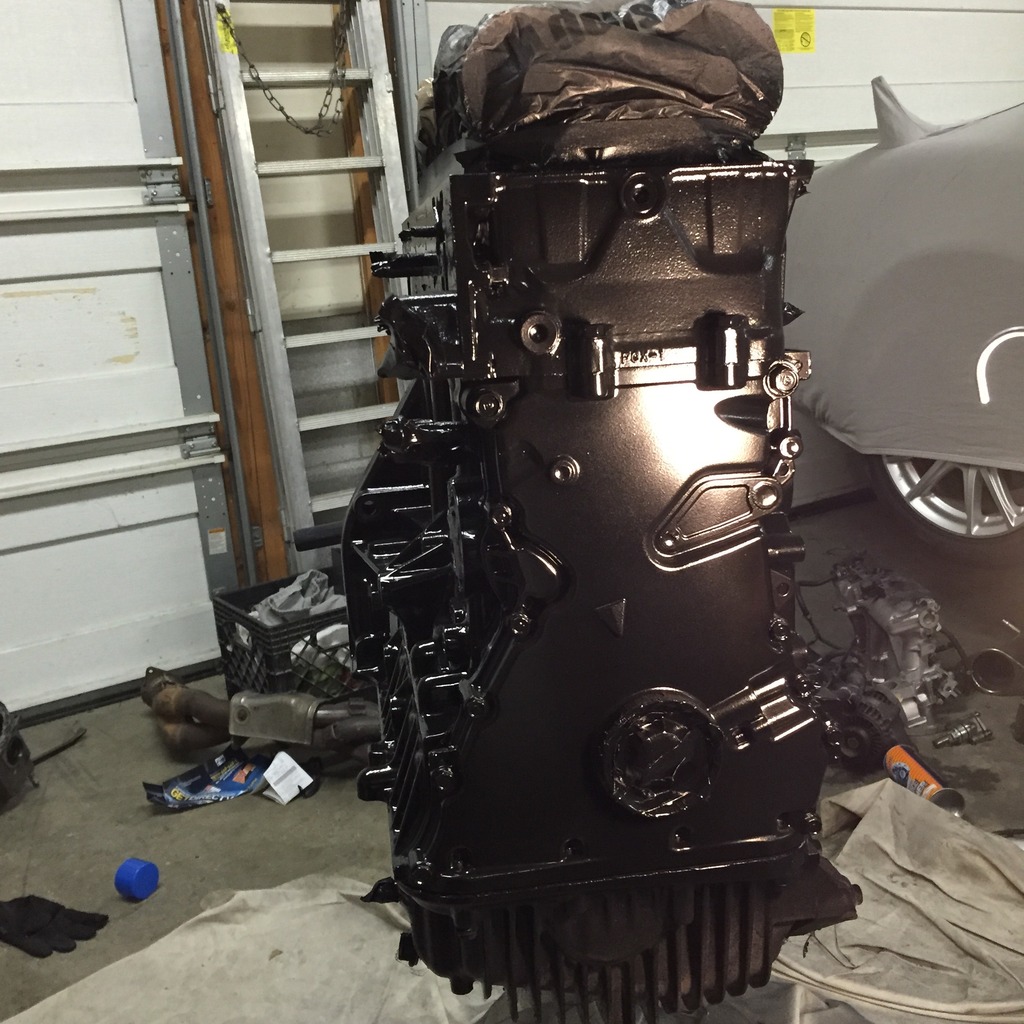
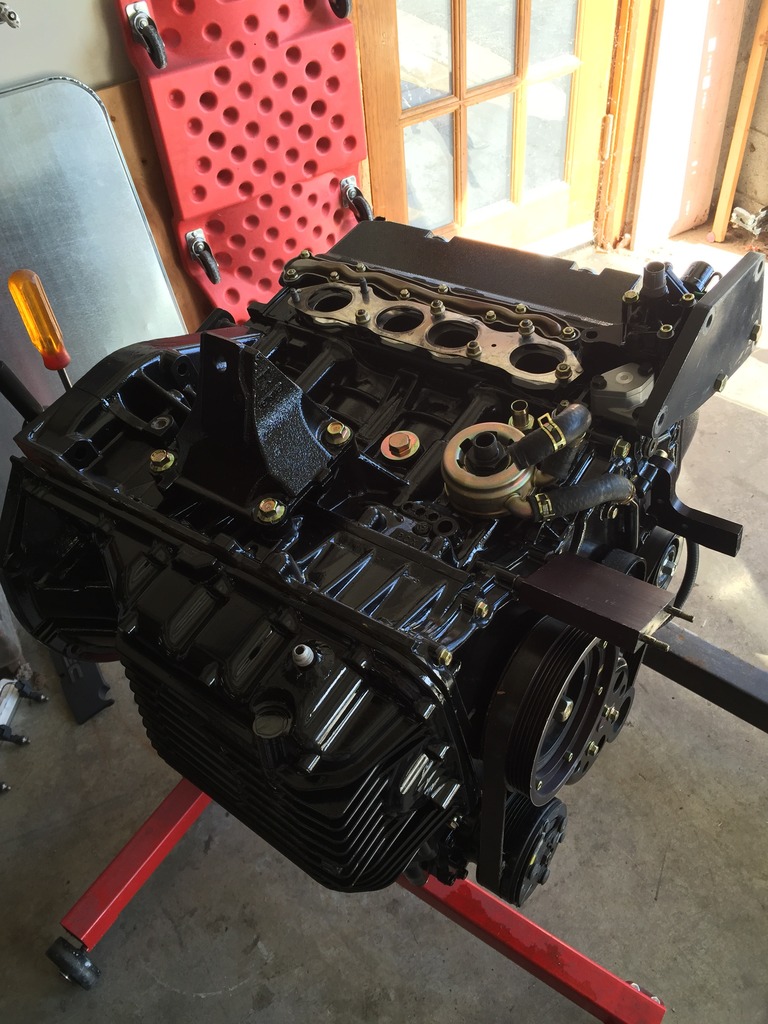
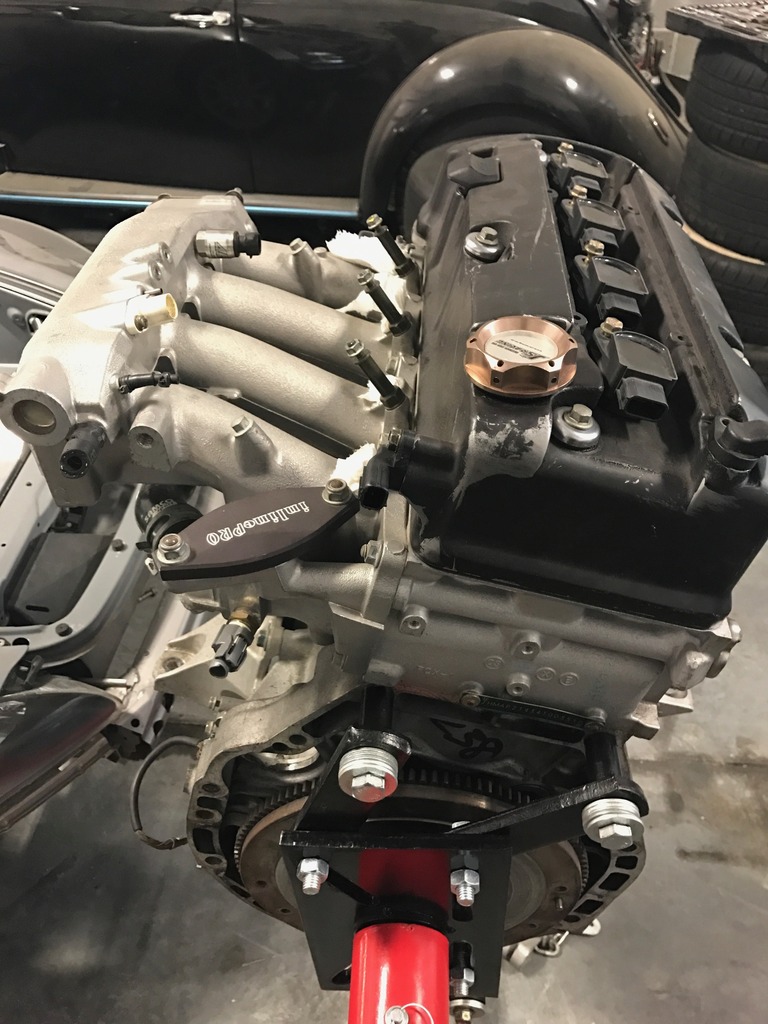
As I sat in this moment looking at this motor I said this thing needed so cleaning to look good in my engine bay so I got to it.
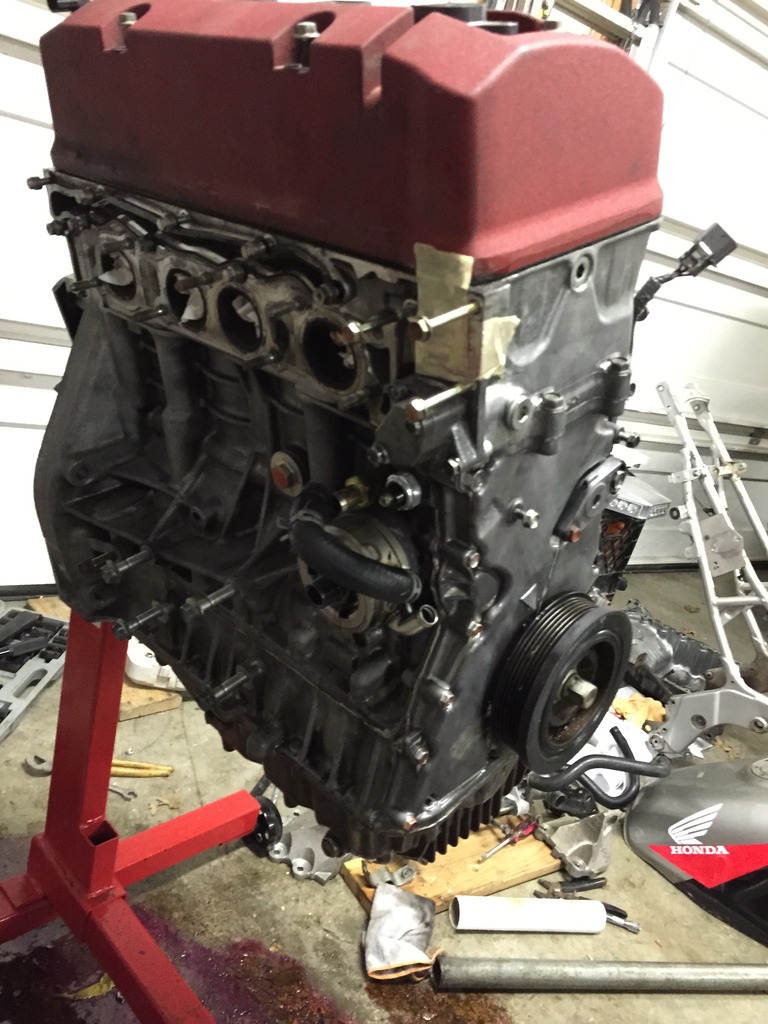
After this thing was looking brand new I still wasn't 100% satisfied. I saw a few members on here who had painted their engines and I was into it. So a short easy engine swap is now turning into something else.
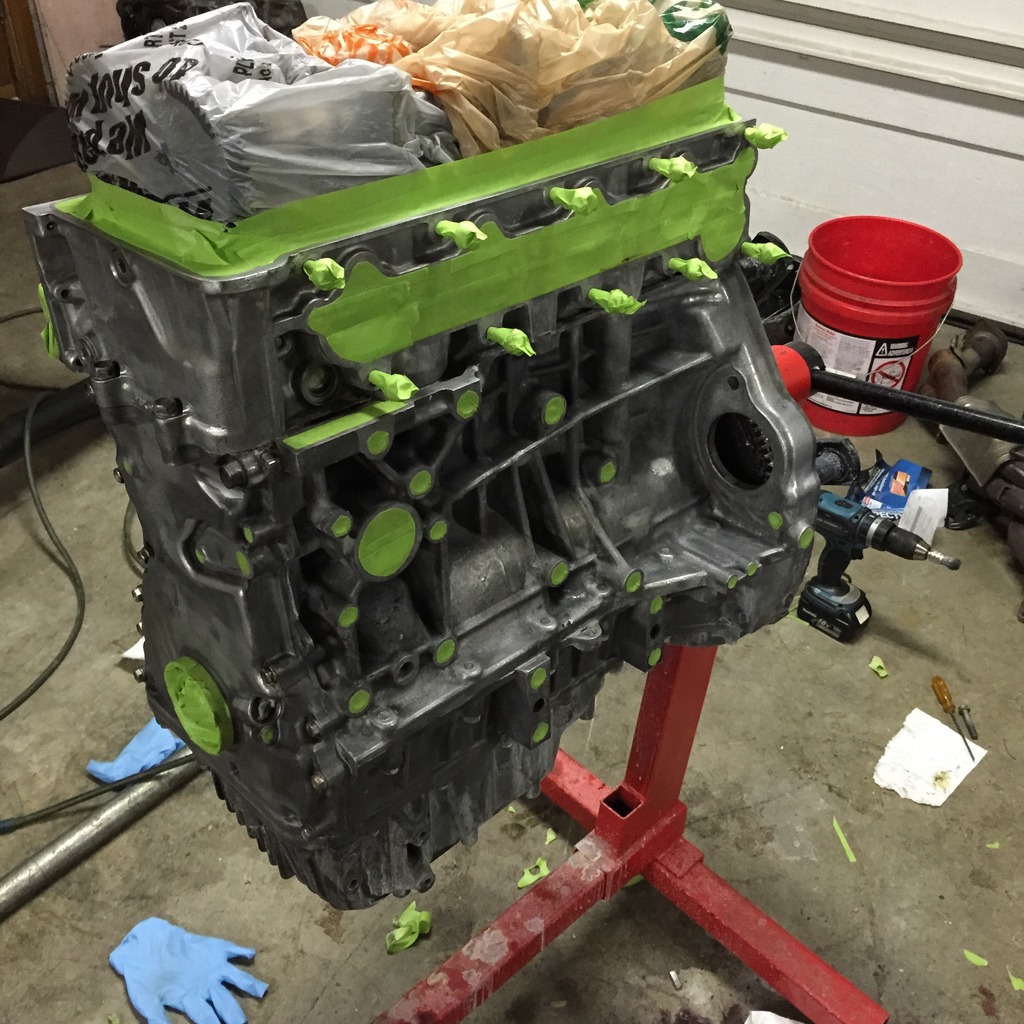
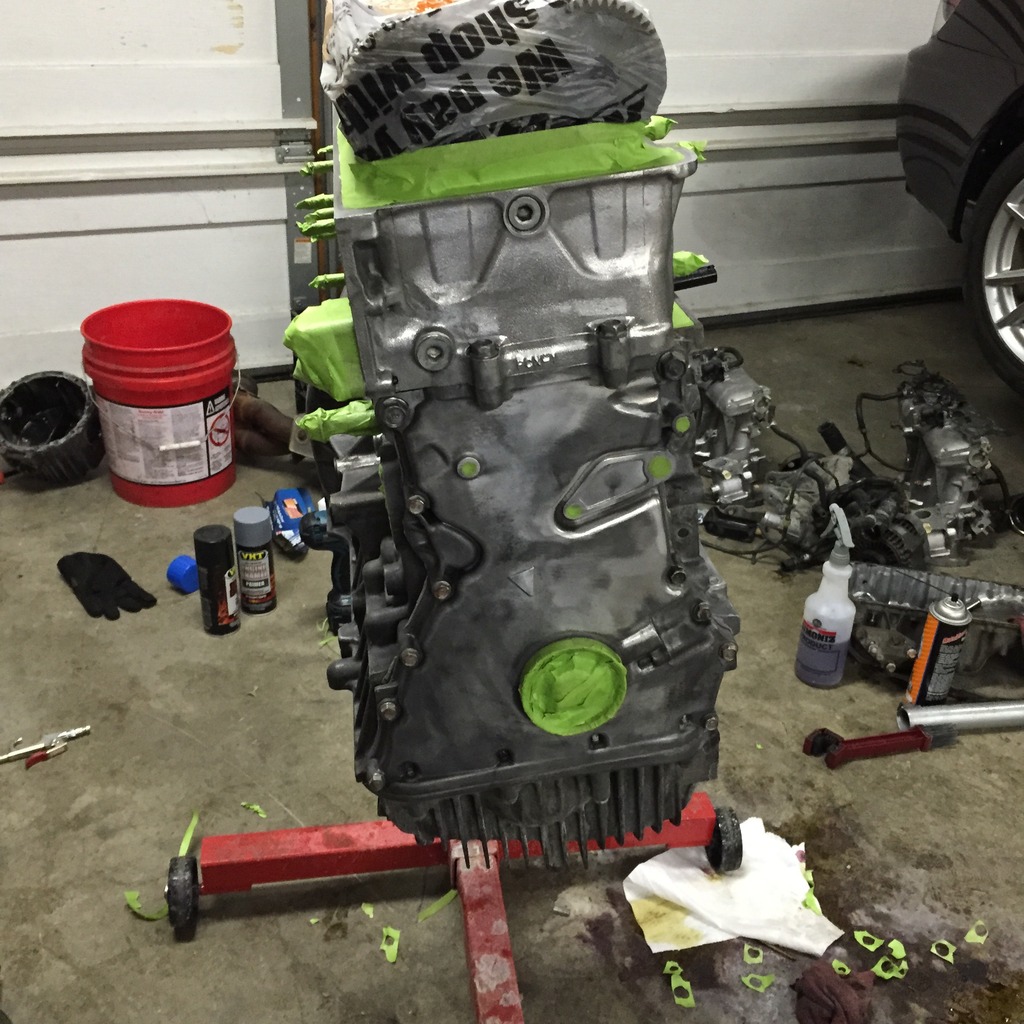
Primer!
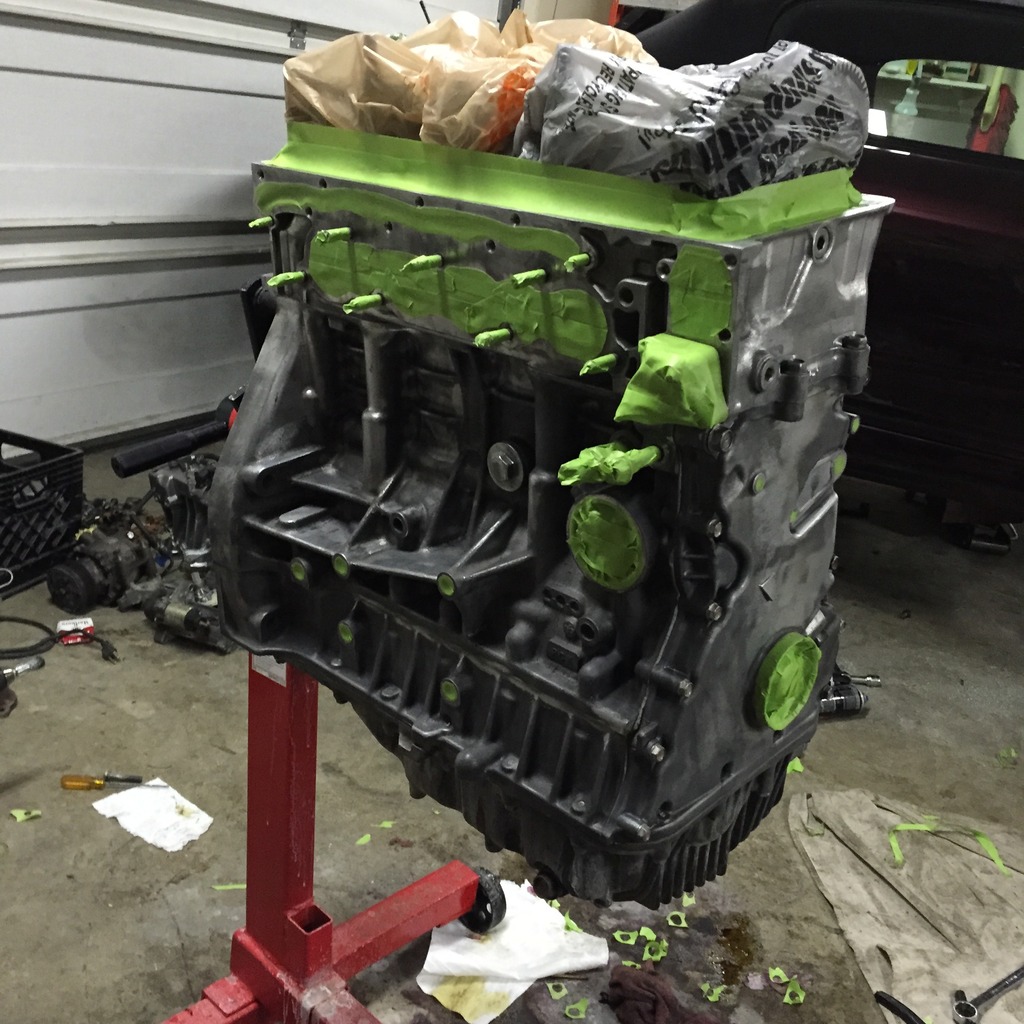
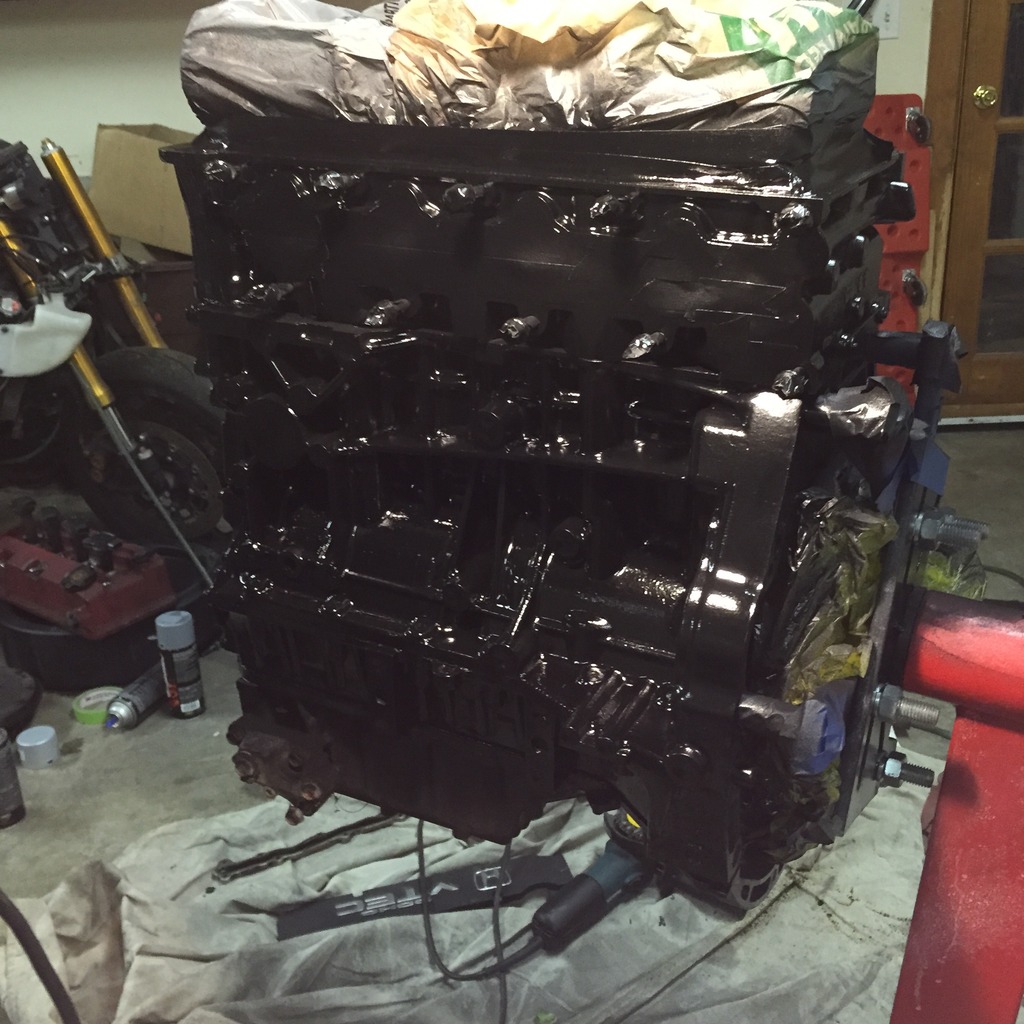
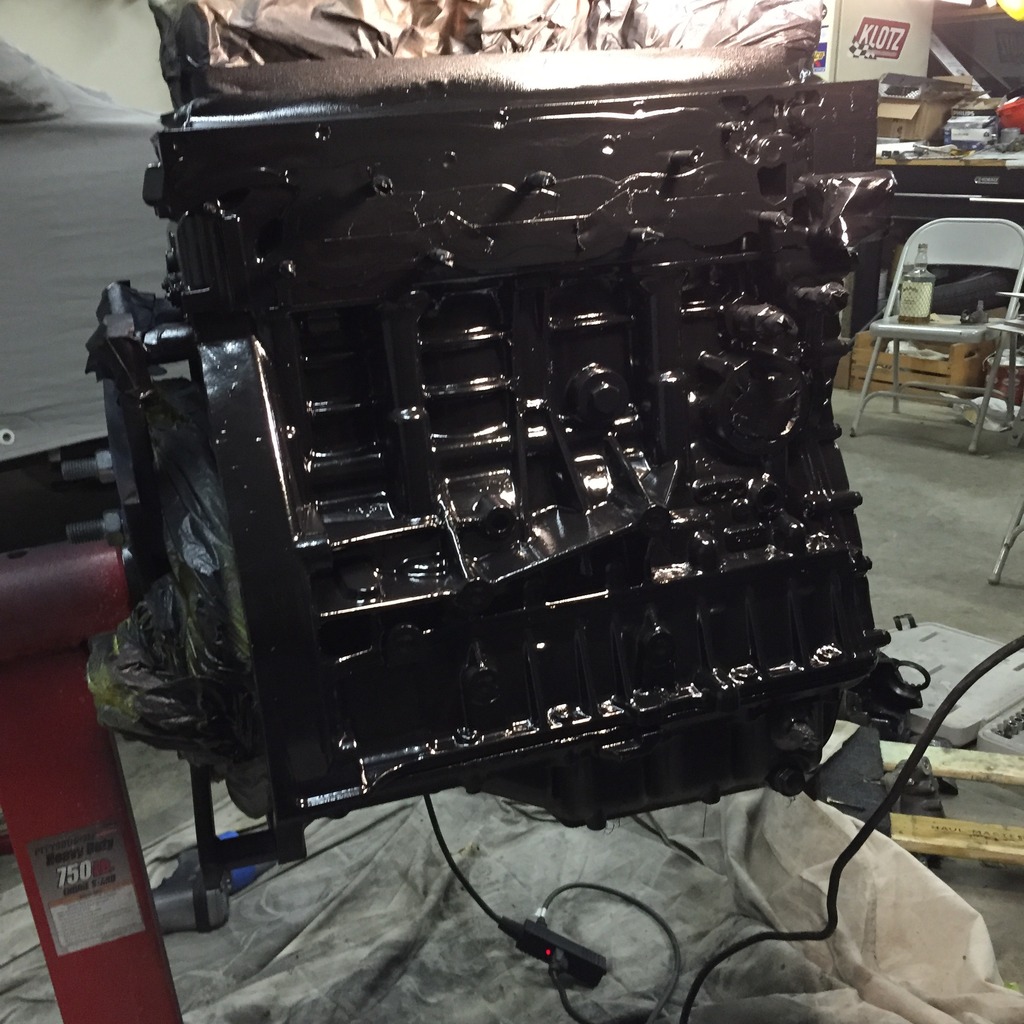
And here's to some of the base coat! I was stuck between the aluminum silver and black and something about black just kicked ass to me. So black it was!
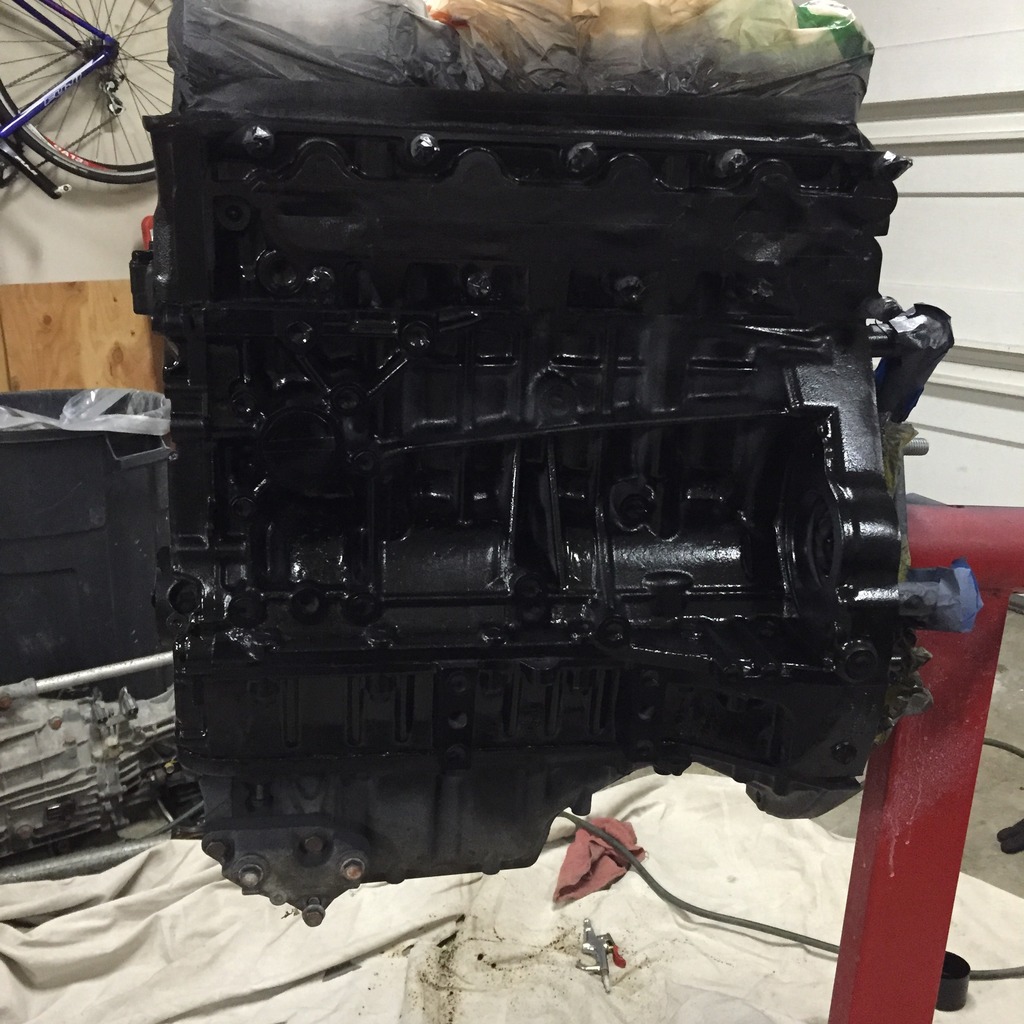
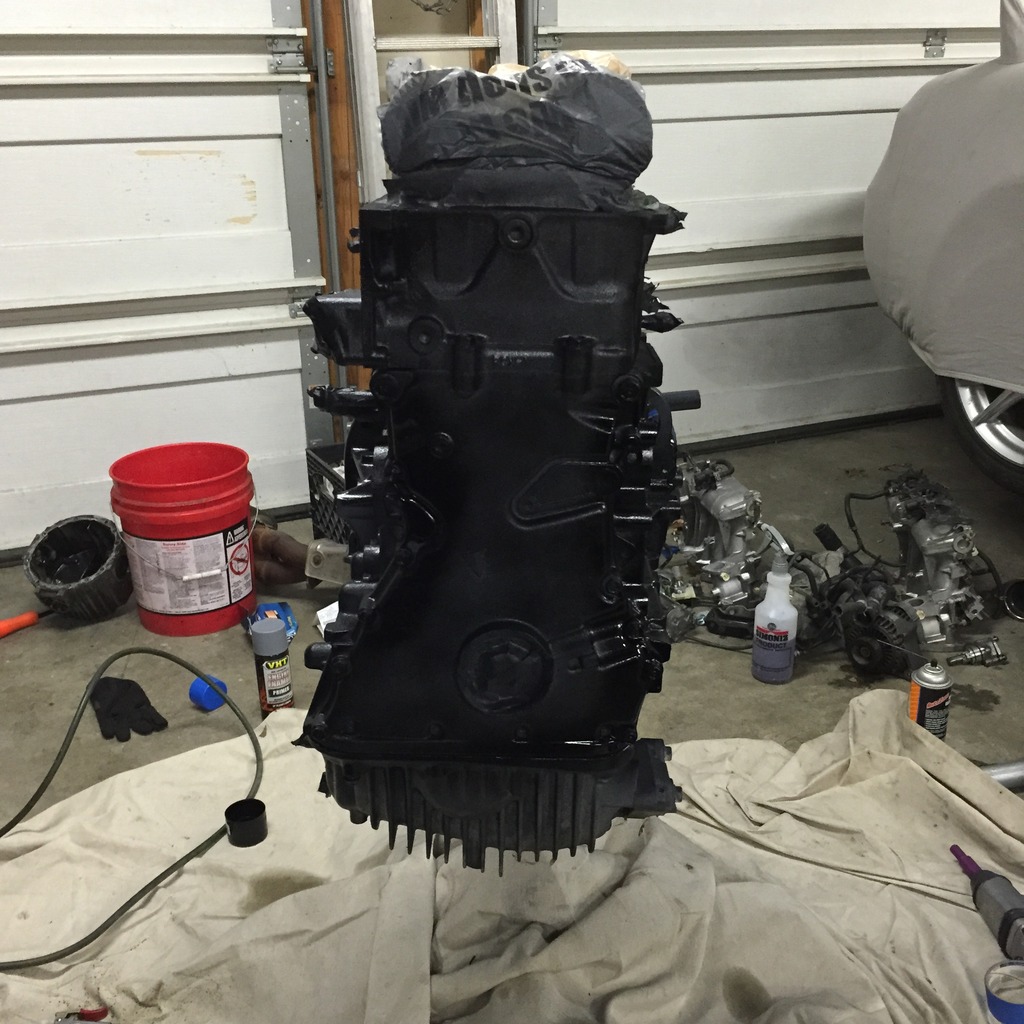
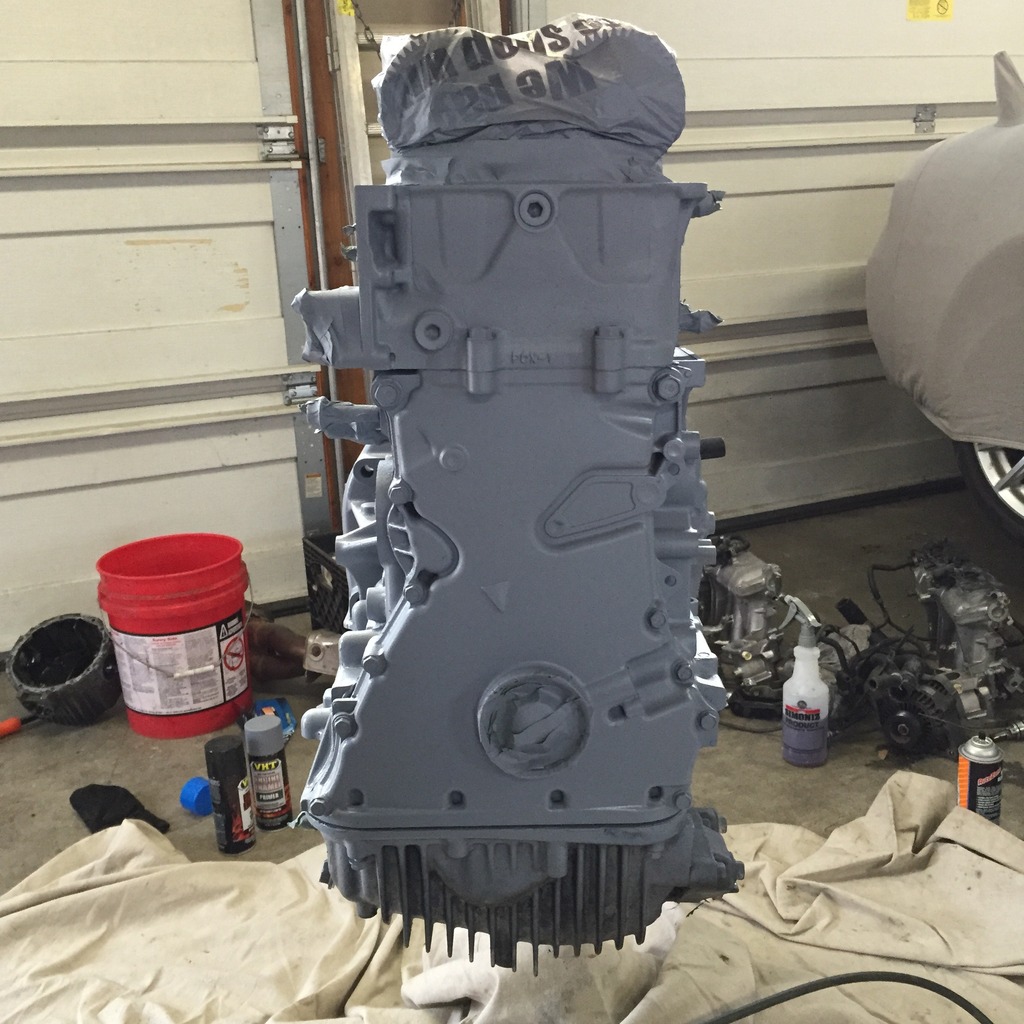
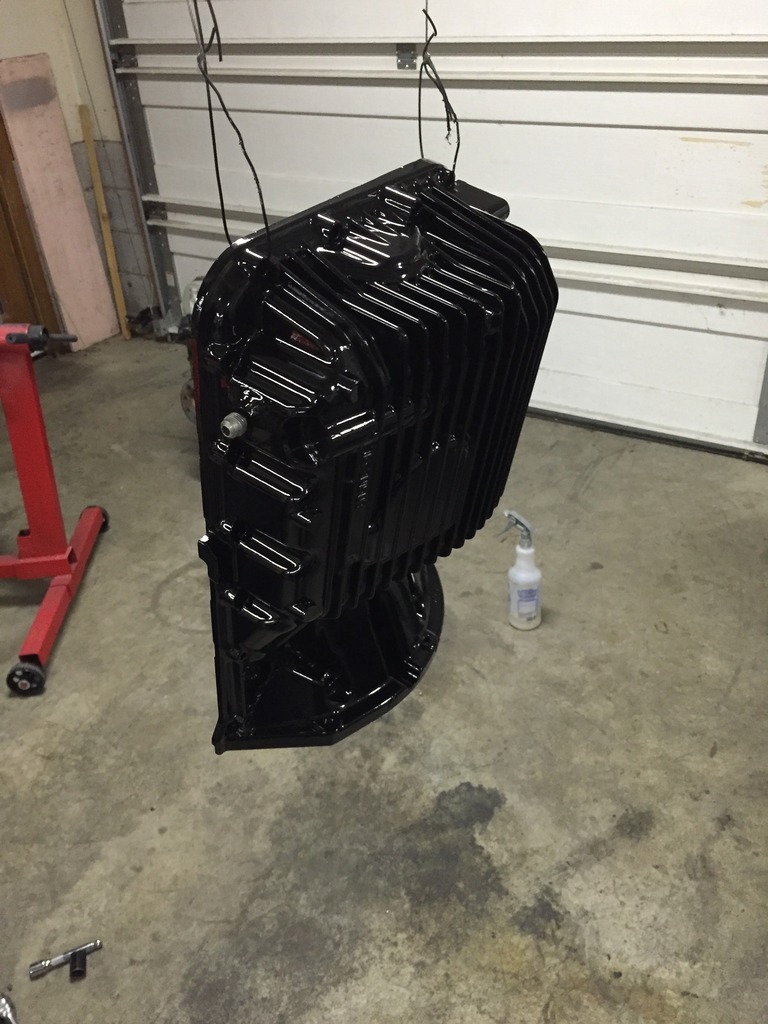
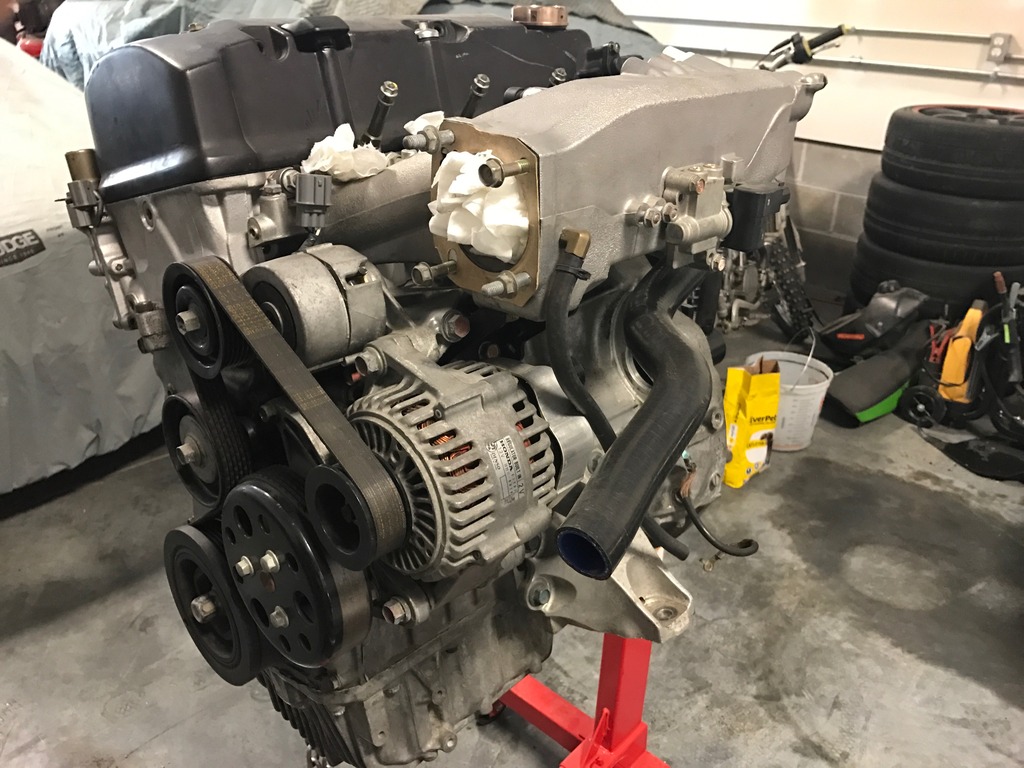
And then after a couple coats of clear and a bunch of late nights I finished everything off paint wise!
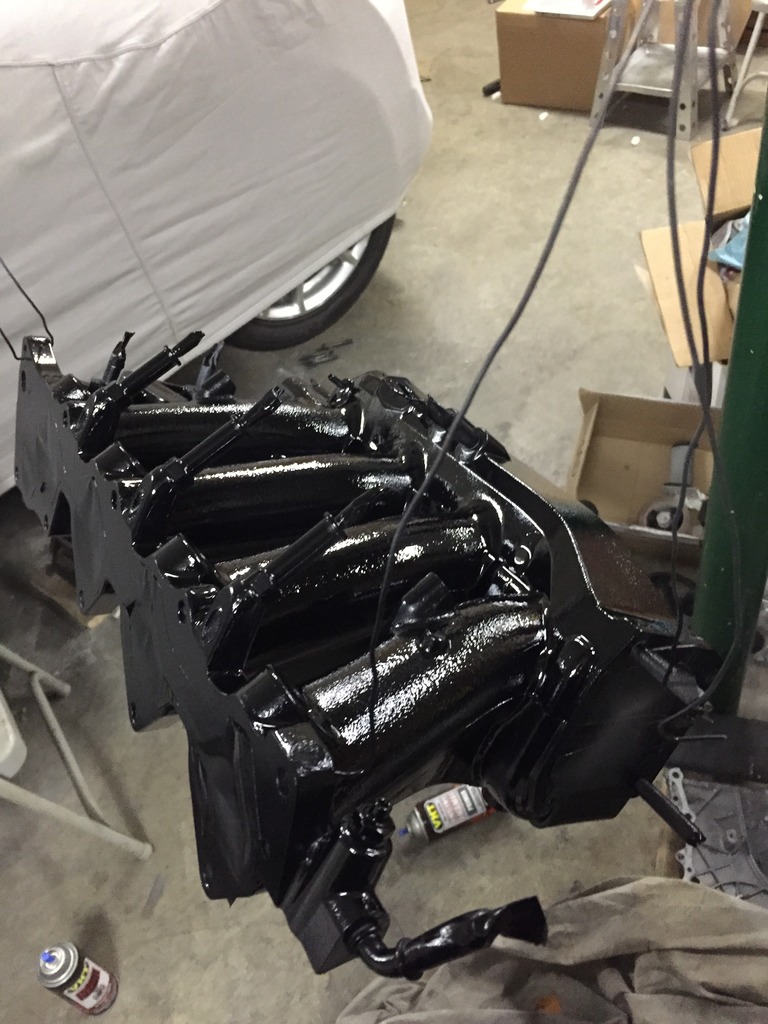
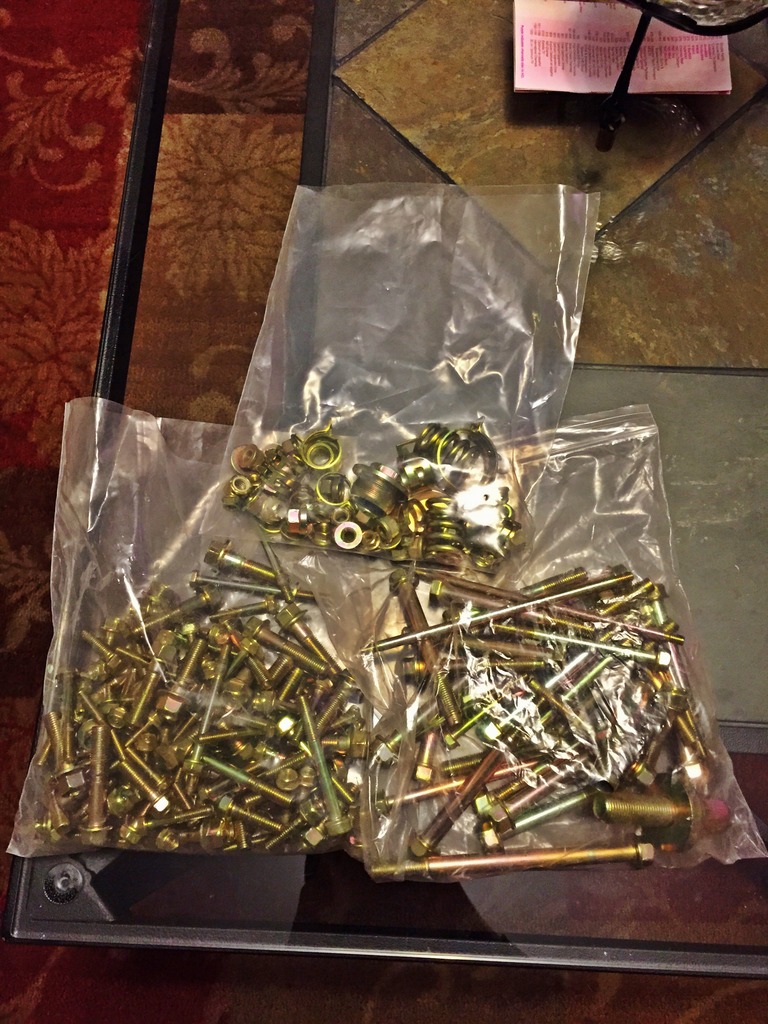
I also painted all the accessories. Vtec solenoid, water pump, alternator, everything. I also didn't like the crumby looking hardware when everything else was looking so good. I found a company in upstate NY who did zinc plating. I sent them roughly 200+ pieces and had everything done for around $100.
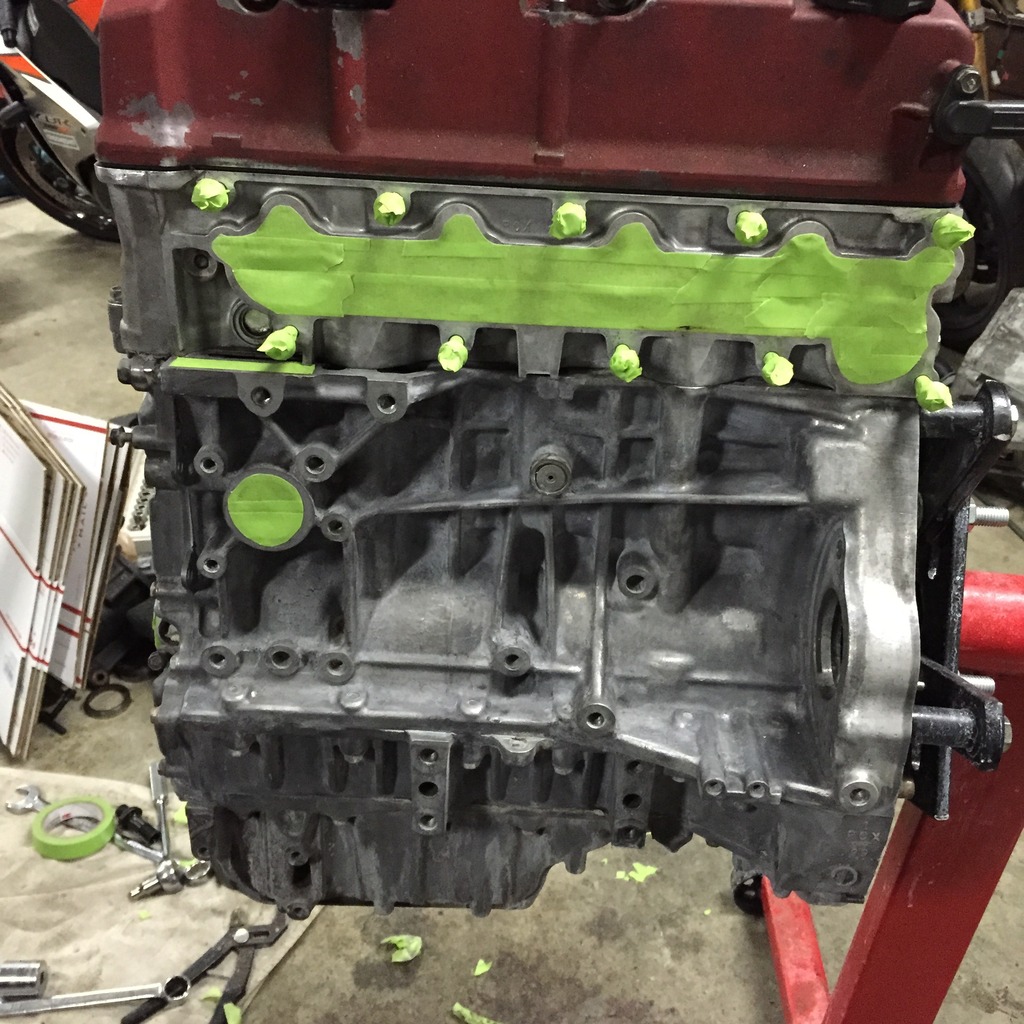
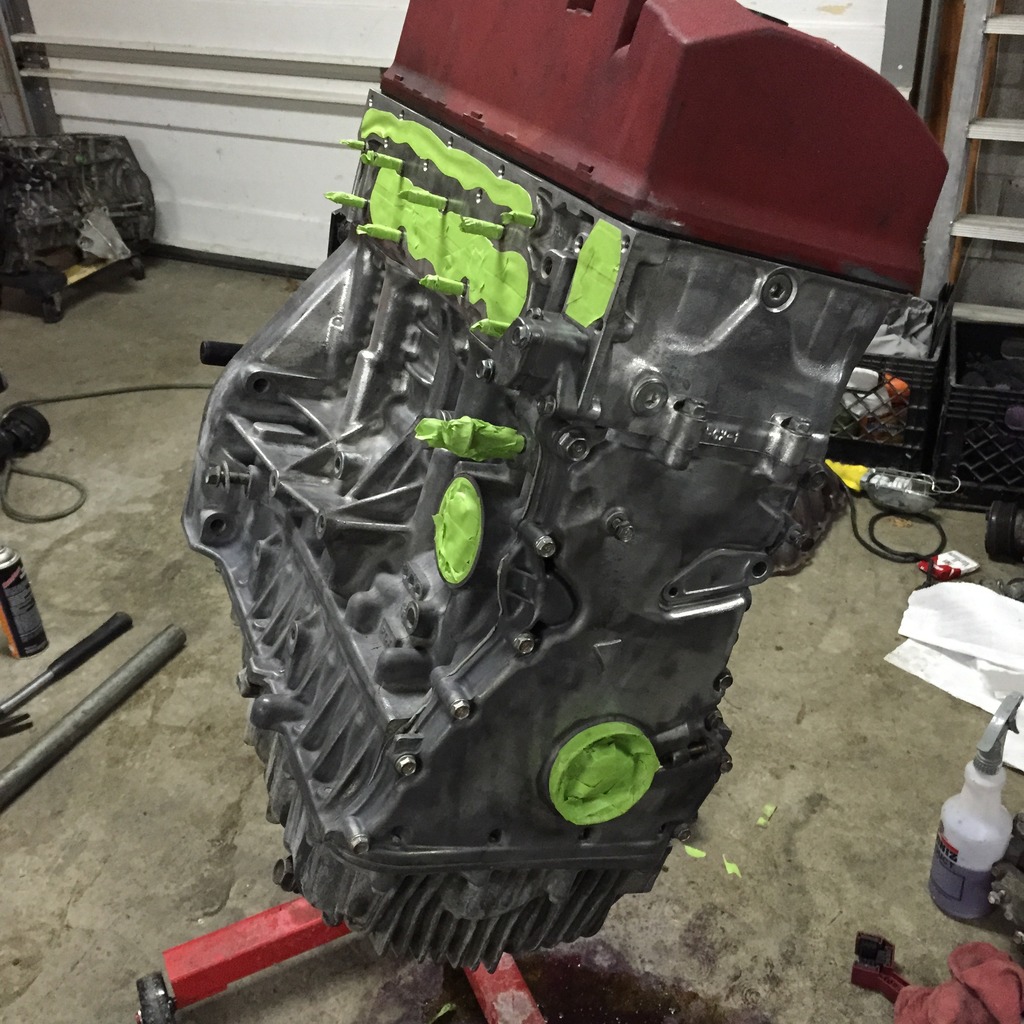
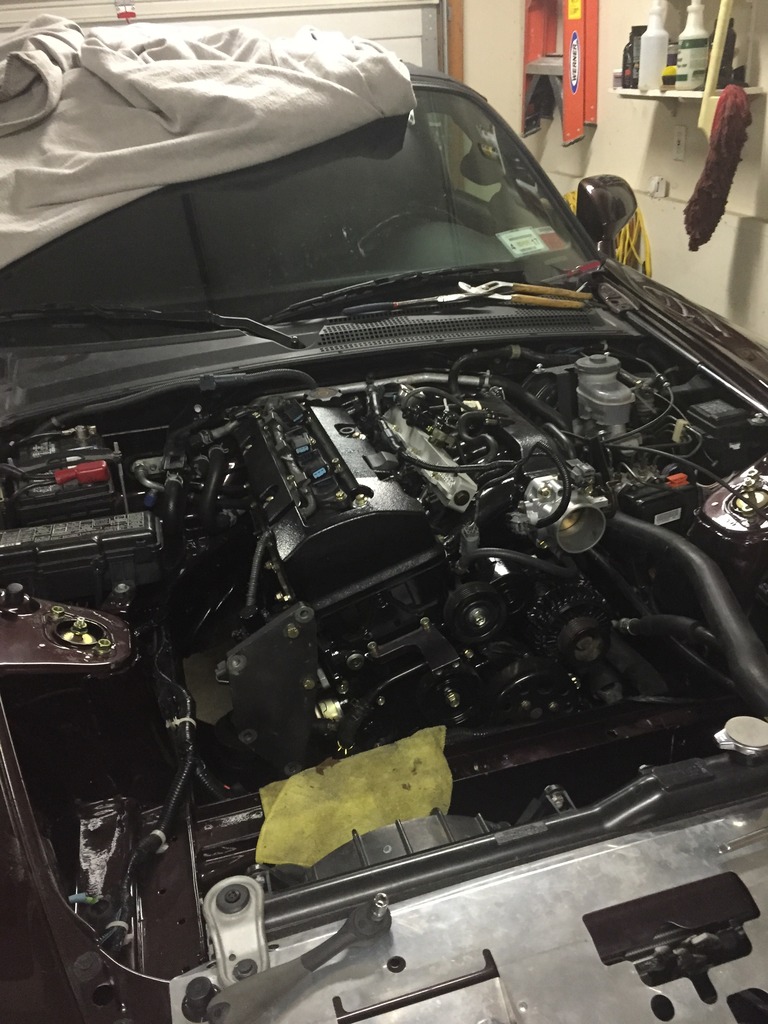
Now to the final assembly of everything!
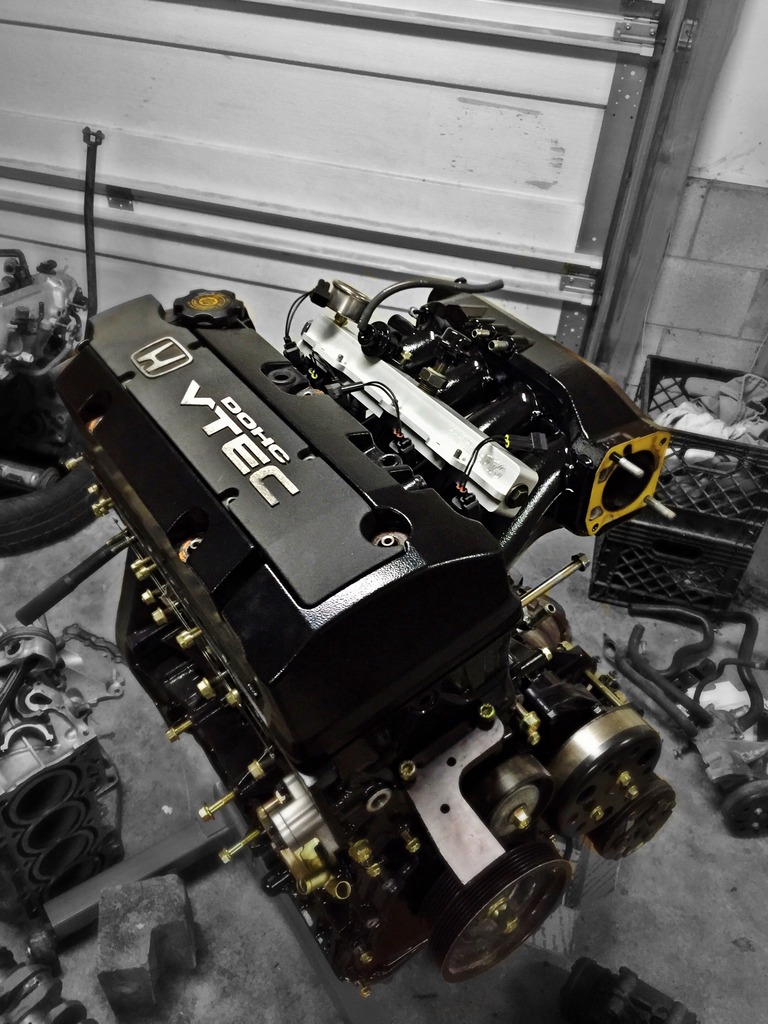
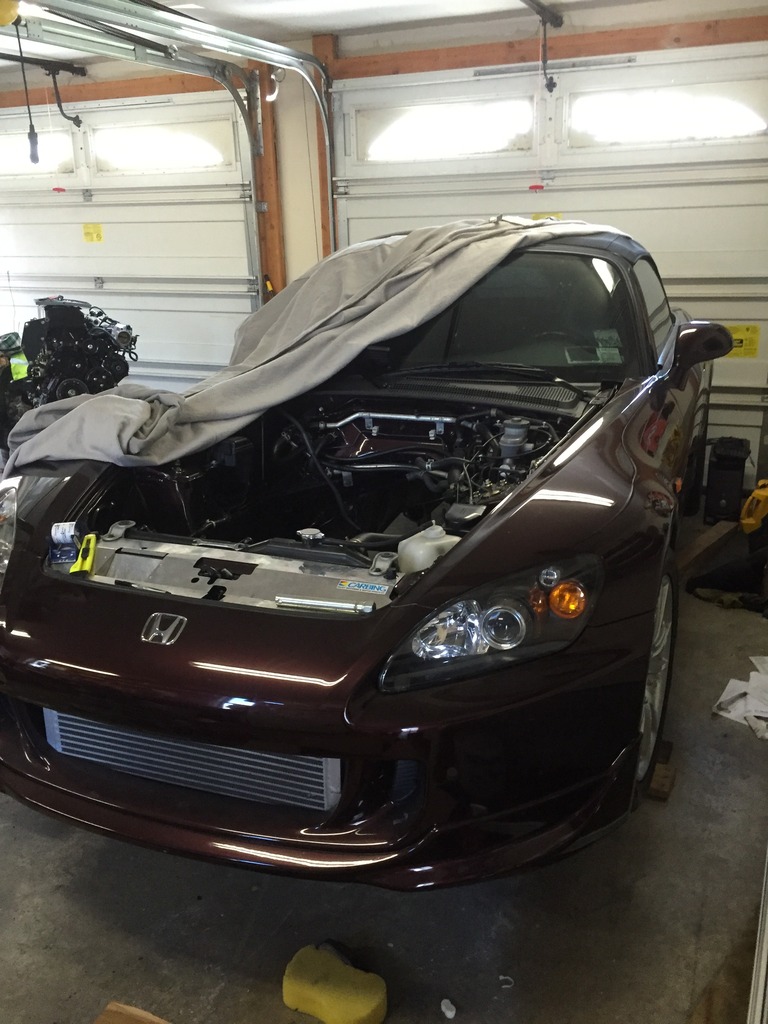
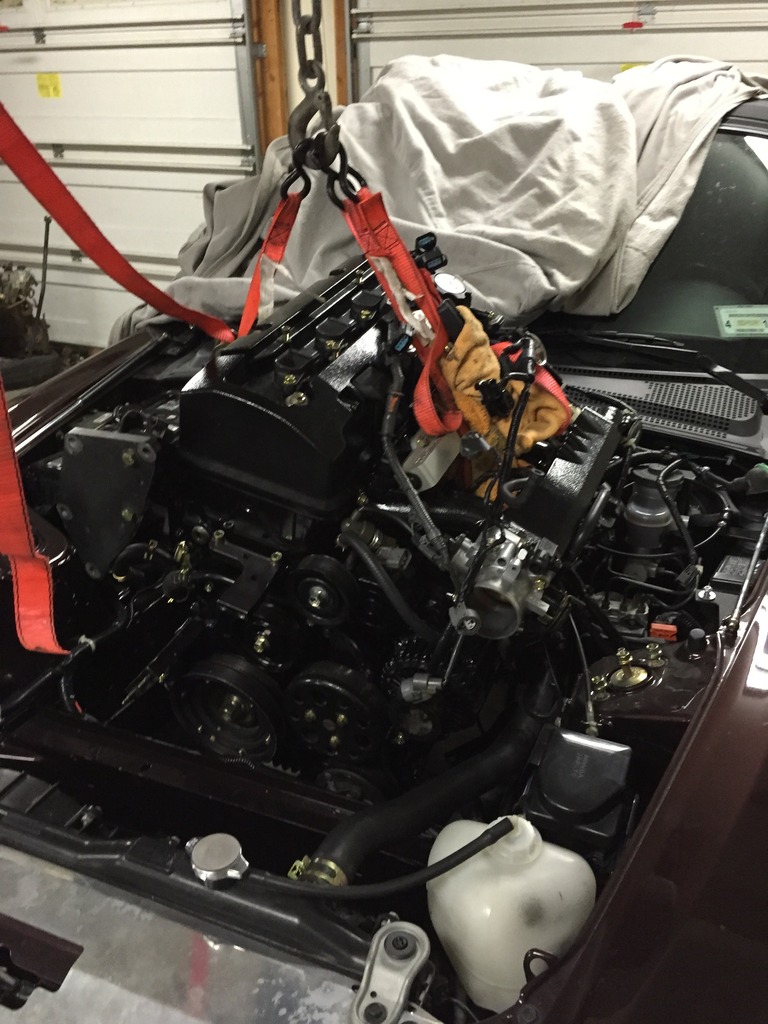
Now to the install back into the heartless car!
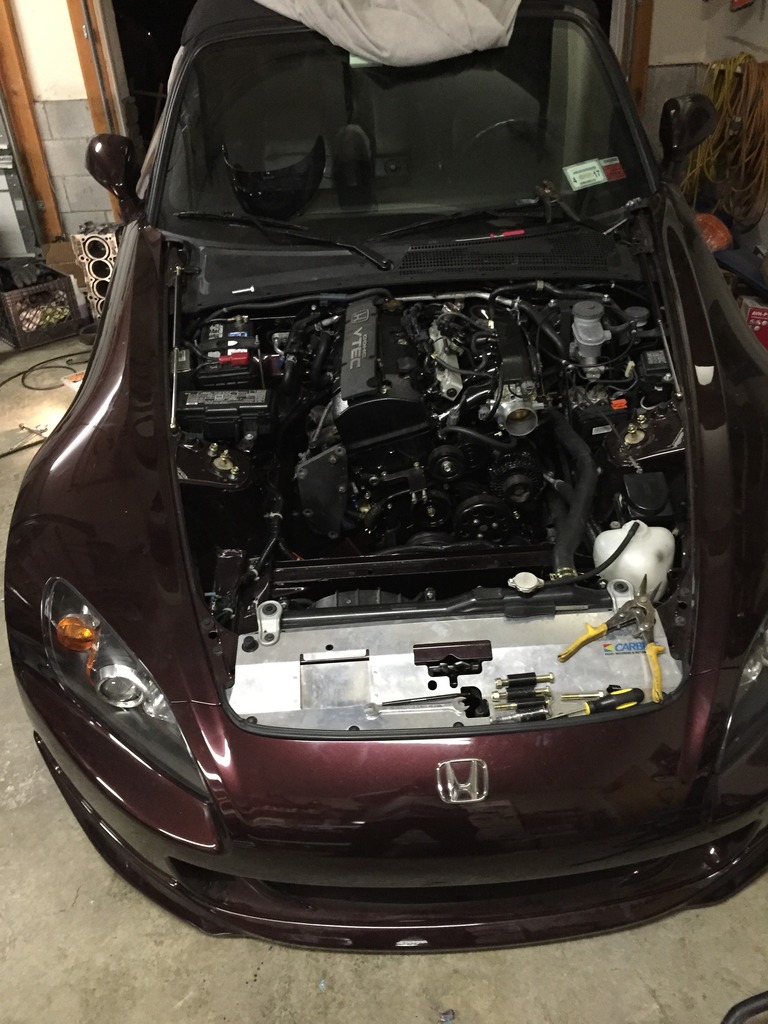
So now we're in 2015 and I'm rushing around to get the car ready to head back to Evan's.. I added a few things to the car for a better tune. Swapped the 1000cc injectors for the new 1300's, swapped the 255 walbro for an AEM 320 and hooked it up with Science of Speed's fuel pump hardware kit, got an Inline Pro fuel rail and I think that was it.
Snapped some pictures the night before the tuning day while I was out on a base map.

Everything was ok and we made the tuning appointment on August 18, 2015.
So here we go again. Issues. The car was running crappy on the dyno and Jeff and I couldn't figure out why. We tried a bunch of different stuff and we ended up calling it quits. Jeff had a feeling that the AEM series 1 was the issue and to switch with the Series 2 or the new Infinity. So again, I called it quits for the year and decided to deal with all of this in the off season.

Fast forward to the winter of 2014/2015. I ended up finding a low mileage f22c complete long block for a great price shipped to me from the Carolinas. The ap1 motor was already out so the car was patiently waiting for a heart transplant.
The f22 when I received it!


As I sat in this moment looking at this motor I said this thing needed so cleaning to look good in my engine bay so I got to it.


After this thing was looking brand new I still wasn't 100% satisfied. I saw a few members on here who had painted their engines and I was into it. So a short easy engine swap is now turning into something else.


Primer!


And here's to some of the base coat! I was stuck between the aluminum silver and black and something about black just kicked ass to me. So black it was!


And then after a couple coats of clear and a bunch of late nights I finished everything off paint wise!


I also painted all the accessories. Vtec solenoid, water pump, alternator, everything. I also didn't like the crumby looking hardware when everything else was looking so good. I found a company in upstate NY who did zinc plating. I sent them roughly 200+ pieces and had everything done for around $100.

Now to the final assembly of everything!


Now to the install back into the heartless car!


So now we're in 2015 and I'm rushing around to get the car ready to head back to Evan's.. I added a few things to the car for a better tune. Swapped the 1000cc injectors for the new 1300's, swapped the 255 walbro for an AEM 320 and hooked it up with Science of Speed's fuel pump hardware kit, got an Inline Pro fuel rail and I think that was it.
Snapped some pictures the night before the tuning day while I was out on a base map.


Everything was ok and we made the tuning appointment on August 18, 2015.

So here we go again. Issues. The car was running crappy on the dyno and Jeff and I couldn't figure out why. We tried a bunch of different stuff and we ended up calling it quits. Jeff had a feeling that the AEM series 1 was the issue and to switch with the Series 2 or the new Infinity. So again, I called it quits for the year and decided to deal with all of this in the off season.
Last edited by KillerCom; Jan 1, 2017 at 04:19 PM.
Thread Starter
Joined: Feb 2010
Posts: 746
Likes: 3
From: Dutchess County
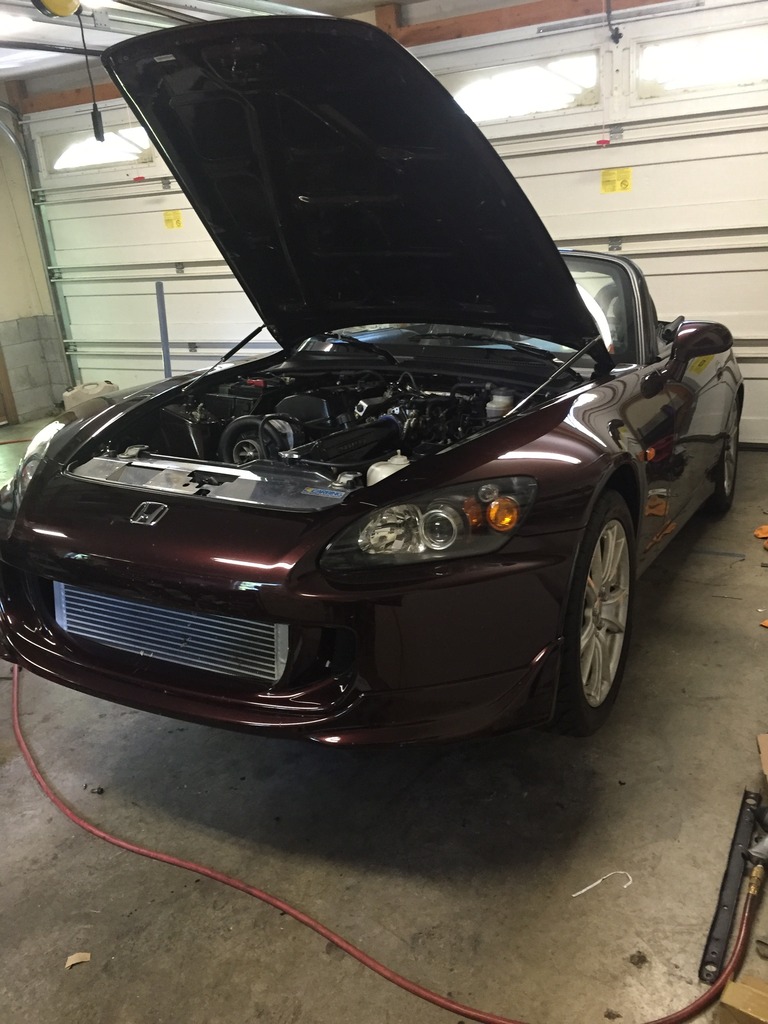
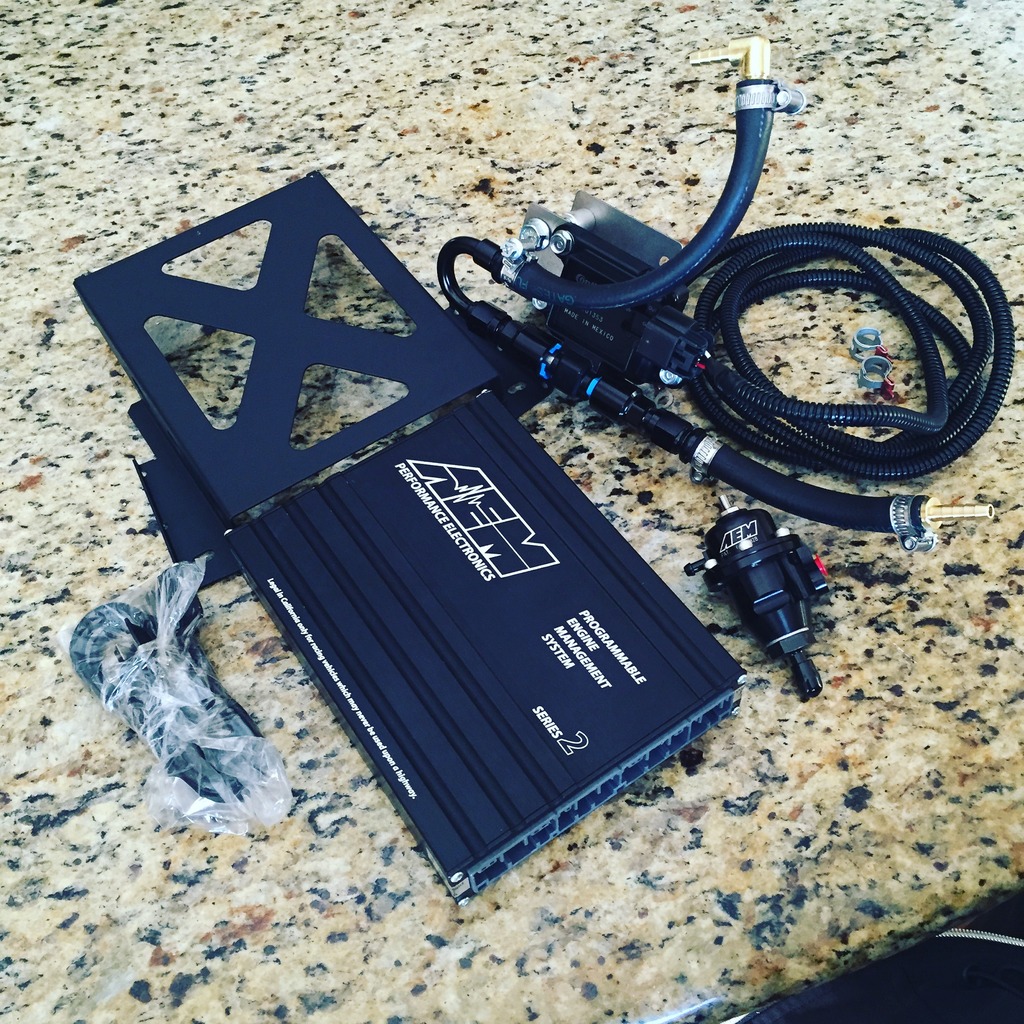
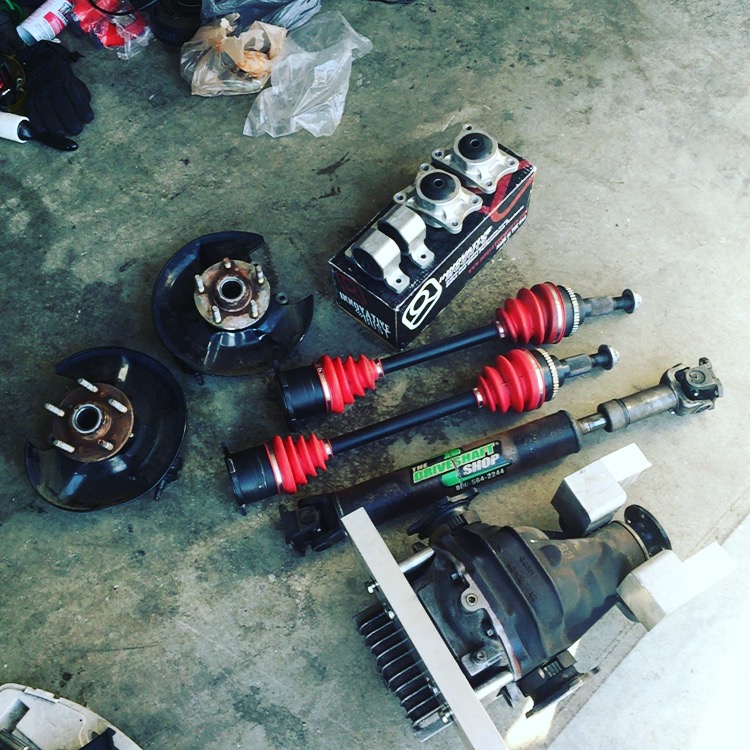
So now we're in the winter of 15/16 and I'm ready to go all out to make sure this car doesn't fall into another issue come tune day. I went ahead and picked up an AEM Series 2 along with the flex fuel setup from Science of Speed now that my new EMS supports it. It was also a plus to hardwire the gauges to the EMS for a better all over protection for the car. I also went ahead and solved all of my potential rear end issues and picked up an Inline Pro rear end kit with a built r200. I also got a great deal on a set of 18" black on black BBS LM's! I went ahead and picked those up and threw the new Kumho PS91's on there, (absolutely awesome tires btw).
I also went ahead and did a full brake job on the car. New pads, rotors, and fluid. (Car already had stainless lines) Ended up with Centric blank rotors, OEM pads and some Motul RBF600 fluid!
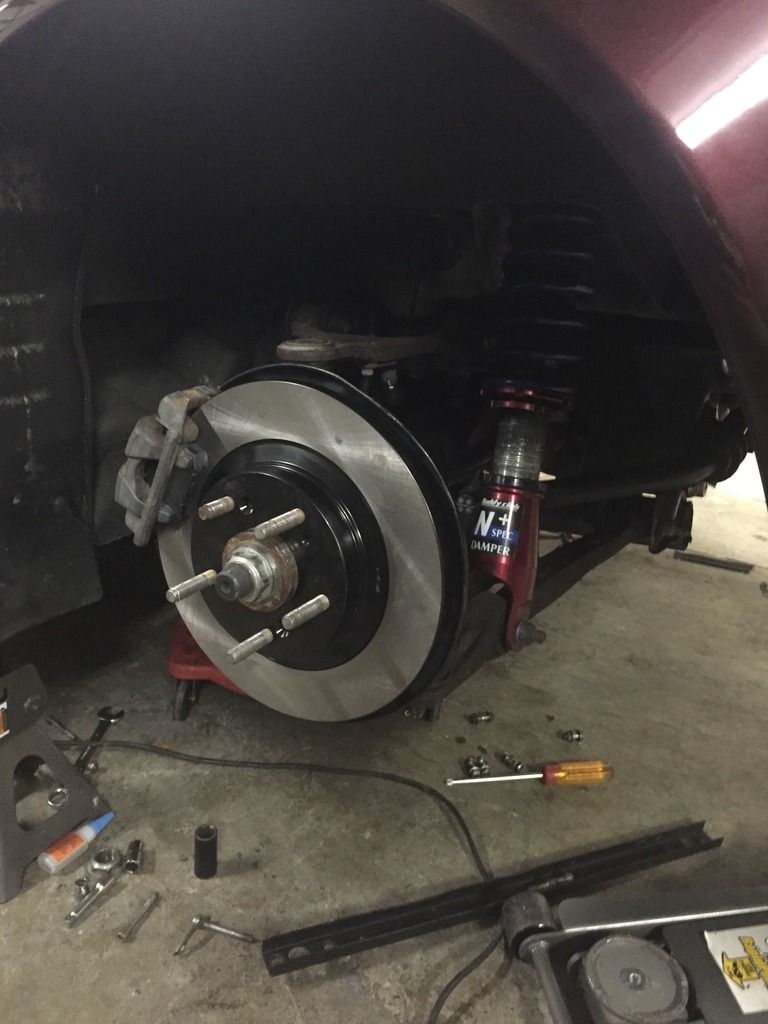
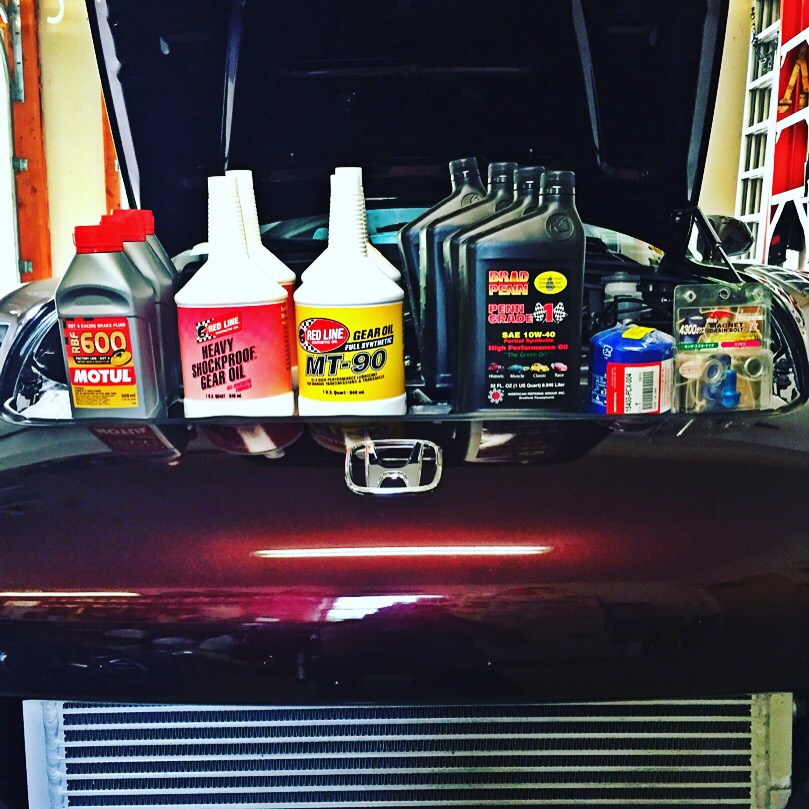
Tune day was finally coming up, so some fresh fluid all over the car was in order! Brad Penn 10w40 oil with an OEM filter, a new magnetic drain plug, and some Red Line heavy shock fluid in the transmission and diffs!
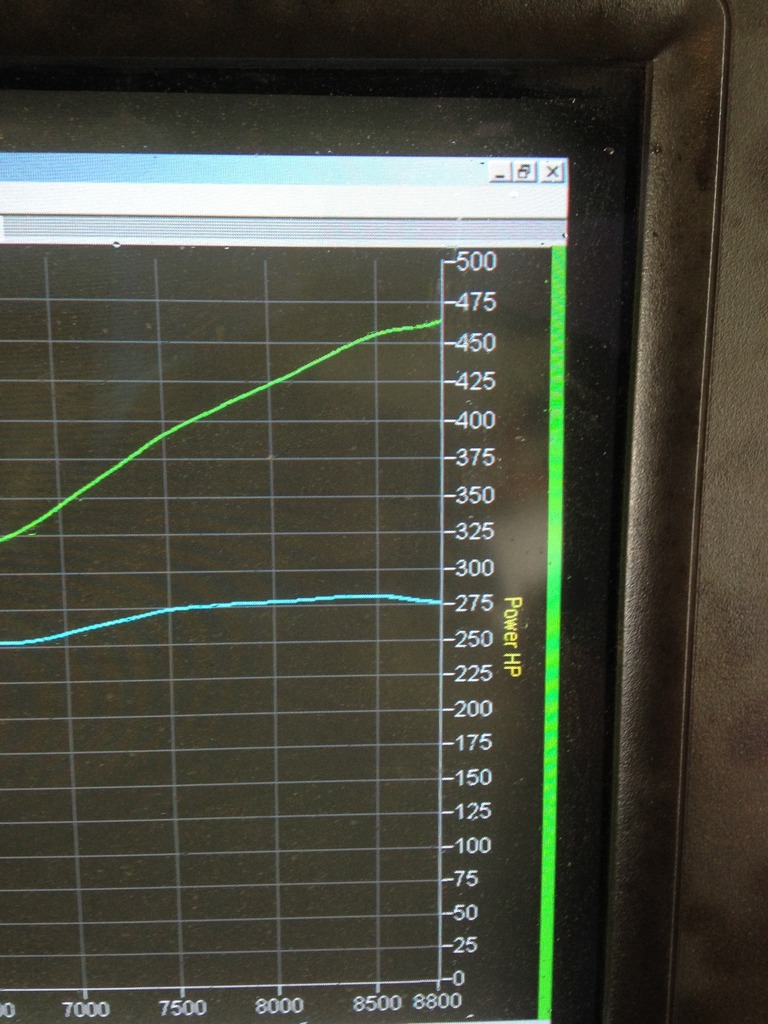
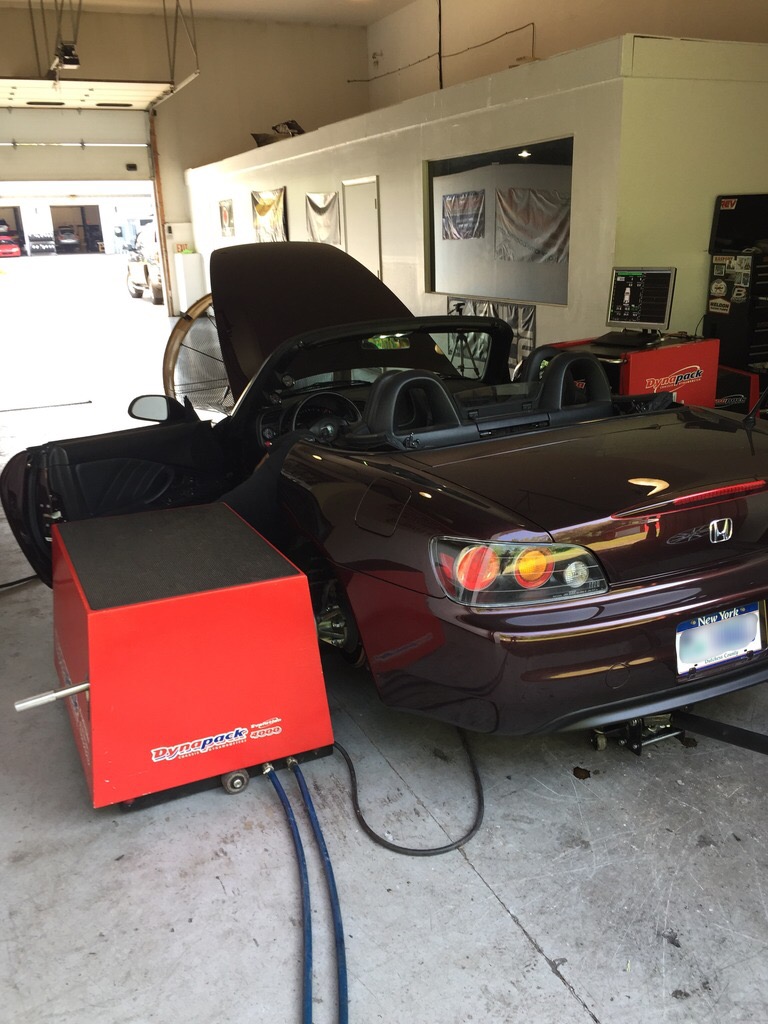
Tune day was finally here, May 25, 2016! The car was beyond ready to put down some numbers now! Now on the Ap2 motor with the bigger injectors I was hoping to see 500whp on E85!
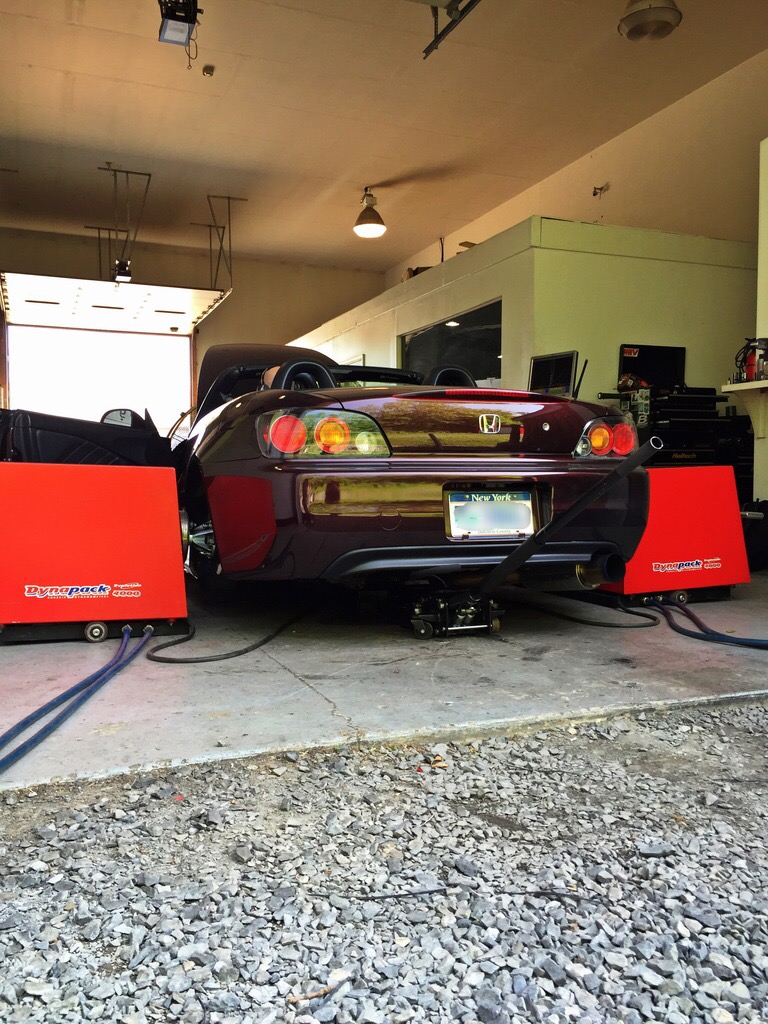
Here's the final dyno pull making 512whp and 329 wtq!
https://vimeo.com/197741205
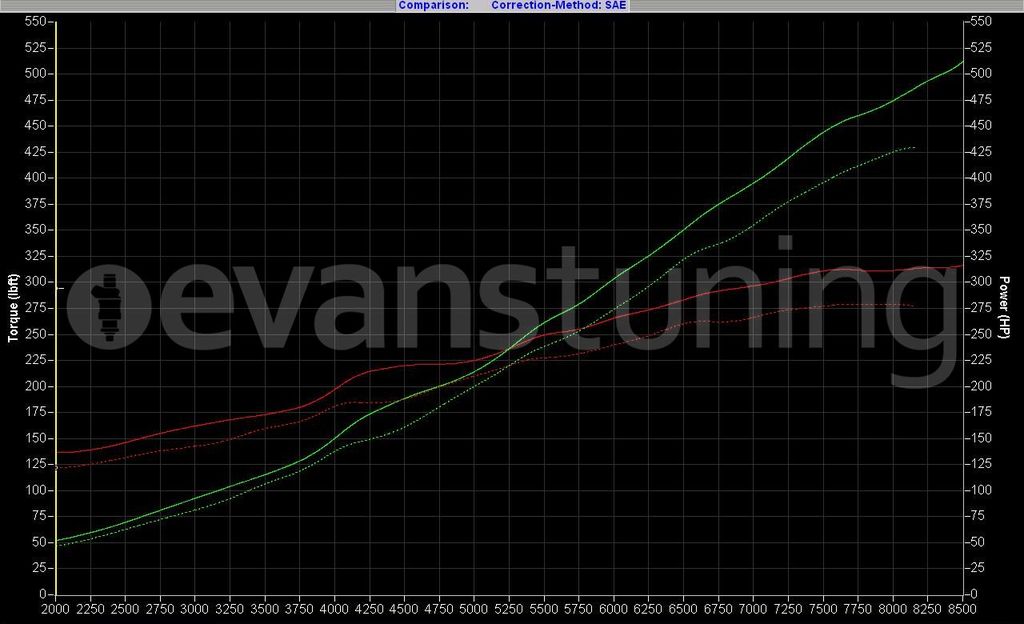
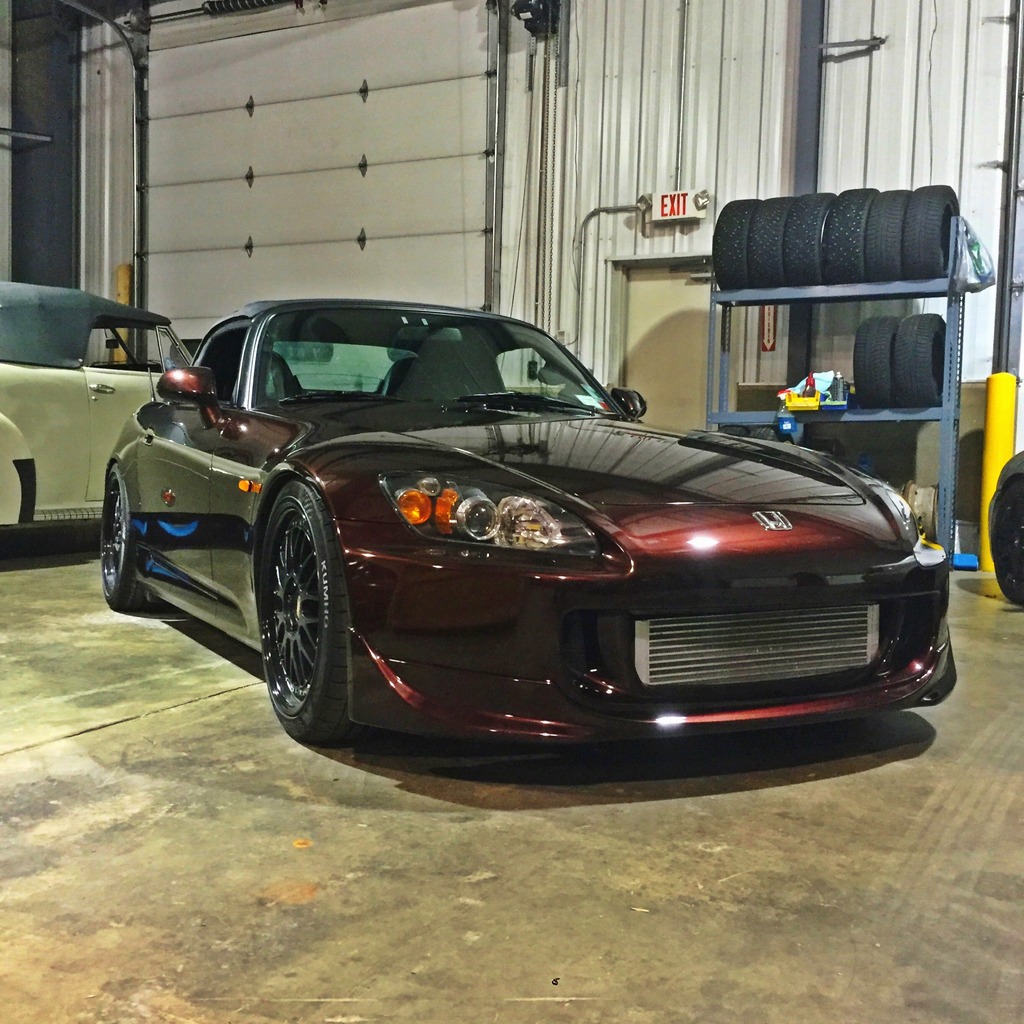
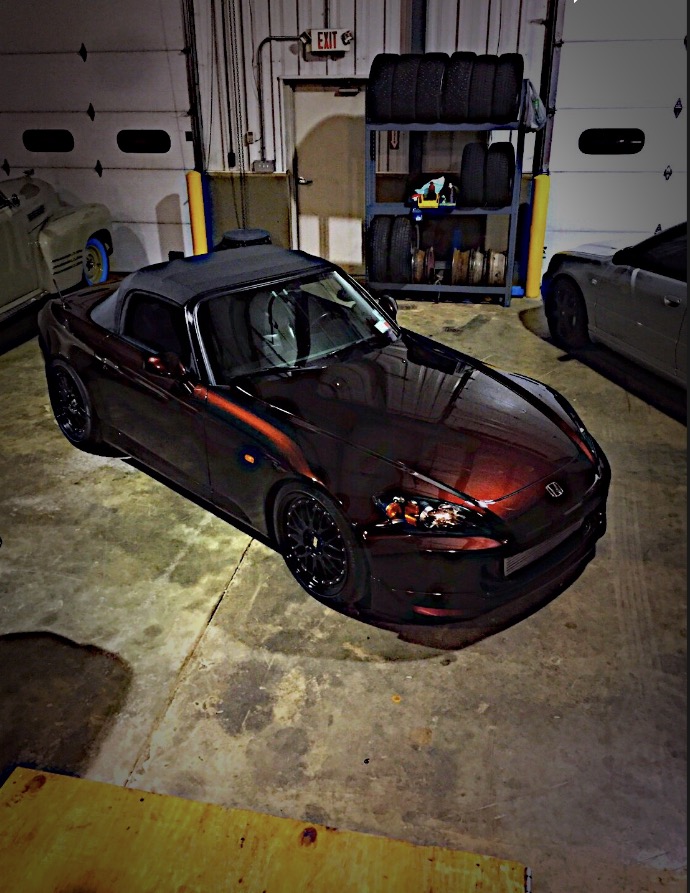
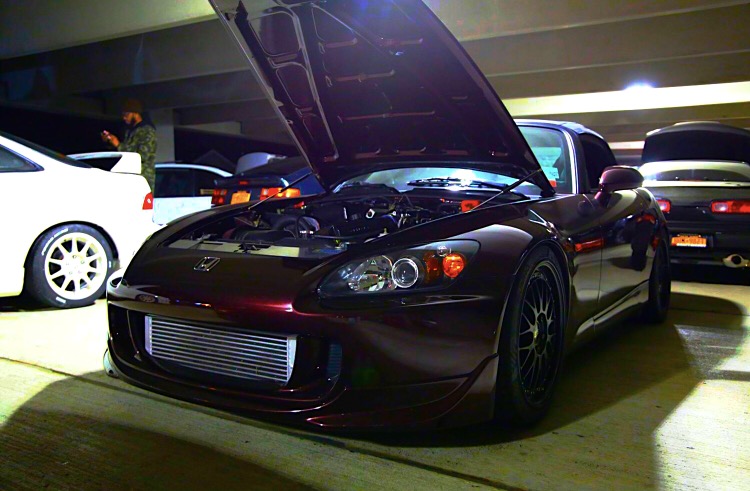
So finally! A sucessful dyno day. 2016 ended up being a perfect year, zero issues! This car rips at 512whp! Here's a few pictures from this year.


I also went ahead and did a full brake job on the car. New pads, rotors, and fluid. (Car already had stainless lines) Ended up with Centric blank rotors, OEM pads and some Motul RBF600 fluid!

Tune day was finally coming up, so some fresh fluid all over the car was in order! Brad Penn 10w40 oil with an OEM filter, a new magnetic drain plug, and some Red Line heavy shock fluid in the transmission and diffs!

Tune day was finally here, May 25, 2016! The car was beyond ready to put down some numbers now! Now on the Ap2 motor with the bigger injectors I was hoping to see 500whp on E85!

Here's the final dyno pull making 512whp and 329 wtq!
https://vimeo.com/197741205

So finally! A sucessful dyno day. 2016 ended up being a perfect year, zero issues! This car rips at 512whp! Here's a few pictures from this year.


Last edited by KillerCom; Jan 1, 2017 at 09:23 PM.


Trending Topics
Thread Starter
Joined: Feb 2010
Posts: 746
Likes: 3
From: Dutchess County
So as 2017 approached and I had a full issue free year to enjoy the car, I got used to the power that I had. I wanted more. Out of my friends that I tend to roll with I had the slower of the few. GTR's, a viper, 2 modded C6 Z06's, CTS-V's, etc. I needed some more power, especially after all the work I've put into this car over the years.
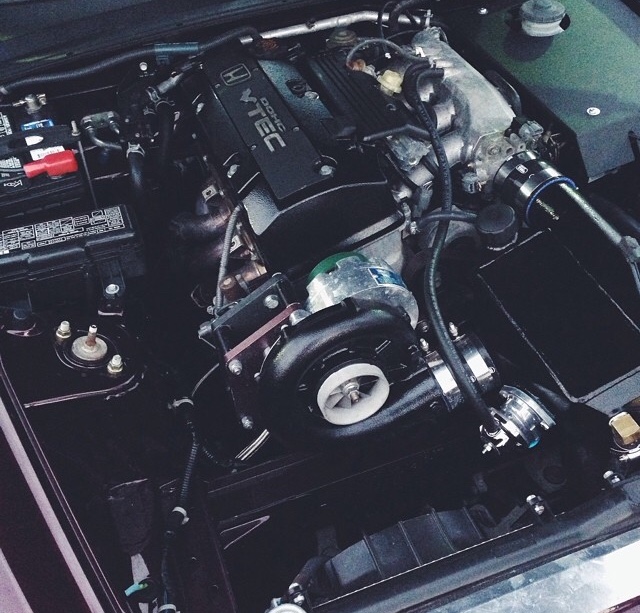
I contacted Jeff over at Evan's and told him I was bored and wanted more. I told him I was looking to see 650-700whp for 2017, but, to buy a kit with the potential of 800-900whp down the road. I threw a few different kits at Jeff and he stood firmly behind Full Race (who wouldn't). I asked him about a turbo and he also recommended Borg Warner's EFR 9180 for my goals. The hunt was on!
I was on vacation in Florida and I found an installed but only used on the dyno Full Race kit with a Borg Warner 7670 EFR. Killer deal to say the least and everything was practically brand new. Only dyno time on the setup! I went ahead and made the purchase despite the turbo included (buyer wouldn't sell the kit without it). Took the ride down to Maryland when I got back from vacation and make the pickup!

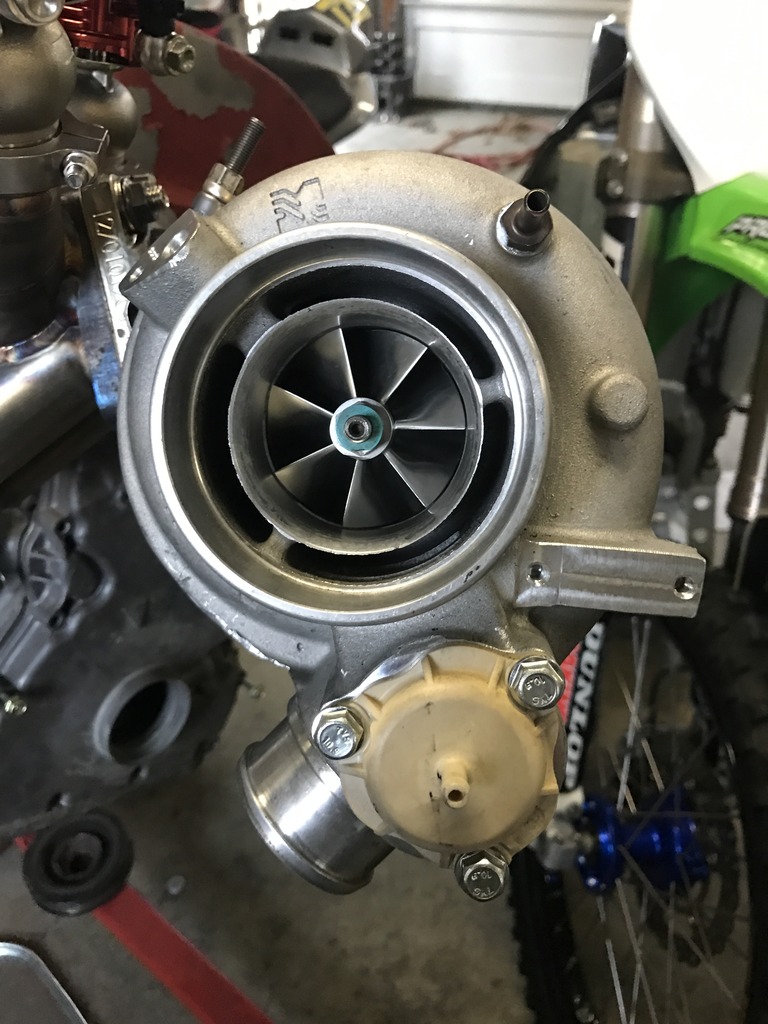
So of course, this is no 9180. I needed that for my goal. According to Jeff this 7670 was good for maybe 580-600whp. I want this kit to be the last setup. No upgrades to the kit itself if I want more power down the road. So the hunt was on for a 9180 now.
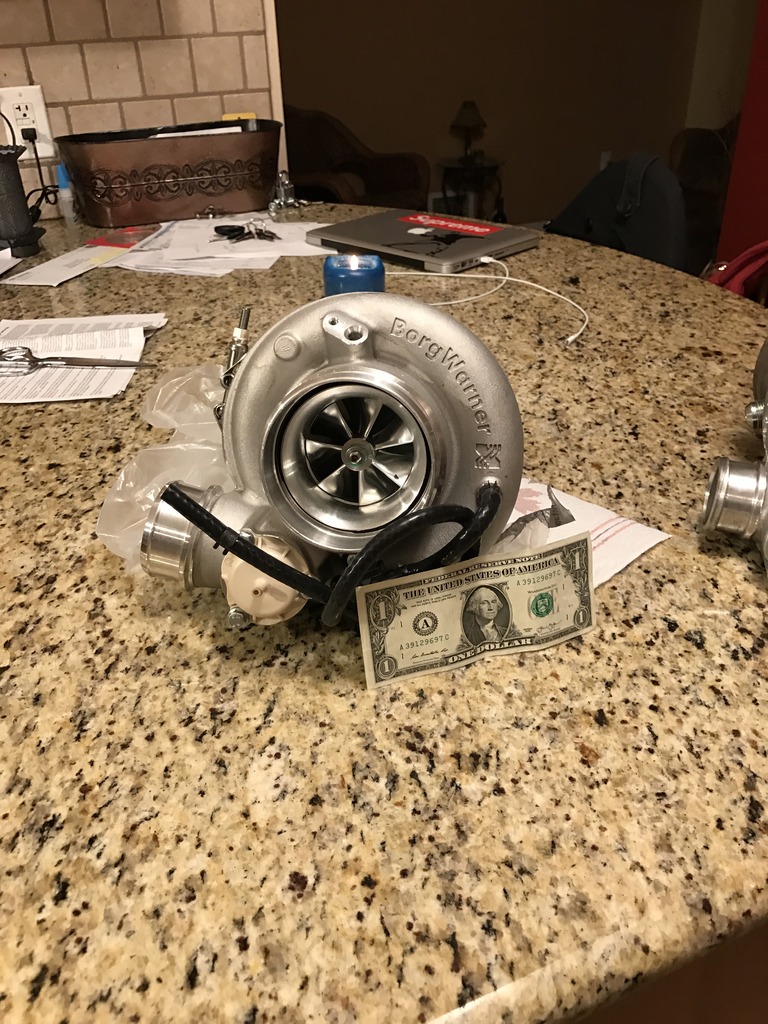
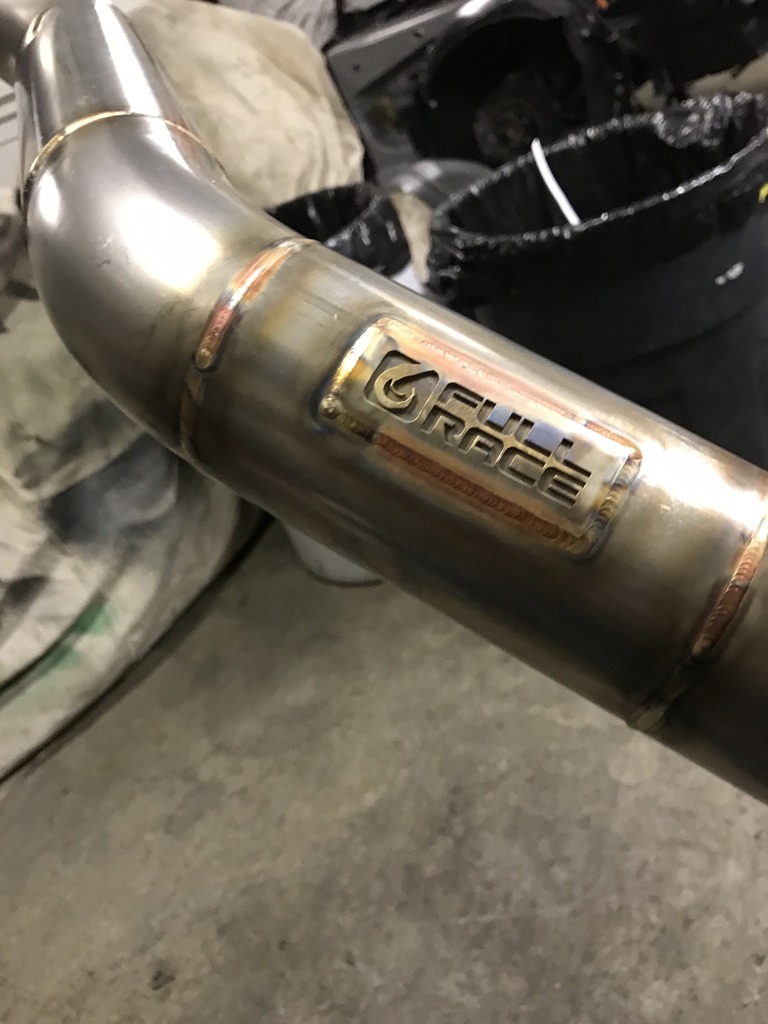
So the deals keep pouring in! I ended up finding a BNIB 9180 supercore for $1200 shipped. Sweet. Now for the turbine housing, I found the best price from TH Motorsports at $380. Went ahead and ordered that and just received it recently since it was back ordered from Borg Warner. Awesome customer service from TH Motorsports and I will absolutely deal with them again.
New 9180!
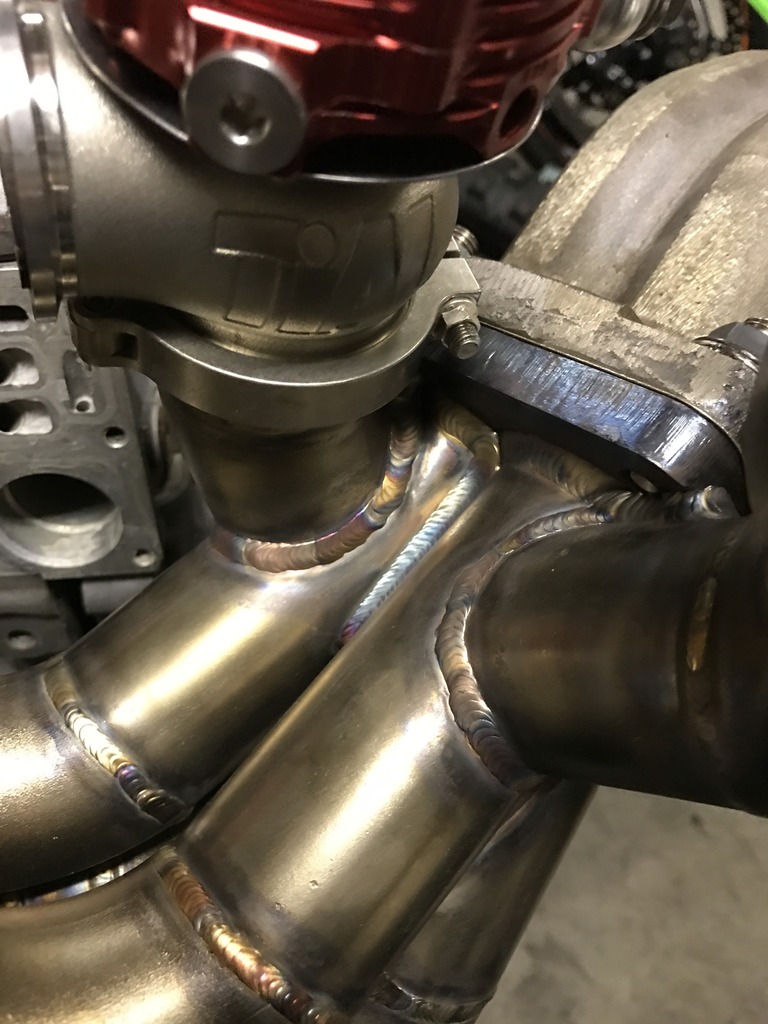
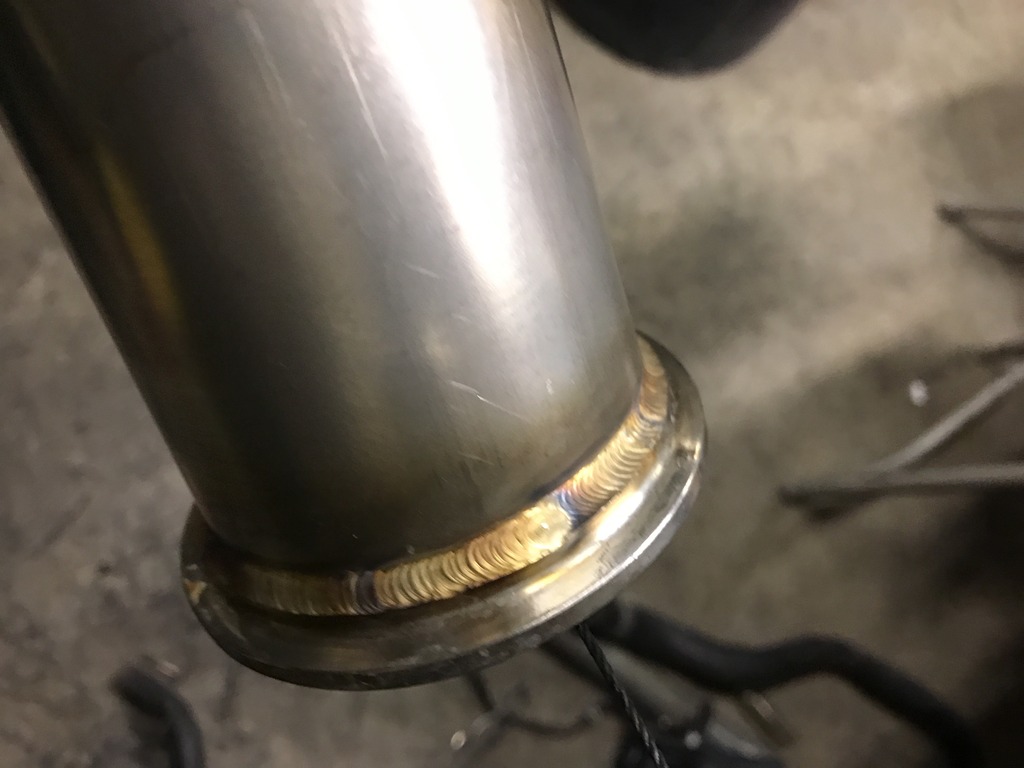
So the pile of parts is growing, putting a smile on my face. I'm a crazy perfectionist and I like over doing things the first time lol. The turbine housing and the turbo manifold are currently being black 2000 degree ceramic coated by a buddy who owns a powder coating company in Fishkill, NY (Prodigy Powder Coating).
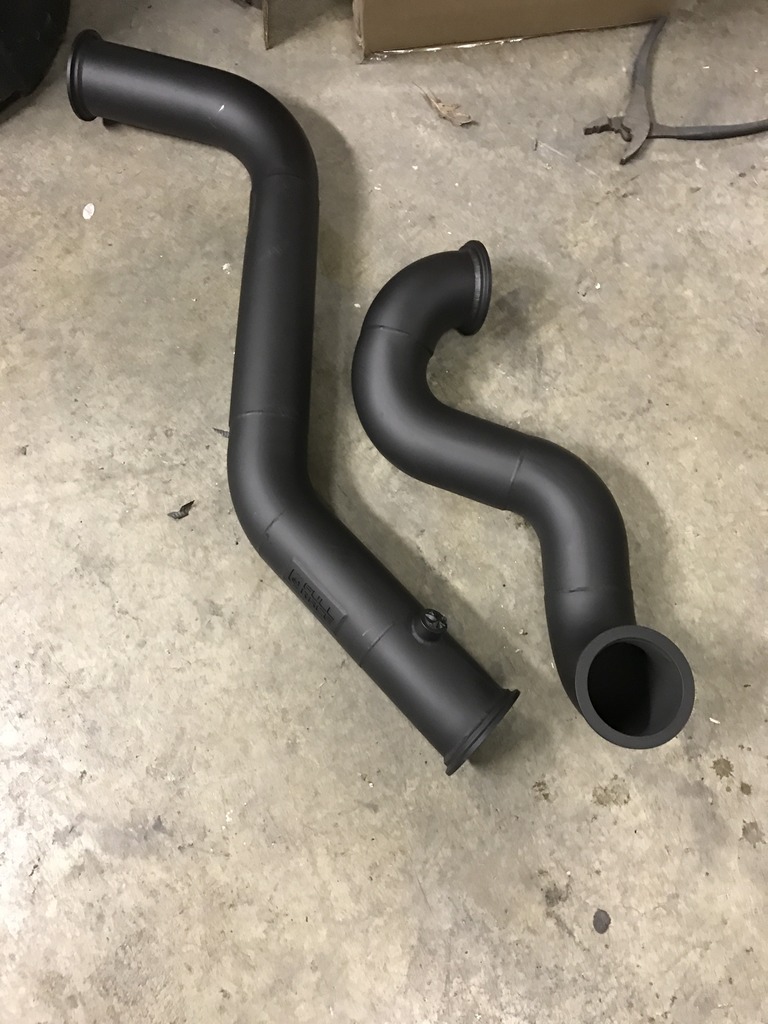
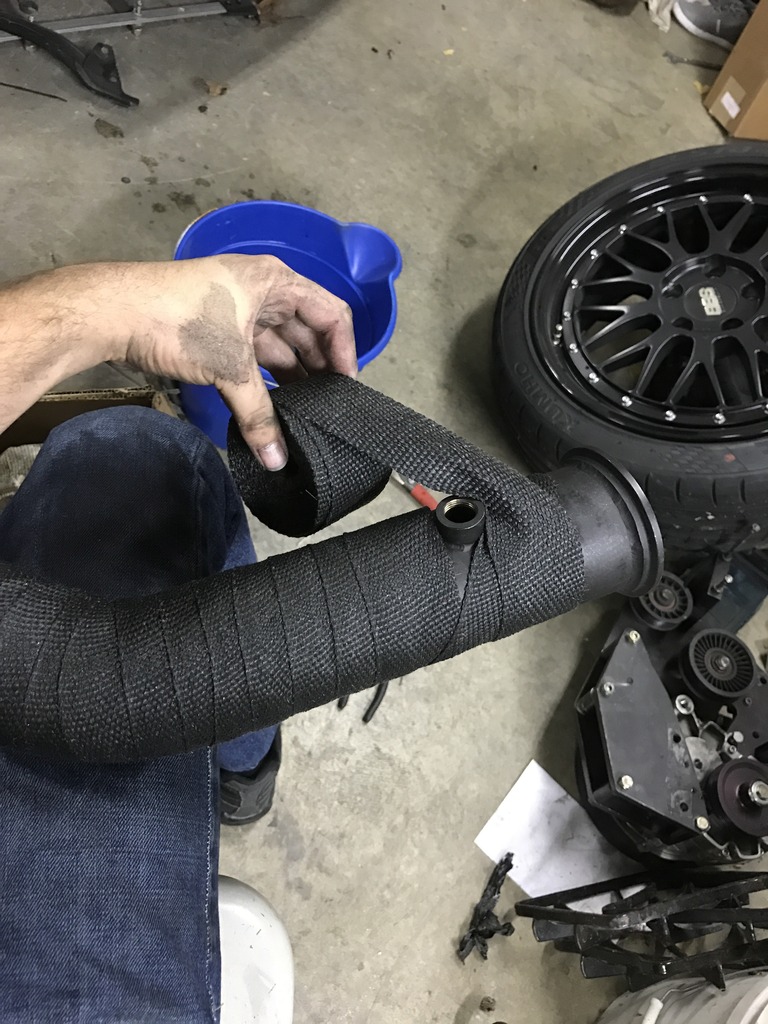
While I wanted the exhaust pieces of the kit coated professionally, I chose to ceramic coat and wrap the downpipes myself.
Bare
Coated

Wrapped
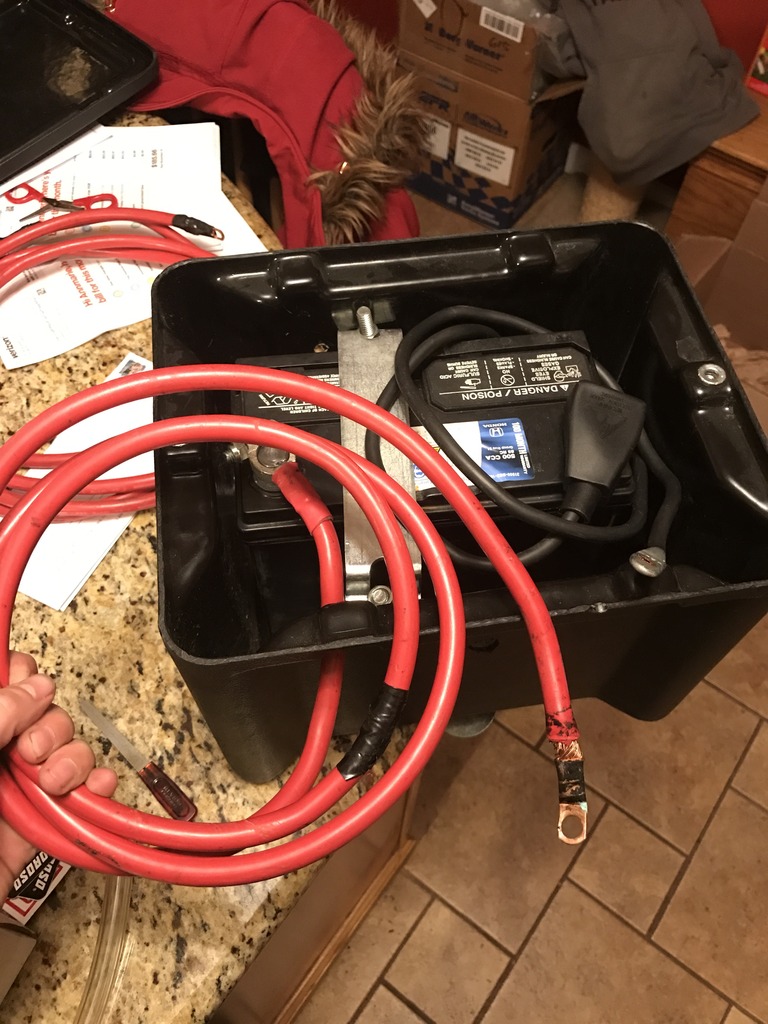
So that'll take care of some heat this kit will be creating. But, this won't protect everything. I don't want to leave the fuse box, battery, and heater valve in their original locations, so a relocation was in order.
I went ahead and purchased an Alloy Craft heater valve relocation bracket from Ballade Sports and a battery relocation kit used from a user here on s2ki.
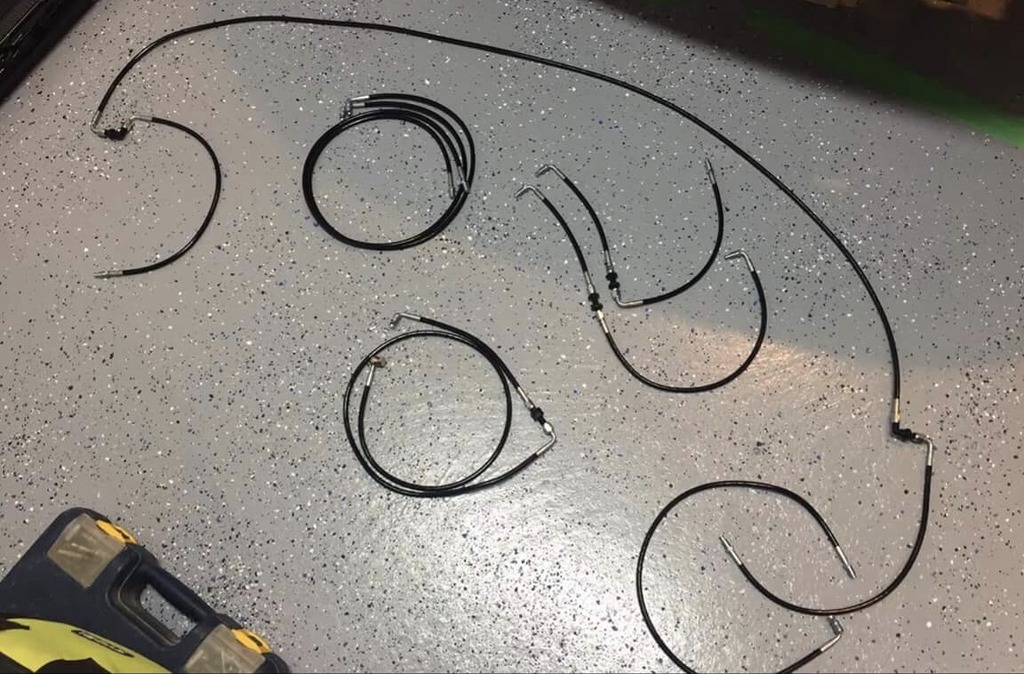
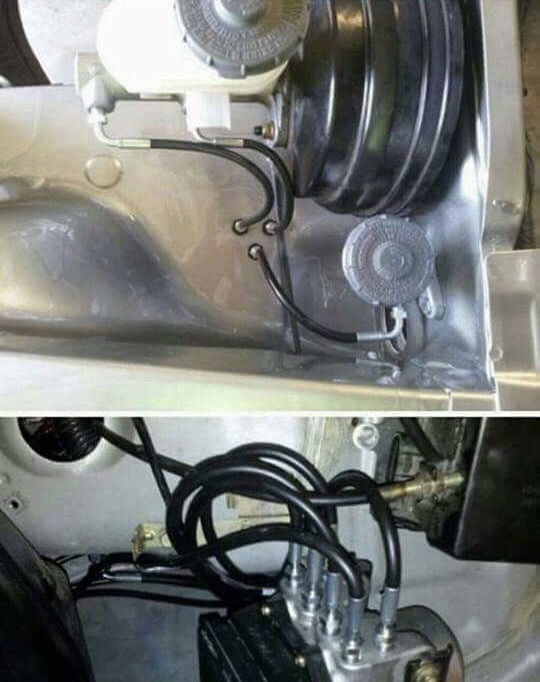
Now I'm in the zone. I'm looking at the engine bay like I'm trying to evict everything in the bay besides the motor. The ABS unit? Ugly. I want it gone. I started gauging interest in the ABS relocation kit from Rywire. I then found a company on the Facebook forums, Hardcore Bays, making quality kits that included a soft line for the clutch master to the slave for a better price. I went ahead and made the purchase. When I received it I was astounded. Amazing quality from these guys and the customer service was top notch!
(Not my pictures, just for reference from Steve at Hardcore Bays)
So now the fuse box and that side.. Here goes nothing!
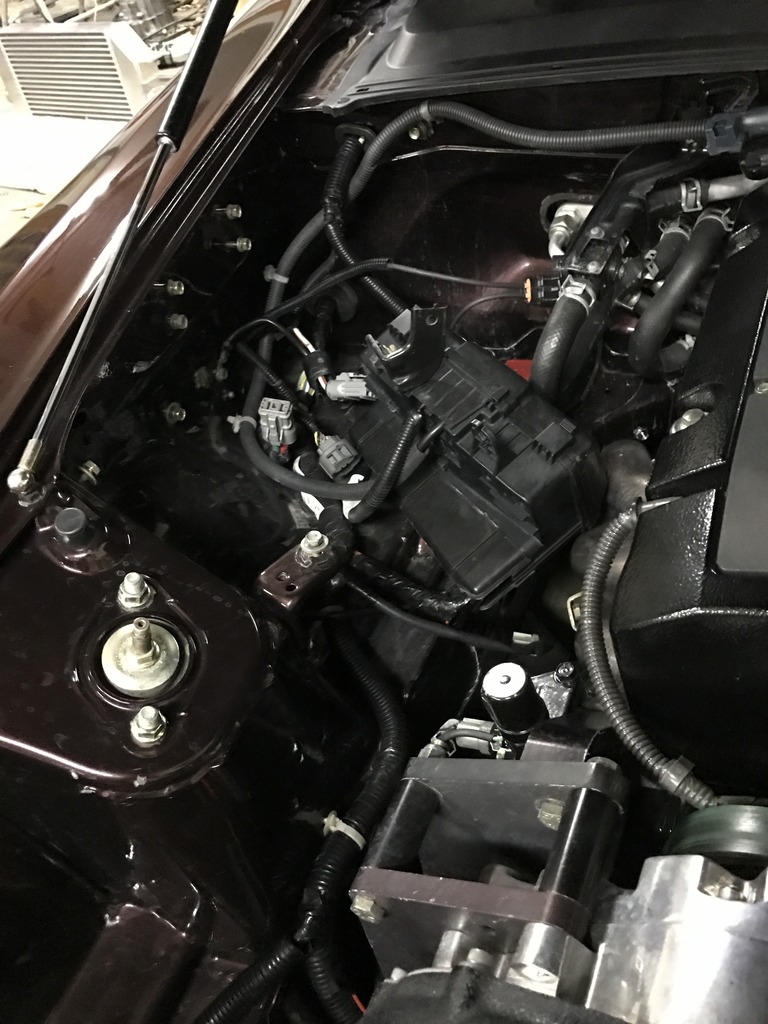
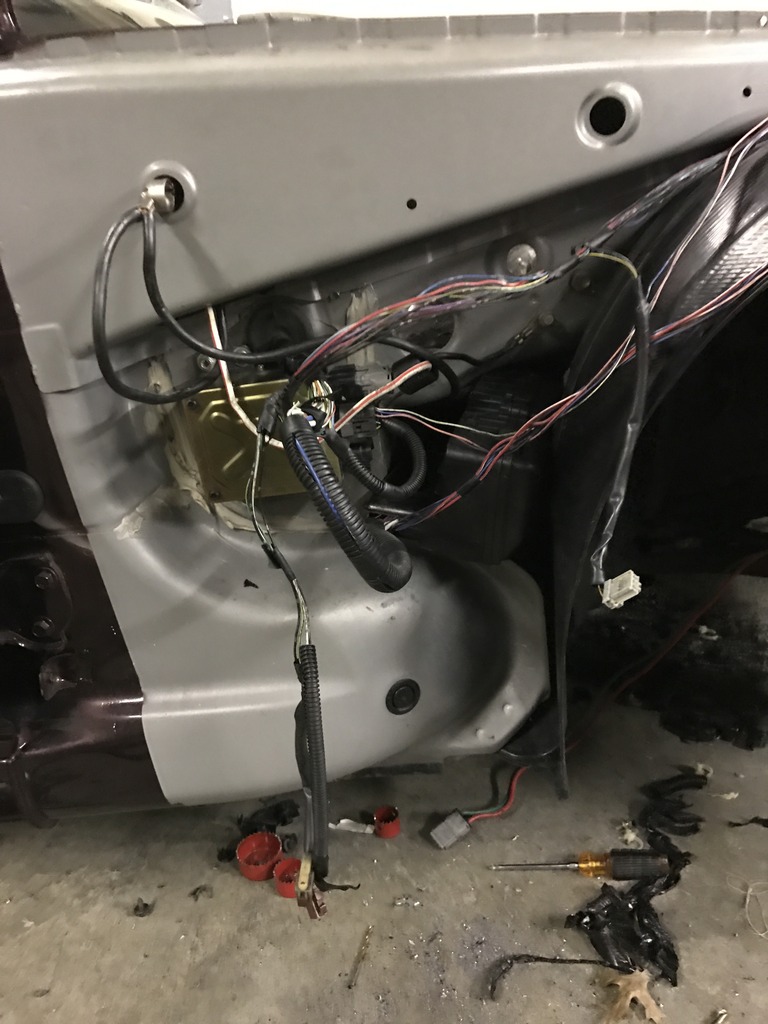
And how it sits as of now!

So the plan was to relocate some ugly stuff out of the bay, install this kit, get tuned and be happy. Wouldn't that be nice.
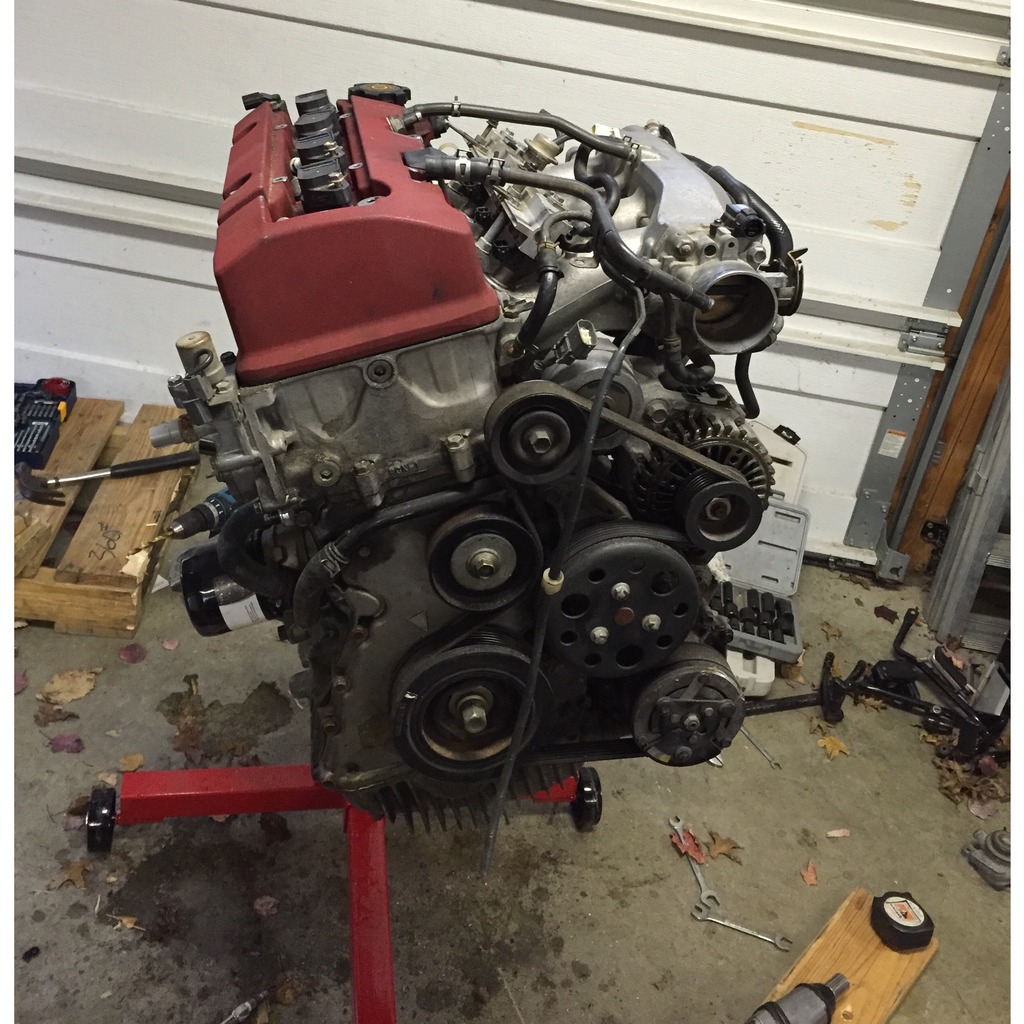
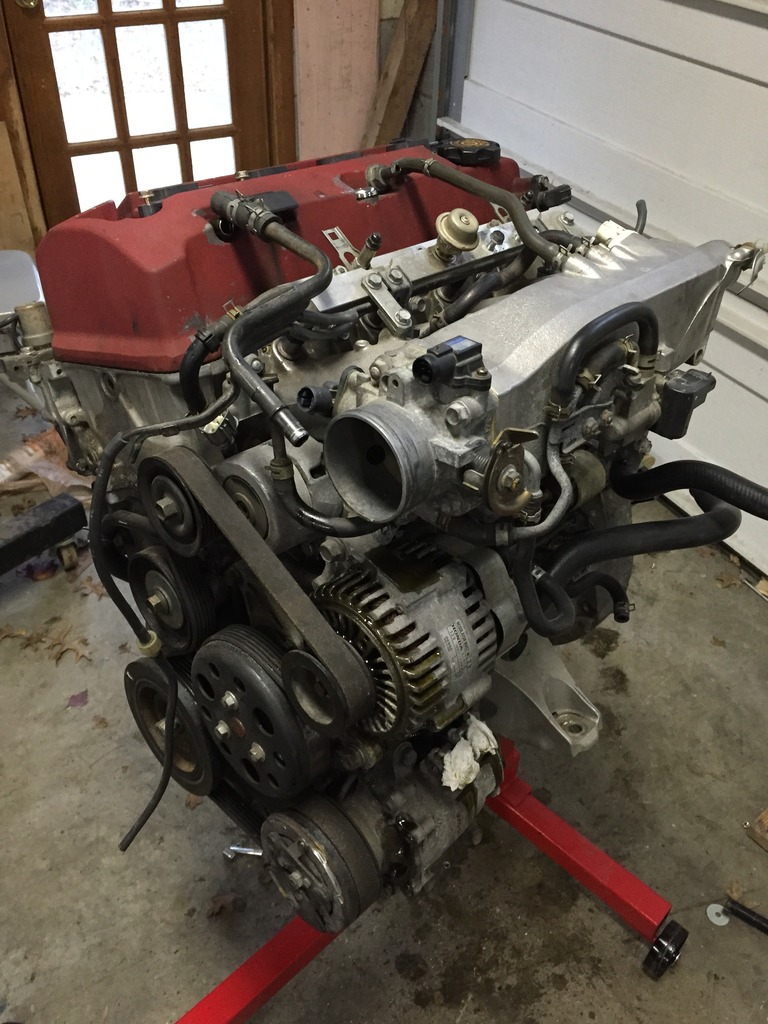
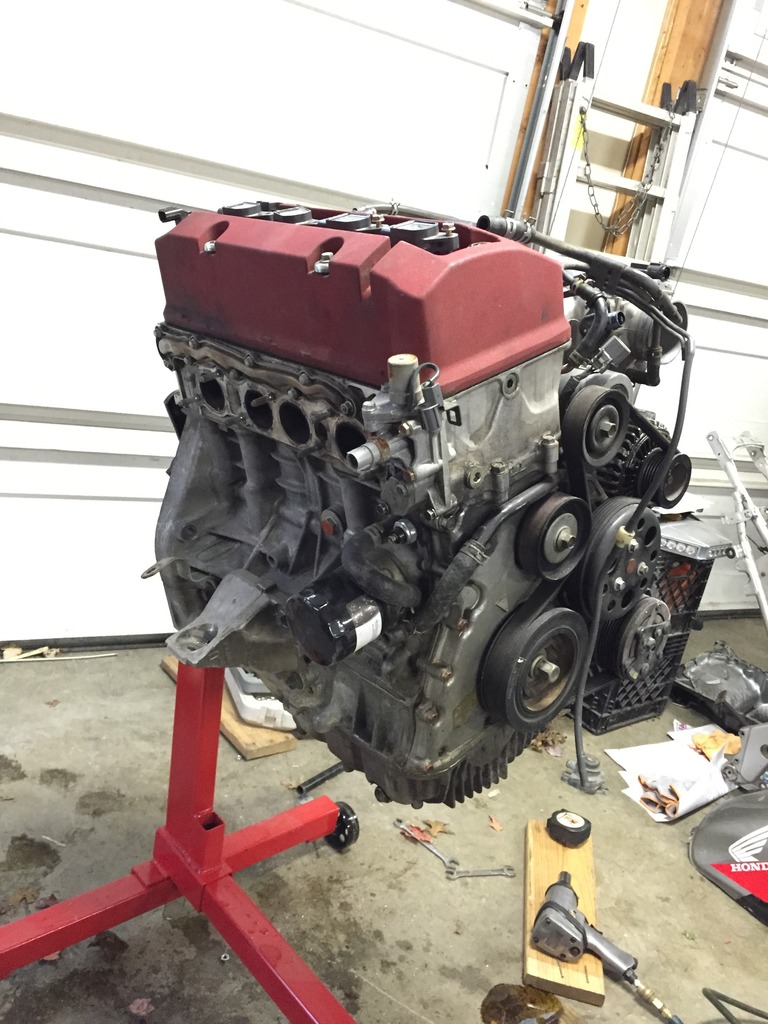
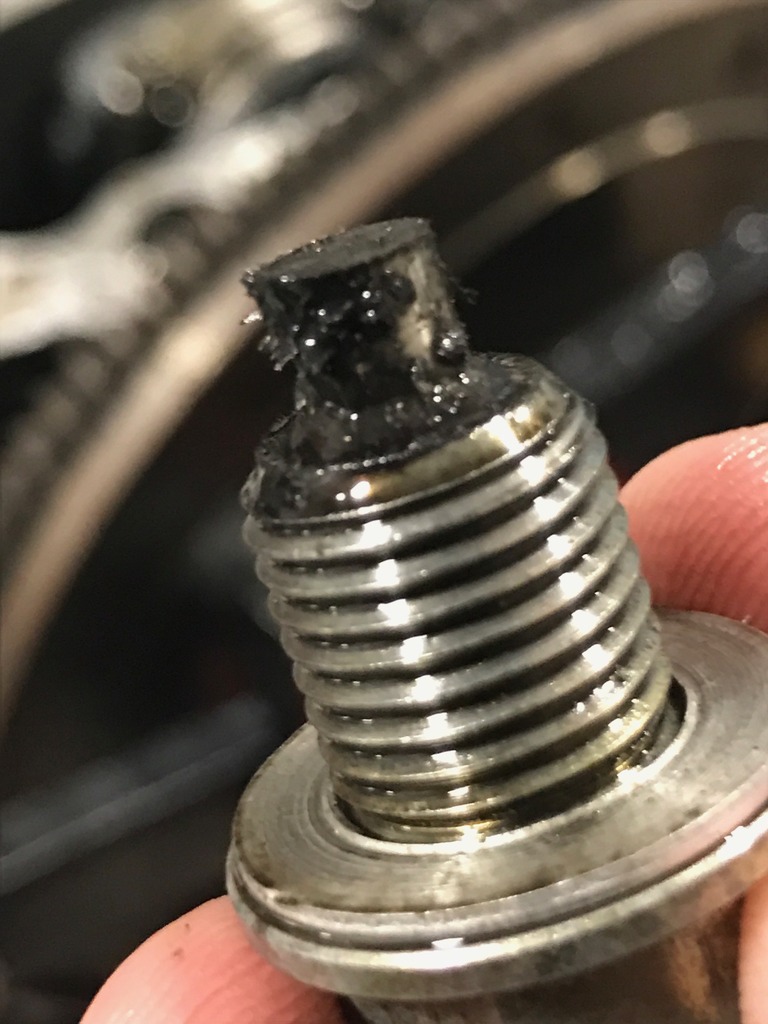
So while I was speaking with a bunch of higher HP guys about everything I got talked into looking for an Inline Pro stage 2.5 head. So now the hunt was on for that. Long story short I ended up finding a 2.5 built head for an awesome price. I contacted the seller and asked why he was selling. He stated he had a built motor from IP (their 1000hp setup) and lost a rod bearing. He decided to go v8 and he was looking to fix the block down the road. Welp, I ended up buying the complete longblock with all the accessories (everything from the oil pan to the valve cover, from the vtec solenoid to the alternator). The motor is coming with some goodies also (Inline Pro TCT, tapped girdle, tapped valve cover, coilpacks, and a EGR block off. All in all I got the whole thing for $2000 shipped to my door. The damage is very minimal. The knock was caught on the dyno, car was shut down and checked. They dumped the oil and found some metal on the magnetic drain plug, no metal in the oil and no metal in the pan once it was removed. The vtec solenoid also came up clear of any metal shavings. The only issue is a slight side to side play in one of the rod bearings. Once received it'll go to inline pro for a complete tear down, inspection and refresh.

So sheesh, wasn't planning on buying an Allen Built longblock this year but oh well. Can't turn down some deals I see. Plus I'll need this sometime soon anyway if I want to be comfy playing in the 800whp club.
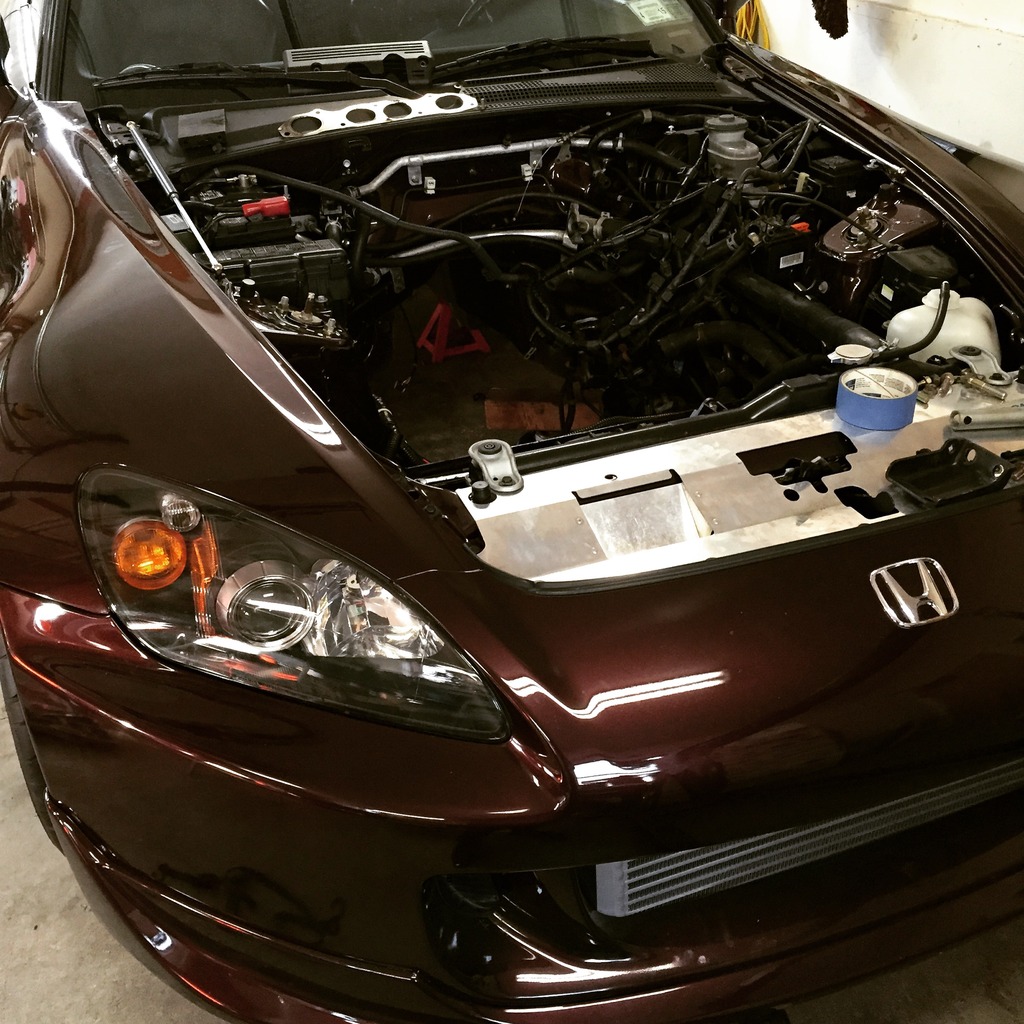
So now what? I'm pulling my motor, removing the battery and the extra ugly stuff in the bay so what does that mean? It means I'm gonna beat myself with a stick if I didn't shave the bay. I have some chips and imperfections anyways so I might as well do it while everything is out and all the fluids have to be replaced where I'm at anyways.
So I got together with my buddy who painted the bay for me years ago and we went over it. He gave me a price and I'm for it. Hardcore Bays, the same company with the ABS relocation kit, offers a 8 piece engine bay shave kit. So, I pulled the trigger on that today. One step closer to a bad ass bay.
Here's a reference picture of the kit from Steve at Hardcore Bays.

I contacted Jeff over at Evan's and told him I was bored and wanted more. I told him I was looking to see 650-700whp for 2017, but, to buy a kit with the potential of 800-900whp down the road. I threw a few different kits at Jeff and he stood firmly behind Full Race (who wouldn't). I asked him about a turbo and he also recommended Borg Warner's EFR 9180 for my goals. The hunt was on!
I was on vacation in Florida and I found an installed but only used on the dyno Full Race kit with a Borg Warner 7670 EFR. Killer deal to say the least and everything was practically brand new. Only dyno time on the setup! I went ahead and made the purchase despite the turbo included (buyer wouldn't sell the kit without it). Took the ride down to Maryland when I got back from vacation and make the pickup!


So of course, this is no 9180. I needed that for my goal. According to Jeff this 7670 was good for maybe 580-600whp. I want this kit to be the last setup. No upgrades to the kit itself if I want more power down the road. So the hunt was on for a 9180 now.
So the deals keep pouring in! I ended up finding a BNIB 9180 supercore for $1200 shipped. Sweet. Now for the turbine housing, I found the best price from TH Motorsports at $380. Went ahead and ordered that and just received it recently since it was back ordered from Borg Warner. Awesome customer service from TH Motorsports and I will absolutely deal with them again.
New 9180!


So the pile of parts is growing, putting a smile on my face. I'm a crazy perfectionist and I like over doing things the first time lol. The turbine housing and the turbo manifold are currently being black 2000 degree ceramic coated by a buddy who owns a powder coating company in Fishkill, NY (Prodigy Powder Coating).
While I wanted the exhaust pieces of the kit coated professionally, I chose to ceramic coat and wrap the downpipes myself.
Bare


Coated


Wrapped

So that'll take care of some heat this kit will be creating. But, this won't protect everything. I don't want to leave the fuse box, battery, and heater valve in their original locations, so a relocation was in order.
I went ahead and purchased an Alloy Craft heater valve relocation bracket from Ballade Sports and a battery relocation kit used from a user here on s2ki.

Now I'm in the zone. I'm looking at the engine bay like I'm trying to evict everything in the bay besides the motor. The ABS unit? Ugly. I want it gone. I started gauging interest in the ABS relocation kit from Rywire. I then found a company on the Facebook forums, Hardcore Bays, making quality kits that included a soft line for the clutch master to the slave for a better price. I went ahead and made the purchase. When I received it I was astounded. Amazing quality from these guys and the customer service was top notch!
(Not my pictures, just for reference from Steve at Hardcore Bays)


So now the fuse box and that side.. Here goes nothing!


And how it sits as of now!

So the plan was to relocate some ugly stuff out of the bay, install this kit, get tuned and be happy. Wouldn't that be nice.
So while I was speaking with a bunch of higher HP guys about everything I got talked into looking for an Inline Pro stage 2.5 head. So now the hunt was on for that. Long story short I ended up finding a 2.5 built head for an awesome price. I contacted the seller and asked why he was selling. He stated he had a built motor from IP (their 1000hp setup) and lost a rod bearing. He decided to go v8 and he was looking to fix the block down the road. Welp, I ended up buying the complete longblock with all the accessories (everything from the oil pan to the valve cover, from the vtec solenoid to the alternator). The motor is coming with some goodies also (Inline Pro TCT, tapped girdle, tapped valve cover, coilpacks, and a EGR block off. All in all I got the whole thing for $2000 shipped to my door. The damage is very minimal. The knock was caught on the dyno, car was shut down and checked. They dumped the oil and found some metal on the magnetic drain plug, no metal in the oil and no metal in the pan once it was removed. The vtec solenoid also came up clear of any metal shavings. The only issue is a slight side to side play in one of the rod bearings. Once received it'll go to inline pro for a complete tear down, inspection and refresh.


So sheesh, wasn't planning on buying an Allen Built longblock this year but oh well. Can't turn down some deals I see. Plus I'll need this sometime soon anyway if I want to be comfy playing in the 800whp club.
So now what? I'm pulling my motor, removing the battery and the extra ugly stuff in the bay so what does that mean? It means I'm gonna beat myself with a stick if I didn't shave the bay. I have some chips and imperfections anyways so I might as well do it while everything is out and all the fluids have to be replaced where I'm at anyways.
So I got together with my buddy who painted the bay for me years ago and we went over it. He gave me a price and I'm for it. Hardcore Bays, the same company with the ABS relocation kit, offers a 8 piece engine bay shave kit. So, I pulled the trigger on that today. One step closer to a bad ass bay.
Here's a reference picture of the kit from Steve at Hardcore Bays.

Last edited by KillerCom; Jan 3, 2017 at 01:55 AM.