
LS Swap - Fueling Setup

Thread Starter
Registered User
Joined: Jan 2011
Posts: 4,624
Likes: 10
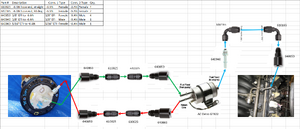
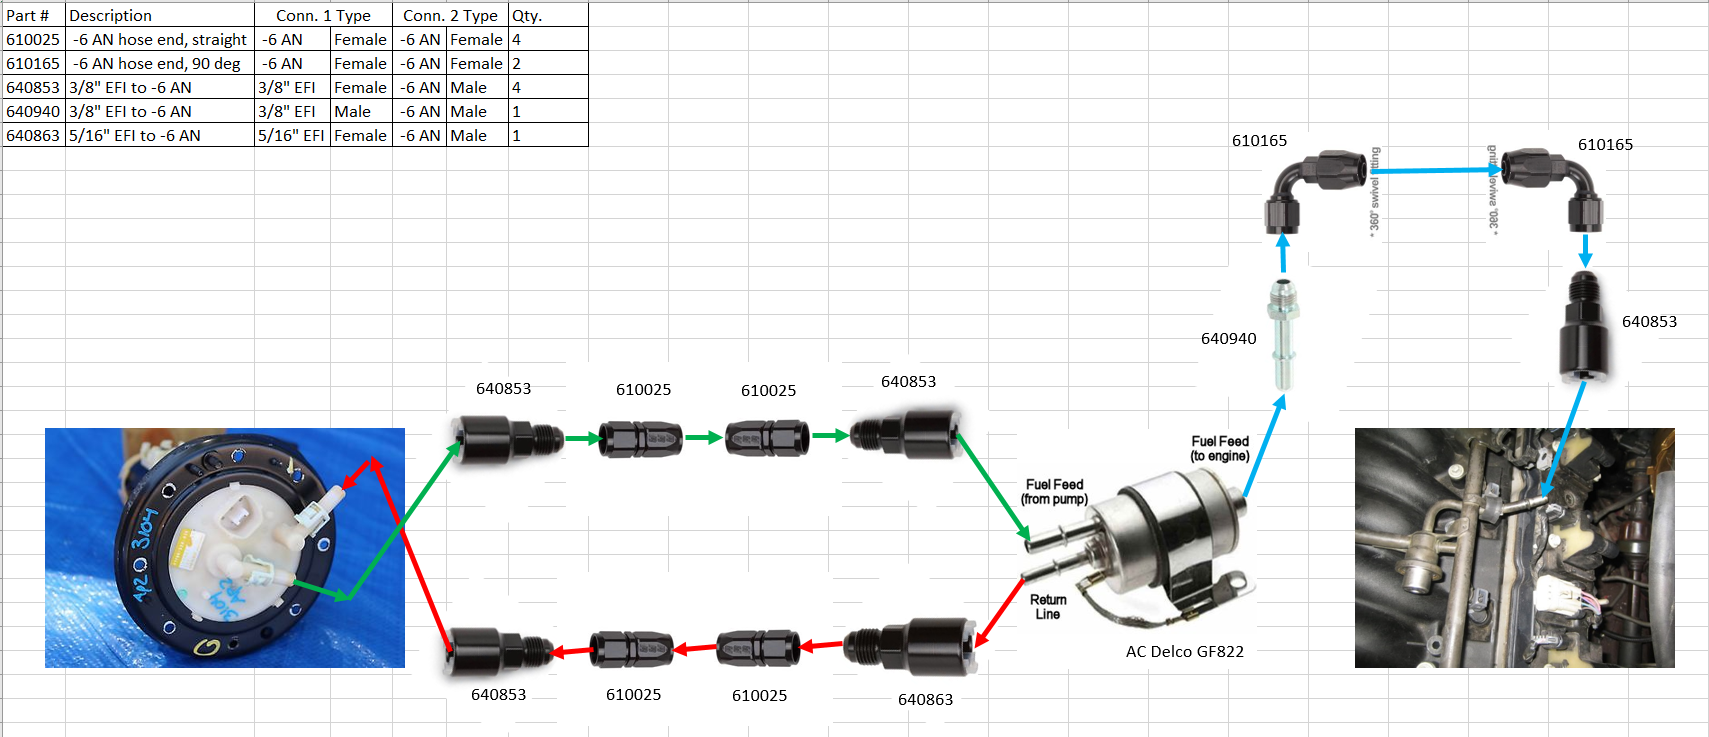
Just wanted to share a diagram that I made documenting the components I used on my LS1 swap's fueling setup. Hopefully this will help someone in the future. Import Muscle gives you part numbers in their instruction manual, but I wanted all black fittings where possible so these part numbers are different. All of these fittings are from Russell. I purchased the fittings from Summit and the AC Delco regulator/filter from Rock Auto.
Moderator


Joined: Oct 2000
Posts: 12,904
Likes: 93
From: Big Box suburb, IL
I wish someone had done this earlier. I went with all the IM recommendations and got the blue and red fittings. Would've been nice to have all black.
Good job though. I'm sure the next LS swap onwer will appreciate this.
Good job though. I'm sure the next LS swap onwer will appreciate this.
Thread Starter
Registered User
Joined: Jan 2011
Posts: 4,624
Likes: 10
FYI - I ended up using some 45 degree hose ends for the two connections on the top of the filter/regulator. This gave me better clearance to run my lines where I mounted the filter/regulator (which was where the evap system used to be). The part number on those 45 degree fittings is 610095.
I've got a leak from one of my 90 degree hose end fittings, which is upsetting. Russell makes quality stuff so its surprising to see. It appears as if the leak is coming from where the bent 90 tube enters the connection end of the fitting. Just a heads up. Everything else seems to be working just fine.
Also FYI - I went with Russell's ProClassic AN Hose and couldn't be happier with it. Its very easy to cut and put these style hose ends on, its very flexible which makes it easy to route, and the black/blue highlight weave pattern looks great. I bought a 20 ft length and it was plenty for the whole job. Part number is 632093.
Thread Starter
Registered User
Joined: Jan 2011
Posts: 4,624
Likes: 10
I went right along the rear brake lines as they run from the ABS module down the firewall and into the under tray. I'm a little concerned with the proximity to the header, I may heat shield them all off.
Registered User
Joined: Dec 2014
Posts: 224
Likes: 8
Yeah that was my concern with the oem location with the new exhaust on that side. I am thinking ill go down the back of the bell and down the tunnel a few inches before moving back into the oem location. What did you do for the evap system vent? I removed everything but just left the vent so im hoping that works out.
Thread Starter
Registered User
Joined: Jan 2011
Posts: 4,624
Likes: 10
Yeah that was my concern with the oem location with the new exhaust on that side. I am thinking ill go down the back of the bell and down the tunnel a few inches before moving back into the oem location. What did you do for the evap system vent? I removed everything but just left the vent so im hoping that works out.
What did you do with that smaller rubber hose?
Trending Topics
Thread Starter
Registered User
Joined: Jan 2011
Posts: 4,624
Likes: 10
No, sorry... I forgot about the water drain. So yeah... there are technically three hoses left over. One is the larger plastic hose which I believe is a vent which I am leaving open to atmosphere under the car. One is the water drain which I am leaving open as well. And one is a smaller (1/4" ID maybe?) rubber hose that I have pulled up to above the fuel tank and have plugged.