daktruckie safety upgrade thread
 03-10-2013, 05:33 PM
#1
Registered User

Thread Starter
This thread will document the modifications I'm making to my AP1 in the name of track safety.
Summary:
Installing:
Hard dog roll bar
Driver bucket seat
Driver 6pt harness
Removing:
Softtop
OEM bulkhead
OEM interior
Driver airbag
As my family grows, I have pretty much converted the car to HPDE only. The more I track, and the larger my family grows, it has come to light that safety is the most important thing to me. WIth 2 friends wrecking last year the harsh reality of track driving is right in front of me. I have decided to make the leap to add a harness and bucket seat for the drivers side. This meant installing a roll bar. There was only one choice for roll bars, I wanted to go with a tested, high quality product. I went with the Hard Dog double diagonal bar with lowered harness and provisions to keep the OEM seatbelts. For the meantime I will keep the passenger side OEM safety in case I do take an occasional weekend trip with the +1, or when we return to the Dragon in 2014. I opted to purchase the HD bulkhead replacement bar as opposed to struggling with the OEM bulkhead. The double diagonal was purchased for optimal rear visibility and the option to retain the center console for minimal storage (wallet, phone, registration).
As far as the installation of the roll bar, in order to minimize work on the OEM plastics, and to make this reversible (or able to sell the items) I have decided to remove all of the interior. This includes the softtop. SInce installing the hardtop in 2010 I have only taken it off once, and during that time I did not use the softtop. Also, the top is getting worn, and keeping it in the car while installing the rollbar just made things a little harder. Removing the interior to install the roll bar was 95% of the way there anyways.
In order to keep this easy to read, I will detail each installation or removal in a separate response to this thread.
-Mike
 03-10-2013, 05:33 PM
#2
Registered User
Thread Starter
Roll Bar installation
After removing the interior trim and the soft top (see next post), installing the roll bar gets quite simple. Installation includes drilling holes from above, and cutting a slot in the wheel well to mount the front backing plates. Each post of the roll bar has 3 grade 8 fasteners, with thick steel mounting plates underneath the car on the other side of the sheet metal. Again, following instructions from Bethania; http://www.bethania-...000_install.htm. Once the bar is test fit into the car, BEFORE DRILLING, it is important to check hard or soft top clearance. I installed the hardtop and verified that the position of the bar allowed adequate spacing for the hard top. I did not check soft top clearance as it was not installed.
It should be noted that the bar was manufactured with such a precision fit that left to right adjustment was limited to just a few millimeters. The position that it wanted to rest it turned out to be a great fit for my hard top, so I started drilling! The directions say to drill the 3[sup]rd[/sup] rear mounting hole from below, but I could not fit my drill into the wheel well with enough room to safely drill at a 90 degree angle. My compromise was to install the backing plate from ABOVE to act as a template. Fasten the 2 bolts to keep the plate from moving, and drill. This deviates from Bethania's directions but worked great for me. My backing plates were SLIGHTLY off from being an exact match, so use each backing plate as a template individually on the correct side.
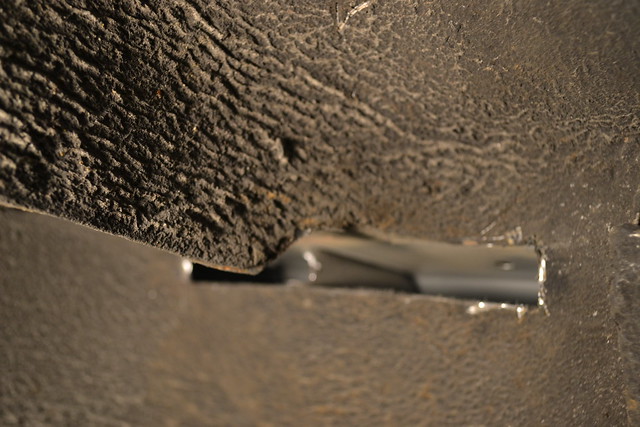
Once all holes are drilled from above, cut the holes in the wheel wells from below. Tips for cutting are to cut the top of the slit even with the rear deck. Any lip will keep the mounting plate from being flush. I left a 1/16” lip on my first cut (accidentally) and had to mash it down with a punch to allow the backing plate to sit flush. You do not want any slop in mounting as this may cause problems with rigidity when you need it most! Another tip is to use the backing plate as a width template. I used a flat blade screwdriver to scribe my cutting line into the OEM undercarriage paint. See the following three pictures for during the cut, after the cut, and fully mounted backing plate.


Front mounting plate from above. It reuses a single 10mm fastener from the OEM interior. The blue wires are for my amplifier and should not be there in your car.

Once the front is mounted, go ahead and tighten the rear plates. See the following pictures for above and below. Note that the bolts are not tight in my picture and when tight you will see threads below the nuts!


Once the bolts are torqued to spec and with loctite, go ahead a reinstall your interior as much as you want to. I left my interior out so my installation is complete. Your situation may and likely will vary. If you're keeping the OEM interior you will want the bulkhead. Instructions for trimming the interior can be found in both the Bethania directions and on s2ki.com
Don't forget to step back and admire your hard work!

After removing the interior trim and the soft top (see next post), installing the roll bar gets quite simple. Installation includes drilling holes from above, and cutting a slot in the wheel well to mount the front backing plates. Each post of the roll bar has 3 grade 8 fasteners, with thick steel mounting plates underneath the car on the other side of the sheet metal. Again, following instructions from Bethania; http://www.bethania-...000_install.htm. Once the bar is test fit into the car, BEFORE DRILLING, it is important to check hard or soft top clearance. I installed the hardtop and verified that the position of the bar allowed adequate spacing for the hard top. I did not check soft top clearance as it was not installed.
It should be noted that the bar was manufactured with such a precision fit that left to right adjustment was limited to just a few millimeters. The position that it wanted to rest it turned out to be a great fit for my hard top, so I started drilling! The directions say to drill the 3[sup]rd[/sup] rear mounting hole from below, but I could not fit my drill into the wheel well with enough room to safely drill at a 90 degree angle. My compromise was to install the backing plate from ABOVE to act as a template. Fasten the 2 bolts to keep the plate from moving, and drill. This deviates from Bethania's directions but worked great for me. My backing plates were SLIGHTLY off from being an exact match, so use each backing plate as a template individually on the correct side.
Once all holes are drilled from above, cut the holes in the wheel wells from below. Tips for cutting are to cut the top of the slit even with the rear deck. Any lip will keep the mounting plate from being flush. I left a 1/16” lip on my first cut (accidentally) and had to mash it down with a punch to allow the backing plate to sit flush. You do not want any slop in mounting as this may cause problems with rigidity when you need it most! Another tip is to use the backing plate as a width template. I used a flat blade screwdriver to scribe my cutting line into the OEM undercarriage paint. See the following three pictures for during the cut, after the cut, and fully mounted backing plate.
Front mounting plate from above. It reuses a single 10mm fastener from the OEM interior. The blue wires are for my amplifier and should not be there in your car.
Once the front is mounted, go ahead and tighten the rear plates. See the following pictures for above and below. Note that the bolts are not tight in my picture and when tight you will see threads below the nuts!
Once the bolts are torqued to spec and with loctite, go ahead a reinstall your interior as much as you want to. I left my interior out so my installation is complete. Your situation may and likely will vary. If you're keeping the OEM interior you will want the bulkhead. Instructions for trimming the interior can be found in both the Bethania directions and on s2ki.com
Don't forget to step back and admire your hard work!
03-10-2013, 05:33 PM
#3
Registered User
Thread Starter
Interior trim and soft top removal.
When I installed the roll bar into my S2000, I made the decision to remove the interior trim behind the seats and the soft top. Removing the interior trim makes it easier to install the bar and run harnesses. To reinstall the trim with a roll bar, many pieces must be cut around the bar, this was not something I was interested in performing the labor of doing. While I was removing the interior trim to install the roll bar, I noticed that I was at a point that would be incredible easy to also remove the soft top. The soft top was folded up unused under my hardtop for 3 years, so I decided it was fair enough to remove it.
To remove the interior trim, I followed the instructions provided by Bethania Garage for installing the roll bar. See those instructions here: http://www.bethania-...000_install.htm. Interior removal is steps 1-26. If you want to see pictures of this process, some good pictures of interior removal can be found here: https://www.s2ki.com/...&attach_id=2115
Step 27 is removal of the stock bulkhead. This can be done if you're not keeping the interior trim. If you're keeping the trim, you need this piece to screw in the panels behind the seat. If you don't the trim, but want to keep the OEM seat belts, you can keep the bulkhead or you can purchase the Hard Dog bulkhead replacement bar. Either of these options provide for a threaded hole to mount the OEM seat belt retractors into. If you're going to be running harnesses only, you don't need either.
In order to remove the soft top, you need to do the following once you've removed the interior trim. 1) Remove the 10mm nuts along the rear and sides of the soft top. 2) Unbolt the soft top brackets from the car. With both of these removed the soft top will lift out. I suggest pulling the soft top fabric off of the studs from step 1, and pulling the fabric up over the trim. This prevents it from getting snagged when lifting out. The soft top is heavy and not well balanced, it took some finesse to wiggle it out, but it will come out cleanly. Careful not to apply too much pressure on the glass window if you have one.
When you're done your car should look like this:
With bulkhead:

Without bulkhead:

When I installed the roll bar into my S2000, I made the decision to remove the interior trim behind the seats and the soft top. Removing the interior trim makes it easier to install the bar and run harnesses. To reinstall the trim with a roll bar, many pieces must be cut around the bar, this was not something I was interested in performing the labor of doing. While I was removing the interior trim to install the roll bar, I noticed that I was at a point that would be incredible easy to also remove the soft top. The soft top was folded up unused under my hardtop for 3 years, so I decided it was fair enough to remove it.
To remove the interior trim, I followed the instructions provided by Bethania Garage for installing the roll bar. See those instructions here: http://www.bethania-...000_install.htm. Interior removal is steps 1-26. If you want to see pictures of this process, some good pictures of interior removal can be found here: https://www.s2ki.com/...&attach_id=2115
Step 27 is removal of the stock bulkhead. This can be done if you're not keeping the interior trim. If you're keeping the trim, you need this piece to screw in the panels behind the seat. If you don't the trim, but want to keep the OEM seat belts, you can keep the bulkhead or you can purchase the Hard Dog bulkhead replacement bar. Either of these options provide for a threaded hole to mount the OEM seat belt retractors into. If you're going to be running harnesses only, you don't need either.
In order to remove the soft top, you need to do the following once you've removed the interior trim. 1) Remove the 10mm nuts along the rear and sides of the soft top. 2) Unbolt the soft top brackets from the car. With both of these removed the soft top will lift out. I suggest pulling the soft top fabric off of the studs from step 1, and pulling the fabric up over the trim. This prevents it from getting snagged when lifting out. The soft top is heavy and not well balanced, it took some finesse to wiggle it out, but it will come out cleanly. Careful not to apply too much pressure on the glass window if you have one.
When you're done your car should look like this:
With bulkhead:
Without bulkhead:
03-10-2013, 05:33 PM
#4
Registered User
Thread Starter
Seat / Harness Installation
In order to install a bucket seat into your S2000, you'll need a bucket seat, a mounting bracket, 6 point harness, and harness installation hardware (usually included with harness purchase).
Once you've gathered all the parts, you can attach the mounting bracket to your seat. Bucket seats are side mount and require a rail/bracket other than OEM. I went with Buddy Club sliding seat rails. My seat is a Cobra Imola ProFit in normal width. The GT width will not fit in the S2000 as the normal fit rubs the door and transmission tunnel. I went with a sliding seat rail for ease of installation (reaching the back bolts), not because I will be sliding the seat once installed. Buddy Club seat rails are known for poor welds where the S2000 specific mounting plates are welded to the slider, so I had these re-enforced by a welder to beef up the bond. Once that was complete, I test fit the bracket to the seat. My first reaction was that the seat was sitting way to high even when mounted as low as possible. The Buddy Club side mount plates bend and the lowest hole to mount with is almost 2” above the rail, this was unacceptable to me, a low seat is required for my knee to miss the steering wheel thus allowing me to heel-toe. I sourced some 90 degree plates from F1 spec on s2ki and used those. I am now able to lower the seat enough so that the bottom of the seat hits the slider pivot on the rail. Cobra seats are 16” wide at mounting creating the issue I was having. The Recaro Profi SPG is only 15” and fits within these tabs so that seat can go even lower. With my F1 spec mounts I am able to get the seat within 2” of dragging on the carpet. When I run the seat without the thick thigh cushions, I clear the steering wheel so that will be my track solution. For the street I don't require heel-toe so I will run with the pads for comfort.
When attaching the seat rail to the seat, make sure to line up the 4 mounting holes with a template you can create from your OEM seat. This will save a lot of headaches taking the seat in and out of the car a dozen times making tiny left/right adjustments where you side mounts are on the rails. Once this is complete, I recommend test fitting in the car a few times. With the seat mounted so low, I had to bend the slider adjustment bar so that it fit under the low seat. The bar as it came from Buddy Club has an upward bend allowing the users hand to grab it. This is great except with the low seat, the bar was flush with the seat, not allowing me to pull up and use the sliding mechanism. I put this bar in a vice and bent it until it was flat, now it clears the seat shell and I'm able to use the sliding mechanism.
After your seat is ready, set it aside. Now we need to determine where to place the anti-sub eye bolts. Consult the documentation for your harness when determining this. I am using eye bolts for the anti-sub and lap belts so that I can use clip-in hardware for the harnesses. Once you determine the location for the bolts, translate the position from above to below. Prior to drilling any hole, I made sure I had a suitable and strong place to mount my backing plate. Once that location was found, I used the backing plate as a template and used a sharpie to make a mark where I'd be drilling. I must have done something right because all 3 holes I drilled were in the right spot, the first time. I drilled pilot holes from below once I found good areas on the body for the backing plates. Once your pilot holes are drilled, push the drill bit up until it is visible pushing on the carpet. Using your finger, pin point the hole and cut a 1” square hole in the carpet, exposing your pilot hole. I drilled the finish holes from above, mainly because of the low space under a car on jack stands. Once drilled, set your eye bolts in, put some sealant on the backing plates, and attach your hardware. I had large washers with lock washers and nuts. SCHROTH harnesses will have backing plates with welded nuts, for this solution I recommend using loctite on the eye bolts. Note that the right hole will go between the brake and fuel lines. I had to trim 1 of the plastic ribs off the cover to allow access to my hole. (See photo below)
The left lap belt eye bolt is easy, it just threads into the OEM seat belt hole. I can't elaborate any more, if you need assistance god help that you got this far already. For the right side, you are going to be drilling into the corner of the transmission tunnel. From below it's very easy to see where the bolt will go, you can also see the OEM seat mount hole/thread for reference. Make sure that where you mount the eye bolt will not interfere with the seat bracket. Going as far back as possible will create maximum clearance. On the left side, the eye bolt fits between the seat rail and the car, this isn't true for the right side so make sure you go back as far as you can. Find a good place for your backing plate, and drill a pilot hole again, repeat the same process for enlarging the hole and fastening your hardware on the backside. You will see that all my bolts are long, I determined how much thread I needed, and cut the rest off. These pictures were taken before the trimming.
Right side lap belt eyebolt, backside

Left side anti-sub eyebolt, backside

Right side anti-sub eyebolt, backside

Above, all bolts installed

Now from above, clip in your harness

The shoulder straps get mounted to your roll bar. Roll up the excess harness and put a zip tie on it. It's also a good idea to put something on the harness bar to keep the harness from sliding left to right. I picked up some very nice machined collars off s2ki to help with this.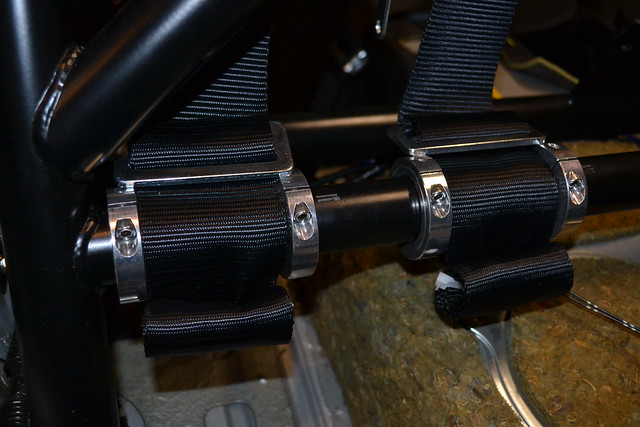
At this point, you're ready to get the seat in the car and test fit your harnesses. I had to take the seat in and out twice to adjust the lap belts and anti-sub strap to get the harness length just right. Originally I had way to much slack such that when the belts were tightened as far as they could, the harness was loose. I solved this by adjusting the position of the clip-ins relative to the cam-locks. This may vary depending on the type of harness you have. That will install the seat in your car, with the safety of a 6 pt harness. I would not recommend a bucket seat without a 6 pt harness.
All done!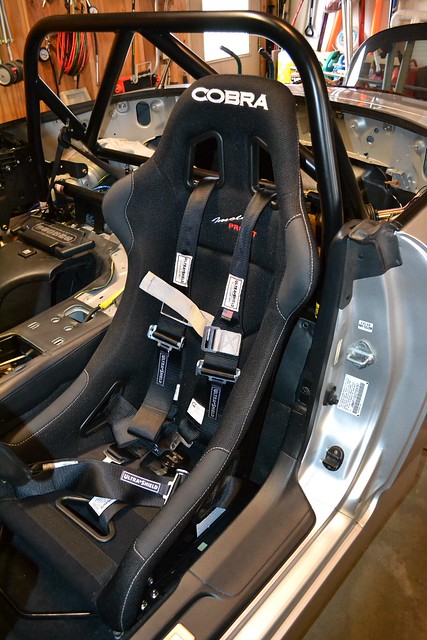
In order to install a bucket seat into your S2000, you'll need a bucket seat, a mounting bracket, 6 point harness, and harness installation hardware (usually included with harness purchase).
Once you've gathered all the parts, you can attach the mounting bracket to your seat. Bucket seats are side mount and require a rail/bracket other than OEM. I went with Buddy Club sliding seat rails. My seat is a Cobra Imola ProFit in normal width. The GT width will not fit in the S2000 as the normal fit rubs the door and transmission tunnel. I went with a sliding seat rail for ease of installation (reaching the back bolts), not because I will be sliding the seat once installed. Buddy Club seat rails are known for poor welds where the S2000 specific mounting plates are welded to the slider, so I had these re-enforced by a welder to beef up the bond. Once that was complete, I test fit the bracket to the seat. My first reaction was that the seat was sitting way to high even when mounted as low as possible. The Buddy Club side mount plates bend and the lowest hole to mount with is almost 2” above the rail, this was unacceptable to me, a low seat is required for my knee to miss the steering wheel thus allowing me to heel-toe. I sourced some 90 degree plates from F1 spec on s2ki and used those. I am now able to lower the seat enough so that the bottom of the seat hits the slider pivot on the rail. Cobra seats are 16” wide at mounting creating the issue I was having. The Recaro Profi SPG is only 15” and fits within these tabs so that seat can go even lower. With my F1 spec mounts I am able to get the seat within 2” of dragging on the carpet. When I run the seat without the thick thigh cushions, I clear the steering wheel so that will be my track solution. For the street I don't require heel-toe so I will run with the pads for comfort.
When attaching the seat rail to the seat, make sure to line up the 4 mounting holes with a template you can create from your OEM seat. This will save a lot of headaches taking the seat in and out of the car a dozen times making tiny left/right adjustments where you side mounts are on the rails. Once this is complete, I recommend test fitting in the car a few times. With the seat mounted so low, I had to bend the slider adjustment bar so that it fit under the low seat. The bar as it came from Buddy Club has an upward bend allowing the users hand to grab it. This is great except with the low seat, the bar was flush with the seat, not allowing me to pull up and use the sliding mechanism. I put this bar in a vice and bent it until it was flat, now it clears the seat shell and I'm able to use the sliding mechanism.
After your seat is ready, set it aside. Now we need to determine where to place the anti-sub eye bolts. Consult the documentation for your harness when determining this. I am using eye bolts for the anti-sub and lap belts so that I can use clip-in hardware for the harnesses. Once you determine the location for the bolts, translate the position from above to below. Prior to drilling any hole, I made sure I had a suitable and strong place to mount my backing plate. Once that location was found, I used the backing plate as a template and used a sharpie to make a mark where I'd be drilling. I must have done something right because all 3 holes I drilled were in the right spot, the first time. I drilled pilot holes from below once I found good areas on the body for the backing plates. Once your pilot holes are drilled, push the drill bit up until it is visible pushing on the carpet. Using your finger, pin point the hole and cut a 1” square hole in the carpet, exposing your pilot hole. I drilled the finish holes from above, mainly because of the low space under a car on jack stands. Once drilled, set your eye bolts in, put some sealant on the backing plates, and attach your hardware. I had large washers with lock washers and nuts. SCHROTH harnesses will have backing plates with welded nuts, for this solution I recommend using loctite on the eye bolts. Note that the right hole will go between the brake and fuel lines. I had to trim 1 of the plastic ribs off the cover to allow access to my hole. (See photo below)
The left lap belt eye bolt is easy, it just threads into the OEM seat belt hole. I can't elaborate any more, if you need assistance god help that you got this far already. For the right side, you are going to be drilling into the corner of the transmission tunnel. From below it's very easy to see where the bolt will go, you can also see the OEM seat mount hole/thread for reference. Make sure that where you mount the eye bolt will not interfere with the seat bracket. Going as far back as possible will create maximum clearance. On the left side, the eye bolt fits between the seat rail and the car, this isn't true for the right side so make sure you go back as far as you can. Find a good place for your backing plate, and drill a pilot hole again, repeat the same process for enlarging the hole and fastening your hardware on the backside. You will see that all my bolts are long, I determined how much thread I needed, and cut the rest off. These pictures were taken before the trimming.
Right side lap belt eyebolt, backside
Left side anti-sub eyebolt, backside
Right side anti-sub eyebolt, backside
Above, all bolts installed
Now from above, clip in your harness
The shoulder straps get mounted to your roll bar. Roll up the excess harness and put a zip tie on it. It's also a good idea to put something on the harness bar to keep the harness from sliding left to right. I picked up some very nice machined collars off s2ki to help with this.
At this point, you're ready to get the seat in the car and test fit your harnesses. I had to take the seat in and out twice to adjust the lap belts and anti-sub strap to get the harness length just right. Originally I had way to much slack such that when the belts were tightened as far as they could, the harness was loose. I solved this by adjusting the position of the clip-ins relative to the cam-locks. This may vary depending on the type of harness you have. That will install the seat in your car, with the safety of a 6 pt harness. I would not recommend a bucket seat without a 6 pt harness.
All done!
03-10-2013, 05:38 PM
#6
Registered User

Join Date: May 2011
Posts: 148
Likes: 0
Received 0 Likes
on
0 Posts
I am wanting to do the same, so I definitely will be following this thread. I was under the impression though that there needs to be a single main diaganol bar in the main hoop going from the top driver side to lower passenger side. I thought the double was more of a looks thing.
Sent from my XT907 using Tapatalk 2
Sent from my XT907 using Tapatalk 2
03-10-2013, 05:44 PM
#7
Registered User
Thread Starter
The easy way to meet SCCA specs is to do as you said. The HD Double Diagonal meets SCCA specs through other means though. It's a very safe and strong design. Hard Dog also sells a bar just like you described.
-Mike
-Mike
Trending Topics
03-10-2013, 05:57 PM
#8
Former Moderator


Subscribed and looking forward to updates. Would like to go this route someday.
Mike, What about the passenger seat? Will you be removing it or replacing with a race seat at some point in the future? Also are you investing in a HANS device?
Mike, What about the passenger seat? Will you be removing it or replacing with a race seat at some point in the future? Also are you investing in a HANS device?
03-10-2013, 06:00 PM
#9
Registered User
Thread Starter
I will be using a HANS, yes! I forgot to mention that but its crucial to know whether or not you'll be using a HANS when you buy the harnesses!
-Mike
03-11-2013, 03:31 AM
#10

With the Hans, one should have 2" shoulder straps.
Also, the Hans makes the shoulder strap come over the shoulder maybe 1-1/2 inches higher than otherwise. So you need to be concerned about the angle of the harness as it extends over the shoulder.
Also, the Hans makes the shoulder strap come over the shoulder maybe 1-1/2 inches higher than otherwise. So you need to be concerned about the angle of the harness as it extends over the shoulder.