
Removing amber from Tail Lights


Thread Starter
Registered User
Joined: Apr 2012
Posts: 73
Likes: 0
Was reading some old posts and wanted to see if we have more specifics or clearer advice on this. Want to remove the amber from the OEM Tail Lights.
So general stuff:
1. Anybody still doing this? How risk is it, any DIYs?
2. edSpecR refers to 'using a heat gun', is that in reference to opening the light or drilling out the amber plastic? Understand how to open the tail light, not sure about how to make a clean cut of the existing amber.
Appreciate your comments and help!
here are mine:
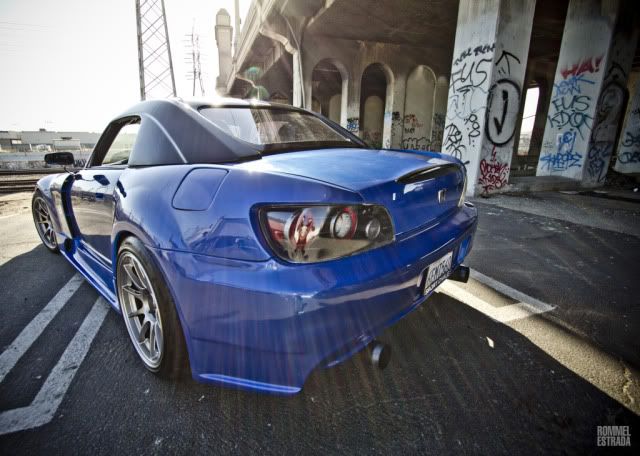
guess im alittle too late to this thread for the OP baking his tails
you need to drill the orange out with a 2.5" (iirc) hole cutter as they dont pop out independently from the red ring. its all one piece.
and the taillights crack about a million times more easily than the front headlights, so be very careful. i used a heat gun.
after drilling out the amber i replaced it with a clear pane of lexan, which you cant see except in person. guess i could've left that part out o well.
guess im alittle too late to this thread for the OP baking his tails
you need to drill the orange out with a 2.5" (iirc) hole cutter as they dont pop out independently from the red ring. its all one piece.
and the taillights crack about a million times more easily than the front headlights, so be very careful. i used a heat gun.
after drilling out the amber i replaced it with a clear pane of lexan, which you cant see except in person. guess i could've left that part out
o well.1. Anybody still doing this? How risk is it, any DIYs?
2. edSpecR refers to 'using a heat gun', is that in reference to opening the light or drilling out the amber plastic? Understand how to open the tail light, not sure about how to make a clean cut of the existing amber.
Appreciate your comments and help!


Joined: Aug 2008
Posts: 4,038
Likes: 1
From: Columbus, OH
I tried and cracked my lens. its a real pain compared to the headlights.
Heat gun is for melting the silicon holding the lens and house together. take your time and go slow.
You can also bake the taillight at 300° for 5mins at a time to helo loosen the silicon all around
Heat gun is for melting the silicon holding the lens and house together. take your time and go slow.
You can also bake the taillight at 300° for 5mins at a time to helo loosen the silicon all around

Joined: Mar 2007
Posts: 488
Likes: 1
From: 626 SGV
im acturally 80% in the process of it, my headlights are almost done and my tail lights are already apart! just waiting for some parts to come in next weekend and ill have some pictures up!
As for the amber, it is impossible to take off. the red and amber is a amber piece painted red on the out side with a lining of silver paint on the back side. Only way to do this is to drill out the amber like what that s2k did and he put a sheet of lexan behind it i believe.
The tails are more difficult then the headlight spreading apart though!!! take your time! I did mine with a heat gun and i see no other way to do it without one. im sure the oven method would be difficult for the tails.
I love modifying lights so this is why i took on the challenge. i would say this is a 3 from a 1-5 but i have been doing alot of retro before this. just think of it as a 400 dollar risk, if you can get over that nothing is 0impossible!!!
Thread Starter
Registered User
Joined: Apr 2012
Posts: 73
Likes: 0

Thread
Thread Starter
Forum
Replies
Last Post