
DIY: Mini Wilwood brake kit with stock rotors
 08-21-2014, 05:48 AM
#1
Registered User

Thread Starter

Alright, When I was going to part out my car there was a lot of interest in my mini wilwood brake kit. I found all of the information here on S2ki, but there wasn't anyone who had actually done it to verify that it actually worked, so i bought everything to give it a shot.
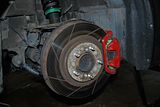
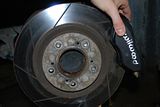
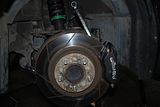
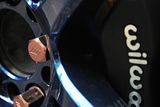
This uses a 4 piston Wilwood Dynalite caliper with the stock rotor, I could tell a significant increase in braking power. But honestly, I mainly did it for looks.
I ordered the brackets through Jegs and it took a few weeks to get them, they were shipped straight from wilwood. So i am assuming that they are made when they are ordered. (also ordered everything else through Jegs except the bolts and washers)
Parts needed:
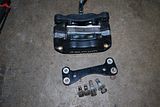
WIL-120-6805 x2 - Brake Caliper, Dynalite, Aluminum, Black Anodized, 4-Piston - $138.83 x2
WIL-250-6289 x2 - Caliper Mounting Bracket, Replacement, Billet Aluminum - $41.60 x2
WIL-220-6860 - Brake Lines, Stainless Steel Braided, Flexline, Front - $84.95
Brake pads of your choice (http://www.wilwood.com/BrakePads/Bra...x?padtype=7112) - I chose the PolymatrixQ pads - $82.24
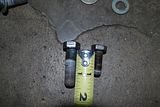
5/8" head bolts x4 (1.5" long)(Forgot what size, just take the caliper bracket to a hardware store) - $5
9/16" head bolts x4 (1" long) - $5
Washers x8 - $5
Anti-sieze
Brake fluid
Tools needed:
1/2" ratchet
3/8" ratchet
12mm socket
Impact driver (for rotor screws)
1/2" 17mm socket
5/8" socket
9/16" wrench
10mm brake line wrench
17mm wrench
Pliers
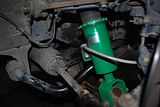
1. Jack car up and get your wheels off. I would highly recommend jack stands, I personally have a Bendpack Quikjack that makes life 100x easier
I already have the rotor screws out here
2. Remove 2 17mm bolts holding the caliper on and pull caliper off (have an extra jack stand ready to use for support)
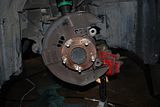
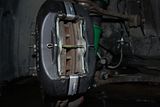
3. Bolt caliper bracket on. I used anti-sieze on all these bolts.
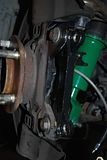
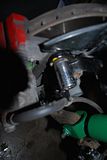
4. Go ahead and install brake line on caliper and test it and make sure you have the line running the right way. I had to cur the rubber grommet to get it around the brake line, put it in the bracket and spin the cut to the bottom
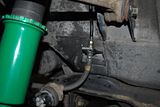
5. Use a pair of pliers and the 10mm brake line wrench to undo the stock brake line and use the pliers to pull out the retaining clip. Put stock caliper out of the way, set the wilwood caliper on the jack stand for support, route line around the front of the strut and use the 10mm brake line wrench and 17mm wrench to get the wilwood line connected. Be sure when doing this that you line the brake line up so it slides in the bracket and the retaining clip will fit.

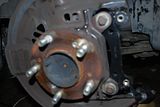
6. This is where it gets a bit tricky. you must set the rotor on the studs (make sure you have it lined up right for the rotor scows, don't ask me why i'm including this). You then put the 9/16" head bolts in the caliper and you have to set it over the caliper, line it up and get the bolts started. There is enough room because the rotor still moves, but it is a bit tricky to get lined up first. Once you get both started, go ahead and tighten them up. Again, I also used anti-sieze here
7. Put the brake pads in and place the cotter pin through the caliper and pads
8. Bleed the brakes and you are ready to go!
9. Make sure you have the brake lines routed where they will not get rub on anything. After this, I replaced my rear lines with stop tech stainless braided lines, new AP1 pads and bled the whole system with ATE superblue...no longer available
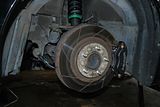
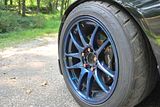
I am running Work Emotion CR-Kai 17x9 +44 and these clear with plenty enough room (with what I have had before with other brake kits)
This uses a 4 piston Wilwood Dynalite caliper with the stock rotor, I could tell a significant increase in braking power. But honestly, I mainly did it for looks.
I ordered the brackets through Jegs and it took a few weeks to get them, they were shipped straight from wilwood. So i am assuming that they are made when they are ordered. (also ordered everything else through Jegs except the bolts and washers)
Parts needed:
WIL-120-6805 x2 - Brake Caliper, Dynalite, Aluminum, Black Anodized, 4-Piston - $138.83 x2
WIL-250-6289 x2 - Caliper Mounting Bracket, Replacement, Billet Aluminum - $41.60 x2
WIL-220-6860 - Brake Lines, Stainless Steel Braided, Flexline, Front - $84.95
Brake pads of your choice (http://www.wilwood.com/BrakePads/Bra...x?padtype=7112) - I chose the PolymatrixQ pads - $82.24
5/8" head bolts x4 (1.5" long)(Forgot what size, just take the caliper bracket to a hardware store) - $5
9/16" head bolts x4 (1" long) - $5
Washers x8 - $5
Anti-sieze
Brake fluid
Tools needed:
1/2" ratchet
3/8" ratchet
12mm socket
Impact driver (for rotor screws)
1/2" 17mm socket
5/8" socket
9/16" wrench
10mm brake line wrench
17mm wrench
Pliers
1. Jack car up and get your wheels off. I would highly recommend jack stands, I personally have a Bendpack Quikjack that makes life 100x easier
I already have the rotor screws out here

2. Remove 2 17mm bolts holding the caliper on and pull caliper off (have an extra jack stand ready to use for support)


3. Bolt caliper bracket on. I used anti-sieze on all these bolts.


4. Go ahead and install brake line on caliper and test it and make sure you have the line running the right way. I had to cur the rubber grommet to get it around the brake line, put it in the bracket and spin the cut to the bottom

5. Use a pair of pliers and the 10mm brake line wrench to undo the stock brake line and use the pliers to pull out the retaining clip. Put stock caliper out of the way, set the wilwood caliper on the jack stand for support, route line around the front of the strut and use the 10mm brake line wrench and 17mm wrench to get the wilwood line connected. Be sure when doing this that you line the brake line up so it slides in the bracket and the retaining clip will fit.


6. This is where it gets a bit tricky. you must set the rotor on the studs (make sure you have it lined up right for the rotor scows, don't ask me why i'm including this). You then put the 9/16" head bolts in the caliper and you have to set it over the caliper, line it up and get the bolts started. There is enough room because the rotor still moves, but it is a bit tricky to get lined up first. Once you get both started, go ahead and tighten them up. Again, I also used anti-sieze here

7. Put the brake pads in and place the cotter pin through the caliper and pads

8. Bleed the brakes and you are ready to go!


9. Make sure you have the brake lines routed where they will not get rub on anything. After this, I replaced my rear lines with stop tech stainless braided lines, new AP1 pads and bled the whole system with ATE superblue...no longer available
I am running Work Emotion CR-Kai 17x9 +44 and these clear with plenty enough room (with what I have had before with other brake kits)


The following users liked this post:
jeallen (03-19-2021)
 08-21-2014, 07:16 AM
#5
So it does look like part of the pads hang off the rotor, reading the spec it says its for a 13 inch rotor, we use 11.8. Are you getting any drag?
Ok I do see that the MIN diameter is 10 inches, so these should work.
Ok I do see that the MIN diameter is 10 inches, so these should work.
08-21-2014, 07:54 AM
#6
I can't see any of the pics because they're blocked at work but this looks like a really fun DIY. I'll check the pics out tonight but I think I want to do this as my next project  Thanks for the comprehensive DIY!
but this looks like a really fun DIY. I'll check the pics out tonight but I think I want to do this as my next project Thanks for the comprehensive DIY!
Trending Topics
08-21-2014, 03:59 PM
#9
Registered User
Thread Starter
Yes, extremely close. The first time I installed them I had some washers I messed with and it is a lot closer with no washer, at least in my case that is.
