2004 Taillight Conversion Wiring
#11
Registered User

Thread Starter
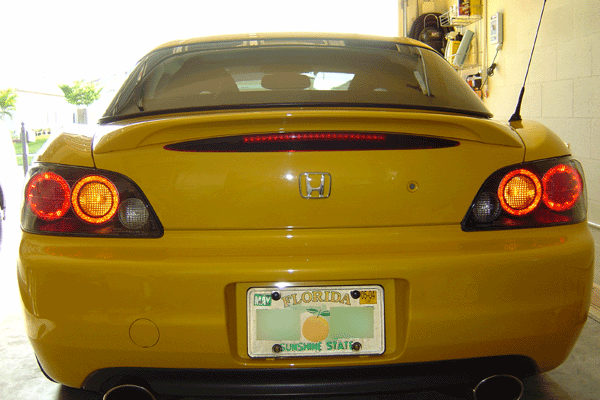
 THE TAILLIGHT INSTALL IS COMPLETE!
 it took only about 2 HOURS! with the $60 air saw i got from home depot the cutting part only took about 4 minutes total. i was stoked at how smoothly it went. it's MUCH easier than clearing your headlights (which we did last weekend).
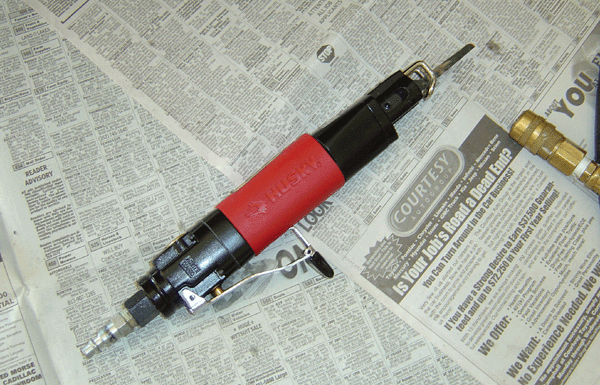
below is a picture of the Husky air saw i got at home depot. i checked out harbor freight first, they were about the same price ($50) but they were out of stock. the Husky one is 5k rpm while the harbor freight one (and every other one i've seen) is 10k rpm. incidentally, the harbor freight one was on sale for 50% off, which is probably why they were all gone.
Things you will need
1. 2004 taillights + foam gaskets (the 4 new bulb sockets are an extra plus - along with the bulbs that go in them)
2. air saw + air compressor (these us a lot of air - a 6 gallon tank is barely enough)
3. grinder, air, dremel or other
4. drill with larger metal bits
5. body colored paint
6. masking tape and newspapers or plastic drop cloth
7. permanent magic marker with pointy tip
8. one foot of metal, approx 1/32" - 1/16" thick and 1" or so wide
9. eye and ear protection - the air saw is REALLY LOUD cutting metal, and metal flakes are flying!
1) before you begin, you'll want to cover the entire bottom of the trunk carpeting with newspapers, an old sheet, or drop cloth. metal shavings will be flying and they are nearly impossible to vacuum out of the carpet. the little sharp edges stick like velcro.
2) uncover the taillights on the inside of the trunk. you'll need to remove the two plastic retainers on each side holding the flap of carpeting over the inside of the lights. to do this, push the center piece in about 2mm (it will click) and pull the carpeting away. if you push the centers in too far, they'll fall into the dark recesses of the body and will be difficult to retrieve. the plastic-backed carpet has a hinge and you can bend it out of the way.
3) unscrew the 4 nuts on each side holding in the original taillights. on the outside lower stud there is a plastic piece stuck on it holding the wiring. pry it off with a screwdriver, it will go on the same way on the new taillights. twist the bulb sockets and pull the wiring away. push out the taillights, supporting them on the outside so they don't scratch the bumper. they may be a little stuck because of the foam gasket.
4) thoroughly clean the dirt that has accumulated behind the taillights. we'll need a clean surface to mark cutouts and mount the new taillights. next tape some newspaper under the inside and outside of the taillight area to make sure metal flakes and pieces don't get on the carpet or behind the bumper.
5) the major obstacle in this project is being able to mark out what needs to be cut accurately. using the foam gasket will enable you to mark out where the new taillight holes need to be cut. but how do we know where to position the gasket in relation to the current holes?
take the original gasket off one original taillight. there is some adhesive around the bottom two studs, so carefully peel it off and try not to rip the foam so you can reattach it later. you can use the same piece of foam for both sides, just flip it over for the other taillight.
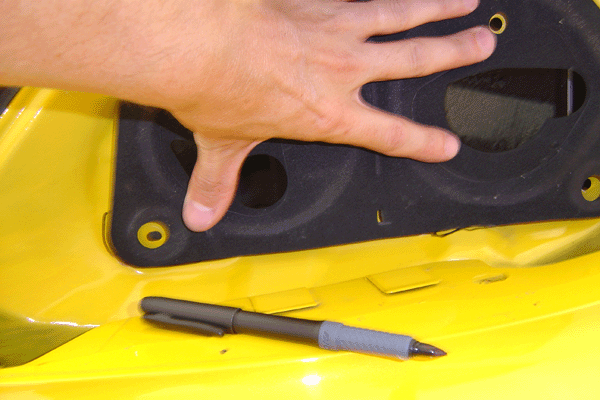
6) align the original gasket how it would be positioned over the original holes. make sure the holes in the car are centered in the holes of the foam, and the foam is straight and not being stretched. use a permanent marker and trace the bottom horizontal edge of the foam gasket:
7) place the new gasket on, aligning the bottom edge to the line you made. that's our reference point vertically. you can't see it in the picture below, but the outside-bottom hole can be used as a reference. the new hole will be about 1/4" directly above the current hole (see one more picture down for the mark):
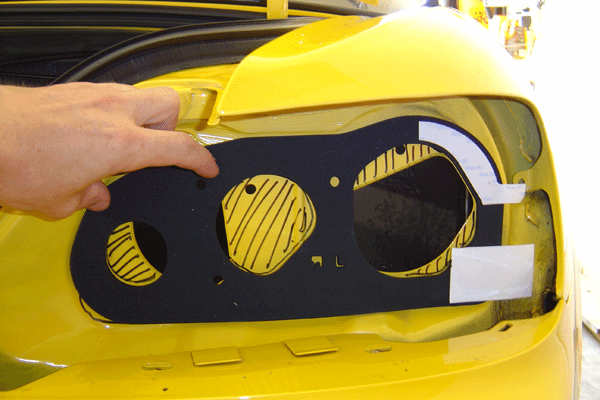
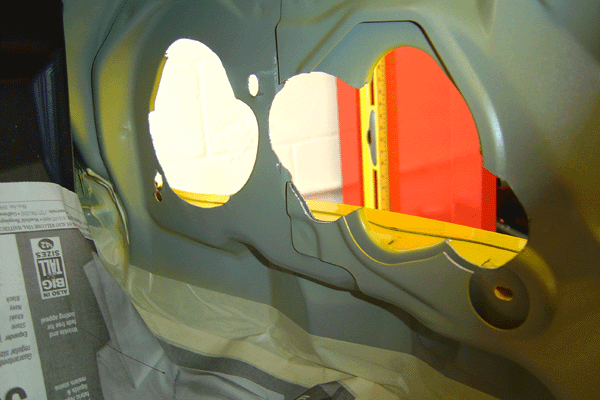
8) now we have the areas marked out that need to be removed. some have 2 pieces of metal behind them, so it will be slower going through them. the air saw i used cut really fast and went around the curves no problem. notice i've drilled the two small stud holes also. i'd recommend only drilling the outside-lower hole first, positioning the light as far in as it will go, then jiggle it slightly to make the top-outside stud scratch the paint in the proper location. you can use that paint scratch as a definite mark for drilling that hole. i had the most trouble with making the reverse light hole (inside most light) large enough. if you cut this one about 1/8" larger you won't be disappointed:

9) cut out the marked areas. use the grinder to remove any burrs and sharp edges. pay special attention to the drilled holes; mine had a bunch of metal on the inside that needed to be removed.
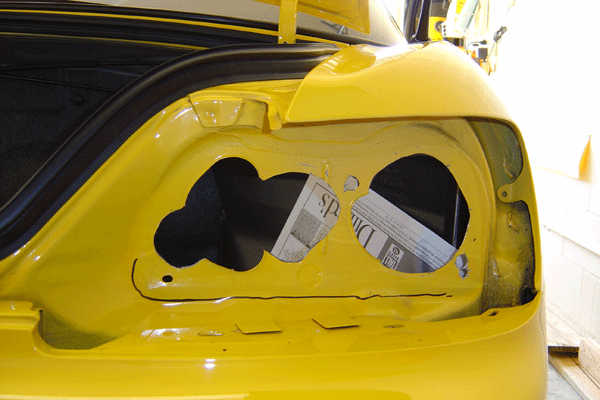
here's an inside look. notice the areas with two layers of metal:
10) test fit the taillight (you'll need to remove the taped on newspaper on the outside first) and make sure they fit properly. mark any areas that need to be cut and repeat until they fit nicely.
11) replace the taped-on newspaper and paint the bare metal edges from the inside and outside with your body-colored spraypaint. it doesn't have to be an exact match, it will all be covered. make sure everything you don't want painted is covered and you are in a well ventilated area. be particularly careful if you have a gas water heater in your garage (like me).
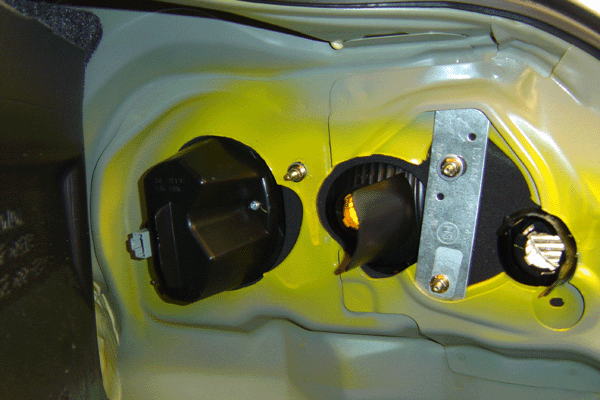
12) the two inside-most studs will be in open air on the new taillights. you'll need to make a brace to support them. i got some thin metal pieces and marked holes and length with them fitted loosely. notice in the picture below how the brace is positioned in between the two metal layers of the car body. my metal is a little thin, i'll probably redo it with some thicker aluminum bars that is available at home depot for about $4.
13) repeat for the other side. you may not want to mount the first taillight so you can use it as a reference for the second side cuts. plus you can be working on the second side while the paint is drying on the first.
14) after the paint has dried and the taillights are mounted, you can follow my wiring instructions above. i haven't seen the 2004 taillight sockets yet (all 4 are the same part number) so hopefully they plug right in with only a tab grinding or two. make sure all the lights work before driving! remove the newspaper, etc, and button up the trunk carpeting. stand back and admire a job well done!
#16
Registered User

Thread Starter
yes i painted where i cut - i bought some krylon yellow which matched nicely. that actually accounted for much of the 2 hours - i was waiting for the paint to dry enough.
yes it appears that they can easily be returned to stock. you cut over 2 of the stock mounting holes, but with big washers it will be ok.
yes it appears that they can easily be returned to stock. you cut over 2 of the stock mounting holes, but with big washers it will be ok.
The following users liked this post:
S2K632 (01-26-2022)
#18
Registered User
Join Date: Jan 2004
Location: Athens GR
Posts: 211
Likes: 0
Received 0 Likes
on
0 Posts
CONGRATULATIONS Liquid iq. 
People like you give credit to this forum. Excellent work & your pictures are very helpful.Thanks!
Is there a way for this tread to be saved??

People like you give credit to this forum. Excellent work & your pictures are very helpful.Thanks!
Is there a way for this tread to be saved??
#19
Community Organizer
Join Date: Oct 2001
Location: Rome - Loutraki
Posts: 288
Likes: 0
Received 0 Likes
on
0 Posts
Hi, Congratulations Liquid iq!!  i'm still waiting for the package,taillights 04,form jeff (hardtopguy)
Your work is very helpful to me!!
When i complete the job i will post the pics of my car!!!
Bye Luca!!!
 i'm still waiting for the package,taillights 04,form jeff (hardtopguy)
Your work is very helpful to me!!
When i complete the job i will post the pics of my car!!!
Bye Luca!!!

