
*SOS Supercharger Review*

Thread Starter
Registered User
Joined: Jan 2008
Posts: 1,967
Likes: 0
From: Lakeland, Florida
Ok, I told Chris@SOS I was going to be doing this a couple weeks ago, but just now had time to do it. so here we go:
I purchased my kit on dec 27, 2011 in order to take advantage of their awesome 600 dollar discount on the stage 2 kit. Mine is a stage 2, Non-SL 1220 with a 9-10psi pulley, AEM s2 ecu, RC 650's(other mods will be covered below). The kit took about a month to get in order because i wanted all the components other than the SC mounting bracket to be in a raw aluminum finish. like it was straight out of casting or fabbing.
Dealing with the guys at that shop is great. they are very thorough, reliable, and easy to deal with. My order came in 2 large boxes. 1 for the SC itself, and 1 for all the other goodies.
The packaging was terrific!every component was cataloged in a folder with my name on it through a checklist. every component was also numerically coded based off of what bag/bundle it was in for easy sourcing. Hvaing all the items hand picked and checked off in a folder specifically for you is really something. I have not purchased every kit out there to date, but as for comptech, greddy, inline pro, none of them do any of this.
As for the parts of the kit:
Wow. you truly do get what you pay for!!!!
i know a lot of guys say "the kit is too expensive for power gained" and crap like that, but let me tell you. you aren't just paying for a top rpm power number. you get days upon days upon days of R&D time, you get Honda Genuine bolts that were selected specifically for each position they will be going into based off thread pitch and shank length requirements. just sourcing all the exact Honda bolts for every spot they go into would take a solid day. You get Teflon, anti-seize, thread locker, every single little clamp, zip-tie, etc. Everything that takes so long to source and figure out that you need when designing a custom kit is all there. (i build custom stainless manifolds, turbo setups, inter-coolers, and general fabbed parts for cars of all kinds, and that is what takes the longest: all the figuring and test fitting different parts, etc. In this kit, the moment you open the box, weeks of work is already done for you. You will not get this from any other kit out there. there is always something else you need to buy, especially with "turbo kits".
moving on, I met this guy when i opened box 2:
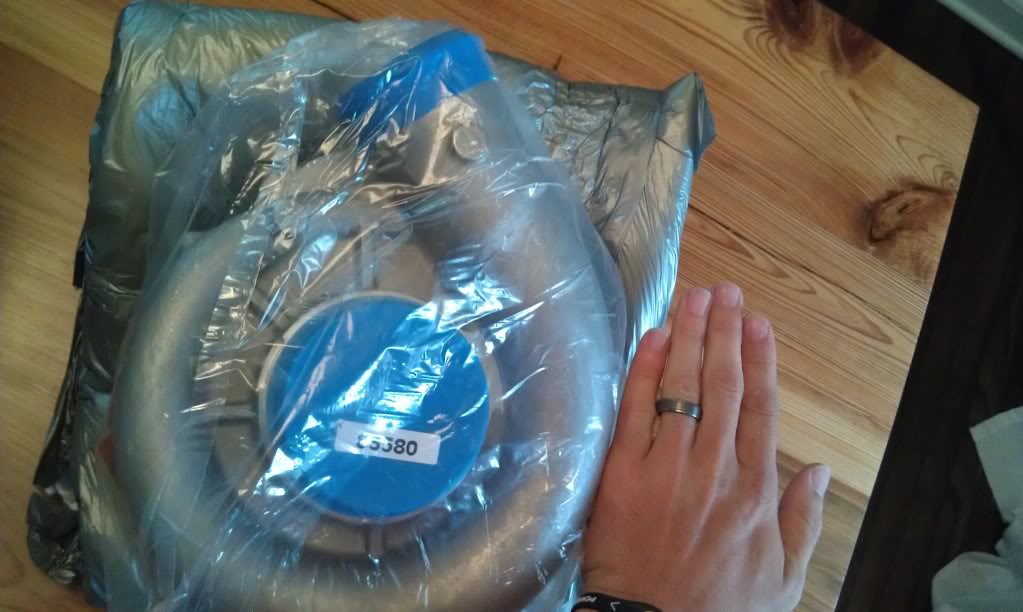
the finish was exactly what i wanted, not just on the sc cover, but in all the parts to come as well. stand by!
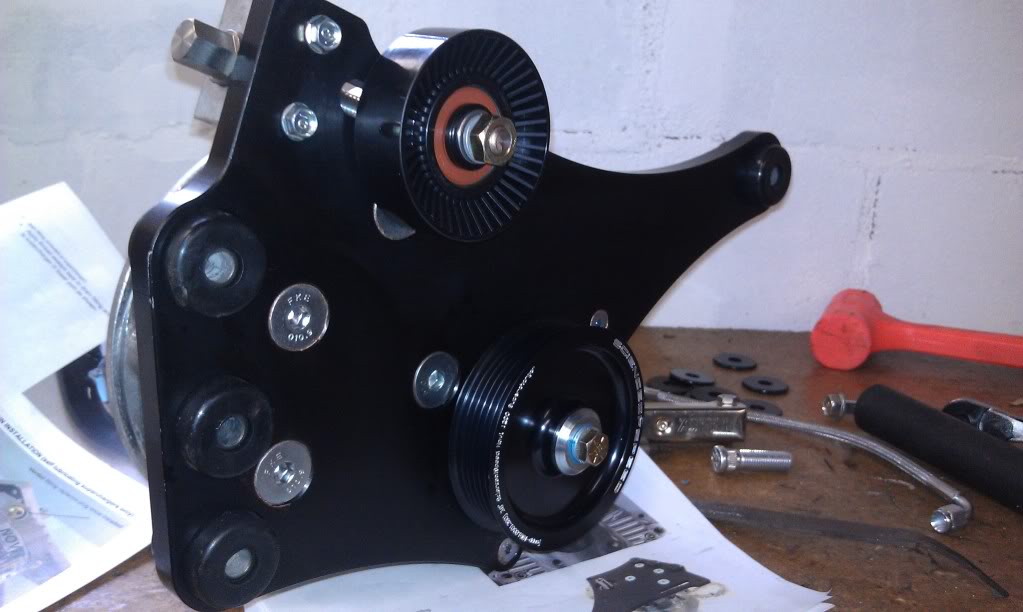
getting ready to go under the knife:
Installation:
this is the most important part IMO. if you can instruct individuals thousands of miles away how to easily and correctly install your product without vocal communication, you have done your job. The instructions are no IKEA instructions. they are step by step, thorough, and even look out for common areas where people might make mistakes. Full of color and full of pictures.
Everything is easy to locate thanks to their packaging method. find the name of the item, see what bag/cluster it is in, retreive it. just that simple.
As for the actual fit and finish of the kit for installation... PERFECT!
everything goes together EXACTLY as it should. no finagling, no wedging, no forcing, no BS. this is where countless hours of R&D come into play. you dont loose time because something doesnt fit exactly like the pic, you dont get frustrated because a companant is a hair off and you have to mash it into place. E V E R Y T H I N G just FITS.
difficulty?
the fuel pump install is always a pain if you are any larger than a 6 year old girl. there is no way around that. it is a "process" and you will get high as a kite in the "process". as for the rest of the install, do yourself a favor and take your time. dont rush. there is no need. and surely dont cut any corners as there is really no need to with this kit. Taking the time to assemble a kit that has had time taken on it will give you a greater appreciation for the quality of craftsmanship of the items you just purchased.
Opinions at completion:
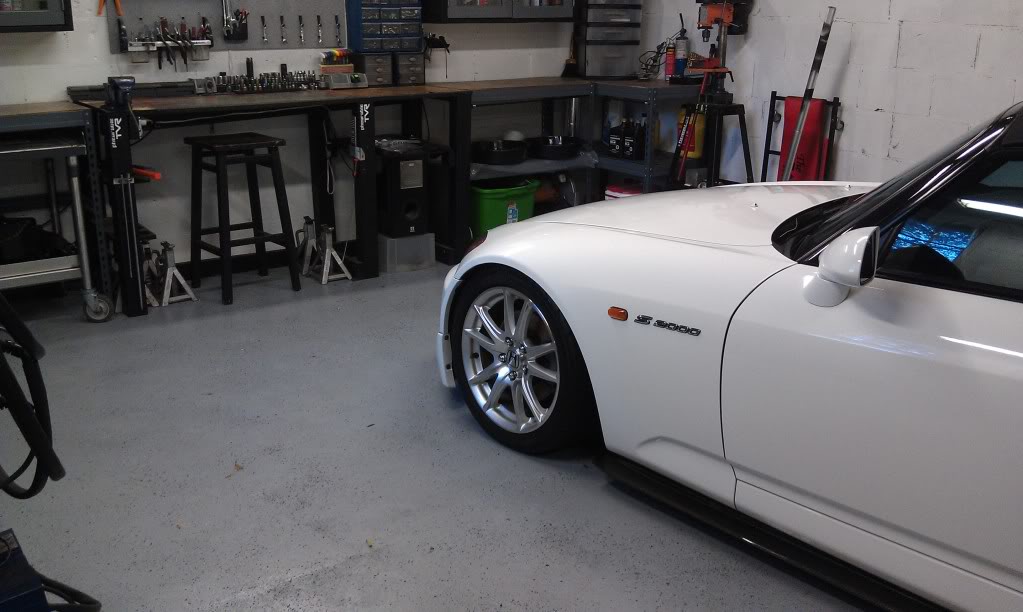
the entire setup looks terrific and fits like it was an upgrade option from Honda themselves. and that is not me being biased or overly appreciative, i am being as objective and rational as possible when i state that. My car started right up the very first time, didnt have ANY drama accompanying it, and acted like it had always been modded that way. no bolts backed out form vibration, no lines leaked, no steps were missed that caused me to quickly rush to take care of the issue. it just started, i gave it a once over, and then turned it off with a massive sense of ease and accomplishment.
Tuning and HP/TQ:
I opted to leave the oem ecu in, the oem injectors in, the SC belt off, and i drove to the dyno for tuning. i dont like the idea of "base maps" as i have encountered pointless drama with them before, so if you opt to use my method, it will be a smooth sailing and worry free ride all the way to the dyno for you.
-On the first dyno(the one my tuner uses to tune on), i made 350whp and 230wt peaking at 9.5 psi at 8300 rpms on a Mustang dyno with my belt slipping in the midrange and i didnt have the tension anywhere close to correct. the car never got above 200 in terms of coolant temp and the aftercooler was literally less than my body temp the entire dyno tiume and aven after my bumper to bumper traffic ride home for an hour and 30 mins.

about 2 weeks later i went to a dyno day with a NA civic buddy of mine and a turbo teg friend and made 373whp and 251wtq on a Dynojet dyno with all mods and everything the exact same except i got the belt tension corrected. pretty cool and direct data for dynomometer comparison.
-I have some upgrades and mods to my SOS kit. I fabbed a larger heat exchanger out of a motorcycle radiator by welding plates over all the inlets/outlets, etc, then i drilled and welded in 2 3/4" aluminum tubes for the water in and out. one at the top and one at the bottom(same side in/out). i like the top to bottom flow because its just like a rad so the water pump doesnt have to pump so hard to flow the fluid. water routing goes: the bottom of the after cooler -> top of the heat exchanger, flows down to the bottom of the heat exchanger -> to the IN of the water pump -> then to the top of the after-cooler. basically, this setup mimics the exact same water pathway of water through our engine(water pump, rad and all). I didnt want a HE that covered the entire length of the bumper opening as this has caused overheating issues in the past with personal and customer cars. my HE is a litle over 1" thick and about 19x8 if i remember correctly.


-I installed a Competition Clutch stage 2 kit on an AP1 flywheel. this holds every bit of the power made, feels like stock, doesnt chatter, and is very suitable for daily driving as thats what i use my car for.
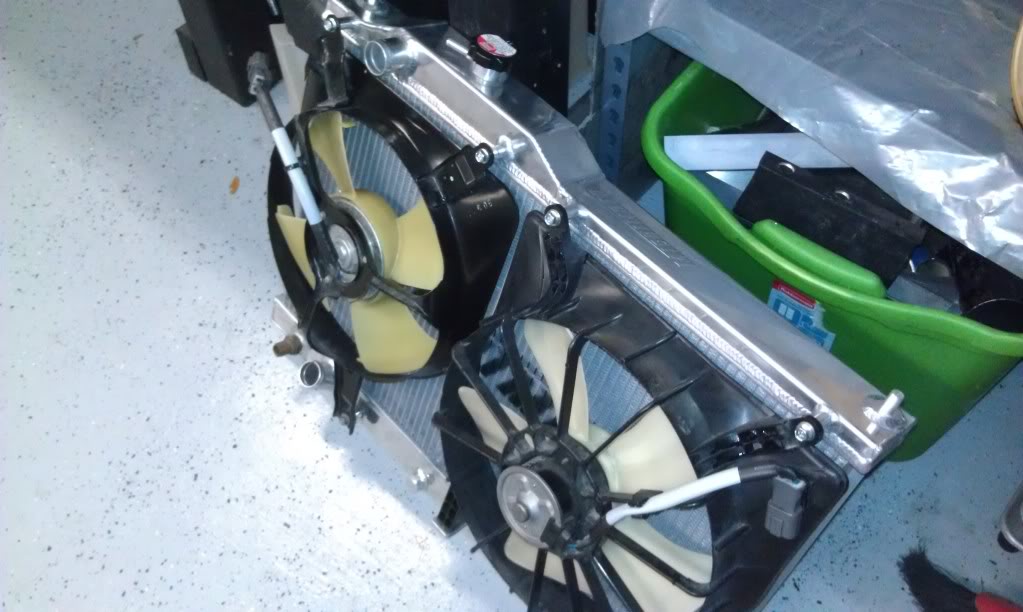
-I got rid of the oem radiator and opted for a mishimoto. i have used this radiator on multiple customer cars from s2000s to STIs to Turbo civics and integras without a single issue. so i will always stick with them. it mounted up like a dream and the oem fans fit perfectly.I also used an aluminum cooling plate in place of the oem plastics. i dont think there are any gains from this at all besides the fact that it looks cool.
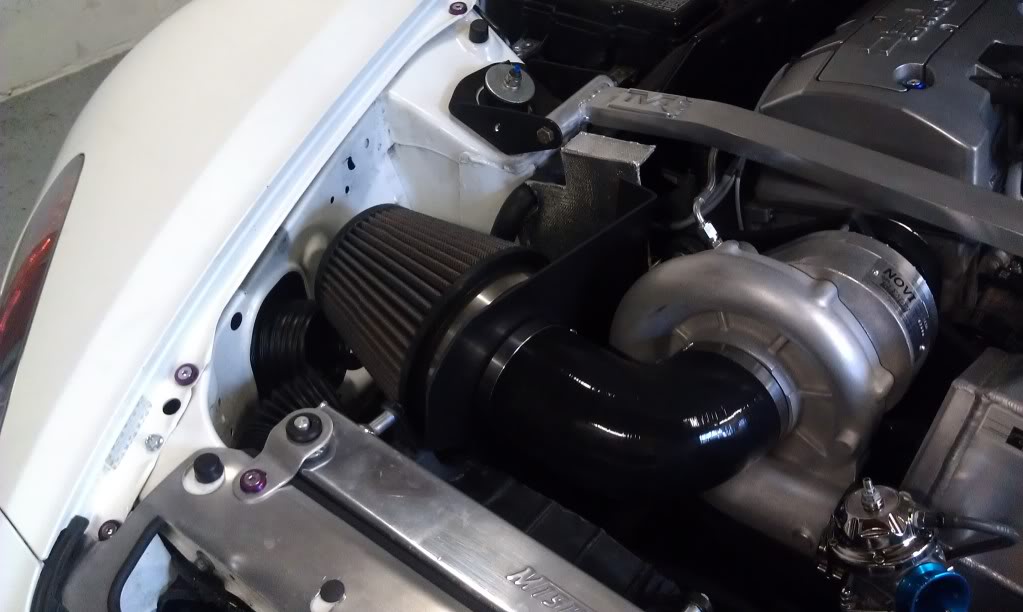
I bought a 3.5" ID silicone 90 for the replacement intake tube since i was no longer recirculating and then got to work on supporting mods for it. used the comptech velocity stack with an AFE filter. then bought a plastic racing brake duct online with a 3" out

and got to cutting, fitting, and fiberglssing it in behind the oem fake brake duct scoop. this is very sneaky and cannot be seen unless you go looking for it.


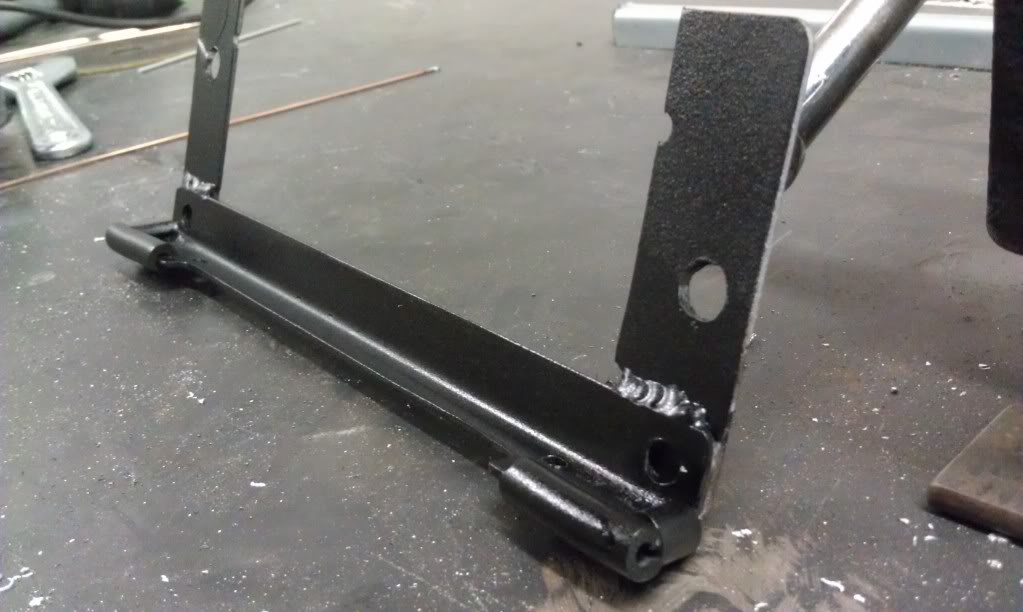
you can see in the last pic i fabbed up a custom headlight/fender mount bracket to accomodate for the 3" hose. this was tricky, but is sturdy as oem and works with the scoop and duct. many said, "eh, i just took mine off." but that is kinda lame as it is there for a good reason. so i ended up with this coated in smoke grey.

i then bought a piece of 1/8" abs plastic and heat bent on a press break the angles i needed and drilled out the 3.5" hole and mounted this under, and around the filter to keep all the unwanted heat from the bay away from my filter and plumbed my 3" ducting from 2 spots right into the area forcing fresh ambient air into the car when crusing at any speed.


I was going to make this a totlly sealed enclosure that drew air through the ducts, but i dont want to worry about rain being violently sucked into the intake, if water happens to be carried in(which will happen) it has a place to go besides right into the SC.
and from the pics you can also see a heat wrapped exhaust area shield i made out of aluminum and bolted to the shock tower to keep those really high temps from interacting with my plastic air filter surround.
-I left the exhaust all stock except for a 3" test pipe. This was a major concern for me as i DD the car and i absolutely hate the loud droning from after market exhausts. it drives me crazy. i can hear the engine and sc all day with this setup and as per my dyno results, it works just fine.
-I upgraded all the silicone coupler clamps to T-Bolt Clampco clamps.
-I welded in an aluminum barb fitting to the VC and ran both VC vent ports down and out to the bottom of the car and they do not carry much, if any oil in them. custom baffles FTW. and the dipstick doesnt play pop-goes-the weasel.
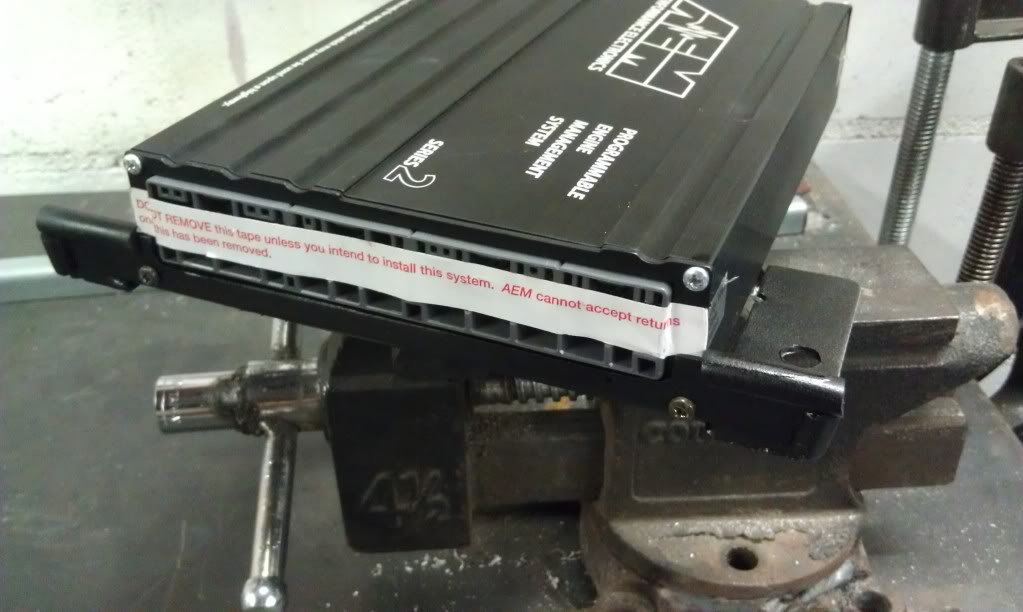
-I fabbed up a bracket to mount the AEM in the same location as the oem ecu. the velcro was not going to happen, i didnt even give it a chance. so i made this bracket and everything fits as it should and is secure.

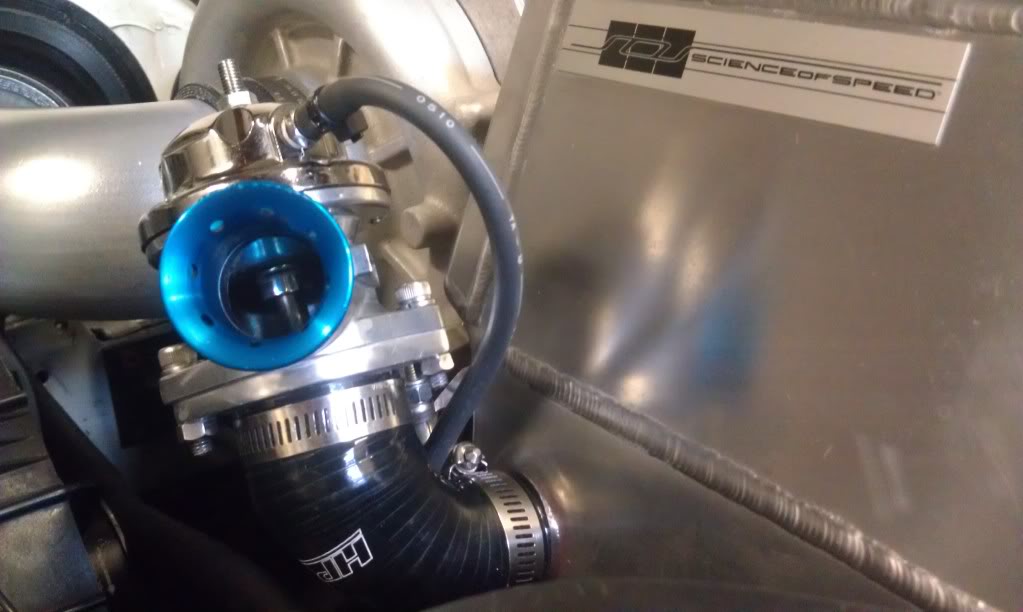
-as for the BPV, it worked just fine on the dyno. held the psi is was supposed to and didnt fall apart. its just not visually appealing and if you want that classic BOV sound, you just dont get it form the BPV. So, I purchased an HPS, black silicone 1" to 1.5" 90 degree hose, a greddy 1.5" adapter flange, and a Greddy type RS bov to go in the Kayser BPV's place. *NOTE* in order to get the RS bov to function like the bpv where it blows off pressure at idle and light throttle, you need to remove the smaller spring inside the tophat and run only the larger spring. this will give the RS valve the same characteristics of the oem bpv in terms of off throttle venting and light throttle dumping. The Greddy sounds great( no obnoxious whistle of the hks or whipsmack sound of the crappy ass RFL. it just sounds like a propper BOV and looks terrific in there.
-I used Castrol edge titanium 10w30 in the motor as i have used since it came out. i used oem honda MTF in the trans. and I used Lucas 75w-90 full synthetic GL5 gear oil in the diff. I drained and filled the brake system and clutch system with Moturl RBF 600. I used Watter wetter and oem honda type-2 coolant in the cooling system. And i used distilled water with a touch of water wetter in the after cooler/heat exchanger.
-Overall driving impressions of the car as a complete package now:
The car is wonderful!! suspension, interior, exterior mods aside, the car is just awesome. properly tuned, the car drives 100% like stock whilst cruising and very light accel. the power delivery with this kit is so SOLID and linear! thats the best way i can describe it, "SOLID". you dont feel like youre on the ragged edge of power or like the kit is going to last a few hundred miles, then tap out. you feel secure just like when the car was totally stock. When Vtec comes in, there is a thrust and the rpms just climb into oblivion in a split second. the care pulls consistently and hard from about 5k to 8400rpm! I have the aem wideband integrated into the ecu as well as the gauge display and also have the aem digital boost gauge for quick referencing while driving and piece of mind. The SC sound is heard at all time with my intake setup. with the top down, you feel like youre riding in an open cabin jet! its fricken great.
-I have been to 521whp turbo before, i have been stock before.... and honestly, overall, this is the best setup i have experienced in this car in terms of power to daily driver ability. This kit is truly worth every cent and it will make your driving experience enjoyable at ALL times since you wont be paranoid about anything breaking and wont have to worry about things coming loose or causing adverse engine effects. I literally just get in every morning and drive and enjoy. that is worth all the money spent to me.
Well, thats the end of the review. i hope this hepls those who are new to the subject or are considering FI.
EDIT: here are the cruising and idling vids people have been requesting to hear what the 1220 with the alum intake and velocity stack sounds like. these were taken randomly on my way home today. the one in my garage shop is on my second post since i couldnt upload any more to this one.
sitting in traffic with light throttle bumps.
http://www.youtube.com/watch?v=jtJ_O...eature=related
crusing down S. Fl ave
http://www.youtube.com/watch?v=xCEhO...eature=channel
keep in mind, none of this was over even 18% throttle. ;-)
-Nathan
I purchased my kit on dec 27, 2011 in order to take advantage of their awesome 600 dollar discount on the stage 2 kit. Mine is a stage 2, Non-SL 1220 with a 9-10psi pulley, AEM s2 ecu, RC 650's(other mods will be covered below). The kit took about a month to get in order because i wanted all the components other than the SC mounting bracket to be in a raw aluminum finish. like it was straight out of casting or fabbing.
Dealing with the guys at that shop is great. they are very thorough, reliable, and easy to deal with. My order came in 2 large boxes. 1 for the SC itself, and 1 for all the other goodies.
The packaging was terrific!every component was cataloged in a folder with my name on it through a checklist. every component was also numerically coded based off of what bag/bundle it was in for easy sourcing. Hvaing all the items hand picked and checked off in a folder specifically for you is really something. I have not purchased every kit out there to date, but as for comptech, greddy, inline pro, none of them do any of this.
As for the parts of the kit:
Wow. you truly do get what you pay for!!!!
i know a lot of guys say "the kit is too expensive for power gained" and crap like that, but let me tell you. you aren't just paying for a top rpm power number. you get days upon days upon days of R&D time, you get Honda Genuine bolts that were selected specifically for each position they will be going into based off thread pitch and shank length requirements. just sourcing all the exact Honda bolts for every spot they go into would take a solid day. You get Teflon, anti-seize, thread locker, every single little clamp, zip-tie, etc. Everything that takes so long to source and figure out that you need when designing a custom kit is all there. (i build custom stainless manifolds, turbo setups, inter-coolers, and general fabbed parts for cars of all kinds, and that is what takes the longest: all the figuring and test fitting different parts, etc. In this kit, the moment you open the box, weeks of work is already done for you. You will not get this from any other kit out there. there is always something else you need to buy, especially with "turbo kits".
moving on, I met this guy when i opened box 2:
the finish was exactly what i wanted, not just on the sc cover, but in all the parts to come as well. stand by!
getting ready to go under the knife:
Installation:
this is the most important part IMO. if you can instruct individuals thousands of miles away how to easily and correctly install your product without vocal communication, you have done your job. The instructions are no IKEA instructions. they are step by step, thorough, and even look out for common areas where people might make mistakes. Full of color and full of pictures.
Everything is easy to locate thanks to their packaging method. find the name of the item, see what bag/cluster it is in, retreive it. just that simple.
As for the actual fit and finish of the kit for installation... PERFECT!
everything goes together EXACTLY as it should. no finagling, no wedging, no forcing, no BS. this is where countless hours of R&D come into play. you dont loose time because something doesnt fit exactly like the pic, you dont get frustrated because a companant is a hair off and you have to mash it into place. E V E R Y T H I N G just FITS.
difficulty?
the fuel pump install is always a pain if you are any larger than a 6 year old girl. there is no way around that. it is a "process" and you will get high as a kite in the "process". as for the rest of the install, do yourself a favor and take your time. dont rush. there is no need. and surely dont cut any corners as there is really no need to with this kit. Taking the time to assemble a kit that has had time taken on it will give you a greater appreciation for the quality of craftsmanship of the items you just purchased.
Opinions at completion:
the entire setup looks terrific and fits like it was an upgrade option from Honda themselves. and that is not me being biased or overly appreciative, i am being as objective and rational as possible when i state that. My car started right up the very first time, didnt have ANY drama accompanying it, and acted like it had always been modded that way. no bolts backed out form vibration, no lines leaked, no steps were missed that caused me to quickly rush to take care of the issue. it just started, i gave it a once over, and then turned it off with a massive sense of ease and accomplishment.
Tuning and HP/TQ:
I opted to leave the oem ecu in, the oem injectors in, the SC belt off, and i drove to the dyno for tuning. i dont like the idea of "base maps" as i have encountered pointless drama with them before, so if you opt to use my method, it will be a smooth sailing and worry free ride all the way to the dyno for you.
-On the first dyno(the one my tuner uses to tune on), i made 350whp and 230wt peaking at 9.5 psi at 8300 rpms on a Mustang dyno with my belt slipping in the midrange and i didnt have the tension anywhere close to correct. the car never got above 200 in terms of coolant temp and the aftercooler was literally less than my body temp the entire dyno tiume and aven after my bumper to bumper traffic ride home for an hour and 30 mins.
about 2 weeks later i went to a dyno day with a NA civic buddy of mine and a turbo teg friend and made 373whp and 251wtq on a Dynojet dyno with all mods and everything the exact same except i got the belt tension corrected. pretty cool and direct data for dynomometer comparison.
-I have some upgrades and mods to my SOS kit. I fabbed a larger heat exchanger out of a motorcycle radiator by welding plates over all the inlets/outlets, etc, then i drilled and welded in 2 3/4" aluminum tubes for the water in and out. one at the top and one at the bottom(same side in/out). i like the top to bottom flow because its just like a rad so the water pump doesnt have to pump so hard to flow the fluid. water routing goes: the bottom of the after cooler -> top of the heat exchanger, flows down to the bottom of the heat exchanger -> to the IN of the water pump -> then to the top of the after-cooler. basically, this setup mimics the exact same water pathway of water through our engine(water pump, rad and all). I didnt want a HE that covered the entire length of the bumper opening as this has caused overheating issues in the past with personal and customer cars. my HE is a litle over 1" thick and about 19x8 if i remember correctly.
-I installed a Competition Clutch stage 2 kit on an AP1 flywheel. this holds every bit of the power made, feels like stock, doesnt chatter, and is very suitable for daily driving as thats what i use my car for.
-I got rid of the oem radiator and opted for a mishimoto. i have used this radiator on multiple customer cars from s2000s to STIs to Turbo civics and integras without a single issue. so i will always stick with them. it mounted up like a dream and the oem fans fit perfectly.I also used an aluminum cooling plate in place of the oem plastics. i dont think there are any gains from this at all besides the fact that it looks cool.
I bought a 3.5" ID silicone 90 for the replacement intake tube since i was no longer recirculating and then got to work on supporting mods for it. used the comptech velocity stack with an AFE filter. then bought a plastic racing brake duct online with a 3" out
and got to cutting, fitting, and fiberglssing it in behind the oem fake brake duct scoop. this is very sneaky and cannot be seen unless you go looking for it.
you can see in the last pic i fabbed up a custom headlight/fender mount bracket to accomodate for the 3" hose. this was tricky, but is sturdy as oem and works with the scoop and duct. many said, "eh, i just took mine off." but that is kinda lame as it is there for a good reason. so i ended up with this coated in smoke grey.
i then bought a piece of 1/8" abs plastic and heat bent on a press break the angles i needed and drilled out the 3.5" hole and mounted this under, and around the filter to keep all the unwanted heat from the bay away from my filter and plumbed my 3" ducting from 2 spots right into the area forcing fresh ambient air into the car when crusing at any speed.
I was going to make this a totlly sealed enclosure that drew air through the ducts, but i dont want to worry about rain being violently sucked into the intake, if water happens to be carried in(which will happen) it has a place to go besides right into the SC.
and from the pics you can also see a heat wrapped exhaust area shield i made out of aluminum and bolted to the shock tower to keep those really high temps from interacting with my plastic air filter surround.
-I left the exhaust all stock except for a 3" test pipe. This was a major concern for me as i DD the car and i absolutely hate the loud droning from after market exhausts. it drives me crazy. i can hear the engine and sc all day with this setup and as per my dyno results, it works just fine.
-I upgraded all the silicone coupler clamps to T-Bolt Clampco clamps.
-I welded in an aluminum barb fitting to the VC and ran both VC vent ports down and out to the bottom of the car and they do not carry much, if any oil in them. custom baffles FTW. and the dipstick doesnt play pop-goes-the weasel.
-I fabbed up a bracket to mount the AEM in the same location as the oem ecu. the velcro was not going to happen, i didnt even give it a chance. so i made this bracket and everything fits as it should and is secure.
-as for the BPV, it worked just fine on the dyno. held the psi is was supposed to and didnt fall apart. its just not visually appealing and if you want that classic BOV sound, you just dont get it form the BPV. So, I purchased an HPS, black silicone 1" to 1.5" 90 degree hose, a greddy 1.5" adapter flange, and a Greddy type RS bov to go in the Kayser BPV's place. *NOTE* in order to get the RS bov to function like the bpv where it blows off pressure at idle and light throttle, you need to remove the smaller spring inside the tophat and run only the larger spring. this will give the RS valve the same characteristics of the oem bpv in terms of off throttle venting and light throttle dumping. The Greddy sounds great( no obnoxious whistle of the hks or whipsmack sound of the crappy ass RFL. it just sounds like a propper BOV and looks terrific in there.
-I used Castrol edge titanium 10w30 in the motor as i have used since it came out. i used oem honda MTF in the trans. and I used Lucas 75w-90 full synthetic GL5 gear oil in the diff. I drained and filled the brake system and clutch system with Moturl RBF 600. I used Watter wetter and oem honda type-2 coolant in the cooling system. And i used distilled water with a touch of water wetter in the after cooler/heat exchanger.
-Overall driving impressions of the car as a complete package now:
The car is wonderful!! suspension, interior, exterior mods aside, the car is just awesome. properly tuned, the car drives 100% like stock whilst cruising and very light accel. the power delivery with this kit is so SOLID and linear! thats the best way i can describe it, "SOLID". you dont feel like youre on the ragged edge of power or like the kit is going to last a few hundred miles, then tap out. you feel secure just like when the car was totally stock. When Vtec comes in, there is a thrust and the rpms just climb into oblivion in a split second. the care pulls consistently and hard from about 5k to 8400rpm! I have the aem wideband integrated into the ecu as well as the gauge display and also have the aem digital boost gauge for quick referencing while driving and piece of mind. The SC sound is heard at all time with my intake setup. with the top down, you feel like youre riding in an open cabin jet! its fricken great.
-I have been to 521whp turbo before, i have been stock before.... and honestly, overall, this is the best setup i have experienced in this car in terms of power to daily driver ability. This kit is truly worth every cent and it will make your driving experience enjoyable at ALL times since you wont be paranoid about anything breaking and wont have to worry about things coming loose or causing adverse engine effects. I literally just get in every morning and drive and enjoy. that is worth all the money spent to me.
Well, thats the end of the review. i hope this hepls those who are new to the subject or are considering FI.
EDIT: here are the cruising and idling vids people have been requesting to hear what the 1220 with the alum intake and velocity stack sounds like. these were taken randomly on my way home today. the one in my garage shop is on my second post since i couldnt upload any more to this one.
sitting in traffic with light throttle bumps.
http://www.youtube.com/watch?v=jtJ_O...eature=related
crusing down S. Fl ave
http://www.youtube.com/watch?v=xCEhO...eature=channel
keep in mind, none of this was over even 18% throttle. ;-)
-Nathan

Joined: Sep 2006
Posts: 10,465
Likes: 52
From: ATL
Looks great! I really really like the raw finish on the supercharger and aftercooler. I think the standard black finish looks a tad more OEM but this still looks great. Did you have to pay extra to get it like that or just a matter of waiting longer?
Thread Starter
Registered User
Joined: Jan 2008
Posts: 1,967
Likes: 0
From: Lakeland, Florida
last sc sound vids:
pulling into my garage/shop
http://www.youtube.com/watch?v=7loAK...feature=relmfu
Greddy RS bov with only the large spring and adjusted to close at 12-14 vac
no girly/gay whistles or chirps here!
http://www.youtube.com/watch?v=pPDLc...ature=youtu.be
pulling into my garage/shop
http://www.youtube.com/watch?v=7loAK...feature=relmfu
Greddy RS bov with only the large spring and adjusted to close at 12-14 vac
no girly/gay whistles or chirps here!
http://www.youtube.com/watch?v=pPDLc...ature=youtu.be


Joined: Aug 2011
Posts: 332
Likes: 0
would you have to remove the smaller spring on all blow off valves to make it work with a supercharger setup? I have a vortech system and I am thinking of putting either the Godzilla BOV or an HKS SSQV. Just wondering if i need to modify them to have them function properly.
Nice write up tho!
Nice write up tho!


Trending Topics
Thread Starter
Registered User
Joined: Jan 2008
Posts: 1,967
Likes: 0
From: Lakeland, Florida
Dont have any vids... yet. all those pics are from my phone when my car was in my shop. no fancy cameras and photoshoots for me :-/
as for the sound, the paxton will have some "gear noise" but thats expected with the rpms the SC will see. if everything is so tight it wont make a sound, the sc wont be able to work as smoothly as it should and spin freely to the desired range. it does not sound like a blender full of bolts though if thats what you are asking. it sounds like a jet that is brake boosting before takeoff with a hint of transmission decel-type of sound. if that makes any sense. and that "gear noise" you are talking about is only heard at idle or low low rpm(0-1000). they dont get really noisy until youve ruined something. Paxton guys say the rattle noise is gear backlash.
as for the sound, the paxton will have some "gear noise" but thats expected with the rpms the SC will see. if everything is so tight it wont make a sound, the sc wont be able to work as smoothly as it should and spin freely to the desired range. it does not sound like a blender full of bolts though if thats what you are asking. it sounds like a jet that is brake boosting before takeoff with a hint of transmission decel-type of sound. if that makes any sense. and that "gear noise" you are talking about is only heard at idle or low low rpm(0-1000). they dont get really noisy until youve ruined something. Paxton guys say the rattle noise is gear backlash.
Thread Starter
Registered User
Joined: Jan 2008
Posts: 1,967
Likes: 0
From: Lakeland, Florida
would you have to remove the smaller spring on all blow off valves to make it work with a supercharger setup? I have a vortech system and I am thinking of putting either the Godzilla BOV or an HKS SSQV. Just wondering if i need to modify them to have them function properly.
Nice write up tho!
Nice write up tho!