
Ballistic Lithium Battery Relocation DIY

Thread Starter
Joined: May 2010
Posts: 3,422
Likes: 2
Been meaning to post this up for a while. Trying to get the car ready for my kit install by taking care of as much as possible before it gets here. I used info from the following threads for ideas of what I wanted to do with my relocation.
Best DIY Battery Relocation
IllestRolla's Build Thread
GMK Build Thread
Some info in these threads about Lithium Batteries, and others using them. Don't think there is another S using a Ballistic but a few guys running Shorai. I chose the Ballistic battery over Shorai because of size and their active involvement on Motorcycle forums. Any question, problem etc etc was immediately responded to in the thread and the customer handled right away (not saying Shorai wouldn't do the same).
http://www.ballisticparts.com/produc...ies/12cell.php
https://www.s2ki.com/s2000/topic/1051105-on-batteries/
https://www.s2ki.com/s2000/topic/102...ithium+battery
https://www.s2ki.com/s2000/topic/707...ithium+battery
https://www.s2ki.com/s2000/topic/863...ithium+battery
https://www.s2ki.com/s2000/topic/953...#entry21788657
Couple a Miatas and Lotus guys running the 12 and 16cell battery with success. I did find a few guys that had problems with them dying during storage. Those two were having parasitic draw issues eating away at the battery. From what I've gathered, Lithuim batteries do not like constant small draws. The s2000 is great for this as it doesn't have a lot of ECU's that wake up while the key is off and out of the ignition. I did a draw test on my car and it was pulling 7-8 milliamps once everything powered down.

Here's the battery next to a large Starbucks cup for size reference

Well after tooling around in a bunch of build threads, decided I liked Illestrollas relo the best. Wish I had come to that conclusion before I took the fender off but no big. Parts list for the relo:
Knukoncepts 0 gauge red and black wire. 12 feet red and 3 feet black. Had a little over 3 feet of red left over.
Stinger Audio 150amp breaker
Stinger Audio Distribution block with at least 1 port for 0 gauge and 2 for 4 gauge (could use only one port for 4 but I used two)
Brass Ring Terminals for 0 gauge. The ones I used were nice but the wire I choice is known for being thicker then most so I had to trim it some to fit the solder. They do make terminals with allen keys. I'd use those if I did this again.
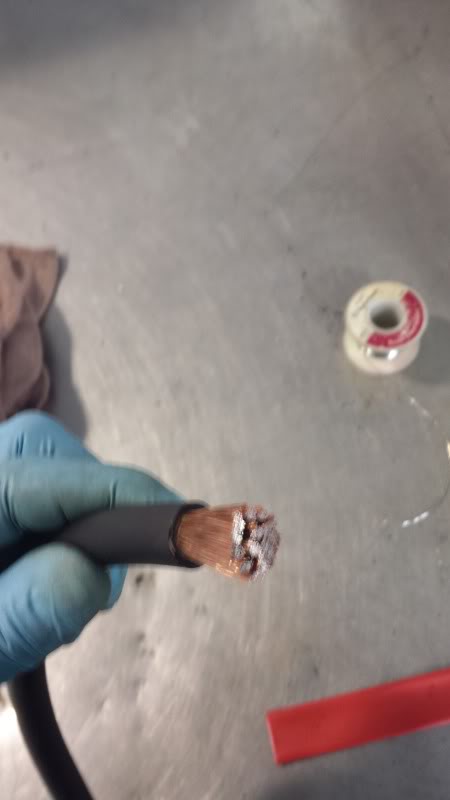
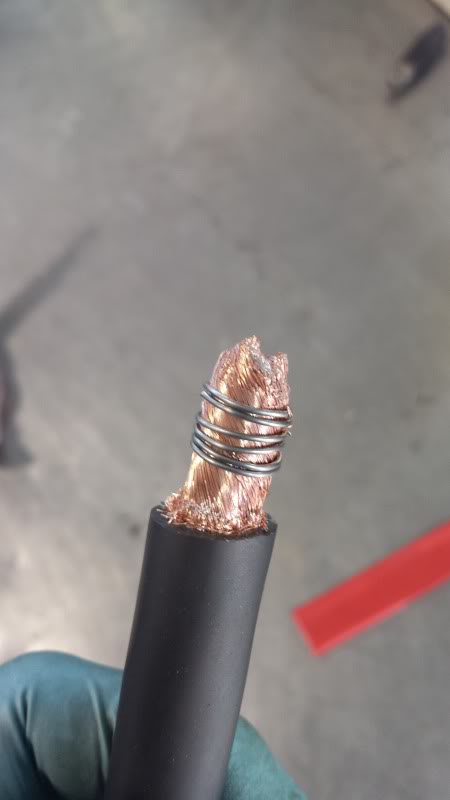
After soldering the ends on and letting them cool. I tugged on them hard to make sure they were on good. Then I used 5/8 shrink wrap and finished off with electrical tape.


Old battery, tray, fuse box and EPS moved out the way. Have to say, I love how our fuse box comes completely about and all the wires have connectors. Makes moving it around really simple. Drilled a 7/8 hole through the firewall right behind the AC blower box. Used a round file to take any burs off the drilled metal and installed a grommet on the wire. After the install was complete, I pulled back the insulation behind the AC box and applied some sealant just for extra water protection (no pic of that). Ran the wire behind the wire for the door electronics and under the passenger side carpet; made sure all trim pieces fit back with the wire under it.


Wire exits behind the passenger seat where the breaker is located. There is panel there that is easily accessed as long as the screw in clips are left out (which I did). Under the breaker is a piece of semi-hard interior foam. This will keep the breaker from making any noise and from vibrating against the body. Zip tied it in place and covered the top with another piece of foam.


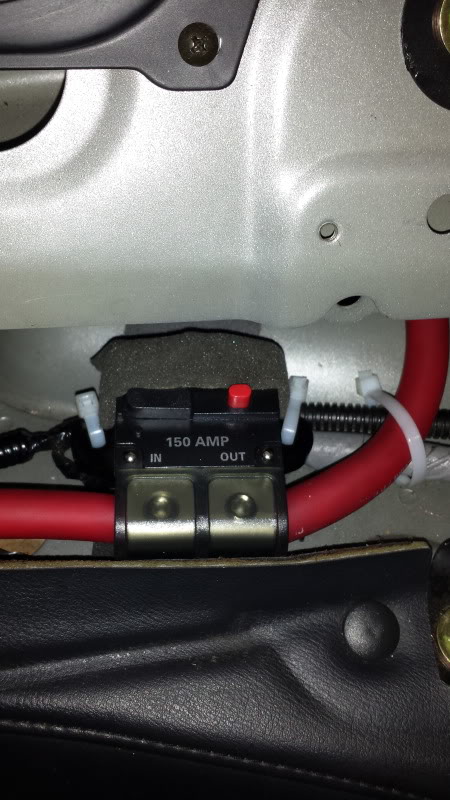
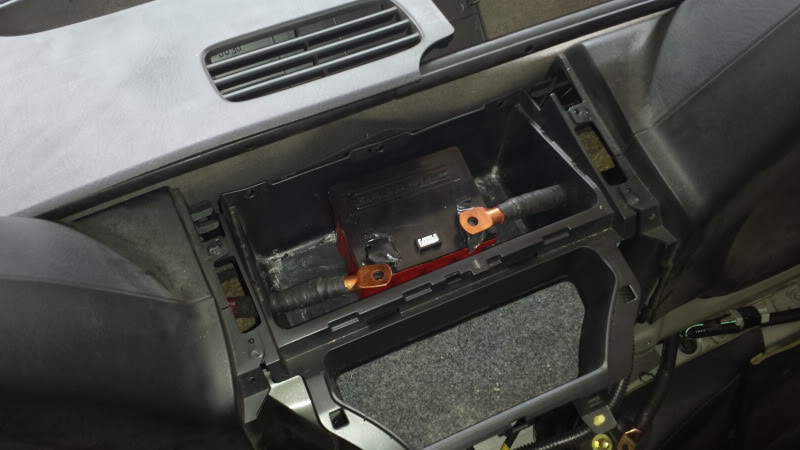
Removed the covers behind the seat and the center console box. Drilled holes in the sides of box for the power and ground cables. Battery is grounded to roll hoop bolt; excellent ground point as it goes straight to the body. Installed some more foam around the battery and a strap to hold it in place.


Best DIY Battery Relocation
IllestRolla's Build Thread
GMK Build Thread
Some info in these threads about Lithium Batteries, and others using them. Don't think there is another S using a Ballistic but a few guys running Shorai. I chose the Ballistic battery over Shorai because of size and their active involvement on Motorcycle forums. Any question, problem etc etc was immediately responded to in the thread and the customer handled right away (not saying Shorai wouldn't do the same).
http://www.ballisticparts.com/produc...ies/12cell.php
https://www.s2ki.com/s2000/topic/1051105-on-batteries/
https://www.s2ki.com/s2000/topic/102...ithium+battery
https://www.s2ki.com/s2000/topic/707...ithium+battery
https://www.s2ki.com/s2000/topic/863...ithium+battery
https://www.s2ki.com/s2000/topic/953...#entry21788657
Couple a Miatas and Lotus guys running the 12 and 16cell battery with success. I did find a few guys that had problems with them dying during storage. Those two were having parasitic draw issues eating away at the battery. From what I've gathered, Lithuim batteries do not like constant small draws. The s2000 is great for this as it doesn't have a lot of ECU's that wake up while the key is off and out of the ignition. I did a draw test on my car and it was pulling 7-8 milliamps once everything powered down.

Here's the battery next to a large Starbucks cup for size reference

Well after tooling around in a bunch of build threads, decided I liked Illestrollas relo the best. Wish I had come to that conclusion before I took the fender off but no big. Parts list for the relo:
Knukoncepts 0 gauge red and black wire. 12 feet red and 3 feet black. Had a little over 3 feet of red left over.
Stinger Audio 150amp breaker
Stinger Audio Distribution block with at least 1 port for 0 gauge and 2 for 4 gauge (could use only one port for 4 but I used two)
Brass Ring Terminals for 0 gauge. The ones I used were nice but the wire I choice is known for being thicker then most so I had to trim it some to fit the solder. They do make terminals with allen keys. I'd use those if I did this again.


After soldering the ends on and letting them cool. I tugged on them hard to make sure they were on good. Then I used 5/8 shrink wrap and finished off with electrical tape.


Old battery, tray, fuse box and EPS moved out the way. Have to say, I love how our fuse box comes completely about and all the wires have connectors. Makes moving it around really simple. Drilled a 7/8 hole through the firewall right behind the AC blower box. Used a round file to take any burs off the drilled metal and installed a grommet on the wire. After the install was complete, I pulled back the insulation behind the AC box and applied some sealant just for extra water protection (no pic of that). Ran the wire behind the wire for the door electronics and under the passenger side carpet; made sure all trim pieces fit back with the wire under it.


Wire exits behind the passenger seat where the breaker is located. There is panel there that is easily accessed as long as the screw in clips are left out (which I did). Under the breaker is a piece of semi-hard interior foam. This will keep the breaker from making any noise and from vibrating against the body. Zip tied it in place and covered the top with another piece of foam.


Removed the covers behind the seat and the center console box. Drilled holes in the sides of box for the power and ground cables. Battery is grounded to roll hoop bolt; excellent ground point as it goes straight to the body. Installed some more foam around the battery and a strap to hold it in place.


Thread Starter
Joined: May 2010
Posts: 3,422
Likes: 2
Like Illest, I bolted the EPS box to the body using the holes from the stock battery tray. To do this, I elongated two of the holes in the EPS box with my drill. Connected the 0 gauge wire to the distribution block and connected the power wires from the fuse block and EPS wiring harness to the 4 gauge ports. You can put them together and install them into one port but using two worked better for how the EPS and Fuse box were located. Note for anyone following this: the side connectors on the EPS box are the SAME and can be mixed up. I didn't notice this until I started the car and had no power steering. I reconnected them the same way I saw in another thread but it was an ap1. The ap2 wires DO NOT go in the same sockets. If you get an EPS light, just switch them or pay attention to where they go 
I mounted the fuse box ontop of the EPS using the brackets that held the fuse and I think the other was the stock EPS bracket. One bracket sits higher then the other and the hole didn't line up where I needed. I drilled a hole in it and used a piece of rubber hose and washers as a makeshift bushing to take up the space between the bracket and the fuse box. The distribution block is double sided tapped down on the EPS box and I put a small amount of duct tape on the side of the plastic cover of the distribution block to keep it from coming off.


[IMG]http://i125.photobucket.com/albums
/p55/redlinesrt4/20131107_133315_zpsb2370fe5.jpg[/IMG]
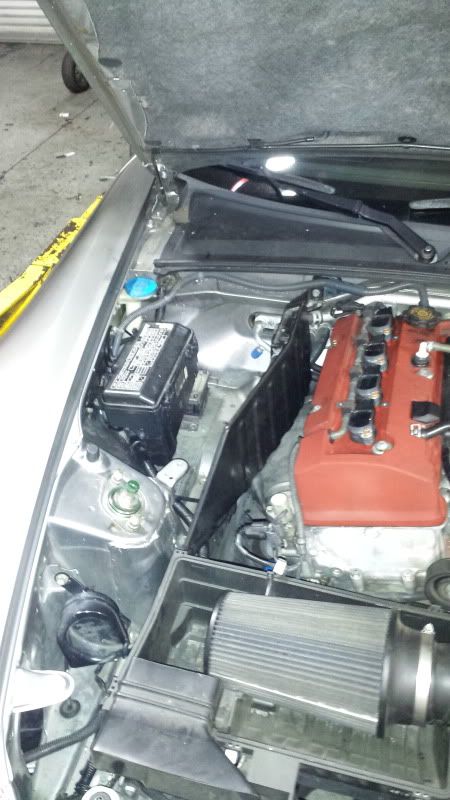
Everything reinstalled in the bay miss the old battery
Seats and interior panels reinstalled. Last pic showing the access to the breaker with the seat in. The breaker can also be manually tripped and completely cuts the battery off from the car. Also put die electric grease over the ends of the breakers plastic cover to seal the wires inside.


Feel free to ask any questions,make suggestions, criticize etc etc
I mounted the fuse box ontop of the EPS using the brackets that held the fuse and I think the other was the stock EPS bracket. One bracket sits higher then the other and the hole didn't line up where I needed. I drilled a hole in it and used a piece of rubber hose and washers as a makeshift bushing to take up the space between the bracket and the fuse box. The distribution block is double sided tapped down on the EPS box and I put a small amount of duct tape on the side of the plastic cover of the distribution block to keep it from coming off.


[IMG]http://i125.photobucket.com/albums
/p55/redlinesrt4/20131107_133315_zpsb2370fe5.jpg[/IMG]
Everything reinstalled in the bay miss the old battery

Seats and interior panels reinstalled. Last pic showing the access to the breaker with the seat in. The breaker can also be manually tripped and completely cuts the battery off from the car. Also put die electric grease over the ends of the breakers plastic cover to seal the wires inside.


Feel free to ask any questions,make suggestions, criticize etc etc

Thread Starter
Joined: May 2010
Posts: 3,422
Likes: 2
Thanks. The battery is like 3 pounds. No one at work could believe a car could be powered by such a small battery. Hardest trouble so far cranking was a few days ago when it was 40 degrees out. After 4 tries though, it start up no problem.
Joined: Apr 2010
Posts: 1,579
Likes: 13
From: Roc
Hey....that's me!

Glad to see you got it all figured out man. The install looks great, appreciate you referencing all the builds at the beginning. That's what this place is all about, everyone's different ideas, helping one another
Glad to see you got it all figured out man. The install looks great, appreciate you referencing all the builds at the beginning. That's what this place is all about, everyone's different ideas, helping one another


Thread Starter
Joined: May 2010
Posts: 3,422
Likes: 2
Thanks guys. I'll keep this updated once or few times a week with updates about how the battery is doing. Its getting colder here in FL, so we'll see how it does on colder mornings. Worst morning so far was a days ago like I stated earlier, 40 degrees and the car sat for 3 days prier. Weak start at first but started good after the 4th try. I can tell the batterys CCA increases as it gets hotter from a draw.
Trending Topics
Joined: Apr 2010
Posts: 1,579
Likes: 13
From: Roc
Thanks guys. I'll keep this updated once or few times a week with updates about how the battery is doing. Its getting colder here in FL, so we'll see how it does on colder mornings. Worst morning so far was a days ago like I stated earlier, 40 degrees and the car sat for 3 days prier. Weak start at first but started good after the 4th try. I can tell the batterys CCA increases as it gets hotter from a draw.
Joined: Aug 2011
Posts: 1,935
Likes: 3
From: Myrtle Beach
I never had much luck soldering heavy gauge wires, is there a trick here, never seem to get it hot enough, even with a tourch the heat just conducts away and I burn the insulation. Love that fuse, where did you get it? Nice job in general.
