
Biohazarde's Build


Thread Starter
Registered User
Joined: Sep 2013
Posts: 98
Likes: 0
Ouch, my golden eagle sleeves seemed to hold up pretty well. Mine burned a little water, because i was an idiot and forgot to put copper spray on my headgasket lol. I have lots of ls /vtec turbo parts for sale, if you need anything! haha.

Thread Starter
Registered User
Joined: Sep 2013
Posts: 98
Likes: 0
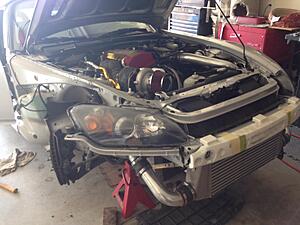
Well did some more work on the car. Started off with a battery relocation and fuse box/eps removal. I chose the footwell for the Fuse box, and inner fender for the EPS...i forgot to take a picture of the inner fender stuff...but it was pretty straight forward...eps mounted in the cubby behind the liner...drilled a hole in the indent by the washer reservoir to rout wires from the inside of car to outside (didnt do the short cut method using the washer reservoir hole). Mounted a distribution box to put the 0 gauge positive wire from battery in trunk, then split it out.


Im also bad and didnt get any pictures of the battery in the trunk...but its a custom made aluminum box, with knuconceptz 0 gauge wire, and an ANL fuse setup, with an odyssey pc680 battery.
Now, working on the 8.8 conversion. I cant get myself to spend the money on the FBM kit, so between me and another member on the boards, we have come up with a pretty cheap solution for it.
First is the 8.8 being rebuilt. 3.90 strange gears, trac-loc rebuilt with 1 extra friction disk.


Then instead of a new drive shaft, using the stock one. With member 5thGen's drawing, I cut out some adapters to allow the stock drive shaft to bolt up to the ford rear end. (the bit on the CNC fell out on this adapter, causing the scuff, still fits perfectly on the hub centric part of the driveshaft and pinion)

Mounts are being made, as are axles -- all together should be into the rear around about 1500 bucks.
Also got some drag radials and AP1 rims, for when the rear end is in!


Thats it for now! waiting for axles to install the rear end, and ordered some goodies for the head, so i can break ear drums with anti lag! stay tuned!


Thread Starter
Registered User
Joined: Sep 2013
Posts: 98
Likes: 0

it comes up behind the blower motor, and decently high up (almost the same height, as the stock hole in the bay, where the wires come out from the cabin) and makes it super easy to re route the wires, and 100% impossible to see from inside the car.

Thread Starter
Registered User
Joined: Sep 2013
Posts: 98
Likes: 0
Got some more goodies and time in the past week or so:
Got in some line locks. its all hard line, and allows me to go back to stock lines in a couple minutes.

Also gave some money to realstreet performance...new springs and retainers.

Installing the new springs and retainers. i started and got a few valves done, and then realized the retainers required ap1 keepers...well sob. so had to order all new keepers, those little things are expensive...and had to wait over a week to get them =(. Its pretty back breaking installing them with the head still on, and a little nerve wracking...lost two of the old keepers through the oil drains in the head =/. BUT! pulled the oil pan off and found them laying in it! PHEW!
old:

new:

Still waiting on axles to put in 8.8 rear end...