TimG's Winter/Spring Rebuild
 12-03-2012, 06:14 AM
#11
Tim,
I always loved reading your posts, as they were always well thought out and quite technical. They were a great influence on my own build back in the day. Glad to see you're still around and slowly improving your car! In hindsight, I'd probably have done the welding for the fuse box as well as it's really tough not having a windshield sprayer on my car.
I always loved reading your posts, as they were always well thought out and quite technical. They were a great influence on my own build back in the day. Glad to see you're still around and slowly improving your car! In hindsight, I'd probably have done the welding for the fuse box as well as it's really tough not having a windshield sprayer on my car.
 12-03-2012, 10:20 AM
#13

Originally Posted by S2K-F8' timestamp='1354497215' post='22185672
Nice write up Tim!
Your fuse box solution is very clever, I like
Scott-
Your fuse box solution is very clever, I like
Scott-
Tim
Scott-
12-03-2012, 02:18 PM
#14

Thread Starter

Here are the links that inspired my frame cutting.
https://www.s2ki.com/s2000/topic/758...ox-relocation/
https://www.s2ki.com/s2000/topic/847...-scroll-setup/
Hopefully, mine will look like the second setup when I'm done.
Tim
12-04-2012, 03:01 AM
#15
Thread Starter
FYI, for anyone else considering the PFab manifold. I am using the 400-8012 ARP studs. They are M8x1.25x38 mm. They're too short to use the washers, but without the washers you can get full thread engagement. If you want to use washers, go the next size up. The nice thing about this size is that you can install the manifold and downpipe with the front few studs installed. You can also pull it off and let it hang if you need. If your studs were even slightly longer, that would not be possible.
Tim
Tim
 12-29-2012, 11:57 AM
#17
Thread Starter
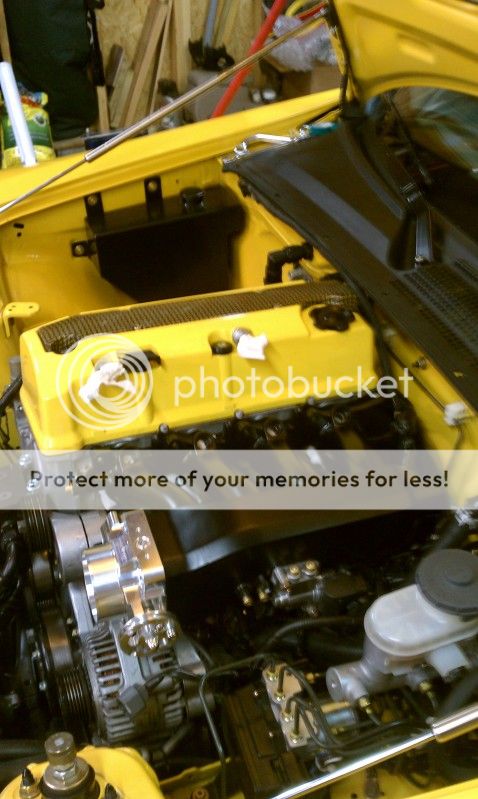
I started welding a couple of days ago and before I was even 10 welds in, I went to town on my S2000. Some of the welds were very nice, others not so nice, but in the end it's done and it's solid.
The fuse box is now relocated into the fender well. There were only 10 or so wires I needed to cut and extend at the fuse box, but there are going to be a ton of wires to extend for the power steering, A/C, hood latch, horn, PTuning radiator fan kit, and a few others. Everything looked close until I put the fender liner back on. Of the wiring going down the passenger's side, only the headlight wiring is long enough. In the end, I will probably have over 40 wires to extend.
If you're thinking about doing this, think hard before committing. The fuse box barely fits, so if your cuts into the frame are even slightly off, it won't work. Also, if your soldering skills aren't up to par, your crimping tool/connectors are poor quality, or your welding is on par with mine or worse, this is a recipe for disaster.
With that said, here are the pictures. If I'm lucky, I might finish the wiring this weekend and will post more pictures once I have progress to show.
Tim
[attachment=32110 SC01819.jpg]
[attachment=32111SC01820.jpg]
The fuse box is now relocated into the fender well. There were only 10 or so wires I needed to cut and extend at the fuse box, but there are going to be a ton of wires to extend for the power steering, A/C, hood latch, horn, PTuning radiator fan kit, and a few others. Everything looked close until I put the fender liner back on. Of the wiring going down the passenger's side, only the headlight wiring is long enough. In the end, I will probably have over 40 wires to extend.
If you're thinking about doing this, think hard before committing. The fuse box barely fits, so if your cuts into the frame are even slightly off, it won't work. Also, if your soldering skills aren't up to par, your crimping tool/connectors are poor quality, or your welding is on par with mine or worse, this is a recipe for disaster.
With that said, here are the pictures. If I'm lucky, I might finish the wiring this weekend and will post more pictures once I have progress to show.
Tim
[attachment=32110
SC01819.jpg][attachment=32111
SC01820.jpg]
12-29-2012, 12:02 PM
#18
Thread Starter
And here's where/how I cut the frame and what I did to mount the fuse box. Please excuse the horrible welding.
Not shown is that I was able to maintain the brace in the back corner, though I had to cut off a bit of the front part of it. It's still using the two lower bolts and the top back bolt.
Tim
[attachment=32112SC01176.jpg]
[attachment=32118SC01807.jpg]
[attachment=32117SC01181.jpg]
[attachment=32116SC01180.jpg]
[attachment=32115SC01179.jpg]
[attachment=32114SC01178.jpg]
[attachment=32113SC01177.jpg]
Not shown is that I was able to maintain the brace in the back corner, though I had to cut off a bit of the front part of it. It's still using the two lower bolts and the top back bolt.
Tim
[attachment=32112
SC01176.jpg][attachment=32118
SC01807.jpg][attachment=32117
SC01181.jpg][attachment=32116
SC01180.jpg][attachment=32115
SC01179.jpg][attachment=32114
SC01178.jpg][attachment=32113
SC01177.jpg]
01-20-2013, 11:59 AM
#19
Thread Starter
So today I finished extending all of the wires from the passenger side wiring harness other than the headlight cluster wires. If you're considering a fuse box relocation, you'll need a huge stock of heat-shrink, solder, and wires. I still have to run a new 2 gauge wire to my distribution block. The stock wiring and my amp wiring all tie into it.
I was going to use an air hammer to get a bit more clearance for the downpipe, but I think I'm just going to try it as is. There is a significant amount of clearance and the less beating/cutting on the car, the better.
My existing oil drain appears to be 4" too short and my oil line 12" too long. (New lines will be approximately 18" for the feed and 24" for the drain.) I also found that the small GT series turbos use a different oil drain versus the BW, large GT, and T3/T4 turbos. As a result, I wound up buying a new oil drain flange, lots of new black AN fittings, black -10 AN hose for the drain, and a new -3 AN black oil feed.
I also bought a generic 2.5" intercooler piping kit from silicone intakes. I'll use some of it for welding practice and will use the rest to redo some of my piping. My old pipes include a BOV on the cold side. I want to eliminate that and do a recirculation valve on the hot side that is plumbed back into the intake piping. Also, the PFab intercooler piping doesn't quite fit the location of the Full Race intercooler. All things to be expected when you're mixing and matching parts.
At this rate, I'll hopefully be back on the road by the end of spring...
Tim
