When you click on links to various merchants on this site and make a purchase, this can result in this site earning a commission. Affiliate programs and affiliations include, but are not limited to, the eBay Partner Network.
Documenting my experience re-doing the arm rest for an AP2 center console.
Saw a favorable review on S2Ki and Amazon about The Tuning-Shop aftermarket leather shift boot and arm rest covers.
Purchased from here: https://www.ebay.com/str/thetuningshop
Customer service was good, typically they responded to my questions next day. They sell the boot and armrest separated and as a combo. It's cheaper as a combo.
Best part is you can ask for customization. I ended up getting non-perforated leather with yellow stitching.
Shipping took about 2 weeks from the UK
Leather arrived in a padded envelope. I ordered the shift boot and arm rest cover. Surprising they included contact glue and a small zip tie for the boot collar.
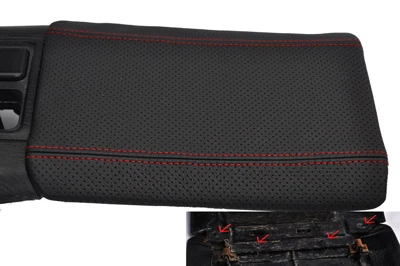
Leather was soft in general, not too thin. Stitching on the boot was good. Fitment was excellent. All holes aligned. Easy install. Armrest stitching was straight, kind of plain looking though. Purely cosmetic. Leather supple. Would've preferred a folded leather design like this:
However it would also be double the price. Generally for about $60, it's a good way to make the interior nicer. If you don't need/want the center stitching, going with a piece of upholstery leather would be a better option since you have more leather to work with with the added thickness of the foam. You'll just need to cut the leather edges with a knife afterwards.
On to the DIY experience.
I recently purchased an AP2 console. The old boot and armrest leather were completely stiff despite leather conditioner.
I figured this was a good opportunity to try some customization. I chose the color primarily because I have a yellow S2000 and liked to have a CR themed interior.
AP2 armrests are easy to remove. Just 4 screws. AP1's are plastic welded together and need creativity to remove as documented here:
I read up on the process on S2Ki, which was helpful but ran across a few issues. Getting leather pre-cut is helpful to get the shape right but if you use too much foam, it may not be enough. 1/2 inch foam is the MAX I would use with this kit.
Here are the material I found helpful to have:
1/2 inch foam (1/2 yard) from Michael's or Joann; was about $5 for me. I wouldn't go thicker with The Tuning-Shop kit because there won't be enough leather. I also considered high density foam but the armrest is notorious for being hard without much padding so I wanted a little bit of cushioning.
Super 77 3M spray adhesive. This stuff is STRONG and also smells a lot. I sprayed both contact surfaces.
Acid brushes for the included contact glue
E6000 glue for the corners
Lots of clips
Iron with steamer
The leather came folded and had an annoying crease in the center. I just steam ironed the leather, suede side up, using a thing piece of cotton between the iron and the leather. Crease came out perfectly.
I cleaned off any old glue and foam. There's ridges on the plastic already so I didn't see a need to scuff it with sandpaper.
I did a rough cut of the foam, applied glue to the plastic surface and foam, waited 30 seconds and put it together.
Afterwards I got some sharp scissors and cut the edges.
I find that if the foam goes over the edge of the plastic, you don't get crisp borders and the armrest looks too chunky.
In hindsight I should've been more careful of the cuts because I ended up with some divots.
Attaching the actual leather was the most challenging part. You essentially have only one shot because the glue is so strong. I spent a lot of time clipping and sizing the leather the way I wanted it to.
Here's some tips:
I found it helpful to use the supplied contact glue to tack down the top of the armrest. Since I have the two yellow stitches, they had to align with the console cupholder edge or else it would bug me alot. Plus if you mess up, it's easier to remove a glued edge instead of the whole cover.
The leather will need to be stretched/foam compressed to get adequate coverage. The spray adhesive is strong so it'll keep things together but you need some leather to extend to the bottom of the plastic shell to keep it taught.
Try to avoid spraying the corners for now.
Generally, spray adhesive for the body of the armrest, contact glue with the brush for the edges.
So after tacking down the top edge, I sprayed some glue on the leather bottom and foam top. I stretched the leather before making contact with the foam. I then used the contact glue to tack down the bottom leather and clipped it into place.
Similarly, I stretched the sides of the leather and rolled it over the bottom of the plastic base and clipped it down.
The hardest part of the project was the corners. Because of the added foam, the cutouts were not as accurate.
What helped me was to shape the corners with your hands without any glue. It'll stretch and form the leather to the edge contours. Clip it into place for a while then work the leather to get a clean corner. I prefer this over vinyl because you can't get it molded the same way.
After adequate stretching, I used the brush and contact glue and clipped it immediately after. After a few hours when the corners have been tacked down, I put a dab of E6000 on the orders to keep them down.
After waiting 24 hours, I again, steam ironed the armrest to address some wrinkling. I was so surprised at how strong the glue was. I did not need staples or anything. After some leather condition, I have the finished product: