

Prothane Poly Bushings

Thread Starter


Joined: Jan 2011
Posts: 1,341
Likes: 132
From: Race Track
I bought a Prothane Total Polyurethane Bushing Kit in black (I know some of the bushings look red). I installed it myself on the hardest working S2000 in Florida, my 2005 daily driver that sees track duty every 6 to 8 weeks. I have not and will not be compensated by Prothane or any of their retailers to post on S2KI. I have been issued a partial refund of my original purchase for being among the first 5 customers of this product who also submitted a separate email review to them with pictures.
There have been problems with the kit. Skip to the end of this first post if you want to look for deal breakers.
It cost me $275.38
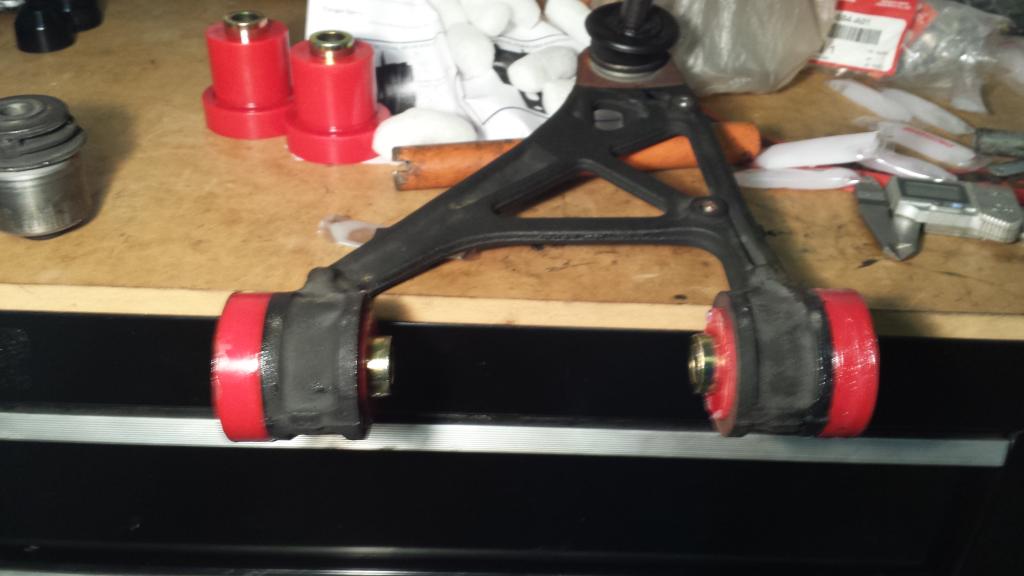
Both the black and red matl are 95A durometer.
This kit included bushings for:
-Front and rear upper control arms
-Front and rear lower control arms
-Rear toe arms
-Front and rear sway bars
-4X differential mount
-Poly boots for some ball joints
-Enough grease to install all the bushings twice.
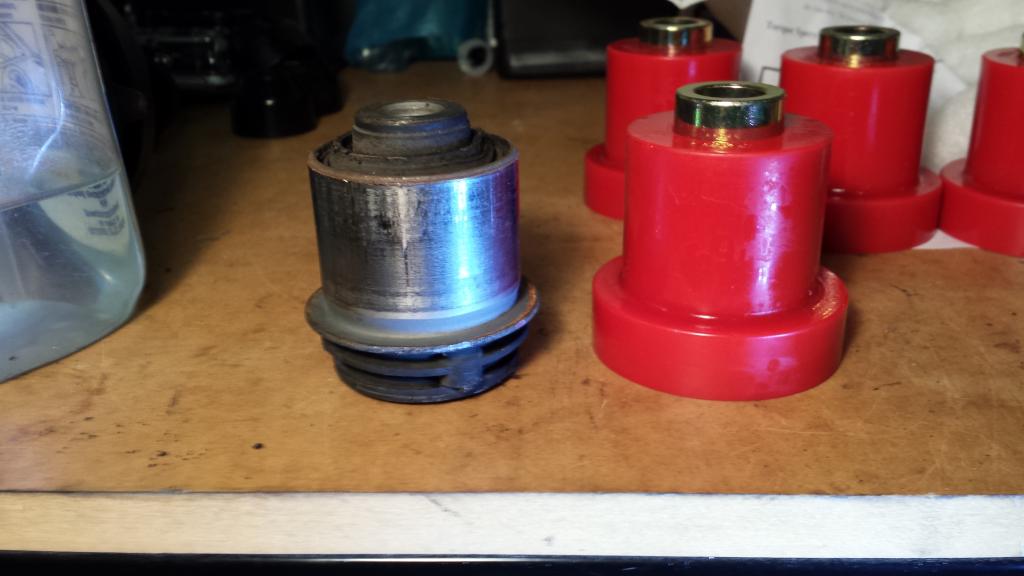
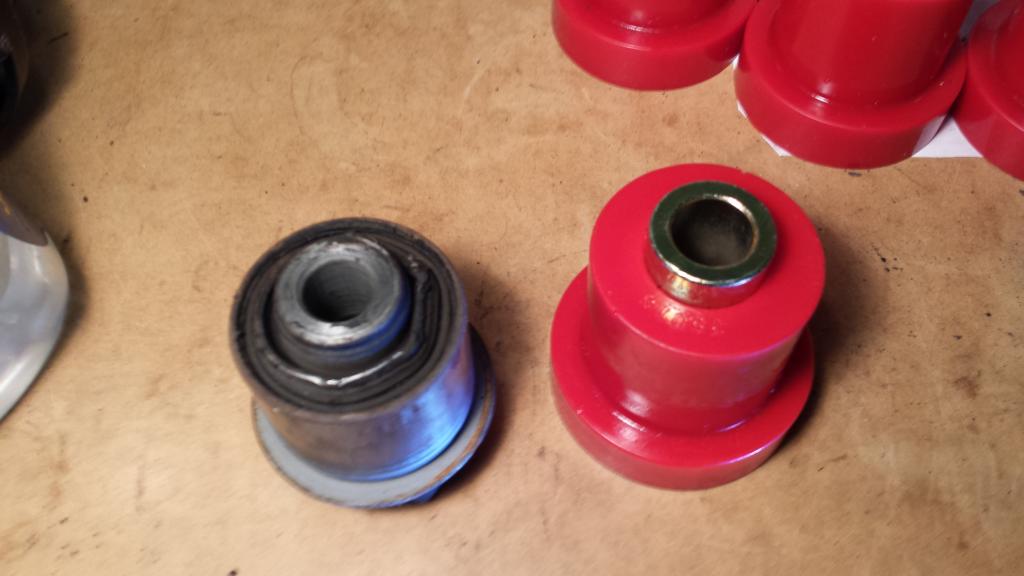
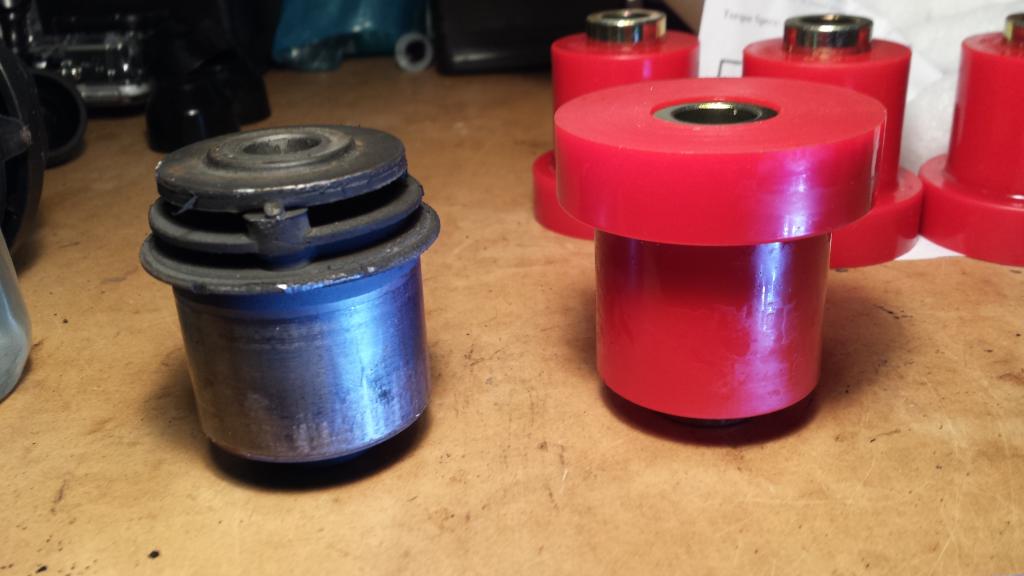
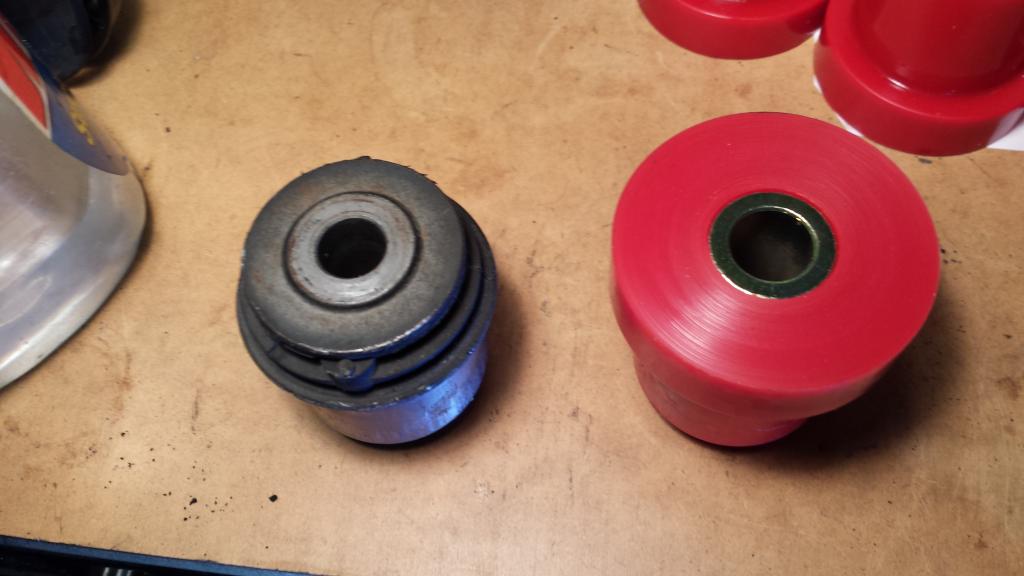
The kit un-boxes with the front, rear, sway bar, and differential packed separate and with their own instructions for dis assembly and installation. Plenty of grease is also provided in each box. Each bushing has the part number molded into it and these numbers are shown in the instructions which was helpful. The instructions are also available online where the pictures are easier to see.
Im reluctant to post a DIY because this is a mid level difficulty install and I wouldn't want a novice to try this without help and the right tools. This job took me 16 hours and was held up when I had to contact Prothane.(Ill explain below) I will post a DIY if there is enough interest. A DIY would be better used for someone to judge how much time it will take and if its worth the PITA for the low cost of the kit. I've added a procedure for the compliance bushing install here https://www.s2ki.com/s2000/topic/110...t__p__23523711

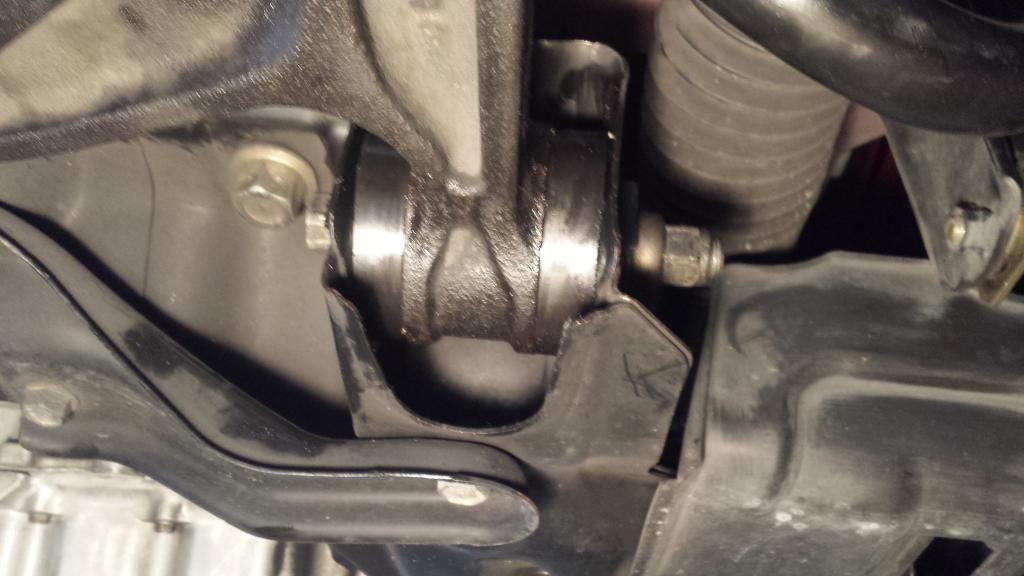
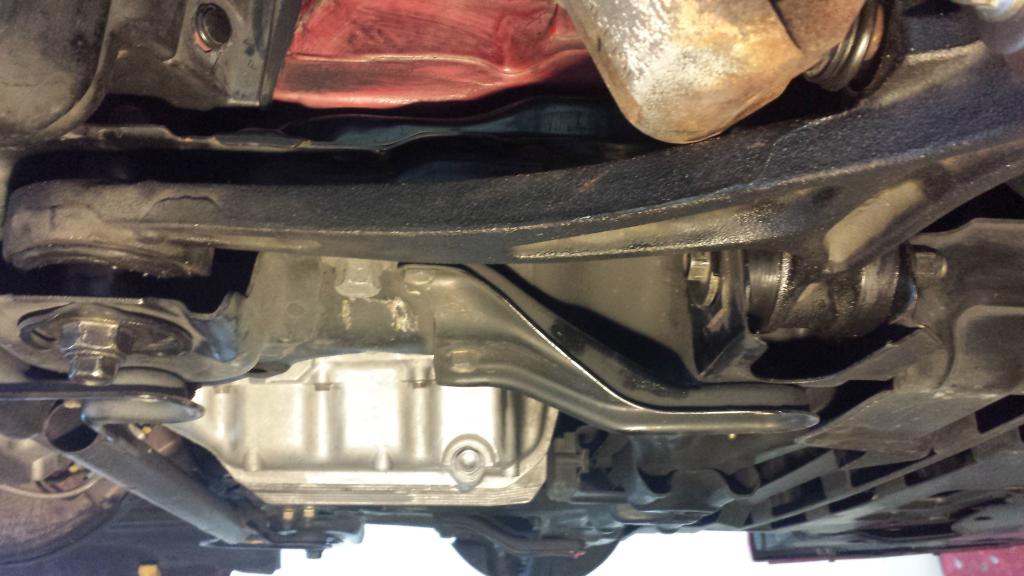
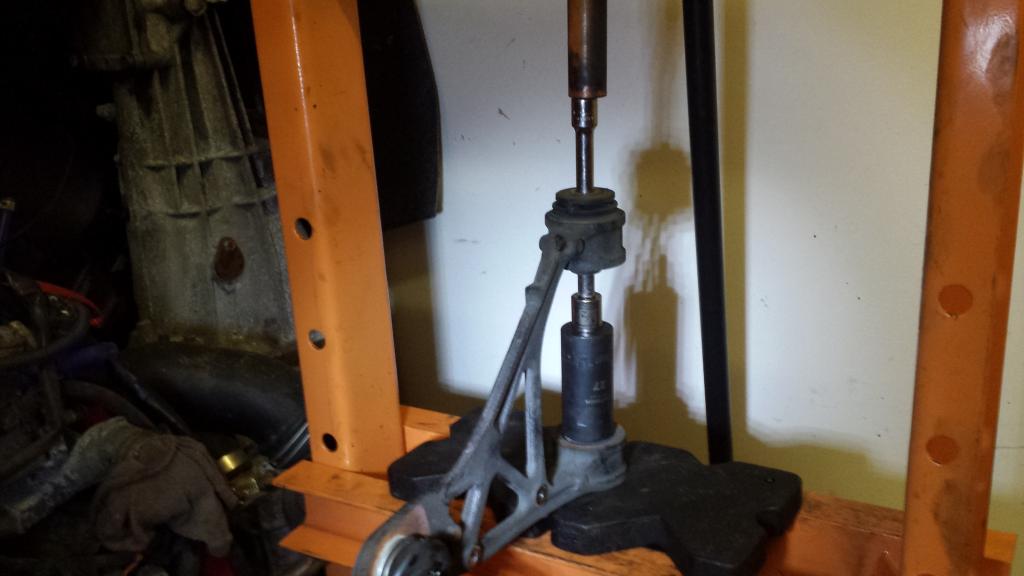
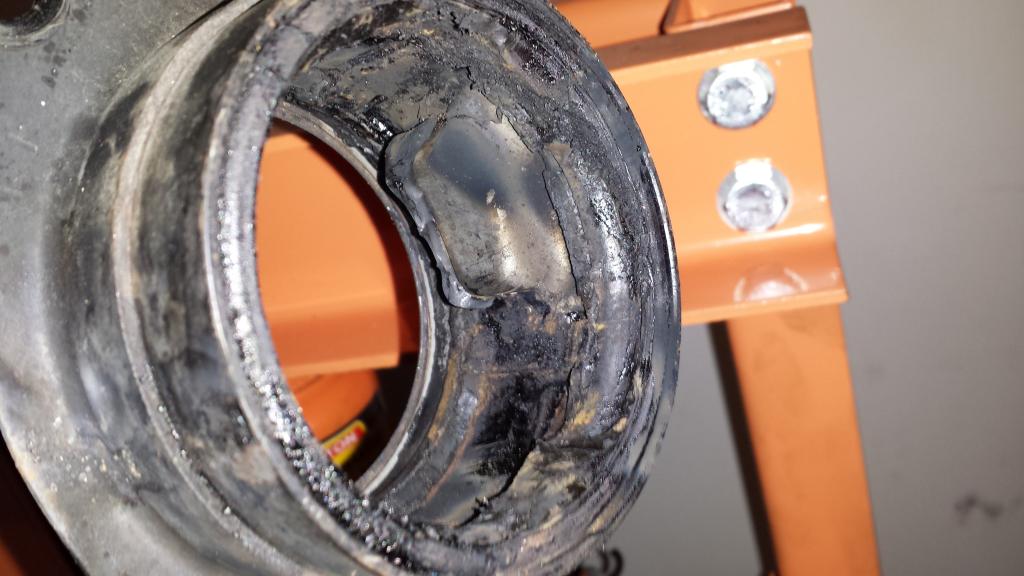
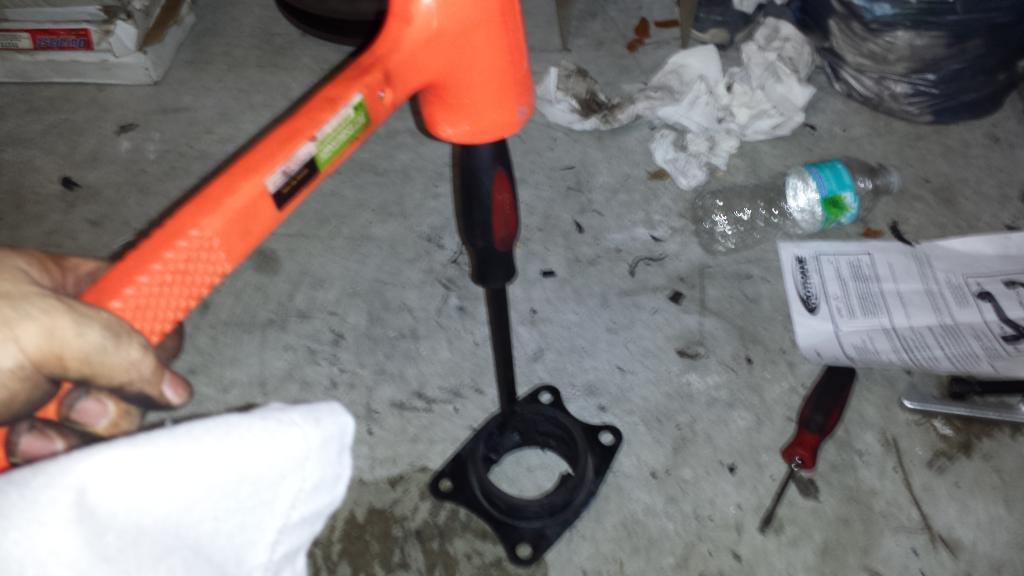
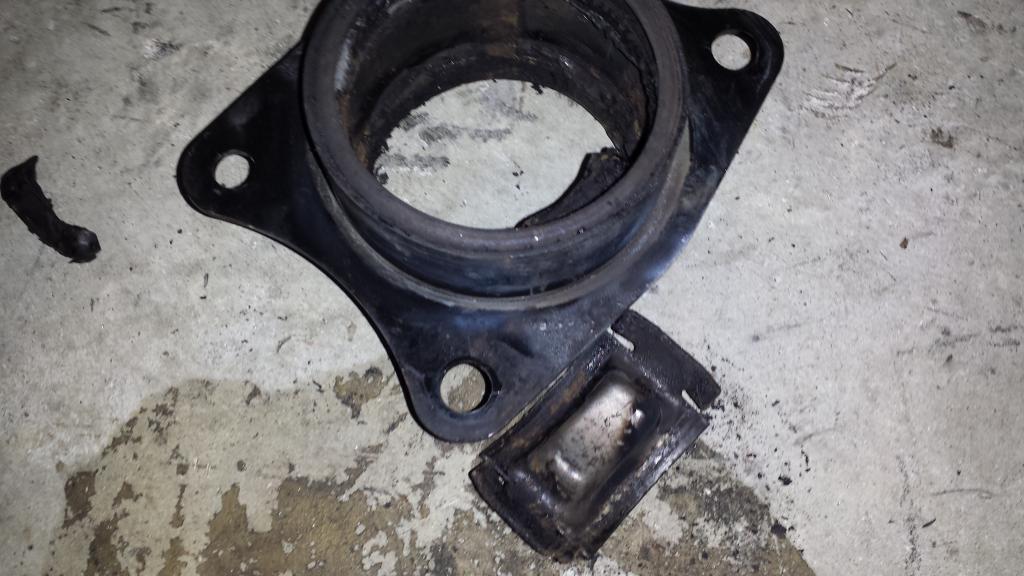
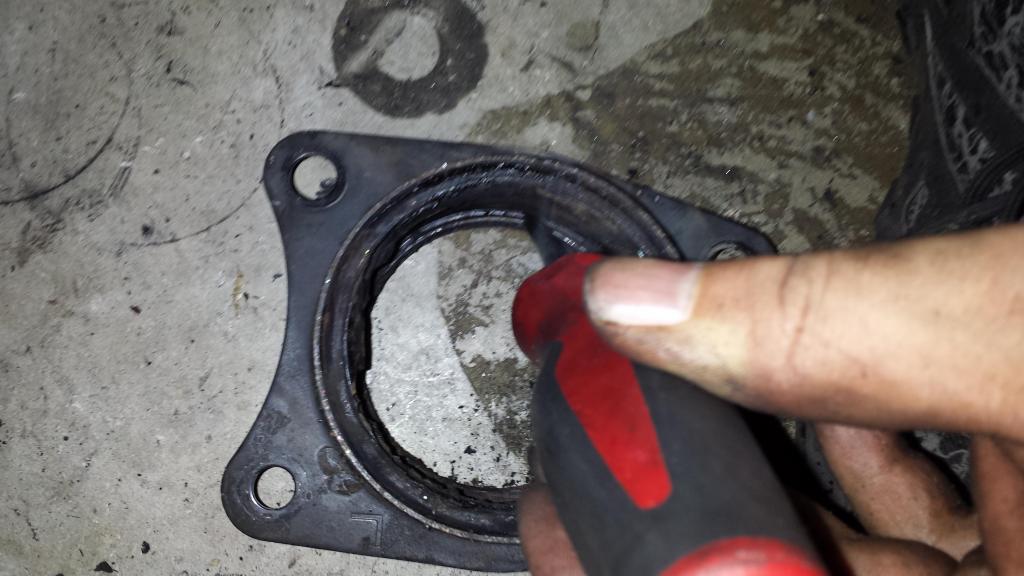
Most of the bushings in the kit do not require the original metal shell of the OEM rubber bushings so, provided you have the right size dies and fixtures for your press, with exception to the diff bushings there is no time consuming and dirty "cooking" of the rubber out of the bushing shell. You simply press the OEM bushing out and after applying the provided grease, you press the new bushings in. The differential bushings are the only parts that use the OEM bushing shell and require the removal of the rubber from the shell. The preparation of the rear diff shell also involves removing part of the multi-piece metal support in the shell assembly. I didnt have the right size dies for all the control arms so for one size i had to "cook" the rubber out with a torch and slit the shell with saw-zilla so i could tap the shell out. On another bushing, the OEM was pressed in from both sides with shoulders on either end so to get it out I had to again cook the rubber out and slit the shell on the ID and on the face. It takes patience to not over cut the shell and hack into the control arm which is much softer metal than the shell.
I will post diff procedure pics because i found the provided instructions to be inadequate.
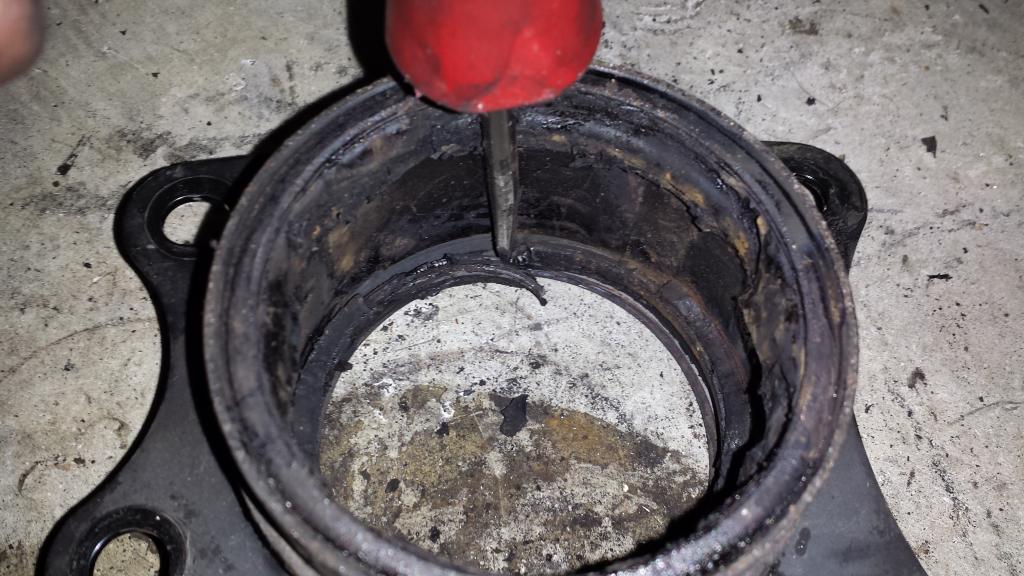
1. Puncture the rear diff bushings to get the fluid out. Do this thoroughly or make a big mess when the torch comes out.
2. Put some pressure on the bushing with the press.
3. Torch the shell until the rubber gives up its hold on the shell.
4. Smash the center section out with a prybar and hammer.
5. May not be necessary but chisel the center section retaining rings out.
6. Prothane will tell you that you dont need to do this: Bend the lip on the shell down on the side that the bushing enters from. Try to make it smooth and break any sharp edges you make. My new bushings would not take the press without this step.


My setup for reference:
-MY05
-HKS Hypermax III with standard spring rates 728/616.
-215/245 Yokohama S-Drive street rubber on AP2V1
-225/245 R888 track rubber on AP2V1
Street impressions are positive. I dont feel any new bumps that the OEM bushings were protecting me from. Instead each bump feels like a tom hit on a drum kit where before most of those bumps felt like base drum kicks. In simpler words the car feels crisp. On the highway is where all the little tom hits increase long distance fatigue somwhat. Clutch engagement and modulation is much more precise than with the fluid filled rubber differential bushings from Honda. The initial hit of the clutch in a starting scenario is more abrupt but after a day I was starting and shifting smoother than ever because the added precision counteracted the lack of compliance in the drivetrain. With a week of daily street driving there are no squeaks or creaks in the suspension as i used plenty of grease. Poly bushings are a great deal different than the no-maintenance OEM bushings so it is unrealistic to think they will be quiet forever. Sooner or later they will need to be greased, luckily the sway bar bushings come with grease fittings built in. The diff bushings defiantly transmit moderately more noise and just a little more vibration than stock but the vibration and noise is steady so it sounds and feels like lower pitch tire noise at first.
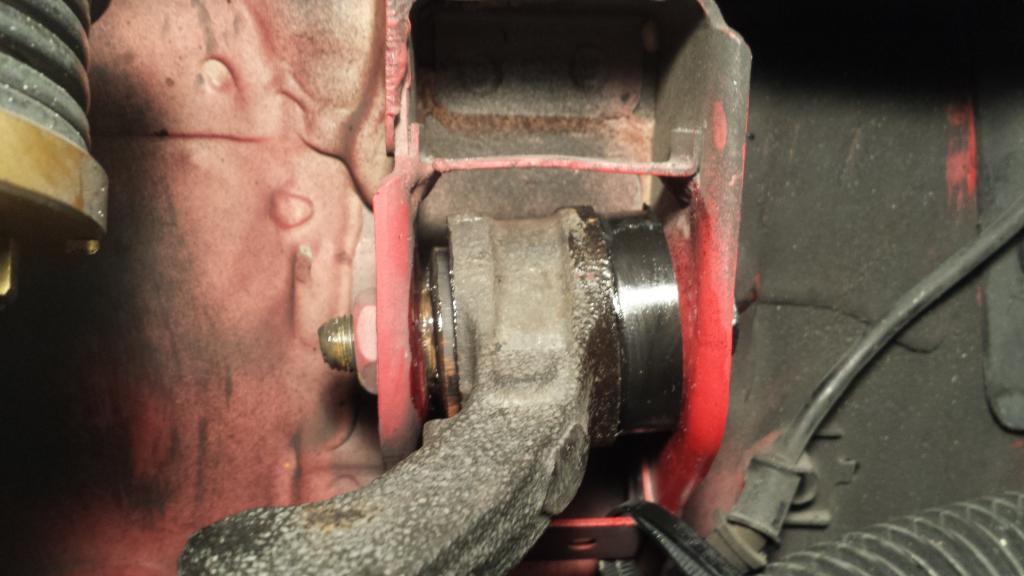
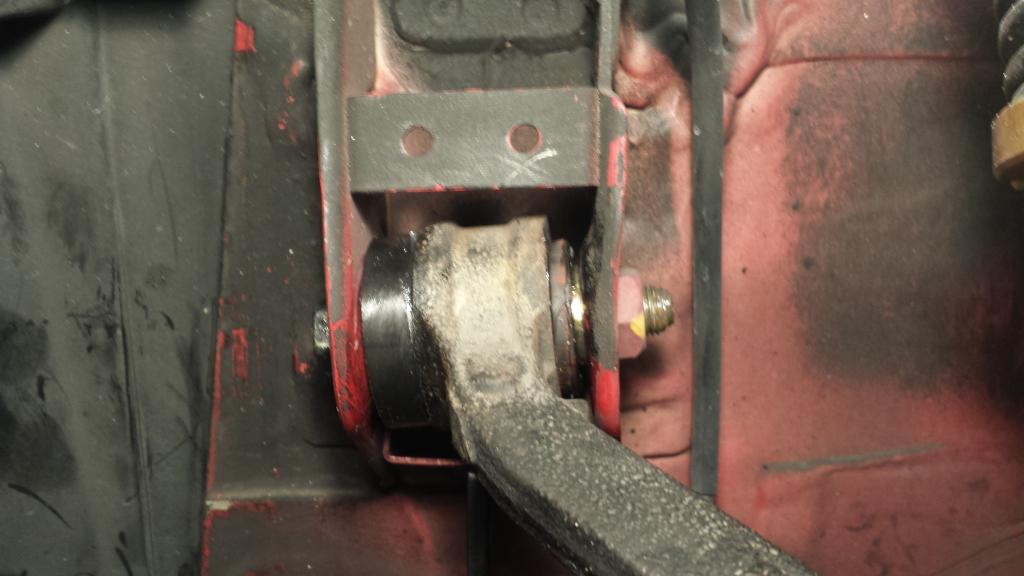
The kit doesn't come with damper mount bushings for the lower control arms which is not ideal. They were some of the most worn bushings at 100,000 miles, third only to the compliance bushings and rear differential bushings. The poly boots for the ball joints are very simple in design and i only installed one for testing purposes. The OEM Honda ball joint boots appear to be far superior in preventing contaminating dust and water from getting to the ball joint. The OEM boots appear to also be superior to retaining the ball joint grease. The sway bar brackets/bushings are not as high quality as the OEM. The OEM appear to be polyurethane and are much firmer than the rubber bushings around the car. The OEM unit is 3D formed to retain the bushing from thrust motion and the holes in the bracket fit the bolt with little play. The Prothane units are similarly firm as the OEM and the generic bracket is flat stock with a radius bend and two 90s. Thrust or side to side play is controlled by the bushing design which has a lip on either side. The holes in the Prothane bracket are big and slotted. Prothane doesn't provide washers for this so I had to dig some out of my tool box before i could be satisfied with the assembly.
The bad......
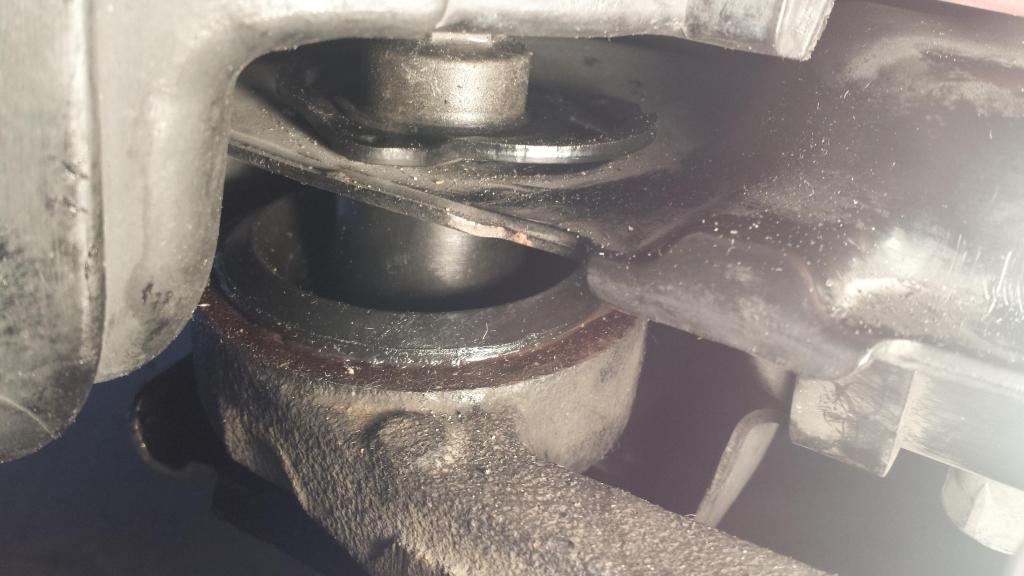
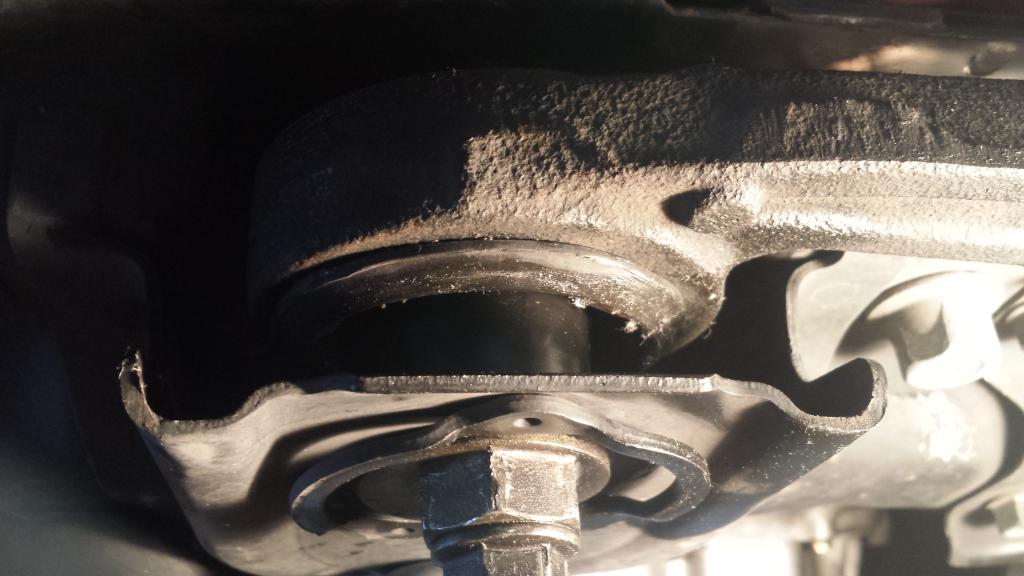
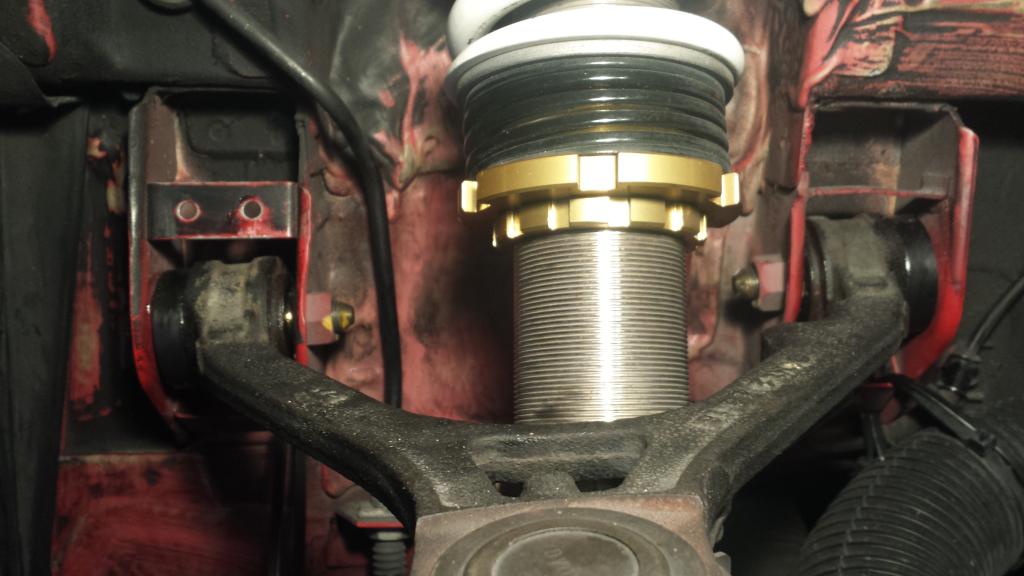
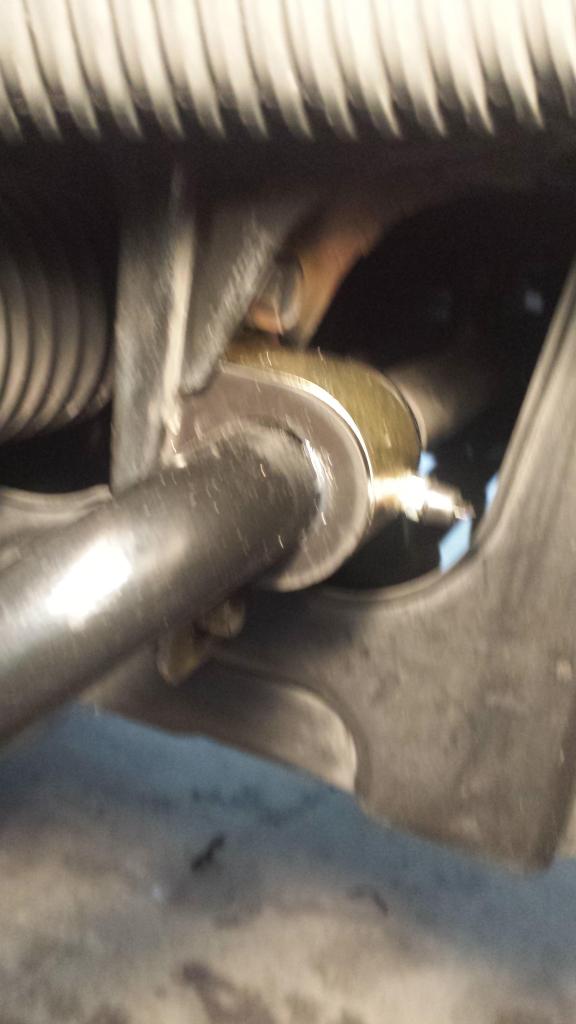
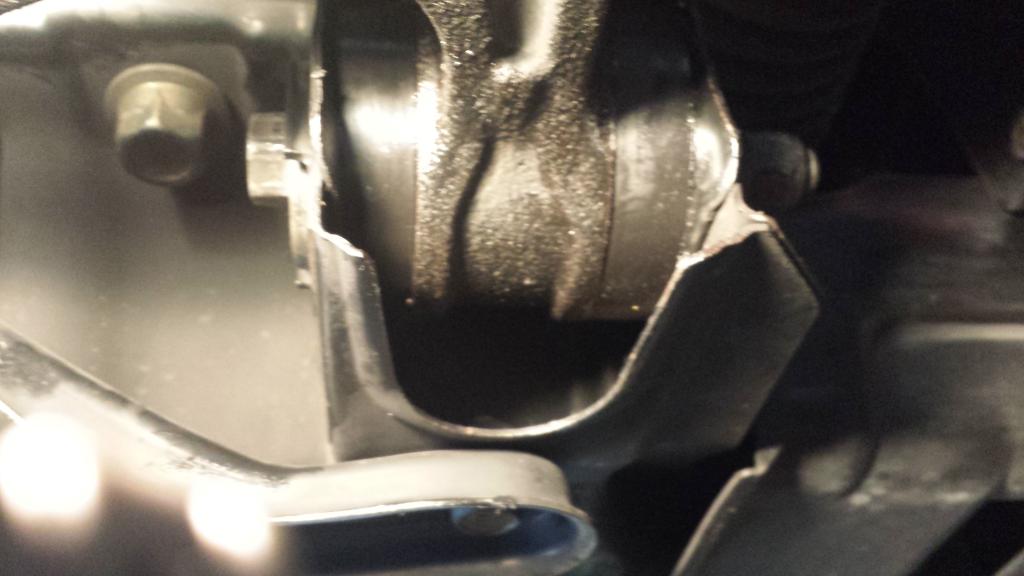
On the track the car is very precise mid corner. In the braking zone is where the kit fails. The car pulls hard to one side when you brake. As you can tell from the pics the pper control arm bushings are only supported on the forward or rearward half of the control arm. This provides no support under braking in the front or under braking and acceleration in the rear. Not only is this dangerous from a driving dynamics stand point, its dangerous because it will fatigue the control arms. I cant recomend the kit as is but its so cheap its worth buying the kit for the half of the components that work. The compliance bushing fails because the overall length of the metal sleeve is too short and thin wall preventing the caster adjuster from tightening. As tight as the adjuster can be it will still rotate under heavy load. As it rotates it will eat the ends of the poly material. I made some custom parts to fix this and ordered powerflex replacements for the UCA bushings.
In the video there are red and black poly bushings, explained below. I assure you all the bushings are Prothane 95A. The cockpit camera view is not the same session as the data and suspension view so they go in and out of sync. Its for a visual reference only but I got it pretty close traffic being the big variable in lap times. Thrust motion is the same or a little more prevalent than the deflection towards the center line. In other words, i think camber seems very stable now but the corners may be "crabbing" like a circle track car. In other words yet, getting on and off the gas seems to noticeably change the wheelbase of the car. I have no data in this area in comparison to stock or other bushings so it may be typical. I think it feels great and what movement i did notice seems acceptable.
In studying the video some more it appears that the camera is moving during gear changes. This may be causing the illusion of the wheelbase deflection as it seems the whole subframe is moving in the frame of the video which is impossible.
Special tools I needed for the install:
-12 ton press from Harbor Freight $125 (Overkill but it was cheap. Pissed it took me this long to get one and it doesn't take up too much space. Now you can be the guy with the pickup truck and the guy with a press)
-Propane torch
-ball joint tool
-all other tools are common
So now that I've attempted to be factual and provide unbiased data, you get to hear why there are red bushings in my black kit.......Prothane didn't to their homework to find out the rear upper control arms are a different design for the AP2 than the AP1. I didnt do my homework either so shame on me. They sell all their kits as 99-09, one part number for the whole run of the S2K. When I got my AP1 rear upper control arm bushings they didn't fit my AP2 but I didn't find that out until i murdered one of the bushings removing it. Luckily for Prothane Im a machinist and a practical quality engineer as well as an automotive fabricator by trade. I provided Prothane measurements of the sub frame and of the OEM bushings to design the AP2 bushings. I urged Prothane to turn me some billet poly bushings from stock to test fit and get my car back on the road as fast as possible. Prothane decided not to do this and took 2 weeks to tool up the machines to make molded parts, better representing the production parts. I then had to argue with Prothane to overnight the parts since i had been waiting for so long and the best they would do was 2nd day shipping. When I received the replacement parts they were red despite sending their engineer multiple pictures and videos of my black bushings. Even worse was the shoulder height of the bushing was .025 short so there was thrust play in the torqued assembly of the prototypes. I sent more measurements, pictures, and video to Prothane in disgust for the sole purpose of getting S2000 owners products they deserve. Right now i have fender washers in my bushings and it almost looks like they belong there. The fit is perfect and they will work perfect. Prothane is fixing their manufactureing process so everyone else gets bushings that fit. I managed to do some serching and found at least one S2KI member who posted that they bought this kit and I messaged him before he tackled the install.
There have been problems with the kit. Skip to the end of this first post if you want to look for deal breakers.
It cost me $275.38
Both the black and red matl are 95A durometer.
This kit included bushings for:
-Front and rear upper control arms
-Front and rear lower control arms
-Rear toe arms
-Front and rear sway bars
-4X differential mount
-Poly boots for some ball joints
-Enough grease to install all the bushings twice.
The kit un-boxes with the front, rear, sway bar, and differential packed separate and with their own instructions for dis assembly and installation. Plenty of grease is also provided in each box. Each bushing has the part number molded into it and these numbers are shown in the instructions which was helpful. The instructions are also available online where the pictures are easier to see.


Im reluctant to post a DIY because this is a mid level difficulty install and I wouldn't want a novice to try this without help and the right tools. This job took me 16 hours and was held up when I had to contact Prothane.(Ill explain below) I will post a DIY if there is enough interest. A DIY would be better used for someone to judge how much time it will take and if its worth the PITA for the low cost of the kit. I've added a procedure for the compliance bushing install here https://www.s2ki.com/s2000/topic/110...t__p__23523711


Most of the bushings in the kit do not require the original metal shell of the OEM rubber bushings so, provided you have the right size dies and fixtures for your press, with exception to the diff bushings there is no time consuming and dirty "cooking" of the rubber out of the bushing shell. You simply press the OEM bushing out and after applying the provided grease, you press the new bushings in. The differential bushings are the only parts that use the OEM bushing shell and require the removal of the rubber from the shell. The preparation of the rear diff shell also involves removing part of the multi-piece metal support in the shell assembly. I didnt have the right size dies for all the control arms so for one size i had to "cook" the rubber out with a torch and slit the shell with saw-zilla so i could tap the shell out. On another bushing, the OEM was pressed in from both sides with shoulders on either end so to get it out I had to again cook the rubber out and slit the shell on the ID and on the face. It takes patience to not over cut the shell and hack into the control arm which is much softer metal than the shell.

I will post diff procedure pics because i found the provided instructions to be inadequate.
1. Puncture the rear diff bushings to get the fluid out. Do this thoroughly or make a big mess when the torch comes out.
2. Put some pressure on the bushing with the press.
3. Torch the shell until the rubber gives up its hold on the shell.
4. Smash the center section out with a prybar and hammer.
5. May not be necessary but chisel the center section retaining rings out.
6. Prothane will tell you that you dont need to do this: Bend the lip on the shell down on the side that the bushing enters from. Try to make it smooth and break any sharp edges you make. My new bushings would not take the press without this step.


My setup for reference:
-MY05
-HKS Hypermax III with standard spring rates 728/616.
-215/245 Yokohama S-Drive street rubber on AP2V1
-225/245 R888 track rubber on AP2V1
Street impressions are positive. I dont feel any new bumps that the OEM bushings were protecting me from. Instead each bump feels like a tom hit on a drum kit where before most of those bumps felt like base drum kicks. In simpler words the car feels crisp. On the highway is where all the little tom hits increase long distance fatigue somwhat. Clutch engagement and modulation is much more precise than with the fluid filled rubber differential bushings from Honda. The initial hit of the clutch in a starting scenario is more abrupt but after a day I was starting and shifting smoother than ever because the added precision counteracted the lack of compliance in the drivetrain. With a week of daily street driving there are no squeaks or creaks in the suspension as i used plenty of grease. Poly bushings are a great deal different than the no-maintenance OEM bushings so it is unrealistic to think they will be quiet forever. Sooner or later they will need to be greased, luckily the sway bar bushings come with grease fittings built in. The diff bushings defiantly transmit moderately more noise and just a little more vibration than stock but the vibration and noise is steady so it sounds and feels like lower pitch tire noise at first.
The kit doesn't come with damper mount bushings for the lower control arms which is not ideal. They were some of the most worn bushings at 100,000 miles, third only to the compliance bushings and rear differential bushings. The poly boots for the ball joints are very simple in design and i only installed one for testing purposes. The OEM Honda ball joint boots appear to be far superior in preventing contaminating dust and water from getting to the ball joint. The OEM boots appear to also be superior to retaining the ball joint grease. The sway bar brackets/bushings are not as high quality as the OEM. The OEM appear to be polyurethane and are much firmer than the rubber bushings around the car. The OEM unit is 3D formed to retain the bushing from thrust motion and the holes in the bracket fit the bolt with little play. The Prothane units are similarly firm as the OEM and the generic bracket is flat stock with a radius bend and two 90s. Thrust or side to side play is controlled by the bushing design which has a lip on either side. The holes in the Prothane bracket are big and slotted. Prothane doesn't provide washers for this so I had to dig some out of my tool box before i could be satisfied with the assembly.
The bad......
On the track the car is very precise mid corner. In the braking zone is where the kit fails. The car pulls hard to one side when you brake. As you can tell from the pics the pper control arm bushings are only supported on the forward or rearward half of the control arm. This provides no support under braking in the front or under braking and acceleration in the rear. Not only is this dangerous from a driving dynamics stand point, its dangerous because it will fatigue the control arms. I cant recomend the kit as is but its so cheap its worth buying the kit for the half of the components that work. The compliance bushing fails because the overall length of the metal sleeve is too short and thin wall preventing the caster adjuster from tightening. As tight as the adjuster can be it will still rotate under heavy load. As it rotates it will eat the ends of the poly material. I made some custom parts to fix this and ordered powerflex replacements for the UCA bushings.
In the video there are red and black poly bushings, explained below. I assure you all the bushings are Prothane 95A. The cockpit camera view is not the same session as the data and suspension view so they go in and out of sync. Its for a visual reference only but I got it pretty close traffic being the big variable in lap times. Thrust motion is the same or a little more prevalent than the deflection towards the center line. In other words, i think camber seems very stable now but the corners may be "crabbing" like a circle track car. In other words yet, getting on and off the gas seems to noticeably change the wheelbase of the car. I have no data in this area in comparison to stock or other bushings so it may be typical. I think it feels great and what movement i did notice seems acceptable.
In studying the video some more it appears that the camera is moving during gear changes. This may be causing the illusion of the wheelbase deflection as it seems the whole subframe is moving in the frame of the video which is impossible.
Special tools I needed for the install:
-12 ton press from Harbor Freight $125 (Overkill but it was cheap. Pissed it took me this long to get one and it doesn't take up too much space. Now you can be the guy with the pickup truck and the guy with a press)
-Propane torch
-ball joint tool
-all other tools are common
So now that I've attempted to be factual and provide unbiased data, you get to hear why there are red bushings in my black kit.......Prothane didn't to their homework to find out the rear upper control arms are a different design for the AP2 than the AP1. I didnt do my homework either so shame on me. They sell all their kits as 99-09, one part number for the whole run of the S2K. When I got my AP1 rear upper control arm bushings they didn't fit my AP2 but I didn't find that out until i murdered one of the bushings removing it. Luckily for Prothane Im a machinist and a practical quality engineer as well as an automotive fabricator by trade. I provided Prothane measurements of the sub frame and of the OEM bushings to design the AP2 bushings. I urged Prothane to turn me some billet poly bushings from stock to test fit and get my car back on the road as fast as possible. Prothane decided not to do this and took 2 weeks to tool up the machines to make molded parts, better representing the production parts. I then had to argue with Prothane to overnight the parts since i had been waiting for so long and the best they would do was 2nd day shipping. When I received the replacement parts they were red despite sending their engineer multiple pictures and videos of my black bushings. Even worse was the shoulder height of the bushing was .025 short so there was thrust play in the torqued assembly of the prototypes. I sent more measurements, pictures, and video to Prothane in disgust for the sole purpose of getting S2000 owners products they deserve. Right now i have fender washers in my bushings and it almost looks like they belong there. The fit is perfect and they will work perfect. Prothane is fixing their manufactureing process so everyone else gets bushings that fit. I managed to do some serching and found at least one S2KI member who posted that they bought this kit and I messaged him before he tackled the install.
Joined: May 2010
Posts: 3,422
Likes: 2
Nice right up. I actually just got done pressing out almost every bushing on my friends s2000 (compliance included). Didn't have the proper sizes but a 24mm socket worked for most of bushings. Only one I had to torch was the large two piece bushings on the rear lower control arm.
Joined: Jul 2007
Posts: 6,358
Likes: 31
From: Phoenix, AZ
Nice right up. I actually just got done pressing out almost every bushing on my friends s2000 (compliance included). Didn't have the proper sizes but a 24mm socket worked for most of bushings. Only one I had to torch was the large two piece bushings on the rear lower control arm.
Community Organizer


Joined: Mar 2013
Posts: 3,171
Likes: 53
From: Tucson, AZ
I got mine installed today sans diff bushings; I'll get those installed sometime this week. I'll be writing about my experiences with them in my upcoming build thread. Thanks for the info on the washers, I found some ones that worked with a little modification. That's pretty stupid that he sent you the red instead of black, especially considering he did send me black. Did you grease up the large diff bushings when shoving them in the shell? I was considering shaving a chamfer in lead edge to get it to feed through the shell lip.
Joined: May 2010
Posts: 3,422
Likes: 2
Originally Posted by dc2-2-ap1
Thanks again for that.
Also, for the rear toe arms and one other bushing (can't remember which) I had to switch between a 25mm and 26mm. I'm sure there is an SAE size that would be perfect.
Thread Starter
Joined: Jan 2011
Posts: 1,341
Likes: 132
From: Race Track
I got mine installed today sans diff bushings; I'll get those installed sometime this week. I'll be writing about my experiences with them in my upcoming build thread. Thanks for the info on the washers, I found some ones that worked with a little modification. That's pretty stupid that he sent you the red instead of black, especially considering he did send me black. Did you grease up the large diff bushings when shoving them in the shell? I was considering shaving a chamfer in lead edge to get it to feed through the shell lip.
Trending Topics
Thread Starter
Joined: Jan 2011
Posts: 1,341
Likes: 132
From: Race Track
Video and impressions added to the OP
On the track the car is very precise. The car takes one good set on the brakes and all I feel is slip angle. Having a better idea of where the limit is and what the car wants to do made a big impression on me. Confidence is high. In the video there are red and black poly bushings, explained below. I assure you all the bushings are Prothane 95A. The cockpit camera view is not the same session as the data and suspension view so they go in and out of sync. Its for a visual reference only but I got it pretty close traffic being the big variable in lap times. Thrust motion is the same or a little more prevalent than the deflection towards the center line. In other words, i think camber seems very stable now but the corners may be "crabbing" like a circle track car. In other words yet, getting on and off the gas seems to noticeably change the wheelbase of the car. I have no data in this area in comparison to stock or other bushings so it may be typical. I think it feels great and what moment i did notice seems acceptable.
In studying the video some more it appears that the camera is moving during gear changes. This may be causing the illusion of the wheelbase deflection as it seems the whole subframe is moving in the frame of the video which is impossible.
http://www.youtube.com/watch?v=w1PoS...lLxX-JeSIGwHlQ
