
FlexSeal Soft Top Repair


Registered User
Joined: Mar 2005
Posts: 20,875
Likes: 0
From: all up in your grill

Registered User
Joined: May 2011
Posts: 774
Likes: 0
From: Milford, MA
Difficulty: 1/5
Time: 2 hours
Cost: $15
Would I recommend this?: If you have a tear that you want fixed, I would definitely recommend this. It's not perfect, but it's not difficult to do and it is cheaper than a shop repair.
How would I do it differently?: I would probably either buy the liner in a can or spray it into a cup first and apply it with a brush, much more precise.
I've been looking in every "as seen on TV" section I can find in any store but I haven't come across flex seal. However, while I was out getting spray paint for another project I came across DupliColor Bed Armor, bedliner in a can.
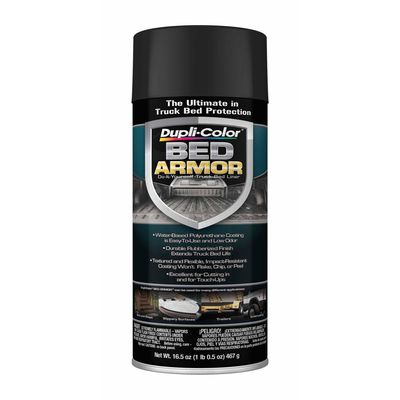
I figured it couldn't hurt, so I bought it. It was a little pricey for a spray can ($15), but whatever.
When I got home I got to work, here is the tear:
Tear from Outside:

Tear from Inside:

To make things clean, I taped off my area to be fixed, I didn't take a photo but also tape the outside so it doesn't spray right through the hole:

I sprayed a test patch on a board to make sure the line was clear and learned that all it takes is a VERY light spritz. VERY. LIGHT. My first push on the button gave me a VERY chunky blob on the ground. Luckily I didn't do that in the car.
Knowing how thick it can come out, I used a lot of tape:

It is also a good idea to have a wet paper towel and a thin piece of cardboard on hand so if it does glop up you can spread it around and take some off.
So I put a couple of light coats on and it didn't work out so well. I stopped taking photos because I didn't think I would end up fixing it. However, my friend wondered if we could sew the hole so the spray would have something easier to stick to as opposed to trying to fill the hole. Out came the sewing kit and it worked rather well. I didn't take pictures of the sewing but if you can't sew then your significant other (or your mother) can teach you.
After a stitching I put more spray on and things started to come together (no pun intended). Remember that paper towel and cardboard? Time to get it if you haven't already. I put it on a bit heavy on the final coat and spread it over the stitches to really make sure it holds up.
Here is the final product:
Inside:

Outside (with fresh morning dew. Perhaps I should take a photo when it is dry as well):

As I said, it isn't perfect, but it worked out pretty well and I'm happy. Now I don't have to worry about rain leaking in or the weight of the snow that is coming tearing it open more. If you have a hole you want fixed, this is one way to do it.
Time: 2 hours
Cost: $15
Would I recommend this?: If you have a tear that you want fixed, I would definitely recommend this. It's not perfect, but it's not difficult to do and it is cheaper than a shop repair.
How would I do it differently?: I would probably either buy the liner in a can or spray it into a cup first and apply it with a brush, much more precise.
I've been looking in every "as seen on TV" section I can find in any store but I haven't come across flex seal. However, while I was out getting spray paint for another project I came across DupliColor Bed Armor, bedliner in a can.
I figured it couldn't hurt, so I bought it. It was a little pricey for a spray can ($15), but whatever.
When I got home I got to work, here is the tear:
Tear from Outside:
Tear from Inside:
To make things clean, I taped off my area to be fixed, I didn't take a photo but also tape the outside so it doesn't spray right through the hole:
I sprayed a test patch on a board to make sure the line was clear and learned that all it takes is a VERY light spritz. VERY. LIGHT. My first push on the button gave me a VERY chunky blob on the ground. Luckily I didn't do that in the car.
Knowing how thick it can come out, I used a lot of tape:
It is also a good idea to have a wet paper towel and a thin piece of cardboard on hand so if it does glop up you can spread it around and take some off.
So I put a couple of light coats on and it didn't work out so well. I stopped taking photos because I didn't think I would end up fixing it. However, my friend wondered if we could sew the hole so the spray would have something easier to stick to as opposed to trying to fill the hole. Out came the sewing kit and it worked rather well. I didn't take pictures of the sewing but if you can't sew then your significant other (or your mother) can teach you.
After a stitching I put more spray on and things started to come together (no pun intended). Remember that paper towel and cardboard? Time to get it if you haven't already. I put it on a bit heavy on the final coat and spread it over the stitches to really make sure it holds up.
Here is the final product:
Inside:
Outside (with fresh morning dew. Perhaps I should take a photo when it is dry as well):
As I said, it isn't perfect, but it worked out pretty well and I'm happy. Now I don't have to worry about rain leaking in or the weight of the snow that is coming tearing it open more. If you have a hole you want fixed, this is one way to do it.
