
oem spoiler installation


Thread Starter
Registered User
Joined: Apr 2006
Posts: 5,539
Likes: 3
From: sunny suisun
the idiot's guide to installing an oem underbody spoiler.
1- get your GF to get you an underbody spoiler and get her to help you put it on.

2-gather your tools
philipps head screw driver, flat head screw driver, paper towel, 10 mm ratchet, 10 mm wrench, isopropyl alcohol, and blue tape (not shown in picture).

3- spread out your nuts and bolts in an orderly, organized fashion.
4 fenderbolts 3 stepped bolts 4 self tapping screws 5 flange nuts 2 clip nuts 4 spring nuts.

4- unclip the three clips you'll find under your bumper


5- find the two dimples on the side of your bumper, align your spring nuts to that. do the same to the other side.

6- if you have a big head like me, lift the car. if not then lucky you. theres a hole under the bumper where you can slip the clip nut in. you do one for each side.


7- there are 5 adhesive pads on the spoiler that have no tabs. you need to peel off part of it (the guide says 5-8 cm but i didnt really have a problem peeling more) fold it up and tape it to the front part of the spoiler

8- take your isopropyl alcohol and pour some on to your paper towel.

9- rub the alcohol directly on the area where the adhesive will stick. (sorry wanabe, i know alcohol hurts paint.)


10- fit your spoiler, this is where it comes handy to have your gf help you. have her hold the other side. the spoiler fits very snug so you will have to pull a bit.

11- place your bolts in. i'll describe which bolts to use from left to right:
fender bolt, fender bolt, stepped bolt, stepped bolt, stepped bolt, fender bolt, fender bolt.
DO NOT TIGHTEN SCREWS AND BOLTS YET!
the stepped bolts and the outside fender bolts need the flange nuts to hold them in place or they will just fall off.

like this.
a good way to put things is place is like this:

one hand on top, the other on the bottom. if you have your gf with you you can hold the flange nut in place on top while she secure the bolt from the bottom.

12- go to the sides of your bumper. align everything. the spoiler and the spring nut to the dimple that is there. screw in your self tapping screws.
an easy way to do this step is to turn your wheel it'll give you the space you need for your hand and your screw driver, as shown below.


13- time to get the adhesive to attach. you must pull towards yourself to give clearance for the tabs, then you must push up and in to get the spoiler in the right place. hold down for 30 seconds.
theres a certain order to this first start on the front part of the lip. remove the three in the front part of the lip. then remove the second tab from the sides then the ones closer in, and then the furthest side adhesive last.
that probably didnt make a whole lot of sense but i didnt follow the order. so you're free to try and figure out how to do it and what it's for.

14- NOW you get to tighten all the bolts and screws previously placed.
15- finish up by replacing the clips you removed earlier.
a short tutorial on how the bumper clips work.

the clip splits apart into two parts.


place the lower part of clip in first

position the top part of the clip.

push the clip in and it'll lock.


16- thank your girlfriend and enjoy!!!
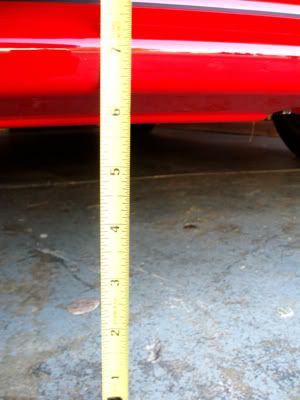
the car will have about 6 inches of clerance after your install the spoiler.
please note, that i took this measurement before the shock absorbers settled so it may actually be lower in reality.
estimated time of work is a little over 1 hour. we kept stopping to take pictures so no duh we're gonna take longer.
DISCLAIMER:
i am not responsible for any damage that occur as a result of this short guide. i am also not responsible for any screw ups that occur as a result of following this guide. my gf and i installed the spoiler this way, it is a guide with pictures meant to help you, the reader install your OEM spoiler.
keywords: OEM, underbody, spoiler, install, installation, guide.
moderator, if i didnt post this in the right forum, please move it.
good luck on your installation!

1- get your GF to get you an underbody spoiler and get her to help you put it on.
2-gather your tools
philipps head screw driver, flat head screw driver, paper towel, 10 mm ratchet, 10 mm wrench, isopropyl alcohol, and blue tape (not shown in picture).
3- spread out your nuts and bolts in an orderly, organized fashion.
4 fenderbolts 3 stepped bolts 4 self tapping screws 5 flange nuts 2 clip nuts 4 spring nuts.
4- unclip the three clips you'll find under your bumper
5- find the two dimples on the side of your bumper, align your spring nuts to that. do the same to the other side.
6- if you have a big head like me, lift the car. if not then lucky you. theres a hole under the bumper where you can slip the clip nut in. you do one for each side.
7- there are 5 adhesive pads on the spoiler that have no tabs. you need to peel off part of it (the guide says 5-8 cm but i didnt really have a problem peeling more) fold it up and tape it to the front part of the spoiler
8- take your isopropyl alcohol and pour some on to your paper towel.
9- rub the alcohol directly on the area where the adhesive will stick. (sorry wanabe, i know alcohol hurts paint.)
10- fit your spoiler, this is where it comes handy to have your gf help you. have her hold the other side. the spoiler fits very snug so you will have to pull a bit.
11- place your bolts in. i'll describe which bolts to use from left to right:
fender bolt, fender bolt, stepped bolt, stepped bolt, stepped bolt, fender bolt, fender bolt.
DO NOT TIGHTEN SCREWS AND BOLTS YET!
the stepped bolts and the outside fender bolts need the flange nuts to hold them in place or they will just fall off.
like this.
a good way to put things is place is like this:
one hand on top, the other on the bottom. if you have your gf with you you can hold the flange nut in place on top while she secure the bolt from the bottom.
12- go to the sides of your bumper. align everything. the spoiler and the spring nut to the dimple that is there. screw in your self tapping screws.
an easy way to do this step is to turn your wheel it'll give you the space you need for your hand and your screw driver, as shown below.
13- time to get the adhesive to attach. you must pull towards yourself to give clearance for the tabs, then you must push up and in to get the spoiler in the right place. hold down for 30 seconds.
theres a certain order to this first start on the front part of the lip. remove the three in the front part of the lip. then remove the second tab from the sides then the ones closer in, and then the furthest side adhesive last.
that probably didnt make a whole lot of sense but i didnt follow the order. so you're free to try and figure out how to do it and what it's for.
14- NOW you get to tighten all the bolts and screws previously placed.
15- finish up by replacing the clips you removed earlier.
a short tutorial on how the bumper clips work.
the clip splits apart into two parts.
place the lower part of clip in first
position the top part of the clip.
push the clip in and it'll lock.
16- thank your girlfriend and enjoy!!!
the car will have about 6 inches of clerance after your install the spoiler.
please note, that i took this measurement before the shock absorbers settled so it may actually be lower in reality.
estimated time of work is a little over 1 hour. we kept stopping to take pictures so no duh we're gonna take longer.
DISCLAIMER:
i am not responsible for any damage that occur as a result of this short guide. i am also not responsible for any screw ups that occur as a result of following this guide. my gf and i installed the spoiler this way, it is a guide with pictures meant to help you, the reader install your OEM spoiler.
keywords: OEM, underbody, spoiler, install, installation, guide.
moderator, if i didnt post this in the right forum, please move it.
good luck on your installation!


Thread Starter
Registered User
Joined: Apr 2006
Posts: 5,539
Likes: 3
From: sunny suisun
Originally Posted by tekstar,Feb 18 2008, 10:03 PM
thanks! my gf just ordered my lip for me today and we will be doing this next weekend
didnt' you have an 06?
didnt' you have an 06?
so i see you got your gf to get you a lip as well
good stuff! good luck with putting it on, and i think the recommended temperature for installation is 60 degrees F. so you might have to wait till it warms up a little.


Joined: Jul 2005
Posts: 6,667
Likes: 6
Originally Posted by shotiable,Feb 19 2008, 09:12 AM
the 06 was under my dad's name so we sold it and i bought an 07 under my name.
so i see you got your gf to get you a lip as well good stuff! good luck with putting it on, and i think the recommended temperature for installation is 60 degrees F. so you might have to wait till it warms up a little.
so i see you got your gf to get you a lip as well
good stuff! good luck with putting it on, and i think the recommended temperature for installation is 60 degrees F. so you might have to wait till it warms up a little.
too bad it's starting to rain! guess i'll have to wait.
Trending Topics
Thread Starter
Registered User
Joined: Apr 2006
Posts: 5,539
Likes: 3
From: sunny suisun
angelus1243- lol, need to be more persuasive. i was unaware of step -1 till today.
tekstar- i insisted on red and i actually think i pissed off anderson honda coz they ordered a red one from me but i declined it since it was all scratched up :thumbdown:... those guys were holding out the good NFR from me!
tekstar- i insisted on red and i actually think i pissed off anderson honda coz they ordered a red one from me but i declined it since it was all scratched up :thumbdown:... those guys were holding out the good NFR from me!
Joined: May 2005
Posts: 7,726
Likes: 1
From: 茨城県
This is very good!
Minus points for no pix of hot gf.
One thing I would add is to pre-drill the side holes with the smallest bit you have. It's not needed but makes it much easier to align before you force it in there.
The tape should be pulled in a specific order (http://www.handa-accessories.com/S2000/s2kfus04.pdf) but that's not really needed either.