
DIY $13 Hood Dampers


Thread Starter
Registered User
Joined: Feb 2012
Posts: 18
Likes: 0
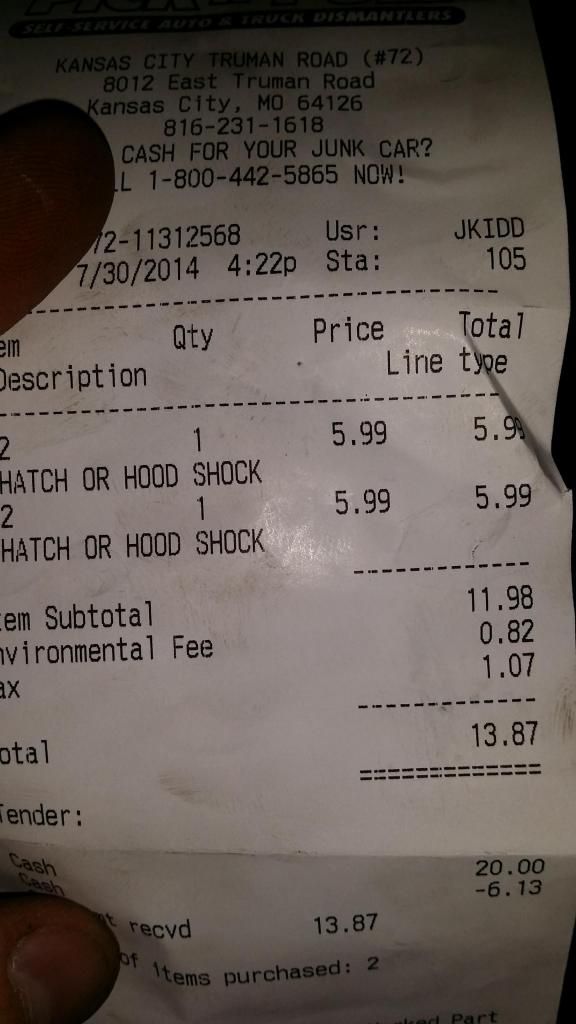
I've been spending quite a bit of time under my hood as of late and I keep catching myself working around the hood prop. So, I began looking into hood dampers but quickly found they are quite expensive for what you get. So, after a short trip to the local junk yard, a few hours of work, and about $13 later I have working hood dampers!!!
These steps can work for ANY car if you take your time and make the appropriate measurements! Just ensure you buy struts that are strong enough to support your hood!
Before doing this, note that my hood has spacers on it! If your hood is not spaced, the bracket location I used will NOT clear your hood!
Here is everything I did to fab the mounting brackets and install the dampers/brackets on the car. This project took about 3 hours to fab the brackets and install on the car. Time spent at the junk yard can vary...
Tools:
Angle grinder w/ cutting disk and flapper wheel
A welder
drill and drill bits
a sharpie
tape measure
rivets and rivet gun
spray paint
grease
vise
Material:
2" x 4-1/2" of 11ga steel (you want to use steel that's strong enough that it won't bend)
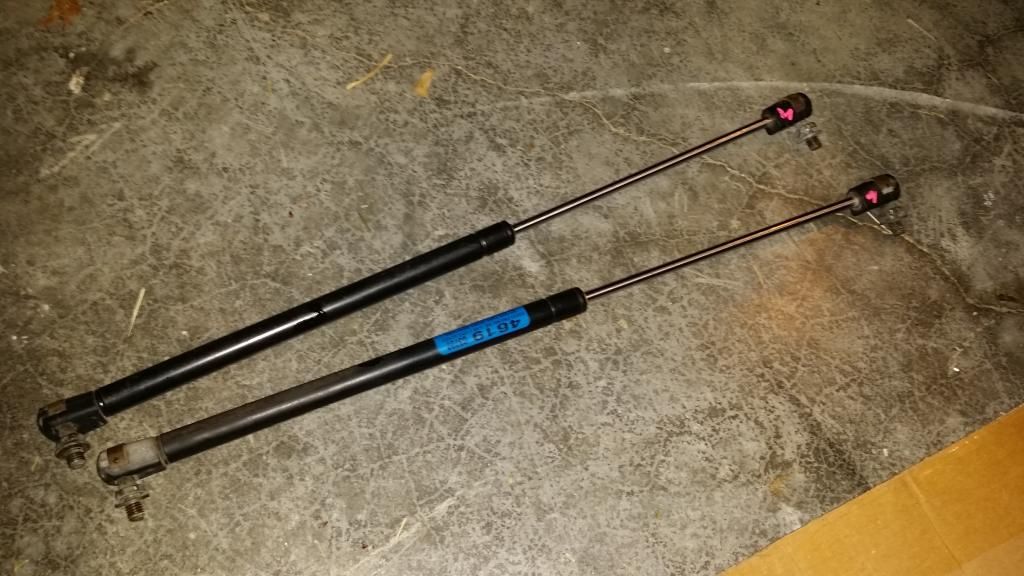
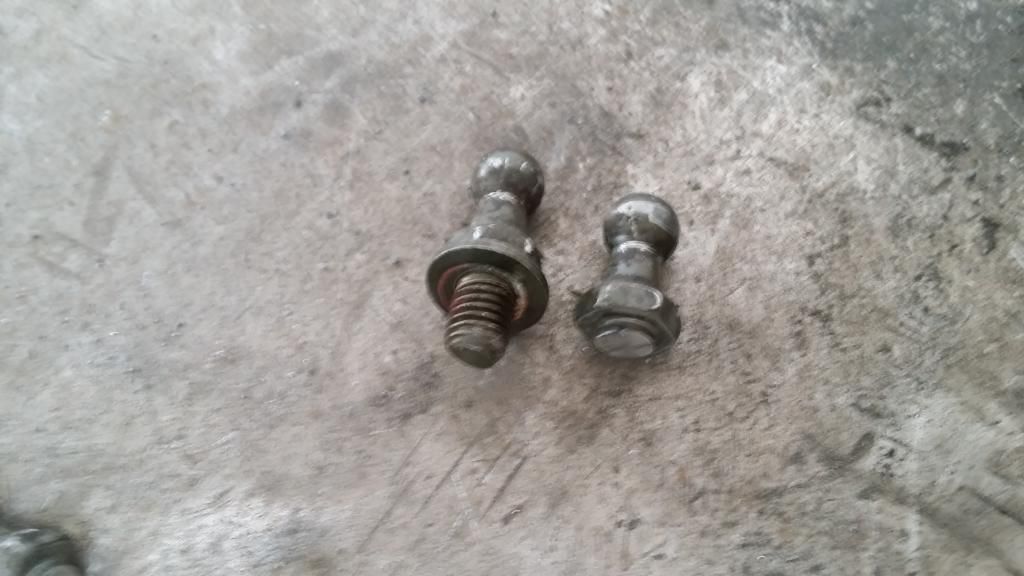
I bought 5th gen (89-93) Celica COUPE trunk struts and the matching pivot ball bolts. I lucked out and found a car with a set that had been replaced. You don't HAVE TO use Celica struts, but after going through the junk yard, they were a set that I found with the longest percentage of stroke and that weren't blown.
Here is how I made the mounting brackets;
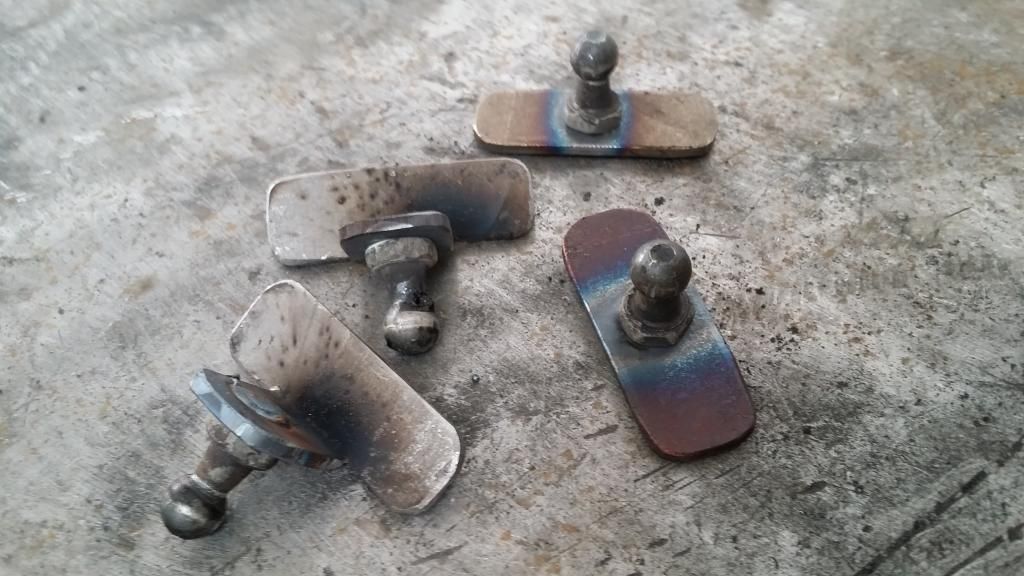
First, I cut off the excess bolt threads (using the washer as a guide). Leaving about a 1/16 of an inch.
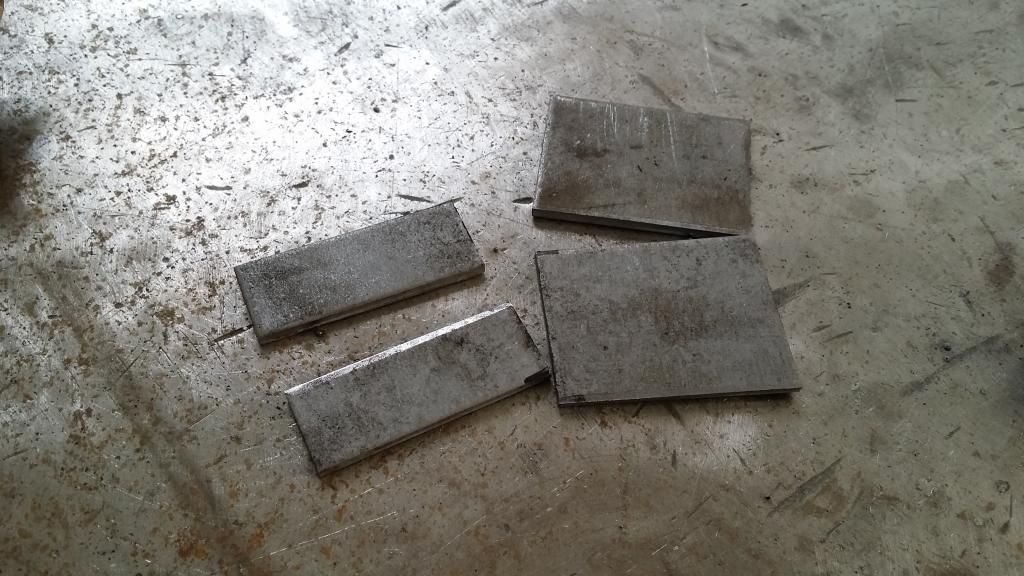
Then rough cut the 4 brackets. 2 brackets are 2" x 3/4" (I'll refer to as "Bracket A"), the other 2 are 2" x 1-1/2" (Bracket B)
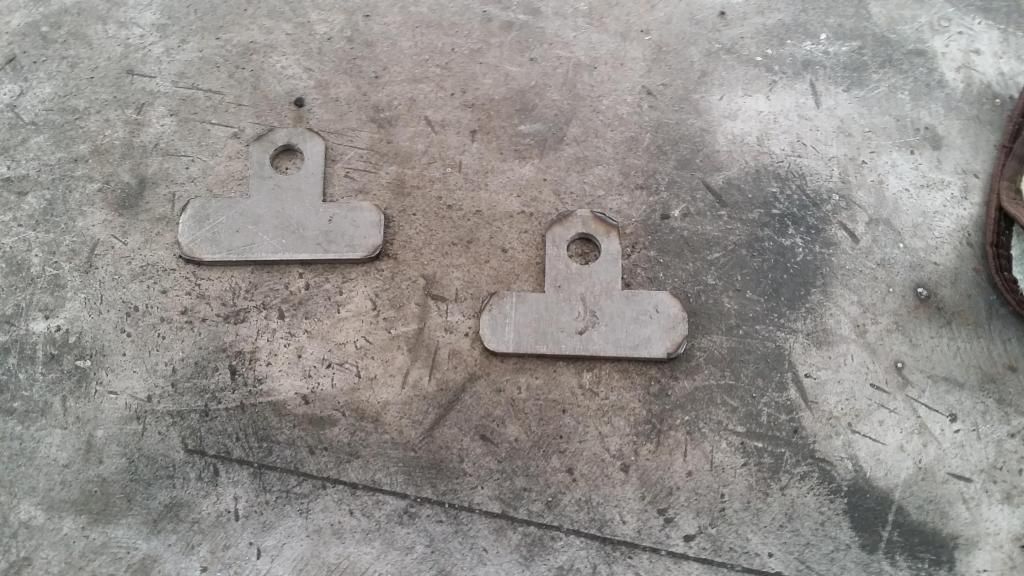
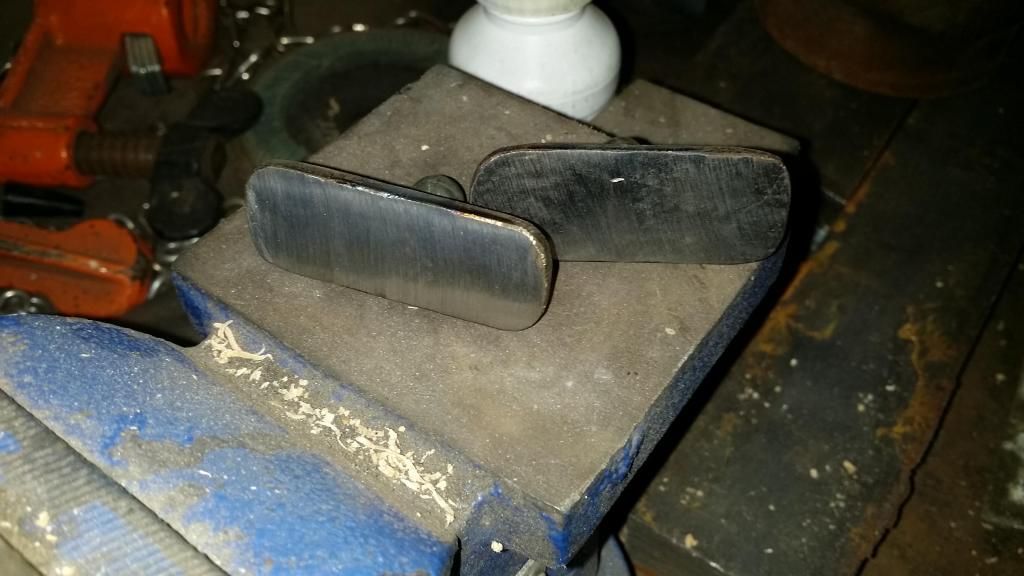
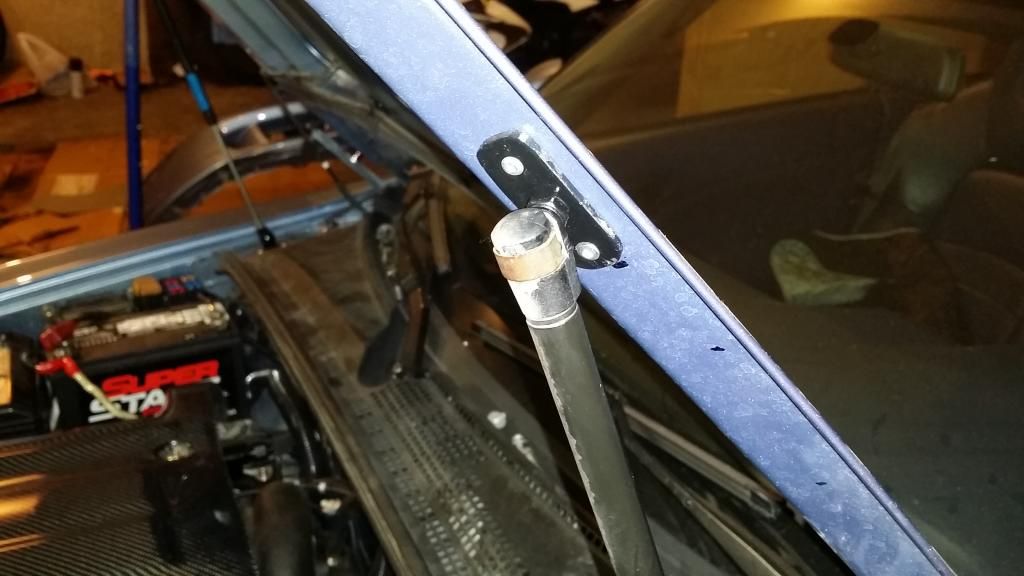
On "Bracket B", scribe a line in the middle of the bracket going lengthwise. Then scribe a line a 1/2" in on each side. Then drill a hole slightly larger than the thread size of your pivot ball bolts. Refer to image below. Round your corner and de-burr your brackets, it only takes a minute and makes the brackets look much more professional!
Once you have "Bracket B" cut out, place it into a vise and bend it 90 degrees. I used a crescent wrench and a hammer to bend them.
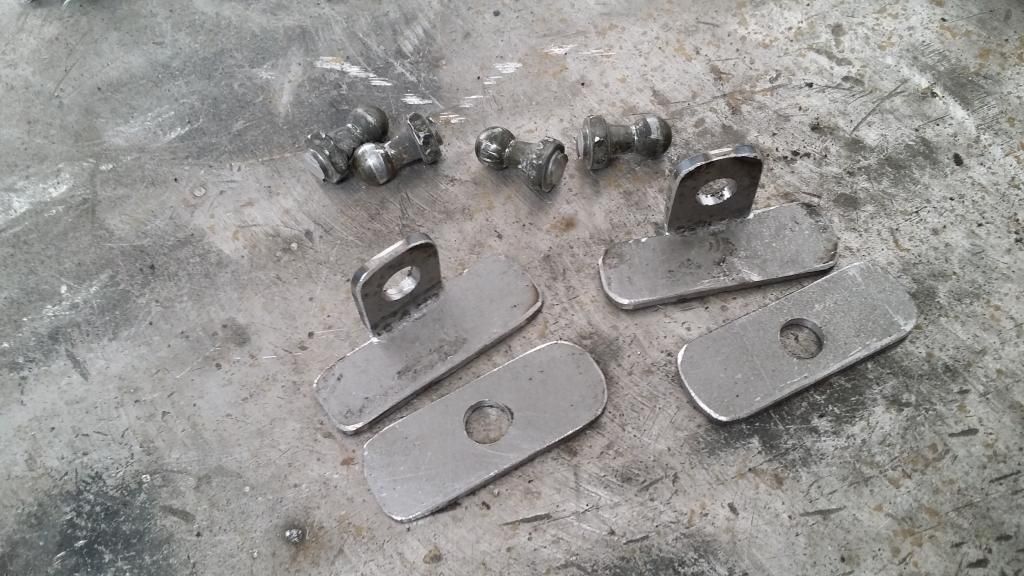
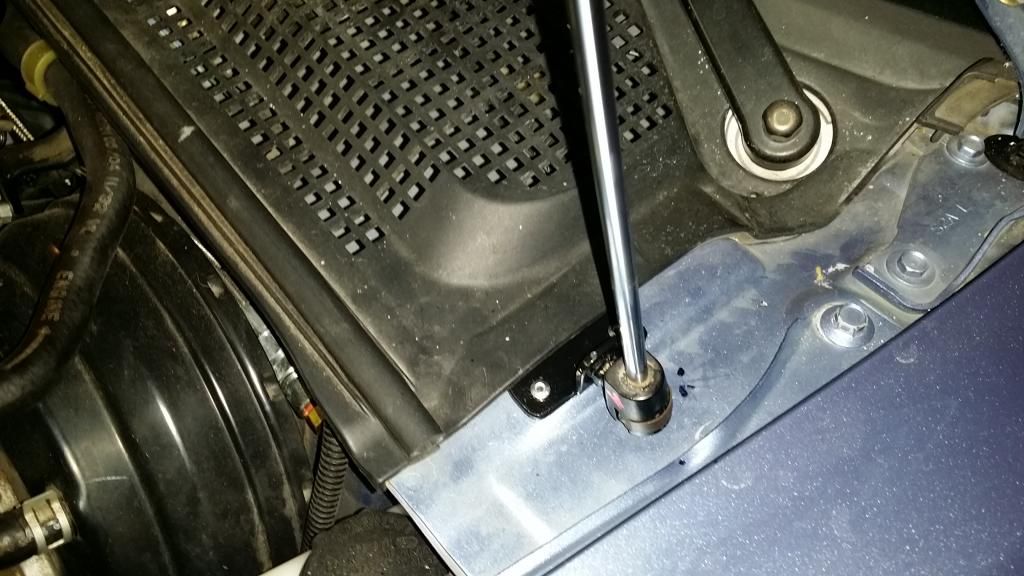
Drill holes in the center of "Bracket A". Using a vise to hold the pivot ball bolt, set "Bracket A" on the bold and weld them together. Note the slight gap between the bracket and bolt. This will allow for better penetration on the bolt when welding.
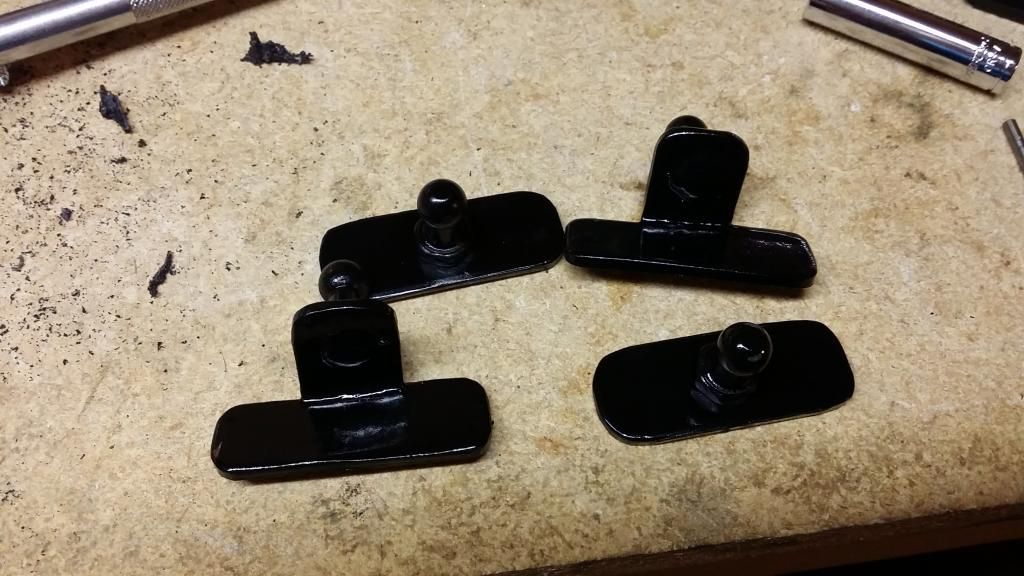
Weld "Bracket B" in a "Z" orientation. Here is what they look like all welded up.
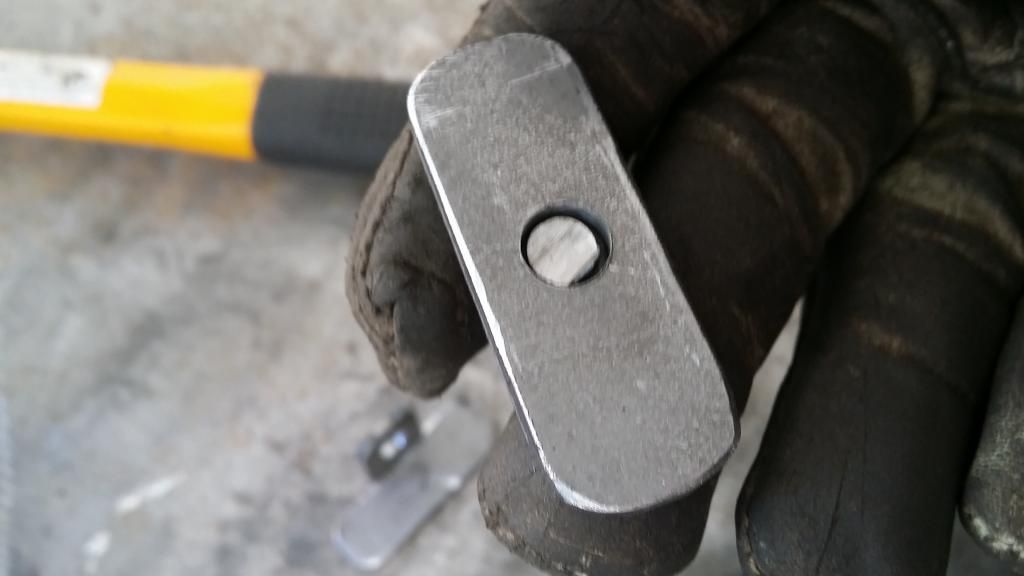
Clean up the weld on "Bracket A" using the angle grinder with a flapper wheel. This bracket will be riveted to the hood and needs to be completely flat!
If you know the size of your rivets, go ahead and drill 2 holes on each end of the brackets. (I didn't know the diameter, so I didn't drill them until after I painted them)
Paint the brackets your desired color, then allow 24 hours to dry. You don't want the paint coming off and gumming up your pivot points.
NOW, you have to do some clearance checking! SORRY I DONT HAVE ANY PICTURES OF THIS, MY HANDS WERE KINDA BUSY...
The struts I use are 11' long when fully compressed and 20" when fully extended. I found a point where "Bracket B" wouldn't interfere with the hood or hood hinges. Then, with the hood almost closed measure from the pivot ball where "Bracket B" will be located 11-1/2" and I marked the inside of the hood with a sharpie. Then, using the extended strut, I opened the hood and held the strut in place at the previous sharpie mark to ensure I wasn't over extending the hood. In my application, I put the center of "Bracket A" at 12-1/2" from the end of the hood hinge.
Place "Bracket B" in the location you want to permanently attach it. Then using a drill/bit that is the appropriate size for you rivets and drill one hole.
Loosely place a rivet through the bracket and into the hole and check clearance again. If your hood is not spaced up, this bracket SHOULD clear if it's installed closer to the firewall and over the lip of the fender.
If you're happy with the location and clearance, go ahead and install the rivet holding the bracket in position. Then drill the 2nd hole and install another rivet. I used a little clear paint a rust prevention before I installed the rivets, but that's up to you.
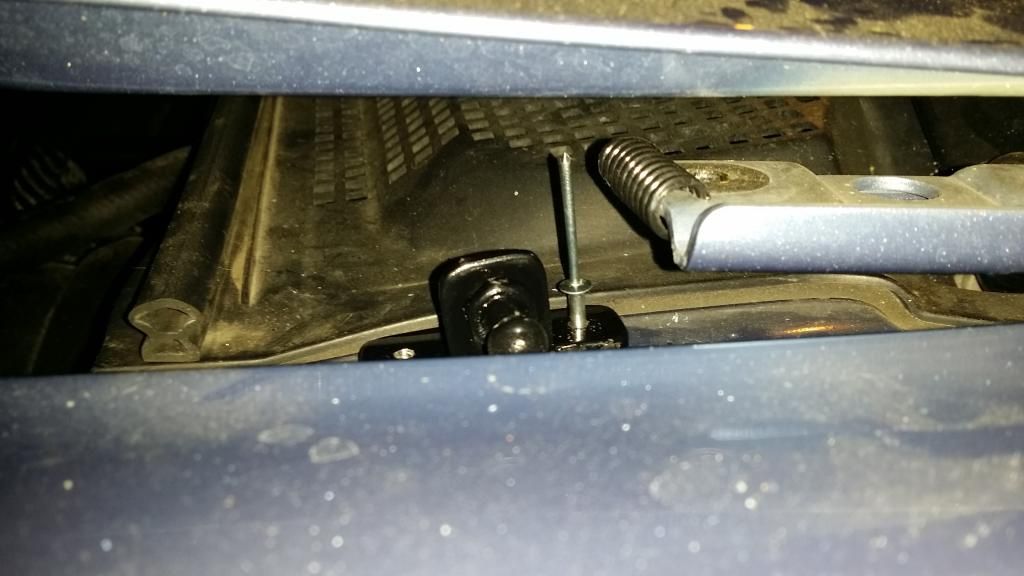
Next, place tape around the drill bit about 1/2" from the end of the bit. This is to keep the bit from plunging through and damaging the hood when you drill it.
Go ahead and clip the damper onto "Bracket B" and open the hood to your desired angle. Just make sure that don't get closer than your mark at 11-1/2", otherwise the damper will bottom out when you close it!
Once you're happy with the angle, install "Bracket A" the same way you did "Bracket B" using rivets. Note that the s2000 hood is aluminum and doesn't need paint to prevent rust.
Check clearance on between the damper and the fender. Its better to only have to move one bracket than to finish everything then have to move both sides!
Then just repeat the process for the other side and you're done!
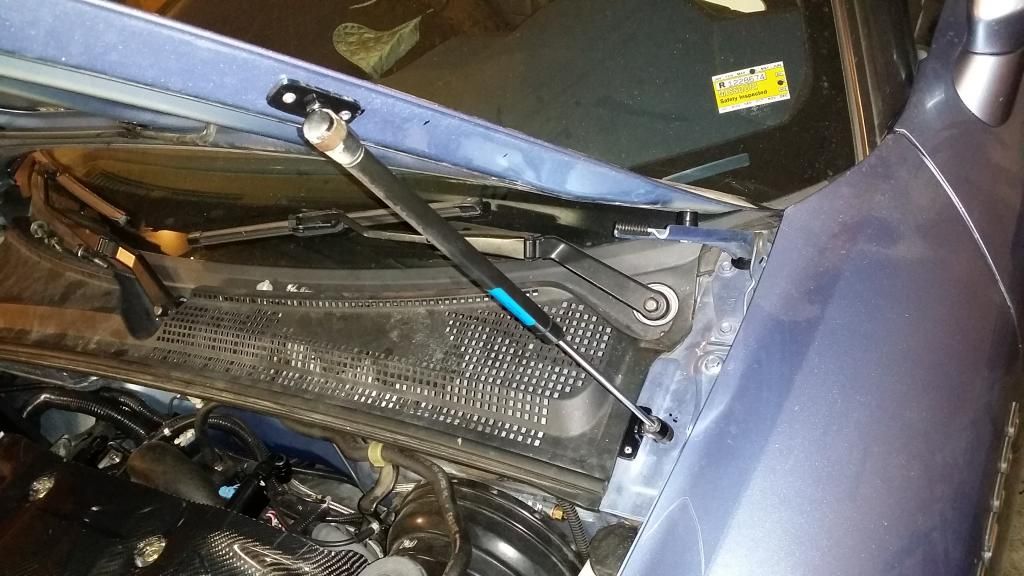
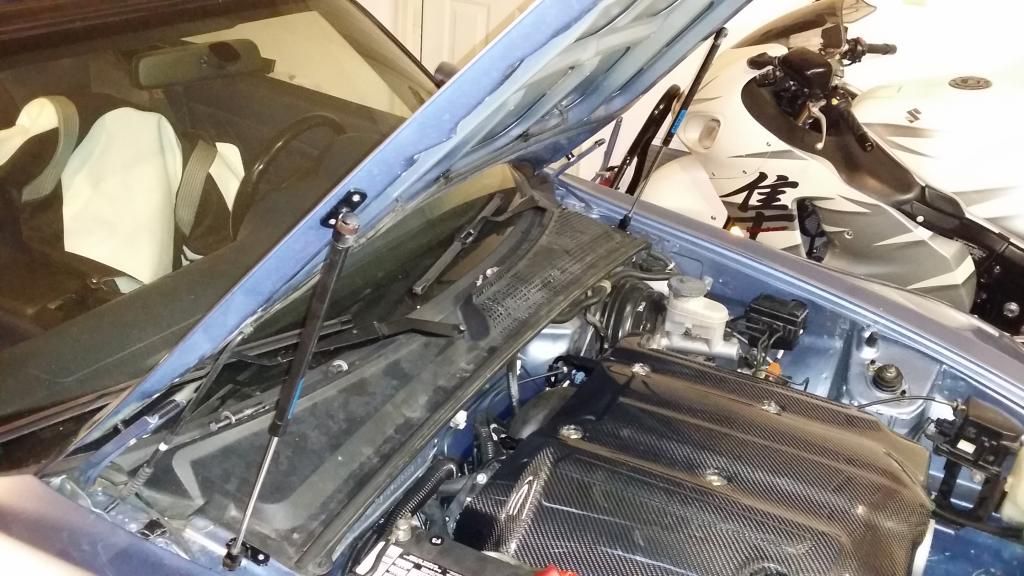
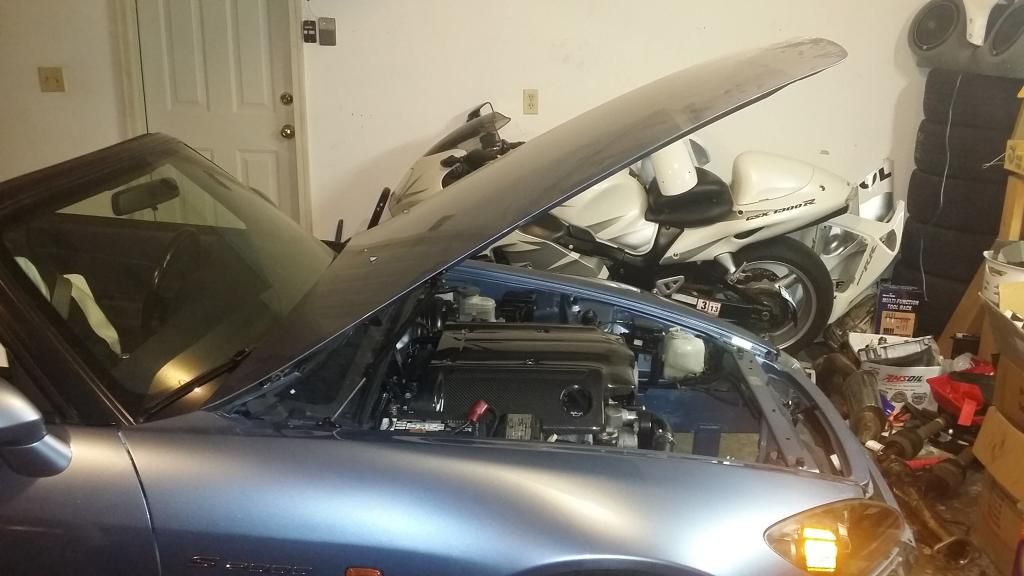
Here is the max hood angle on my car. I could get closer to 90 degrees if I wanted to move "Bracket A" closer to the hinge by an inch (I have about 1-1/2 before I bottom out the strut with the hood closed) But I actually prefer a little bit of angle to my hood when it's popped...

Here is the minimum angle that the struts will still support the weight of the hood.
I hope this helps save someone some money and gives them a little afternoon project!
These steps can work for ANY car if you take your time and make the appropriate measurements! Just ensure you buy struts that are strong enough to support your hood!

Before doing this, note that my hood has spacers on it! If your hood is not spaced, the bracket location I used will NOT clear your hood!
Here is everything I did to fab the mounting brackets and install the dampers/brackets on the car. This project took about 3 hours to fab the brackets and install on the car. Time spent at the junk yard can vary...
Tools:
Angle grinder w/ cutting disk and flapper wheel
A welder
drill and drill bits
a sharpie
tape measure
rivets and rivet gun
spray paint
grease
vise
Material:
2" x 4-1/2" of 11ga steel (you want to use steel that's strong enough that it won't bend)
I bought 5th gen (89-93) Celica COUPE trunk struts and the matching pivot ball bolts. I lucked out and found a car with a set that had been replaced. You don't HAVE TO use Celica struts, but after going through the junk yard, they were a set that I found with the longest percentage of stroke and that weren't blown.


Here is how I made the mounting brackets;
First, I cut off the excess bolt threads (using the washer as a guide). Leaving about a 1/16 of an inch.

Then rough cut the 4 brackets. 2 brackets are 2" x 3/4" (I'll refer to as "Bracket A"), the other 2 are 2" x 1-1/2" (Bracket B)

On "Bracket B", scribe a line in the middle of the bracket going lengthwise. Then scribe a line a 1/2" in on each side. Then drill a hole slightly larger than the thread size of your pivot ball bolts. Refer to image below. Round your corner and de-burr your brackets, it only takes a minute and makes the brackets look much more professional!

Once you have "Bracket B" cut out, place it into a vise and bend it 90 degrees. I used a crescent wrench and a hammer to bend them.

Drill holes in the center of "Bracket A". Using a vise to hold the pivot ball bolt, set "Bracket A" on the bold and weld them together. Note the slight gap between the bracket and bolt. This will allow for better penetration on the bolt when welding.

Weld "Bracket B" in a "Z" orientation. Here is what they look like all welded up.

Clean up the weld on "Bracket A" using the angle grinder with a flapper wheel. This bracket will be riveted to the hood and needs to be completely flat!

If you know the size of your rivets, go ahead and drill 2 holes on each end of the brackets. (I didn't know the diameter, so I didn't drill them until after I painted them)
Paint the brackets your desired color, then allow 24 hours to dry. You don't want the paint coming off and gumming up your pivot points.

NOW, you have to do some clearance checking! SORRY I DONT HAVE ANY PICTURES OF THIS, MY HANDS WERE KINDA BUSY...
The struts I use are 11' long when fully compressed and 20" when fully extended. I found a point where "Bracket B" wouldn't interfere with the hood or hood hinges. Then, with the hood almost closed measure from the pivot ball where "Bracket B" will be located 11-1/2" and I marked the inside of the hood with a sharpie. Then, using the extended strut, I opened the hood and held the strut in place at the previous sharpie mark to ensure I wasn't over extending the hood. In my application, I put the center of "Bracket A" at 12-1/2" from the end of the hood hinge.
Place "Bracket B" in the location you want to permanently attach it. Then using a drill/bit that is the appropriate size for you rivets and drill one hole.
Loosely place a rivet through the bracket and into the hole and check clearance again. If your hood is not spaced up, this bracket SHOULD clear if it's installed closer to the firewall and over the lip of the fender.

If you're happy with the location and clearance, go ahead and install the rivet holding the bracket in position. Then drill the 2nd hole and install another rivet. I used a little clear paint a rust prevention before I installed the rivets, but that's up to you.

Next, place tape around the drill bit about 1/2" from the end of the bit. This is to keep the bit from plunging through and damaging the hood when you drill it.
Go ahead and clip the damper onto "Bracket B" and open the hood to your desired angle. Just make sure that don't get closer than your mark at 11-1/2", otherwise the damper will bottom out when you close it!
Once you're happy with the angle, install "Bracket A" the same way you did "Bracket B" using rivets. Note that the s2000 hood is aluminum and doesn't need paint to prevent rust.

Check clearance on between the damper and the fender. Its better to only have to move one bracket than to finish everything then have to move both sides!

Then just repeat the process for the other side and you're done!

Here is the max hood angle on my car. I could get closer to 90 degrees if I wanted to move "Bracket A" closer to the hinge by an inch (I have about 1-1/2 before I bottom out the strut with the hood closed) But I actually prefer a little bit of angle to my hood when it's popped...

Here is the minimum angle that the struts will still support the weight of the hood.

I hope this helps save someone some money and gives them a little afternoon project!


Thread Starter
Registered User
Joined: Feb 2012
Posts: 18
Likes: 0
Yes sir! I actually modeled my kit after the Redline kit. I'm pretty confident if I were to move my lower brackets it would clear a hood without spacers. But I have to space the hood up to clear the engine cover...

Thread
Thread Starter
Forum
Replies
Last Post