
Installing Speedo Healer

Thread Starter


Joined: Jan 2001
Posts: 9,930
Likes: 363
From: West of Chi., IL
This describes my install of the HealTech Electronics (a Hungarian company based near Budapest) Speedo Healer universal kit. It is a speedometer calibration device used to adjust the speedometer to read accurately when the gearing of the drive train on a vehicle is changed.
Please note that I purchased my unit at a fair price from Blue Monkey Motorsports. When I sought technical advice, Todd Robinson immediately introduced me to Norbert (sadly, I do not have his full name), the "person in charge" in Hungary. Both were spectacularly helpful and responsive.
Please note that this is a description of my install into a first generation AP2 (MY2004) and not intended as a set of instructions. To the extent that one uses any part of this description to guide their own install, I am not liable for them having elected to do so.
When the gearing is made taller (more mph for the same rpm) the calibration needs to be made positively. This is what I need because I have installed a 3.9 crown and pinion gearing in my rear assembly. I want the taller gearing because I've installed a supercharger kit. The present design of the Yellow Jacket that I have and used when I went went with shorter gearing (4.3 J's Racing vs the OEM 4.1) does not permit Positive calibration. It only works for negative calibration and does quite a good job at that.
The version of the Speedo Healer kit that must be used on the S2000 is the "Universal" kit. Although I did not use them, it comes with connectors, wire ties and other accessory parts.
The installation of the Speedo Healer is very much like that of the Yellow Jacket.
Below you will find scheme drawing that I believe is accurate, a stepped process description of my install and a photo of my install and location of the module on the side of the under-dash fuse box.
I will revisit this thread from time to time over a short term to review it and make changes as I feel it may need.
THE UNIT
The package is quite compact and very well protected. I would not be bashful about installing this unit in the engine box or on the chassis where it is subject to a harsh environment.
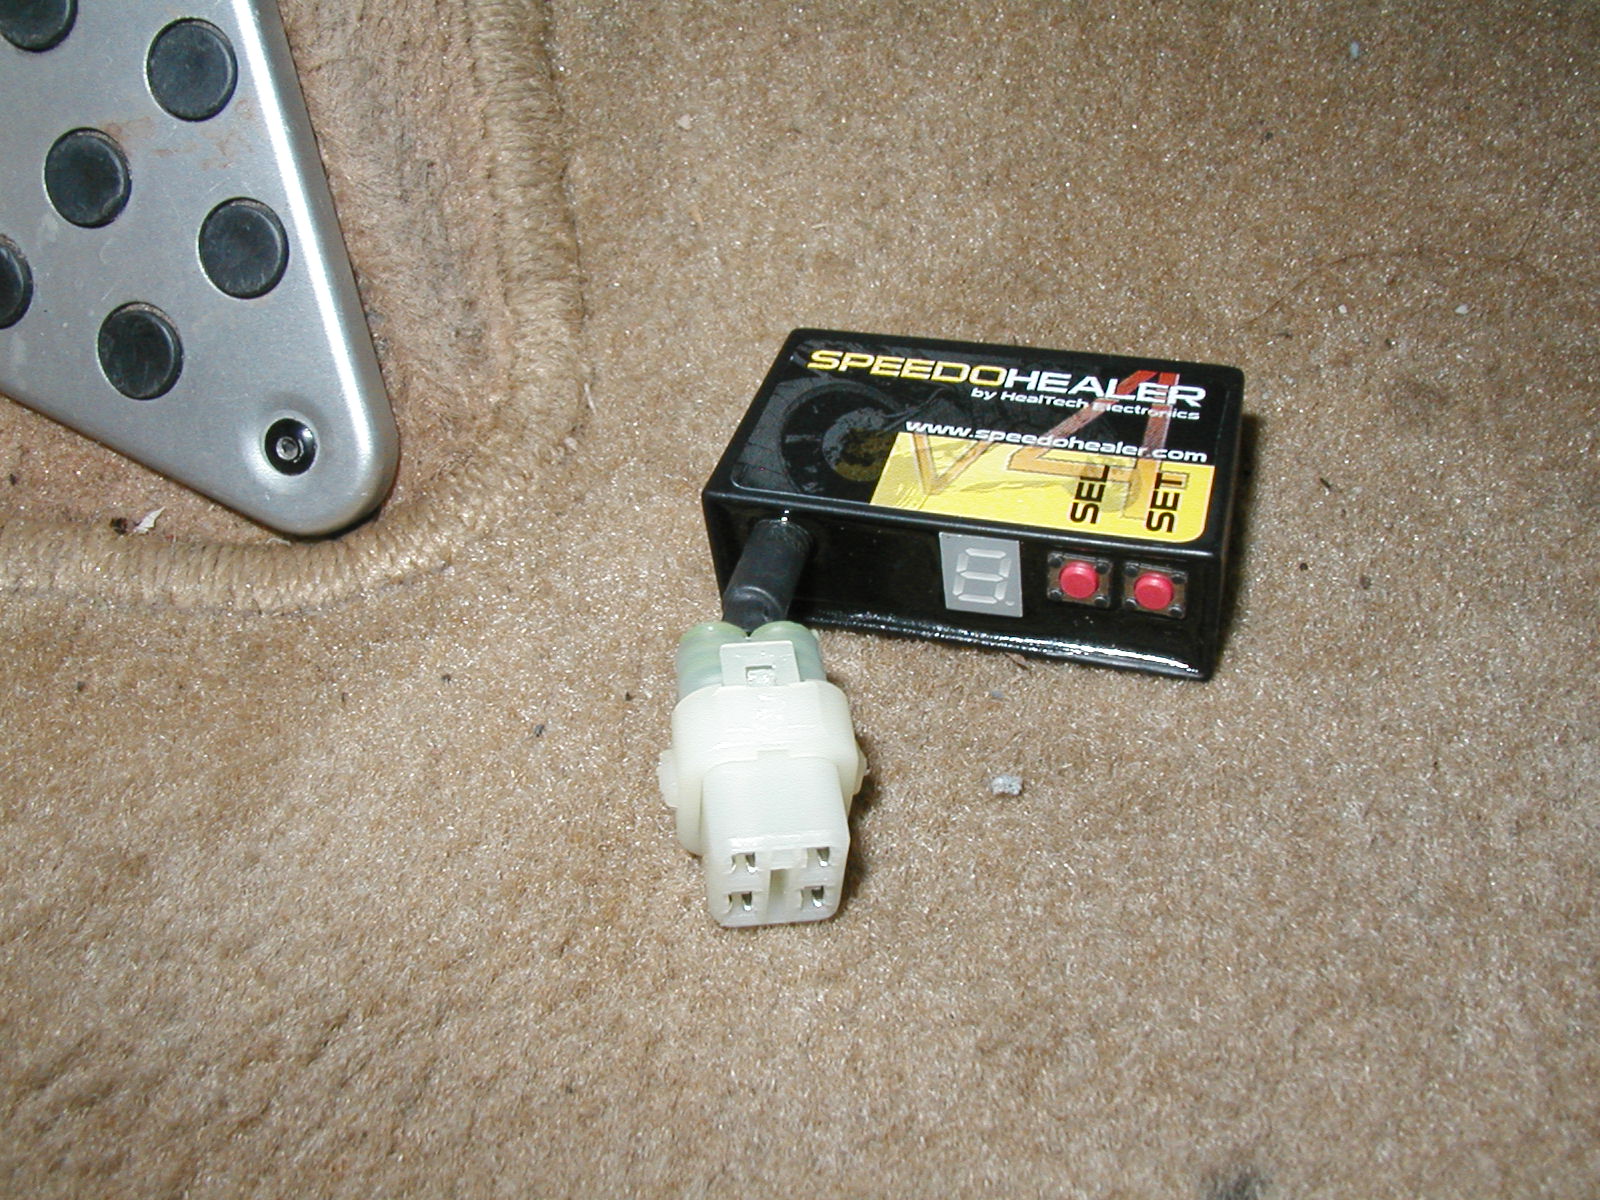
THE HARNESS
The harness that comes with the kit is quite long. Where I installed my unit in close proximity to the wiring under the dash, only a small fraction (say, 8") of the harness provided was actually employed.

THE CIRCUIT
The following diagram reflects my understanding of the circuit. It schematically shows the circuit configuration that I have used and it was successful.

THE PROCESS
The following is a general description of the process that I used for my installation.
1 - Remove the left door sill
2 - Lift the rubber door stripping and remove the small press clip from the top left kick panel
3 - Remove the press clip from the front of the left kick panel
4 - While lifting the hood release latch, slide the left kick panel to the rear while rotating it anti-clockwise to allow the hood release latch to retract through the panel thereby releasing it for final removal
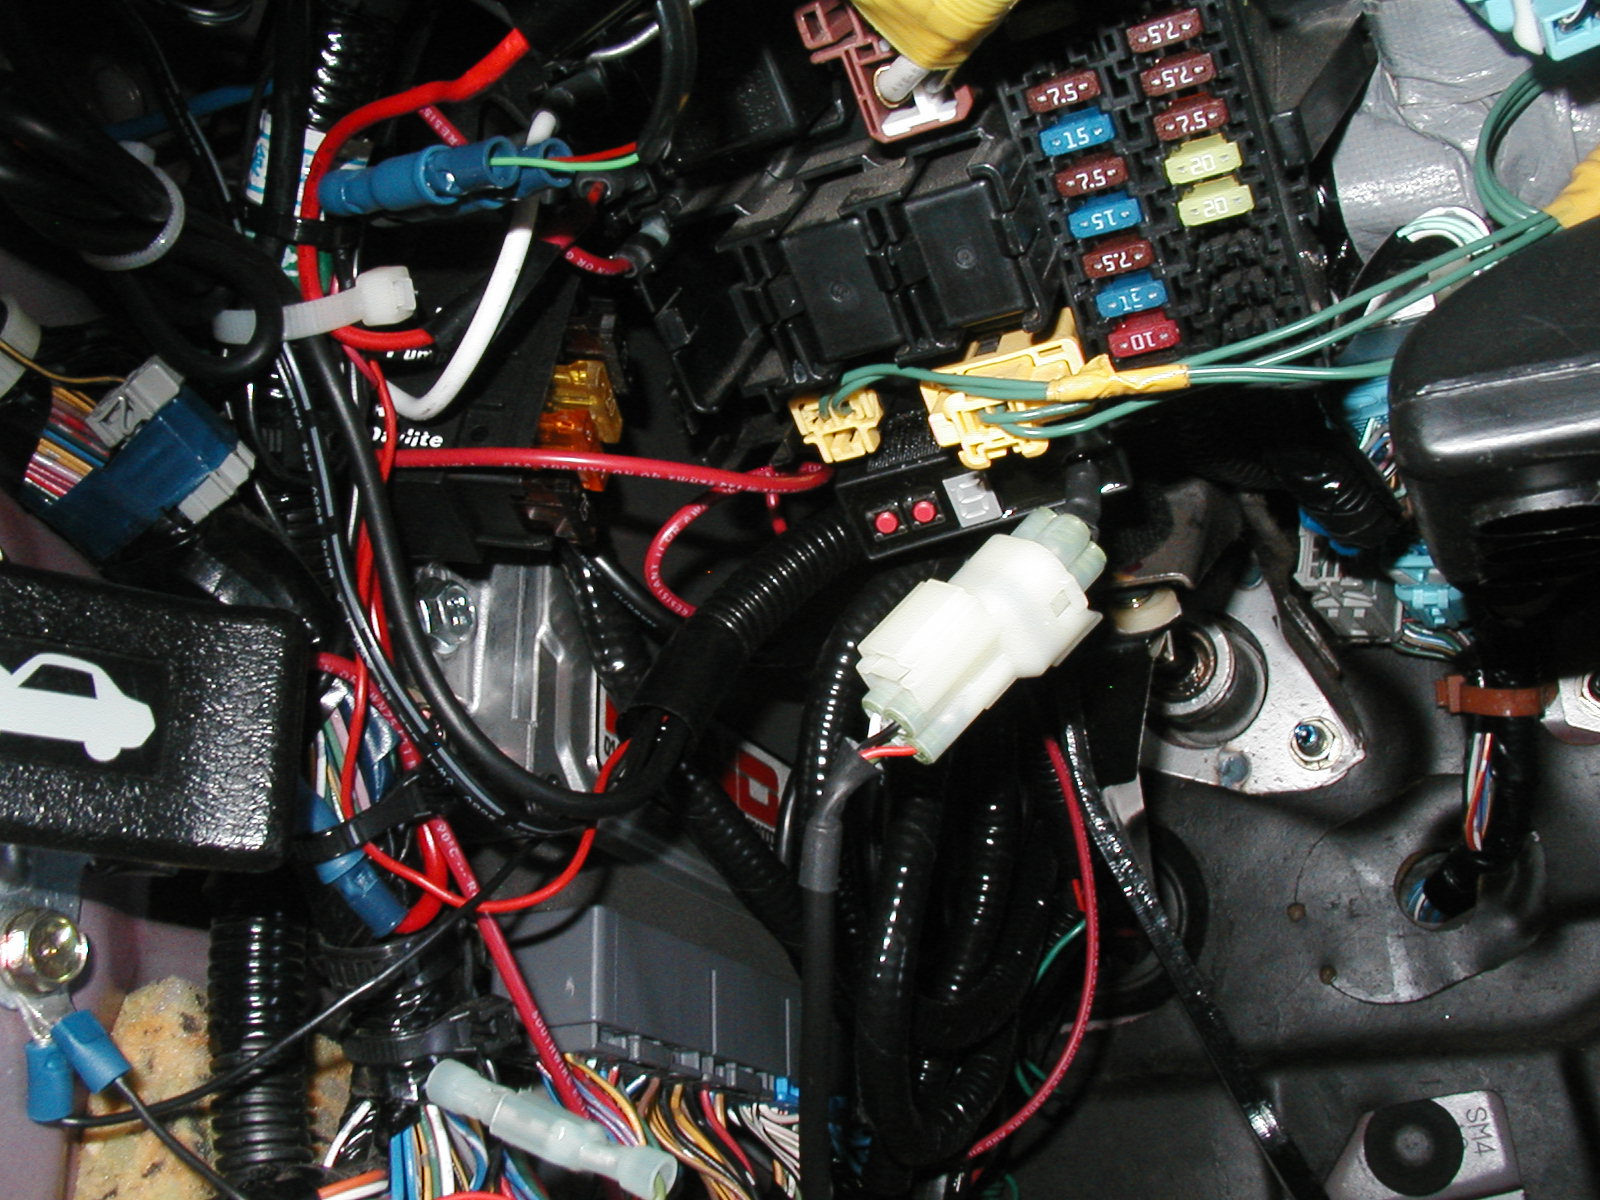
5 - Determine the final mounting location for calibrator unit (velcro on side of under-dash fuse box)
6 - Locate the dash harness interface connector C101 (blue connector noted in photo) and estimate the length of calibrator harness necessary to make connections from the mounting location to the wire harness and ground to the rear of C101 (blue connector)
7 - Cut the calibrator harness to the estimated length
8 - Install a ring terminal onto the calibrator harness black wire
9 - Install a male spade terminal onto the calibrator harness red wire
10 - Install a male spade terminal onto the calibrator harness white wire
11 - Install a female spade terminal onto the calibrator harness green wire
12 - Identify the yellow/blue (reference voltage) wire in the dash harness located to the rear of C101 (blue connector)
13 - Install a spade terminal crimp tap onto the yellow/blue wire approximately 2" to the rear
of C101 (blue connector)
14 - Identify the blue/white (speed signal) wire in the dash harness located to the rear of C101 (blue connector)
15 - At approximately 2" to the rear of C101 (blue connector), cut the blue/white wire
16 - Install a female spade terminal onto the end of the blue/white wire at its segment nearest to C101 (blue connector).
17 - Install a male spade terminal onto the end of the blue/white wire at its segment that runs into the dash harness and up to the gauge module
18 - Connect the male spade connector on the red calibrator harness wire to the spade terminal crimp tap on the yellow/blue wire
19 - Connect the male spade terminal on the end of the white wire to the female spade terminal on the blue/white wire segment nearest to C101 (blue connector)
20 - Connect the female spade terminal on the end of the green wire to the male spade terminal on the blue/white wire segment that runs into the dash harness
21 - Mount the ring terminal on the black calibrator harness wire to the 6 mm bolt at the bottom of the hood release latch mounting bracket.
22 - After mounting, follow the manufacturer's supplied instructions to set up the unit and the require compensation.
23 - Reinstall the kick panel and door sill
Please note that the use of one male stud connector at one end of the blue/white wire and a female at the other will permit re-connection and reversion back to the original wiring configuration in the event that you wish to remove the Speedo Healer.
THE RESULT
The image below shows my result of the process, above, with notation that I believe is consistent with that description.

THE MOUNT
The following image shows that I have located my unit onto the side of the under-dash fuse box using a section of industrial-grade velcro. This enables me to remove the unit from the fuse box to view the settings for a new adjustment as it may need from time to time.
Please note that I purchased my unit at a fair price from Blue Monkey Motorsports. When I sought technical advice, Todd Robinson immediately introduced me to Norbert (sadly, I do not have his full name), the "person in charge" in Hungary. Both were spectacularly helpful and responsive.
Please note that this is a description of my install into a first generation AP2 (MY2004) and not intended as a set of instructions. To the extent that one uses any part of this description to guide their own install, I am not liable for them having elected to do so.
When the gearing is made taller (more mph for the same rpm) the calibration needs to be made positively. This is what I need because I have installed a 3.9 crown and pinion gearing in my rear assembly. I want the taller gearing because I've installed a supercharger kit. The present design of the Yellow Jacket that I have and used when I went went with shorter gearing (4.3 J's Racing vs the OEM 4.1) does not permit Positive calibration. It only works for negative calibration and does quite a good job at that.
The version of the Speedo Healer kit that must be used on the S2000 is the "Universal" kit. Although I did not use them, it comes with connectors, wire ties and other accessory parts.
The installation of the Speedo Healer is very much like that of the Yellow Jacket.
Below you will find scheme drawing that I believe is accurate, a stepped process description of my install and a photo of my install and location of the module on the side of the under-dash fuse box.
I will revisit this thread from time to time over a short term to review it and make changes as I feel it may need.
THE UNIT
The package is quite compact and very well protected. I would not be bashful about installing this unit in the engine box or on the chassis where it is subject to a harsh environment.
THE HARNESS
The harness that comes with the kit is quite long. Where I installed my unit in close proximity to the wiring under the dash, only a small fraction (say, 8") of the harness provided was actually employed.
THE CIRCUIT
The following diagram reflects my understanding of the circuit. It schematically shows the circuit configuration that I have used and it was successful.
THE PROCESS
The following is a general description of the process that I used for my installation.
1 - Remove the left door sill
2 - Lift the rubber door stripping and remove the small press clip from the top left kick panel
3 - Remove the press clip from the front of the left kick panel
4 - While lifting the hood release latch, slide the left kick panel to the rear while rotating it anti-clockwise to allow the hood release latch to retract through the panel thereby releasing it for final removal
5 - Determine the final mounting location for calibrator unit (velcro on side of under-dash fuse box)
6 - Locate the dash harness interface connector C101 (blue connector noted in photo) and estimate the length of calibrator harness necessary to make connections from the mounting location to the wire harness and ground to the rear of C101 (blue connector)
7 - Cut the calibrator harness to the estimated length
8 - Install a ring terminal onto the calibrator harness black wire
9 - Install a male spade terminal onto the calibrator harness red wire
10 - Install a male spade terminal onto the calibrator harness white wire
11 - Install a female spade terminal onto the calibrator harness green wire
12 - Identify the yellow/blue (reference voltage) wire in the dash harness located to the rear of C101 (blue connector)
13 - Install a spade terminal crimp tap onto the yellow/blue wire approximately 2" to the rear
of C101 (blue connector)
14 - Identify the blue/white (speed signal) wire in the dash harness located to the rear of C101 (blue connector)
15 - At approximately 2" to the rear of C101 (blue connector), cut the blue/white wire
16 - Install a female spade terminal onto the end of the blue/white wire at its segment nearest to C101 (blue connector).
17 - Install a male spade terminal onto the end of the blue/white wire at its segment that runs into the dash harness and up to the gauge module
18 - Connect the male spade connector on the red calibrator harness wire to the spade terminal crimp tap on the yellow/blue wire
19 - Connect the male spade terminal on the end of the white wire to the female spade terminal on the blue/white wire segment nearest to C101 (blue connector)
20 - Connect the female spade terminal on the end of the green wire to the male spade terminal on the blue/white wire segment that runs into the dash harness
21 - Mount the ring terminal on the black calibrator harness wire to the 6 mm bolt at the bottom of the hood release latch mounting bracket.
22 - After mounting, follow the manufacturer's supplied instructions to set up the unit and the require compensation.
23 - Reinstall the kick panel and door sill
Please note that the use of one male stud connector at one end of the blue/white wire and a female at the other will permit re-connection and reversion back to the original wiring configuration in the event that you wish to remove the Speedo Healer.
THE RESULT
The image below shows my result of the process, above, with notation that I believe is consistent with that description.
THE MOUNT
The following image shows that I have located my unit onto the side of the under-dash fuse box using a section of industrial-grade velcro. This enables me to remove the unit from the fuse box to view the settings for a new adjustment as it may need from time to time.

Thread
Thread Starter
Forum
Replies
Last Post
Jeremy Clarkson
S2000 Under The Hood
12
Sep 11, 2012 11:27 AM