Sreeve2k
 01-02-2017, 03:50 PM
#1
Registered User

Thread Starter
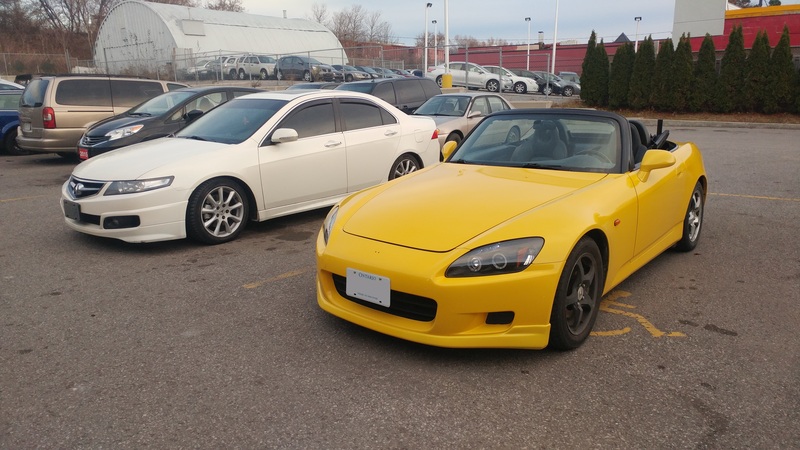
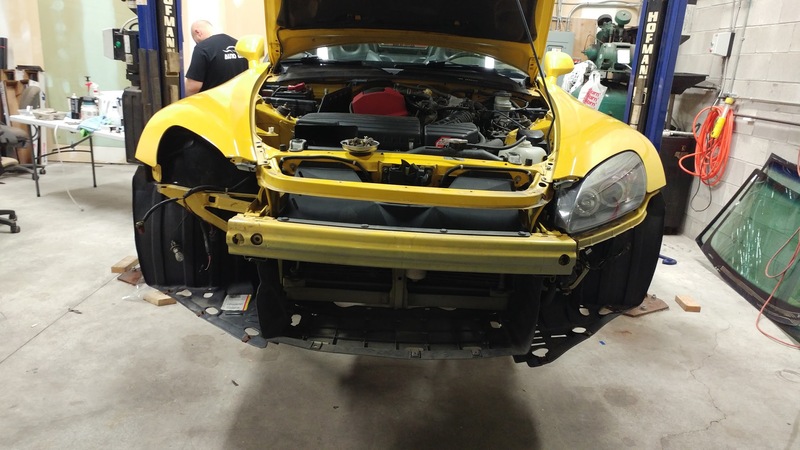
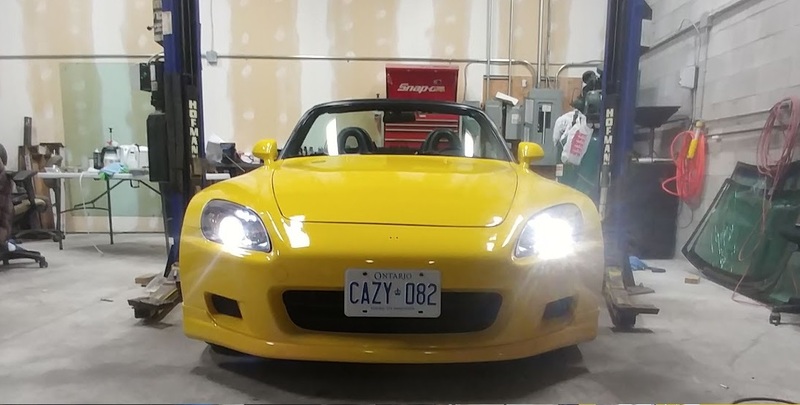
HI, im Steve (some call me sreeve) and on December 1st 2016 i turned this....
 into this!
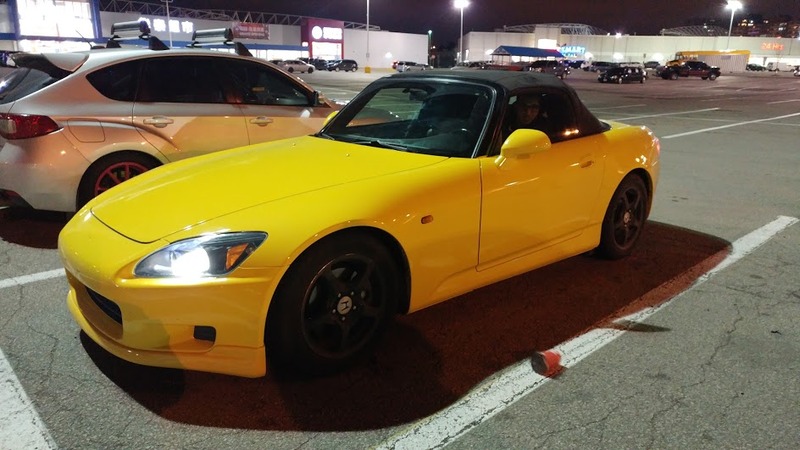
2001 S2000 with 194,500 km
The Good
-Stainless steel single tip exhaust / Cat-less / magnaflow glass-pike / stainless steel muffler (louder then id prefer)
-No CEL light (o2 spacers)
-Runs Great
-Smooth gearbox
The Bad
-Reallllyyyyy dirty, like never been detailed and collected years of dust (dash feels like sandpaper)
-Soft top is beat up and has tears, Plastic rear window torn and patched up
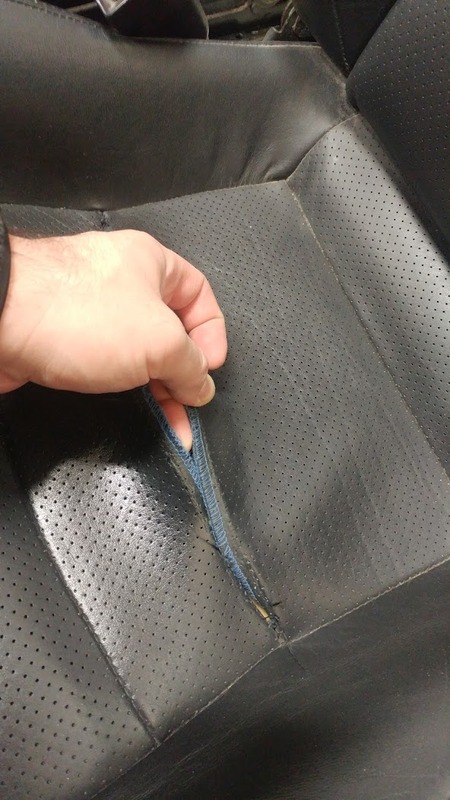
-Driver seat is ripped (stitching has unravelled)
-Shitty E-bay Headlights
-Passenger low-beam and high-beam doesn't work
-Wheels have old / crappy / faded / peeling / plasi dip
-Windshield has been installed horribly
-Windshield Frame been pained like garbage
-broken radio cover / cup holder
+more
but i don't mind
i guess i have the winter to fix it up. Turned my TSX into my daily
 into this!
2001 S2000 with 194,500 km
The Good
-Stainless steel single tip exhaust / Cat-less / magnaflow glass-pike / stainless steel muffler (louder then id prefer)
-No CEL light (o2 spacers)
-Runs Great
-Smooth gearbox
The Bad
-Reallllyyyyy dirty, like never been detailed and collected years of dust (dash feels like sandpaper)
-Soft top is beat up and has tears, Plastic rear window torn and patched up
-Driver seat is ripped (stitching has unravelled)
-Shitty E-bay Headlights
-Passenger low-beam and high-beam doesn't work
-Wheels have old / crappy / faded / peeling / plasi dip
-Windshield has been installed horribly
-Windshield Frame been pained like garbage
-broken radio cover / cup holder
+more
but i don't mind
i guess i have the winter to fix it up. Turned my TSX into my daily

Last edited by Sreeve; 01-02-2017 at 07:08 PM.
 01-02-2017, 04:28 PM
#2
Registered User
Thread Starter
First thing i did was change my Engine oil, transmission oil, and differential Oil. I used all OEM Honda fluid except for the engine oil, i used Castrol Syntec Edge 10w30
Suddenly the transmission doesn't feel as smooth :@ maybe the previous owner was using some additive? im not sure. its not like a problem but any ideas?
If you noticed in the last picture i peeled off the plasti-dip off one wheel
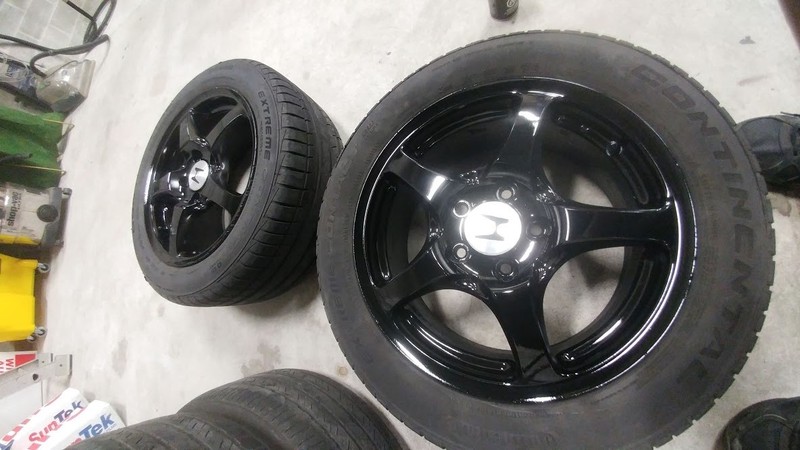
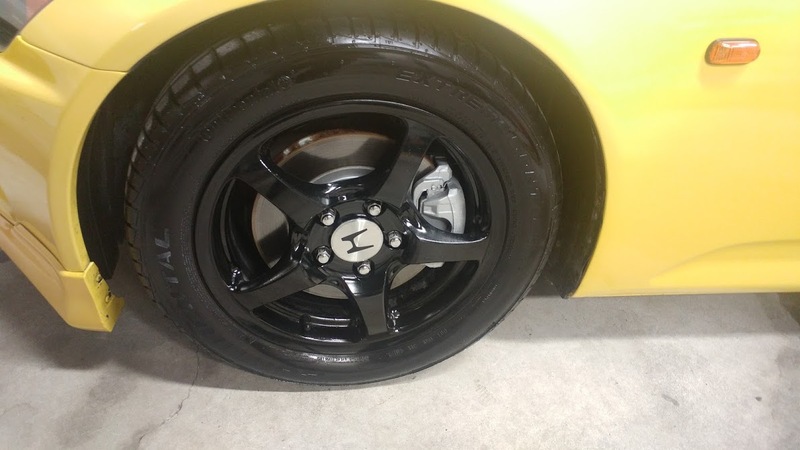
i suddenly found out why it was plasti-dipped. The wheel are badly scratched up, curbed up, chewed up. my solution? Paint it Black!
it took a long time to peel it all off, and i sanded whatever parts woudlnt peel, not a perfect job but it will do untill i buy new wheels (tires are pretty new so i get to shed them up this summer)
i had a lot of caliper paint sitting around so i used that and i also painted the calipers OEM silver. it was previously painted red, and it was all faded
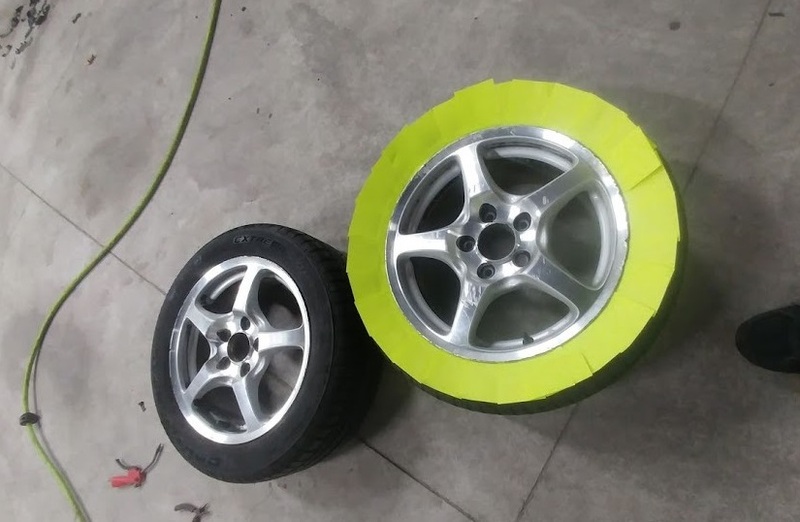
many layers of paint later
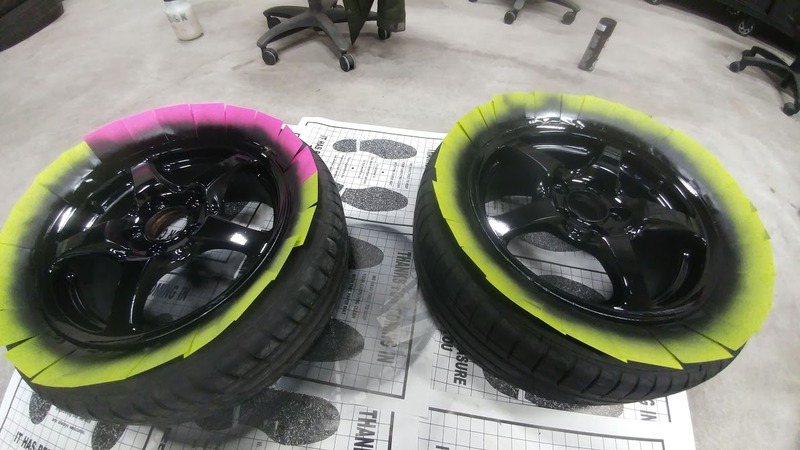
The Finished product
Suddenly the transmission doesn't feel as smooth :@ maybe the previous owner was using some additive? im not sure. its not like a problem but any ideas?
If you noticed in the last picture i peeled off the plasti-dip off one wheel
i suddenly found out why it was plasti-dipped. The wheel are badly scratched up, curbed up, chewed up. my solution? Paint it Black!
it took a long time to peel it all off, and i sanded whatever parts woudlnt peel, not a perfect job but it will do untill i buy new wheels (tires are pretty new so i get to shed them up this summer)
i had a lot of caliper paint sitting around so i used that and i also painted the calipers OEM silver. it was previously painted red, and it was all faded

many layers of paint later

The Finished product

 01-02-2017, 04:48 PM
#3
Registered User
Thread Starter
Now time to battle the headlight issue
First i checked the fuse, and the passenger side fuse was blown.... i wonder why?
something was fishy about these e-bay headlights so i took them apart (really wish it came with OEM headlights)
already loving the car and how easy everything is to work on / take apart
well the wiring was a hack job, wires spliced and tapped into, with electrical tape
i cut all the garbage off, soldered the wires together and shrunk wrap them (the way it should be done on a car)
also bulbs seemed to be burnt out on the low beams so i replaced them with 4300K (I like oem colour)
Success!
The headlights were aimed too high, i lowered them a low
should of gone a little lower but ill readjust later
First i checked the fuse, and the passenger side fuse was blown.... i wonder why?
something was fishy about these e-bay headlights so i took them apart (really wish it came with OEM headlights)
already loving the car and how easy everything is to work on / take apart


well the wiring was a hack job, wires spliced and tapped into, with electrical tape
i cut all the garbage off, soldered the wires together and shrunk wrap them (the way it should be done on a car)
also bulbs seemed to be burnt out on the low beams so i replaced them with 4300K (I like oem colour)
Success!

The headlights were aimed too high, i lowered them a low
should of gone a little lower but ill readjust later
Last edited by Sreeve; 01-02-2017 at 04:51 PM.
01-02-2017, 05:15 PM
#4

Congrats and welcome to the forum. You've made some great progress in short order, good work. If you need a nice set of ap1 headlights see Fernando's for sale post, he has some mint headlights for sale.
The previous owner may have used a different fluid like Amsoil or Syncromesh, it often takes a couple weeks worth of driving to allow new fluid to become homogenous with remnants of the old fluid and to plate up on the metal surfaces. I bet it will feel better with a bit of driving. Good luck with the remaining upgrades.
The previous owner may have used a different fluid like Amsoil or Syncromesh, it often takes a couple weeks worth of driving to allow new fluid to become homogenous with remnants of the old fluid and to plate up on the metal surfaces. I bet it will feel better with a bit of driving. Good luck with the remaining upgrades.


 01-02-2017, 06:16 PM
#6
you can use aluminum paint stripper on the rims to remove the clear coat. Then sand. Works well - I've used airplane aluminum paint stripper available at part source/canadian tire with much success.
next up, do your valve adjustment and check those retainers. replace the spark plugs (torque to 22lbft) and antifreeze with Honda stuff.
good luck and keep us posted
darcy
next up, do your valve adjustment and check those retainers. replace the spark plugs (torque to 22lbft) and antifreeze with Honda stuff.
good luck and keep us posted
darcy
01-02-2017, 07:00 PM
#7
Registered User
Thread Starter
Congrats and welcome to the forum. You've made some great progress in short order, good work. If you need a nice set of ap1 headlights see Fernando's for sale post, he has some mint headlights for sale.
The previous owner may have used a different fluid like Amsoil or Syncromesh, it often takes a couple weeks worth of driving to allow new fluid to become homogenous with remnants of the old fluid and to plate up on the metal surfaces. I bet it will feel better with a bit of driving. Good luck with the remaining upgrades.
The previous owner may have used a different fluid like Amsoil or Syncromesh, it often takes a couple weeks worth of driving to allow new fluid to become homogenous with remnants of the old fluid and to plate up on the metal surfaces. I bet it will feel better with a bit of driving. Good luck with the remaining upgrades.
you can use aluminum paint stripper on the rims to remove the clear coat. Then sand. Works well - I've used airplane aluminum paint stripper available at part source/canadian tire with much success.
next up, do your valve adjustment and check those retainers. replace the spark plugs (torque to 22lbft) and antifreeze with Honda stuff.
good luck and keep us posted
darcy
next up, do your valve adjustment and check those retainers. replace the spark plugs (torque to 22lbft) and antifreeze with Honda stuff.
good luck and keep us posted
darcy
that would be all my fluids changed
spark plugs is good too cause i dont know when they were changed last and they're cheap
valve adjustment and retainers is out of my comfort zone but ill get a couple friends to help me out who are more experienced with that sort of stuff
now something else i did out of my comfort zone
i attempted to do some body work, turned out really good and i'm impressed with my work
the windshield was installed very badly, it was also cheap glass (distortion) and the windshield frame was poorly painted
it looked like it was sanded by 40-grit sand paper and sprayed black with a can (who does that?)
i ripped out the shitty windshield and attempted to auto dip the frame (Auto-dip is like Plasti-dip but leaves a vinyl like finish instead of rubber-like)
it was supposed to auto-level to fill in the scratches but the scratches were too deep and came out bad, along with some runs

it came out a lot better on my friends wheels

anyways i said f**k it and peeled it all off and decided to go all Dexter on the car
i got a little carried away with bondo and realize after many hours of sanding, the less you use, the better


after a full day of sanding sprayed it with some primer


then i vinyl wrapped the frame, came out perfect! looks better in person then pictures


Next step, i ordered an OEM glass (not with a honda logo but the OEM brand is called PGW)

and installed that bad boy!

then i figured why not tint the window while im at it
i went super light, 45%.

took this as an opportunity while i had the seats out to fully shampoo the inside
i wish i took a before and after picture, lets just say when you rub you hand on the carper, you hand turns black... Yuukkkk
Trending Topics
01-02-2017, 07:20 PM
#8
Registered User
Thread Starter
I threw away the stripped shitty momo shift knob the car came with
every time i would make a hard shift to second the knob would fly off, VERY ANNOYING!
I found an OEM Civic SI shift knob on kijiji. it will do for now
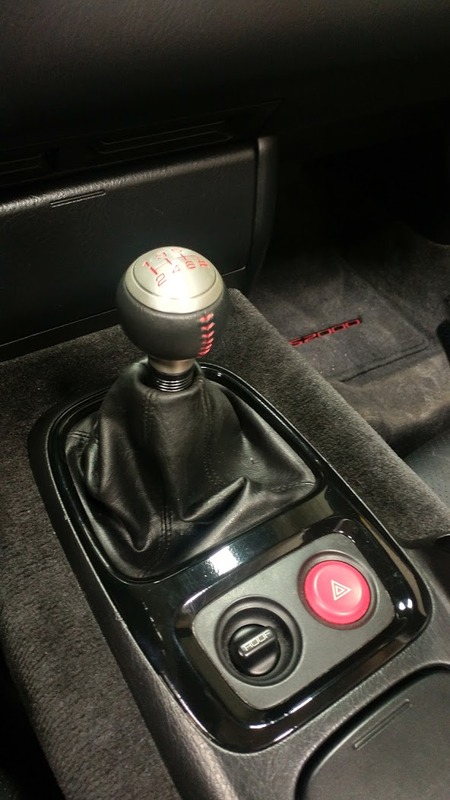
i figured id repaint the trim around the shift boot black cause it was all damaged
I also fixed the radio door clip, 5$ part got it for 4$ shop cost
and i found the little spring under the cup holder and popped it back into place, works like a charm!
now i'm waiting for a few things in the mail
-OEM rear view mirror
-New windshield washer nozzles (i dont like the current ones because they are painted yellow)
-OEM red Honda emblems (front and rear)
-OEM Black Chrome S2000 fender emblems
-New battery tie down (not about the rusted look)
-new stubby antenna (current one looks like it has erectile dysfunction
that was over $300 bucks on stupid things that don't do anything but at least i got them out of the way
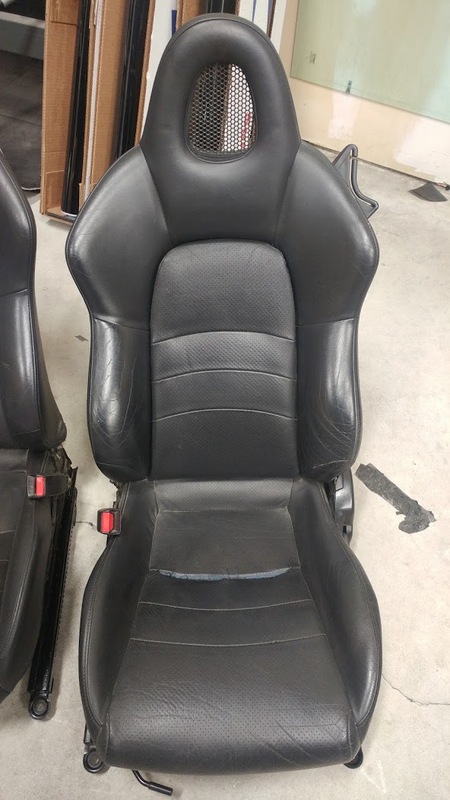
I'm not sure what to do about my torn seat, its only the stitching not the leather itself
i think ill leave it for the time being unless i find a place to do it for cheap
every time i would make a hard shift to second the knob would fly off, VERY ANNOYING!
I found an OEM Civic SI shift knob on kijiji. it will do for now

i figured id repaint the trim around the shift boot black cause it was all damaged
I also fixed the radio door clip, 5$ part got it for 4$ shop cost
and i found the little spring under the cup holder and popped it back into place, works like a charm!
now i'm waiting for a few things in the mail
-OEM rear view mirror
-New windshield washer nozzles (i dont like the current ones because they are painted yellow)
-OEM red Honda emblems (front and rear)
-OEM Black Chrome S2000 fender emblems
-New battery tie down (not about the rusted look)
-new stubby antenna (current one looks like it has erectile dysfunction
that was over $300 bucks on stupid things that don't do anything but at least i got them out of the way
I'm not sure what to do about my torn seat, its only the stitching not the leather itself
i think ill leave it for the time being unless i find a place to do it for cheap

 01-02-2017, 08:05 PM
#9
the seat is dead nuts easy.
remove the lower seat cushion from the frame. Cut the hog rings. remove the cover. Have the lower cushion rebuilt by upholsterer while you...
...get out your needle and appropriate thread and resew it up- the holes are already there so be careful and for less than 5 bucks you'll have the "leather" resewn and looking great again. I've done it before and my results are holding up just fine.
with the seat cover warmed up in the sun, pull it over the rebuilt lower seat cushion and reinstall new hog rings and reinstall on the frame.
see…easy.
darcy
01-02-2017, 08:14 PM
#10
Registered User
Thread Starter
the seat is dead nuts easy.
remove the lower seat cushion from the frame. Cut the hog rings. remove the cover. Have the lower cushion rebuilt by upholsterer while you...
...get out your needle and appropriate thread and resew it up- the holes are already there so be careful and for less than 5 bucks you'll have the "leather" resewn and looking great again. I've done it before and my results are holding up just fine.
with the seat cover warmed up in the sun, pull it over the rebuilt lower seat cushion and reinstall new hog rings and reinstall on the frame.
see…easy.
darcy
remove the lower seat cushion from the frame. Cut the hog rings. remove the cover. Have the lower cushion rebuilt by upholsterer while you...
...get out your needle and appropriate thread and resew it up- the holes are already there so be careful and for less than 5 bucks you'll have the "leather" resewn and looking great again. I've done it before and my results are holding up just fine.
with the seat cover warmed up in the sun, pull it over the rebuilt lower seat cushion and reinstall new hog rings and reinstall on the frame.
see…easy.
darcy
i figured i want racing seats eventually but they better these are the more i can sell them for in the future also