F20C Engine Rebuild


 05-27-2015, 07:10 AM
#13
Registered User
Thread Starter

Join Date: Mar 2015
Posts: 15
Likes: 0
Received 0 Likes
on
0 Posts
A quick update.
The pistons have arrived from the states and are in perfect condition.
I'm just waiting on the new rings from Honda, and then it'll be time to begin the reassembly process.
Cheers
James.
The pistons have arrived from the states and are in perfect condition.
I'm just waiting on the new rings from Honda, and then it'll be time to begin the reassembly process.
Cheers
James.
 05-27-2015, 01:02 PM
#15
Registered User


Join Date: Oct 2004
Posts: 229
Likes: 0
Received 0 Likes
on
0 Posts
I would be hesitant at re-using the valve spring retainers as you simple don't know the history to this engine. For the work and cost you have already put into it, it would be a better precaution to install new ones from the f22 or aftermarket ones. I use Ferrea tool steel retainers for the k20 as they are much stronger than oem and only a few grams heavier than titanium ones, but without any gauling/wear issues that even nitrided ti ones can suffer from.
05-28-2015, 07:57 AM
#16
Registered User
Thread Starter
Join Date: Mar 2015
Posts: 15
Likes: 0
Received 0 Likes
on
0 Posts
Hi All
Some images thus far. Obviously, I am keen to measure, analyse, repair, replace as necessary. I have read and heard much about 'you've always got to do this or that'. I'm not ignoring obvious experiences, but I am keen to base what I do on facts rather than feelings or someone told someone who told someone else.
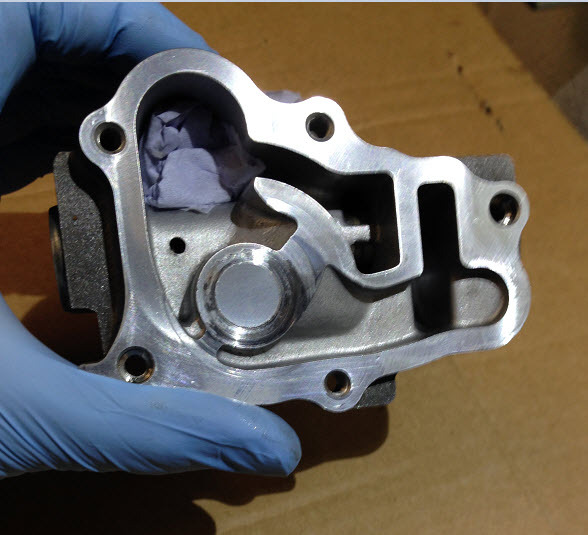
Here is an image of the oil pump upon stripping. This image shows the rotor. I have measured all aspects of the pump according to the manual, and it is well within the specification.

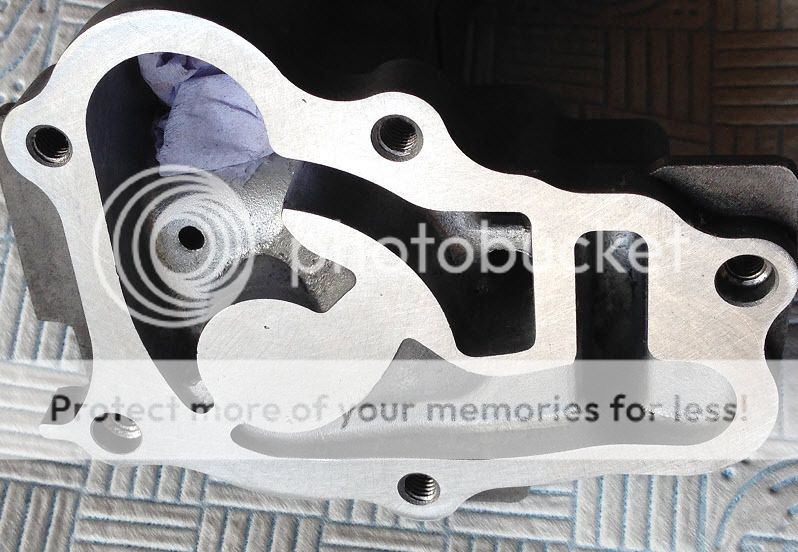
Next up is the housing. There are distinct signs of wear. A result of the lack of oil which caused the engine to expire.
From a different angle showing the scoring on the housing - it looks rough, but not actually too bad. More of a circular burr really.

Here is the housing after re-facing. A minimal amount was taken off to obtain this finish.
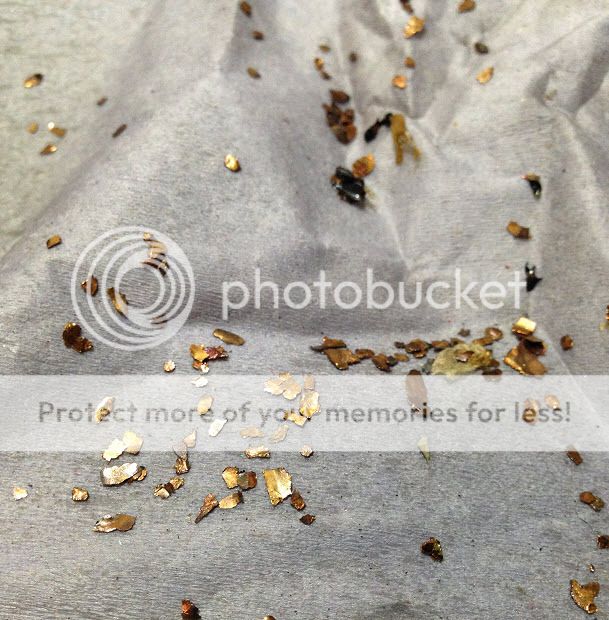
When I stripped the pump down, all of these were caught in the pump and in the strainer. The remnants of the original engine failure.
More interesting than this was to see where else the metallic particles had gone. There were plenty in the Vtec solenoid strainer, and also here in the piston cooler jet bolts.
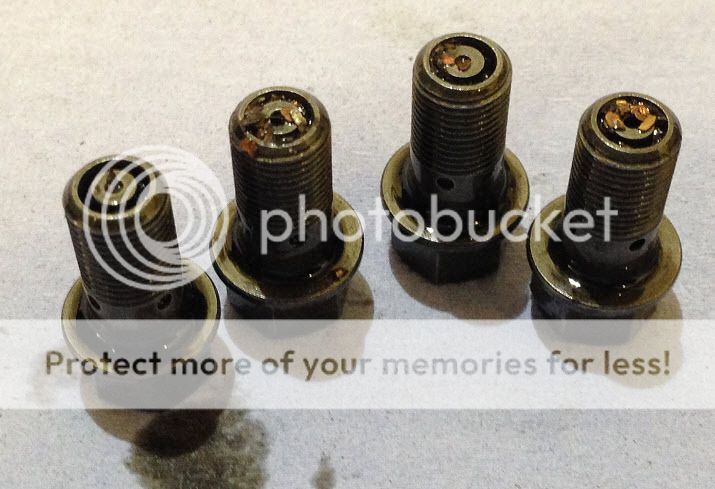
It really goes to show, that it you are unlucky enough to 'spin' a bearing, the resulting 'contamination' is likely to be widespread.
The bottom end is next up for building. I've had the replacement crank to the machine shop and have new ACL race bearings to go in. I'm going to plastigauge the bearings to ensure the relevant clearance is present, and then begin bolting it all together.
Pistons and rings for measurement thereafter. Then I can built the short engine.
Cheers
James.
Some images thus far. Obviously, I am keen to measure, analyse, repair, replace as necessary. I have read and heard much about 'you've always got to do this or that'. I'm not ignoring obvious experiences, but I am keen to base what I do on facts rather than feelings or someone told someone who told someone else.
Here is an image of the oil pump upon stripping. This image shows the rotor. I have measured all aspects of the pump according to the manual, and it is well within the specification.
Next up is the housing. There are distinct signs of wear. A result of the lack of oil which caused the engine to expire.
From a different angle showing the scoring on the housing - it looks rough, but not actually too bad. More of a circular burr really.
Here is the housing after re-facing. A minimal amount was taken off to obtain this finish.
When I stripped the pump down, all of these were caught in the pump and in the strainer. The remnants of the original engine failure.
More interesting than this was to see where else the metallic particles had gone. There were plenty in the Vtec solenoid strainer, and also here in the piston cooler jet bolts.
It really goes to show, that it you are unlucky enough to 'spin' a bearing, the resulting 'contamination' is likely to be widespread.
The bottom end is next up for building. I've had the replacement crank to the machine shop and have new ACL race bearings to go in. I'm going to plastigauge the bearings to ensure the relevant clearance is present, and then begin bolting it all together.
Pistons and rings for measurement thereafter. Then I can built the short engine.
Cheers
James.
05-28-2015, 08:40 AM
#17
Registered User
Thread Starter
Join Date: Mar 2015
Posts: 15
Likes: 0
Received 0 Likes
on
0 Posts
I was faced with the dilemma of getting another engine, which was likely to have significant mileage and unknown service history, spending anywhere between £1500 and £2300, or rebuilding. I would say that there isn't going to be much difference in price, but I will know exactly what I have got for my money. Obviously, in true 'wheeler dealer style', my labour is for free. If I had to pay independent garage rates for someone else to do it, the rebuild may come out £500 to £700 more than the used engine repair route. It will be an emotional experience either way.
I did buy the car for the right money, knowing that I'd have significant expenditure to get it mobile again.
The valve guides were completely shot on the original engine. The rest of the wear and tear could be partially attributable to the oil 'starvation'. Having seen used engines with 70, 80, 90 thousand miles for sale, I'm sure that if you stripped them down there would be things that you'd want or feel compelled to do (valve guides, new rings, new bearings, oil pump, seals and gaskets) to protect your investment.
From the position I am in today, I feel rebuild is the best option for me. But it may not be the best option for others. I would just worry about fitting a high mileage, used engine without properly analysing its condition, or giving it a basic refresh. It would be sickening to have your replacement engine 'fall over' within a year or two of fitting it.

One thing is for sure, every part I've had to buy for the engine is, comparatively speaking, reassuringly expensive. But then, it is a great design with huge power. It's not possible to drink champagne on a beer budget.

Cheers
James.
05-29-2015, 12:22 AM
#20
Seems the oil vain has expanded due to heat and lightly scored housing,
is there an oil seal on the pump that needs swaping out, not sure of config
is there an oil seal on the pump that needs swaping out, not sure of config