When you click on links to various merchants on this site and make a purchase, this can result in this site earning a commission. Affiliate programs and affiliations include, but are not limited to, the eBay Partner Network.
UK & Ireland S2000 CommunityDiscussions related to the S2000, its ownership and enthusiasm for it in the UK and Ireland. Including FAQs, and technical questions.
MOT rules are now if headlight washers are fitted they must work. Fell foul of this yesterday so time to fix..
After a false start the pump was confirmed as the problem, 12v to the terminals and no spinny spinny. I planned at first to replace with a generic pump but the £5 job that arrived from amazon looked a) ultra weedy and b) had tiny diameter inlet and outlets and bodging into the orifices designed for the OEM pump looked to be a nightmare. A new OEM pump part no 76806SM5G03 is over £100 and I didn't want to wait for fleabay (where you can get a pattern part for £30)
So I decided to open the original pump up and it was surprisingly easy to fix! Here's what I did in case it comes in handy for anyone.
You will need:
10mm socket
Flat head & phillips screwdriver
Groove joint pliers
possibly cocktail sticks & patience.
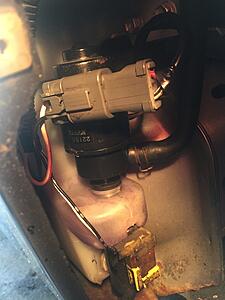
The pump is located in the driver side wheel arch on the left, under the windscreen washer tank fill point. Turn the steering to lock for ease of access and remove the 2 x phillips screws and 2 x trim clips securing the arch liner to the arch. I also removed the 3 under body trim clips to make it easier to get access.
Unplug the wire coming down from above from the connector on the pump (squeeze the tab).
The pump inlet is at the bottom secured into a hole in the fluid tank with a rubber bung/washer and the oulet pipe is on the side. Put a bucket or other receptacle under the pump/tank, remove the clip with pliers and remove the outlet pipe from the pump. All your screenwash will now drain out.
The pump is secured with a 10mm bolt behind on the left which is a pain to get at but possible with a small 1/4 inch socket - you'll need to get a finger round the back to stop the nut from moving as it isn't captive.
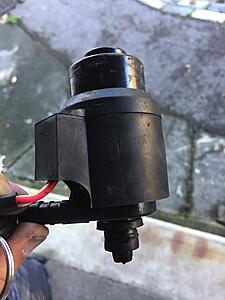
Lift the pump clear of the tank, remove the metal clip and you should have:
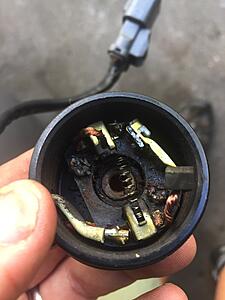
Slide off the rubber shroud and you'll find the 'wet end' of the pump.
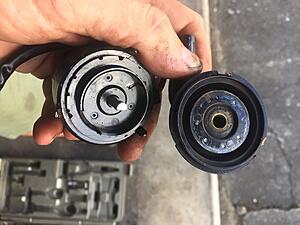
Bend these 3 tabs up with screwdriver and it just lifts off.
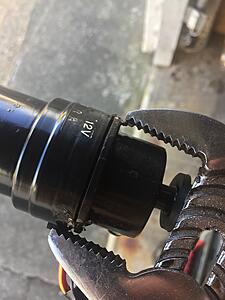
Now - grab the spindle of the motor with some mole/vise grips and make sure they are flush with where the shaft protrudes from the body. Hold the motor body and pull and you should reveal the guts of the motor.
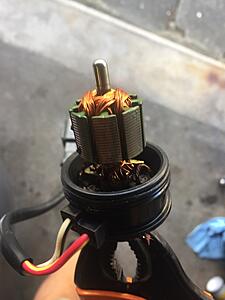
The grips are keeping the armature secured in place. If you don't do this then the carbon brushes will pop out like this (here's one where it should be and one popped out) ....
....and they are a pig to put back again. If you do this, like I did, then patience, tweezers and cocktail sticks. Use cocktail stick to push and hold spring back into its shaft, tweezer to insert square carbon block back into the square housing (curved side facing out, wire coming out the top) and then to hold in place if you wedge the point of a cocktail stick between the block and the housing it will hold it in place long enough to do the other one and then get the commutator down between them to hold in place.
Inspect the housing, give it a squirt of WD40, clean out and check over the 'main spinny bit' too for any issues. I found a stray chunk of metal/washer that was jamming/shorting the motor and was the reason for it packing up. Make sure the carbon brushes are contacting the commutator and there's not a lot that can go wrong it's such a simple construction.
Slide the motor back into the housing again being careful not to let the shaft move up (magnet will try to pull it) and bend the tabs back down with the groove jaw pliers.
Plug it back into the loom, test and and if all well then robert's your mother's brother. reassembly the reverse of the above yada yada.
Now you can look forward to summer days of MOT passes and elbow misplacement roofdown impromptu showers. Huzzah.
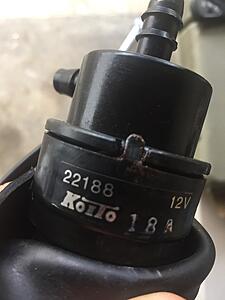
I have a headlight sprayer pump I took off my 2000 EU S2000. The number is (Koito) 22188 with a stamp 03F. The stamp shown in this thread is 18A. I note this because it doesn't seem possible to separate the case as shown to expose the armature; the case appears as a single piece.