
HTV1320 Supercharger Build


Thread Starter

Joined: Mar 2002
Posts: 884
Likes: 0
From: Nashville
Well....I think that I might actually finish this thing.
For well over a year now, I have been wanting to modify my Stage One Tuning Supercharger kit so that I could run the new TVS1320. This supercharger shows tremendous promise compared to my current MP62. I realize that this setup will never make 500hp like some turbo setups. But, the combination of instant torque and linear power delivery is perfect for Autocross.
In February, I sent an email to Harrop Engineering requesting some engineering drawings with dimensions. To my surprise, they gladly obliged. With drawings in hand, I verified that the new supercharger would fit into the space that was once occupied by the MP62. The only hiccup in fitting the new supercharger into the was the actuator was on the opposite side from the MP62, which would create an interference with the header. So again, I asked Harrop if they would mirror the actuator to put it on the opposite side. They again came through. Harrop machined the case and mirrored the actuator bracket to relocate the actuator.
10 Days later, I had a brand new HTV1320 sitting on my kitchen table.
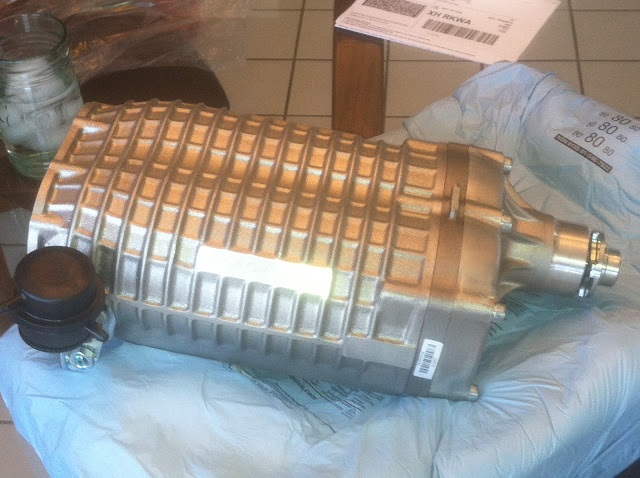
Here is a side by side comparison of the HTV1320 and the MP62

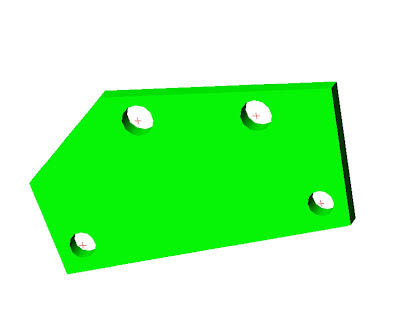
The next step was to design some new brackets to support the new supercharger and and tensioner. I was able to use the dimensions from the drawings to develop enough of a 3D Model to accurately design all the brackets to ensure proper fitment and alignment. Well...almost, I had to trim one of the plates because the shock tower was in the way of the tensioner support plate.

Lower Support Bracket
Upper Support Bracket

Rear Support Bracket

Tensioner Bracket
Once these brackets were designed and test fit, I moved onto the throttle body. My first thought was to use the ACCUFAB single plate throttle body for a 2005 Ford Lighting since the blade rotated the in the proper direction, and it had and oval shape that matched the supercharger almost perfectly . If fact, it matched it too perfectly. I found the measurements on the internet, and the blade was 1 mm narrower, but 2 mm larger than the inlet on the supercharger.
My next option was the Holley Twin 58mm throttle body for the LT1 Camaro. At 1150 cfm, the Twin 58mm flows more than enough for this supercharger. Splicing the TPS into the wiring harness was done using a $10.00 TPS pigtail from DIYautotune. I did run into some stumbling blocks along the way. First, the throttle cable cam interfered with the actuator. This was remedied removing the offending section with a cutoff wheel. Next, the throttle pedal would only open the plates to 90%. I had to modify the pedal stop to allow a bit more travel.

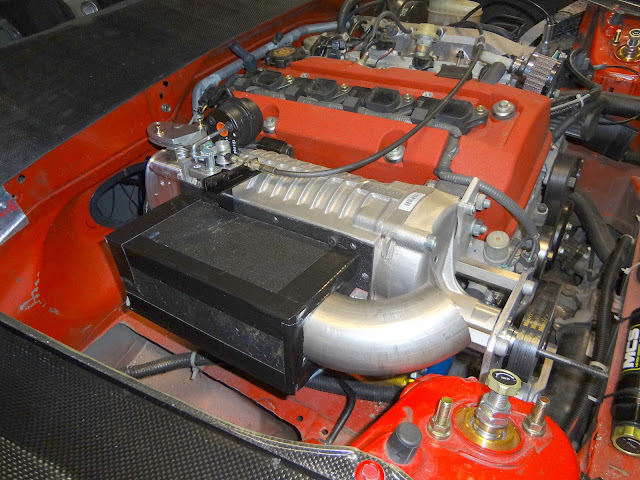
Supercharger with TB and support brackets mounted
Now I am designing the outlet manifold. So far, this is what I have on the board.

Here are some shots of the car as it sits today.
Close up of the manifold mock up.

Front View

MP62 HTV comparison

The Car
For well over a year now, I have been wanting to modify my Stage One Tuning Supercharger kit so that I could run the new TVS1320. This supercharger shows tremendous promise compared to my current MP62. I realize that this setup will never make 500hp like some turbo setups. But, the combination of instant torque and linear power delivery is perfect for Autocross.
In February, I sent an email to Harrop Engineering requesting some engineering drawings with dimensions. To my surprise, they gladly obliged. With drawings in hand, I verified that the new supercharger would fit into the space that was once occupied by the MP62. The only hiccup in fitting the new supercharger into the was the actuator was on the opposite side from the MP62, which would create an interference with the header. So again, I asked Harrop if they would mirror the actuator to put it on the opposite side. They again came through. Harrop machined the case and mirrored the actuator bracket to relocate the actuator.
10 Days later, I had a brand new HTV1320 sitting on my kitchen table.
Here is a side by side comparison of the HTV1320 and the MP62
The next step was to design some new brackets to support the new supercharger and and tensioner. I was able to use the dimensions from the drawings to develop enough of a 3D Model to accurately design all the brackets to ensure proper fitment and alignment. Well...almost, I had to trim one of the plates because the shock tower was in the way of the tensioner support plate.
Lower Support Bracket
Upper Support Bracket
Rear Support Bracket
Tensioner Bracket
Once these brackets were designed and test fit, I moved onto the throttle body. My first thought was to use the ACCUFAB single plate throttle body for a 2005 Ford Lighting since the blade rotated the in the proper direction, and it had and oval shape that matched the supercharger almost perfectly . If fact, it matched it too perfectly. I found the measurements on the internet, and the blade was 1 mm narrower, but 2 mm larger than the inlet on the supercharger.
My next option was the Holley Twin 58mm throttle body for the LT1 Camaro. At 1150 cfm, the Twin 58mm flows more than enough for this supercharger. Splicing the TPS into the wiring harness was done using a $10.00 TPS pigtail from DIYautotune. I did run into some stumbling blocks along the way. First, the throttle cable cam interfered with the actuator. This was remedied removing the offending section with a cutoff wheel. Next, the throttle pedal would only open the plates to 90%. I had to modify the pedal stop to allow a bit more travel.
Supercharger with TB and support brackets mounted
Now I am designing the outlet manifold. So far, this is what I have on the board.
Here are some shots of the car as it sits today.
Close up of the manifold mock up.
Front View
MP62 HTV comparison
The Car
Thread Starter
Joined: Mar 2002
Posts: 884
Likes: 0
From: Nashville
Smoothflow Pulley is making these pulleys for me.

I am having both a 63.5mm and a 70mm pulley made. The first will replicate the pulley I ran on the MP62 (~19,800 RPM). The 70mm (~18,000 RPM) will hopefully make enough power to not have to over spin this blower.
I am having both a 63.5mm and a 70mm pulley made. The first will replicate the pulley I ran on the MP62 (~19,800 RPM). The 70mm (~18,000 RPM) will hopefully make enough power to not have to over spin this blower.

 you are awesome!!! If you want to sell your old mp62 setup with brackets etc pm me!


Joined: Oct 2002
Posts: 8,044
Likes: 6
From: South Florida
i bet it can touch 450whp which, will be, retarded nice power band. the blower flows so much more air then the mp62. what after cooler are you using? or are you doing a vmount fmic?
i cant wait to see a dyno. congrats on making it work.
i cant wait to see a dyno. congrats on making it work.
Trending Topics


Thread Starter
Joined: Mar 2002
Posts: 884
Likes: 0
From: Nashville
When I first started with the stage one tuning kit, I was running a 6" PWR intercooler with a Fluidyne heat exchanger for the 03-04 cobra. By the time I added the water and hoses, the whole system was 35lb. After the first season, I tried to shed as much weight as possible. I bypassed the intercooler with a straight pipe, and monitored IATs. I found that the intake temps went up 10 degrees while the car sat in idling in grid between runs. However, there was no noticeable gain in temp during a run.
In grid, the temps would slowly rise to 150-155. On course, the temps were 5-10 over ambient.
I should mention that I am also running water injection and 110 leaded race fuel.
In grid, the temps would slowly rise to 150-155. On course, the temps were 5-10 over ambient.
I should mention that I am also running water injection and 110 leaded race fuel.