
Walbro 400 fuel pump install

Thread Starter

Joined: Sep 2004
Posts: 4,894
Likes: 9
From: Tampa, FL
As a follow up to this thread posted by DFWs2k, I want to post my findings with installing this pump and give some general guidelines on a proper install. I upgraded from a Walbro 255, which I've used for over 4 years with no issues and supported over 440whp on pump gas. My fuel system is a simple as it gets - stock lines, stock regulator, ID 1000's. About two years ago I rewired the 255 directly to the battery (this is important) and was hoping to swap the new Walbro 400 in as a direct replacement using that configuration. But, after reading the aforementioned thread, I realized this pump might be a little more work than I initially anticipated which it ended up being.
Here is a picture of the completed assembly with the new pump in the hanger, right before we dropped it back in the tank:

As you can see, the housing is not modified. I believe the reason DFWs2k modified his is because he was using the OEM sock filter, which has about a half inch "neck" that causes the pump to sit about a half inch too low in the tank if the housing is not modified. I used the new sock filter that came with the pump, which fits shorter on the pump than the OEM sock filter does. Here is a comparison shot to illustrate the differences:
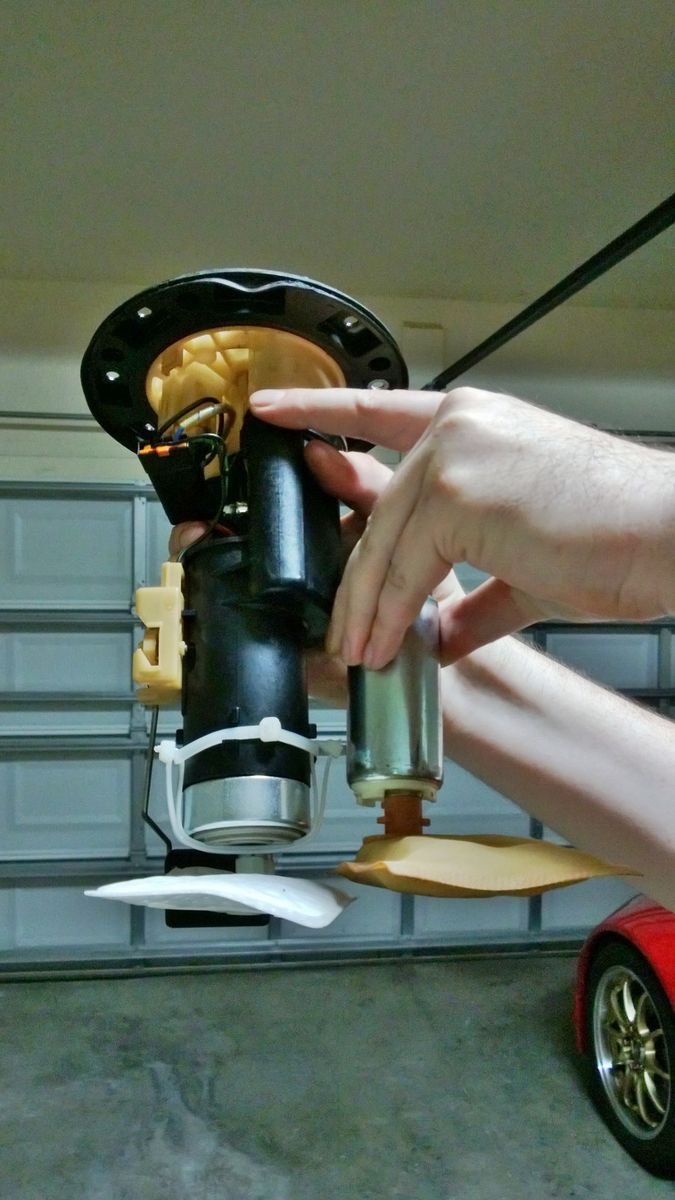
As you can see, the two pumps (as shown) should sit about the same depth in the tank. We had no issues with the fuel level sender or with the fuel pickup (sock filter) hitting the bottom of the tank after installing the new pump. As long as the top of the assembly sits flush when you reinstall it in the tank and you can tighten the nuts on the top without forcing it, you should be ok. If you try installing the assembly and it does not want to sit flush at the top, it’s because the pickup is sitting too low. You'll need to pull it back out and figure out what's going on. If you use the filter that comes with the Walbro 400 install kit, again you will not need to modify the fuel pump housing, given these caveats:
- The plastic clip that normally holds the OEM pump or Walbro 255 to the housing at the bottom does not fit. As pictured, we got creative with zip ties for added security to hold the pump. I highly recommend you do this or find some other way to secure the pump, else the only thing holding up the pump will be the fuel hose.
- It was mentioned in the other thread that you might need to use a longer fuel hose from the top of the housing to the pump outlet, we did not. We loosened the top clamp on the stock housing and slid the fuel hose down about half an inch until it fit on both sides and still had enough room to tighten the clamp down on the housing.
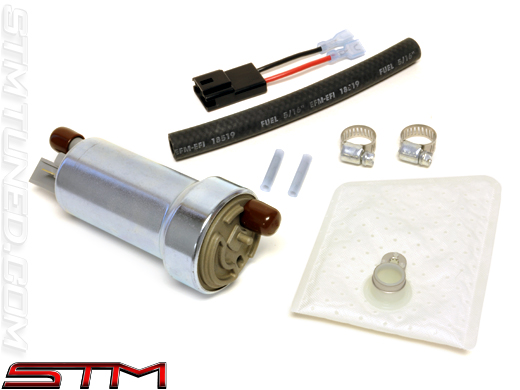
I believe the install kit I had was the universal kit, I will see if I can confirm this by looking at the packaging it came in when I get chance. Regardless, the sock filter you need to use looks like this:
Now, onto the most important portion of this install - wiring.
As I mentioned previously, my Walbro 255 was rewired to the battery. The install kit that came with my Walbro 400 was PnP. Meaning, the harness that came with the pump plugged right into the stock harness in the hanger. DO NOT USE THIS HARNESS. If you use the harness, you will be powering the pump through the super thin factory wiring (my guess is it’s about 24ga wire) which is not big enough to carry the current this pump requires. Keep reading and I will explain in more detail why this important. My Walbro 255 was wired similar to this:
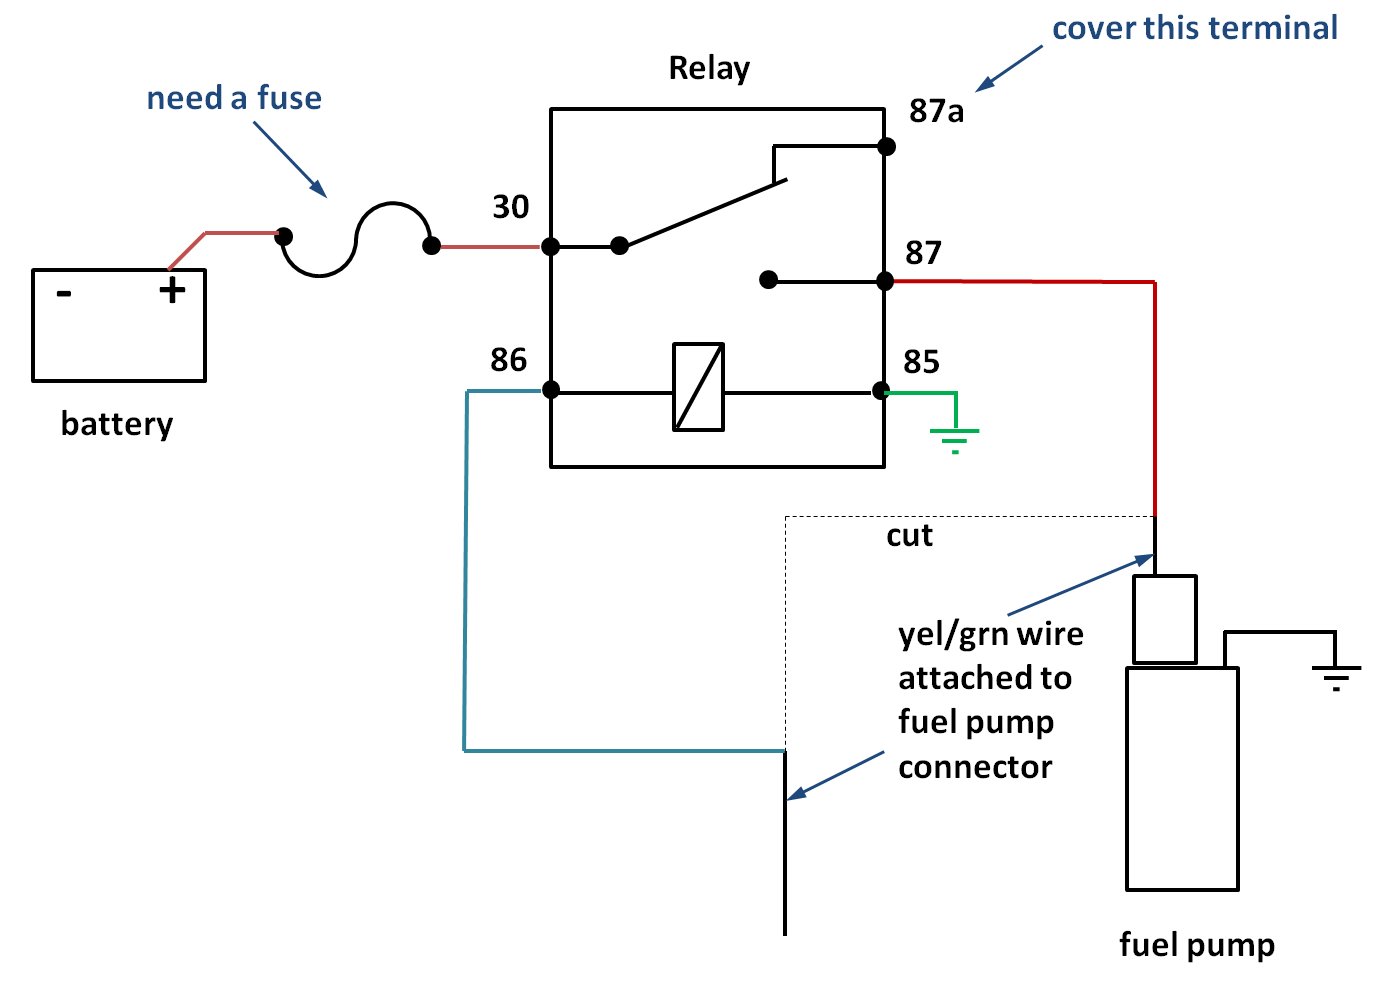
I don't have pictures of it but basically the power lead coming out of the relay was spliced into the yellow/green wire located at the wire bundle at the top of the pump assembly (what you see when you look from above the driver seat or from the trunk) above the fuel pump cover. This worked fine for the Walbro 255, but WILL NOT WORK for the Walbro 400. In this configuration, the car started, ran and even made awesome power on the dyno.
But, not even an hour after it got off the dyno, this happened:

The relay MELTED at the power lead going to the pump. This happened because the stock wiring being used between the top of the hanger assembly and the pump produced too much resistance and in turn, heat, which burned up the relay. Luckily for me, the car died right after I started it and not in the middle of a pull. You can wire the pump as depicted in the above diagram, but instead of "rewiring" with the stock wiring, you need to "hardwire" the power and ground wires through the housing directly to the pump itself. I did not do that portion of the install myself, but I would imagine all that was done was drilling a small hole big enough to fit the power and ground wires through the top of the housing and connecting them directly to the pump, and sealing the hole with some silicone. If a few people are really curious, I'll pull the cover off and confirm that this is how mine is setup.
Lastly, I mentioned in the other thread that this install was a bitch. The stuff above (especially now that you know it ahead of time) wasn't that big of a deal. The hardest part for me (other than the relay burning up) was actually pulling the fuel lines off the assembly during the initial install. Mine were stuck and I couldn't do it by hand. If you've gotten back there to do anything with the fuel pump, you know there isn't a lot of room and it’s pretty much a bitch to work on. Factor in stuck connectors and the overall difficulty (and rage) goes up x 10. We were able to get the connectors off by using a pair of pliers to squeeze in the white connectors and pushing the fuel hose back off of the ports. To prevent this issue in the future, we sprayed silicone spray like this on the plastic connectors for lubrication during final assembly. It’s funny I went through all that trouble to ensure I could get them back off easily, as it appears that this pump will support all my goals and is good for close to 700whp on gas. As long as it holds up, I don’t anticipate moving to any other pumps in the future.
Hope that helps. If there are any questions, please post up vice PM so everyone can see the questions & answers.
Here is a picture of the completed assembly with the new pump in the hanger, right before we dropped it back in the tank:
As you can see, the housing is not modified. I believe the reason DFWs2k modified his is because he was using the OEM sock filter, which has about a half inch "neck" that causes the pump to sit about a half inch too low in the tank if the housing is not modified. I used the new sock filter that came with the pump, which fits shorter on the pump than the OEM sock filter does. Here is a comparison shot to illustrate the differences:
As you can see, the two pumps (as shown) should sit about the same depth in the tank. We had no issues with the fuel level sender or with the fuel pickup (sock filter) hitting the bottom of the tank after installing the new pump. As long as the top of the assembly sits flush when you reinstall it in the tank and you can tighten the nuts on the top without forcing it, you should be ok. If you try installing the assembly and it does not want to sit flush at the top, it’s because the pickup is sitting too low. You'll need to pull it back out and figure out what's going on. If you use the filter that comes with the Walbro 400 install kit, again you will not need to modify the fuel pump housing, given these caveats:
- The plastic clip that normally holds the OEM pump or Walbro 255 to the housing at the bottom does not fit. As pictured, we got creative with zip ties for added security to hold the pump. I highly recommend you do this or find some other way to secure the pump, else the only thing holding up the pump will be the fuel hose.
- It was mentioned in the other thread that you might need to use a longer fuel hose from the top of the housing to the pump outlet, we did not. We loosened the top clamp on the stock housing and slid the fuel hose down about half an inch until it fit on both sides and still had enough room to tighten the clamp down on the housing.
I believe the install kit I had was the universal kit, I will see if I can confirm this by looking at the packaging it came in when I get chance. Regardless, the sock filter you need to use looks like this:
Now, onto the most important portion of this install - wiring.
As I mentioned previously, my Walbro 255 was rewired to the battery. The install kit that came with my Walbro 400 was PnP. Meaning, the harness that came with the pump plugged right into the stock harness in the hanger. DO NOT USE THIS HARNESS. If you use the harness, you will be powering the pump through the super thin factory wiring (my guess is it’s about 24ga wire) which is not big enough to carry the current this pump requires. Keep reading and I will explain in more detail why this important. My Walbro 255 was wired similar to this:
I don't have pictures of it but basically the power lead coming out of the relay was spliced into the yellow/green wire located at the wire bundle at the top of the pump assembly (what you see when you look from above the driver seat or from the trunk) above the fuel pump cover. This worked fine for the Walbro 255, but WILL NOT WORK for the Walbro 400. In this configuration, the car started, ran and even made awesome power on the dyno.
But, not even an hour after it got off the dyno, this happened:
The relay MELTED at the power lead going to the pump. This happened because the stock wiring being used between the top of the hanger assembly and the pump produced too much resistance and in turn, heat, which burned up the relay. Luckily for me, the car died right after I started it and not in the middle of a pull. You can wire the pump as depicted in the above diagram, but instead of "rewiring" with the stock wiring, you need to "hardwire" the power and ground wires through the housing directly to the pump itself. I did not do that portion of the install myself, but I would imagine all that was done was drilling a small hole big enough to fit the power and ground wires through the top of the housing and connecting them directly to the pump, and sealing the hole with some silicone. If a few people are really curious, I'll pull the cover off and confirm that this is how mine is setup.
Lastly, I mentioned in the other thread that this install was a bitch. The stuff above (especially now that you know it ahead of time) wasn't that big of a deal. The hardest part for me (other than the relay burning up) was actually pulling the fuel lines off the assembly during the initial install. Mine were stuck and I couldn't do it by hand. If you've gotten back there to do anything with the fuel pump, you know there isn't a lot of room and it’s pretty much a bitch to work on. Factor in stuck connectors and the overall difficulty (and rage) goes up x 10. We were able to get the connectors off by using a pair of pliers to squeeze in the white connectors and pushing the fuel hose back off of the ports. To prevent this issue in the future, we sprayed silicone spray like this on the plastic connectors for lubrication during final assembly. It’s funny I went through all that trouble to ensure I could get them back off easily, as it appears that this pump will support all my goals and is good for close to 700whp on gas. As long as it holds up, I don’t anticipate moving to any other pumps in the future.
Hope that helps. If there are any questions, please post up vice PM so everyone can see the questions & answers.
 Thanks!


Trending Topics

Registered User
Joined: Sep 2010
Posts: 196
Likes: 0
Thank you for the write up. I just ordered the E85 version Walbro 400 and the harness is already connected to the pump. Does this harness has the same thin wiring as the standard Walro 400 or is it different?