o_O S2000 | Mk I — Stage II
 11-22-2017, 06:53 AM
#3091
Registered User


Definitely sub'd to your thread. I've watched several of your touge videos on YT, and the level of stress they can induce is amazing. Great driving. Keep up the good work!
 11-24-2017, 02:36 PM
#3092

Thread Starter
Glad you enjoy! We need a forum where you can subscribe to people like Twitch so I can get a little bit of a kickback, haha. (haha, but also hmmmm...)
01-01-2018, 05:37 AM
#3093
Thread Starter
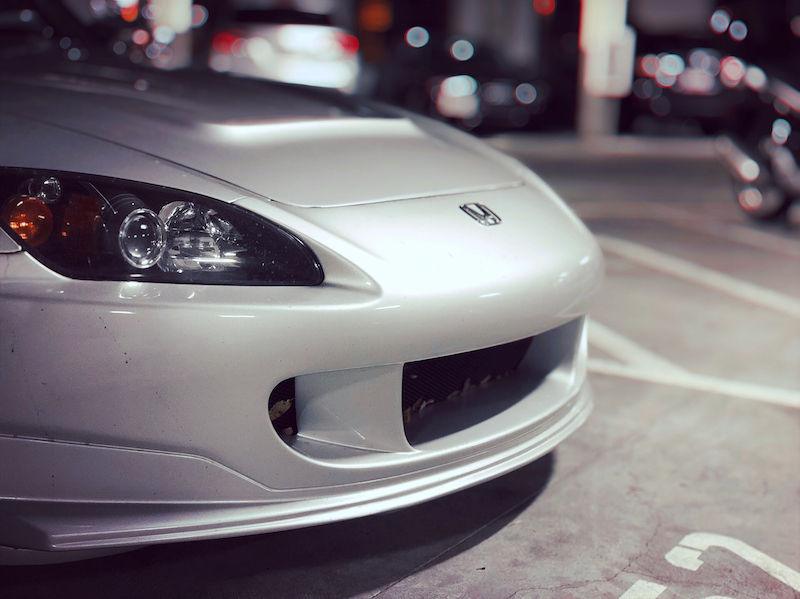
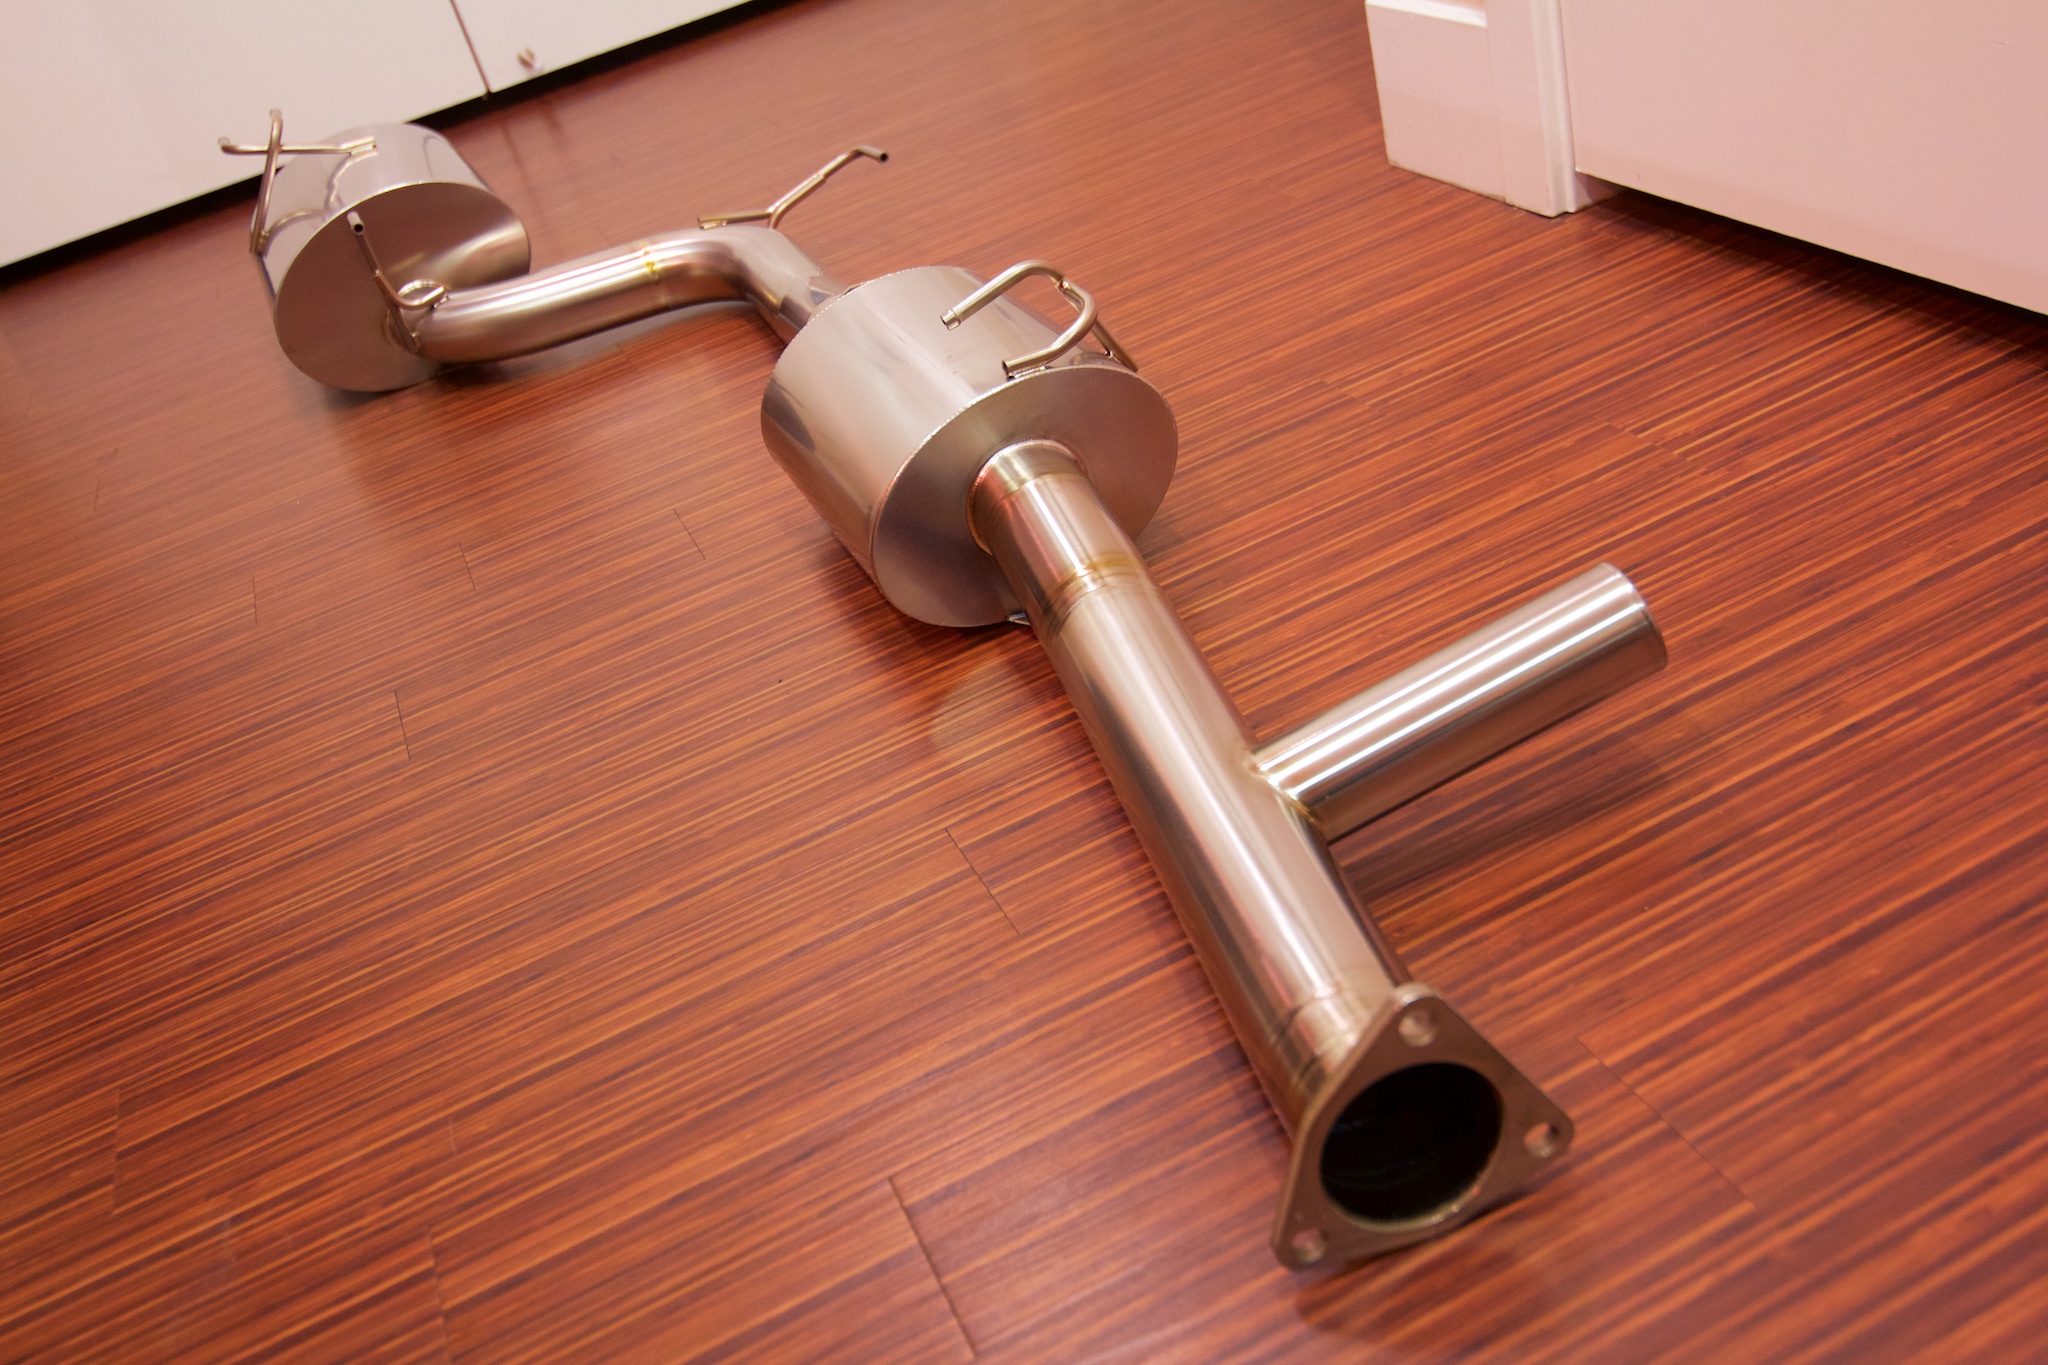
Amuse Euro-S exhaust installed, again...
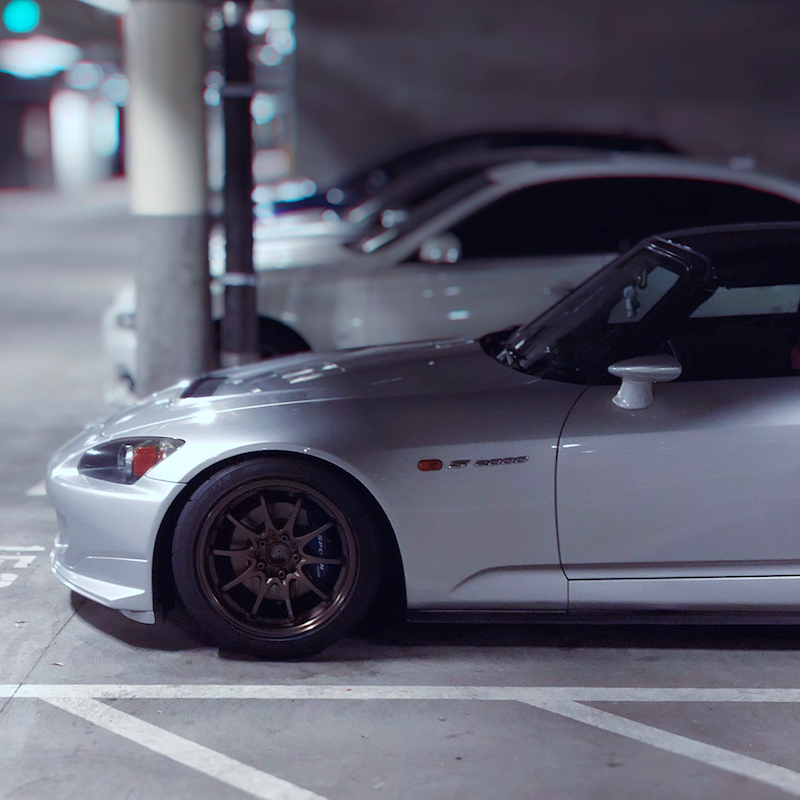
A few new photos of the car.

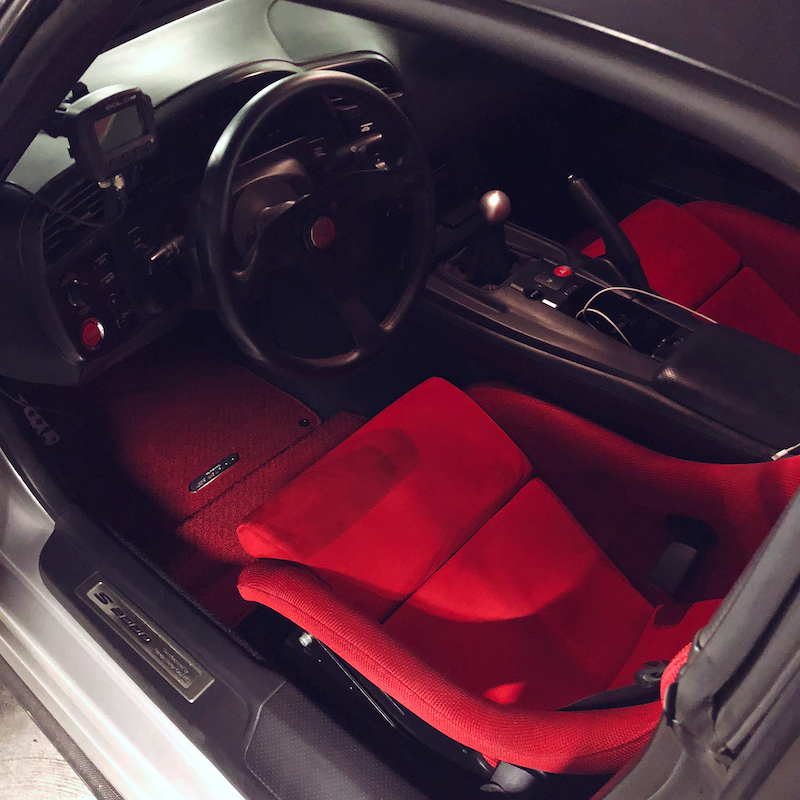
Decided to put the red floor mats in as well.
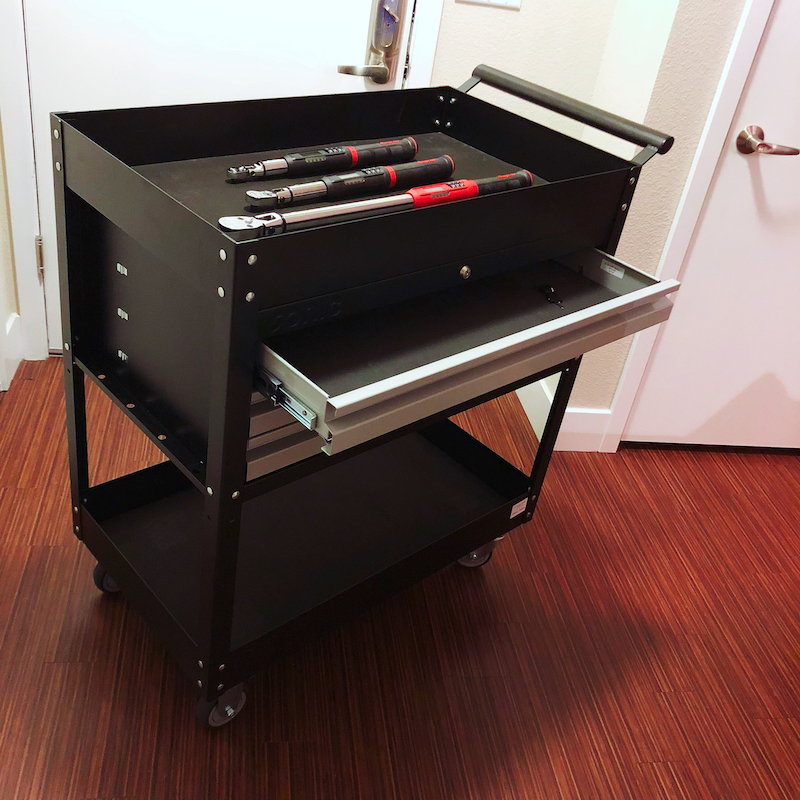
I found that Sonic Tools also makes a really nice service cart so I got one to use as my main cart for working on the car, much better wheels than my previous one and it also has drawers just like my Sonic toolbox so I can transfer the inserts over when I need specific tools. It also has a lot more space for everything.
Also recently got the Amuse Euro-S installed. I actually got a EVS test pipe and high flow data and had them both modified to provide proper clearance for the Amuse exhaust, and had Son from Trackspec Autosports make a jig as well so additional can be made if needed. They were basically just both cut near the exhaust mounting side, then modified to provide more clearance near the front of the exhaust and the exhaust tunnel.

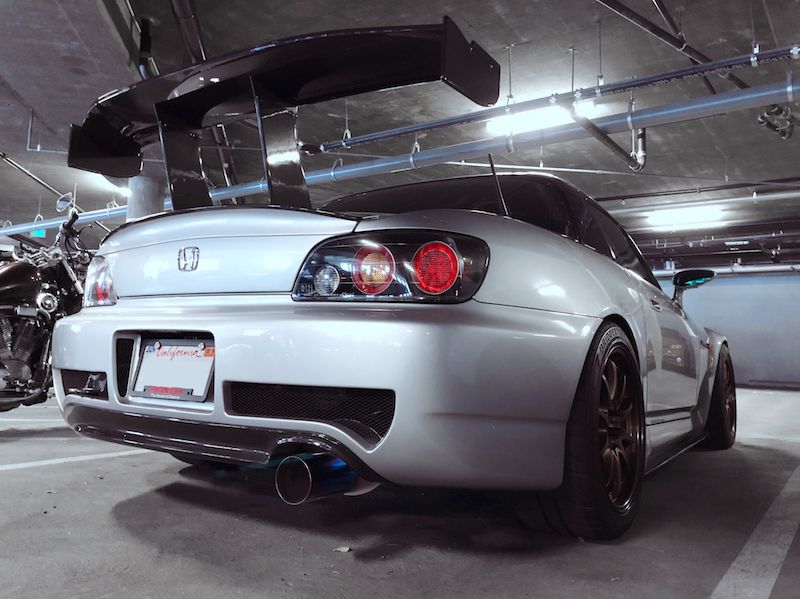

It's amazing how quiet this thing is compared to the EVS 70mm. I am currently testing it out with the HFC and it is just a bit louder than OEM exhaust. With the header and intake and hood, the sound is very well balanced across the car. I will probably run it like this for awhile but I definitely like the extra raunchiness that a test pipe provides. Definitely nice to have both.
I will be keeping the EVS 70mm as well, but so glad to finally have the Amuse back on the car.
A few new photos of the car.
Decided to put the red floor mats in as well.
I found that Sonic Tools also makes a really nice service cart so I got one to use as my main cart for working on the car, much better wheels than my previous one and it also has drawers just like my Sonic toolbox so I can transfer the inserts over when I need specific tools. It also has a lot more space for everything.
Also recently got the Amuse Euro-S installed. I actually got a EVS test pipe and high flow data and had them both modified to provide proper clearance for the Amuse exhaust, and had Son from Trackspec Autosports make a jig as well so additional can be made if needed. They were basically just both cut near the exhaust mounting side, then modified to provide more clearance near the front of the exhaust and the exhaust tunnel.
It's amazing how quiet this thing is compared to the EVS 70mm. I am currently testing it out with the HFC and it is just a bit louder than OEM exhaust. With the header and intake and hood, the sound is very well balanced across the car. I will probably run it like this for awhile but I definitely like the extra raunchiness that a test pipe provides. Definitely nice to have both.
I will be keeping the EVS 70mm as well, but so glad to finally have the Amuse back on the car.
03-23-2018, 04:52 PM
#3094
Thread Starter
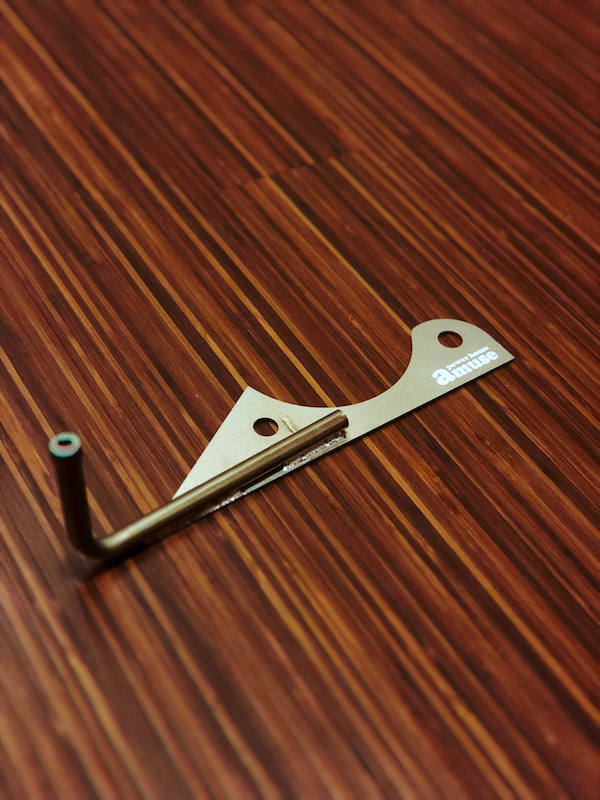
PCI fixed passenger seat mount for 06+
PCI updated their 06+ passenger seat mounts to a once piece base plate and have a fixed version available. The "fixed" version is still adjustable it just doesn't have sliders which makes it very light and allows you to get the seat as low as possible. Since I don't really care about adjusting the passenger seat position with a bucket seat I plan on swapping this one in to save a little more weight and to simplify things a bit more.
I also got the latest 06+ driver's side mount which I will post up soon. PCI also recently designed some new side mounts for use with sliders that are made to better accommodate the Recaro Pole Position and help get it even lower.
03-23-2018, 04:53 PM
#3095
Thread Starter
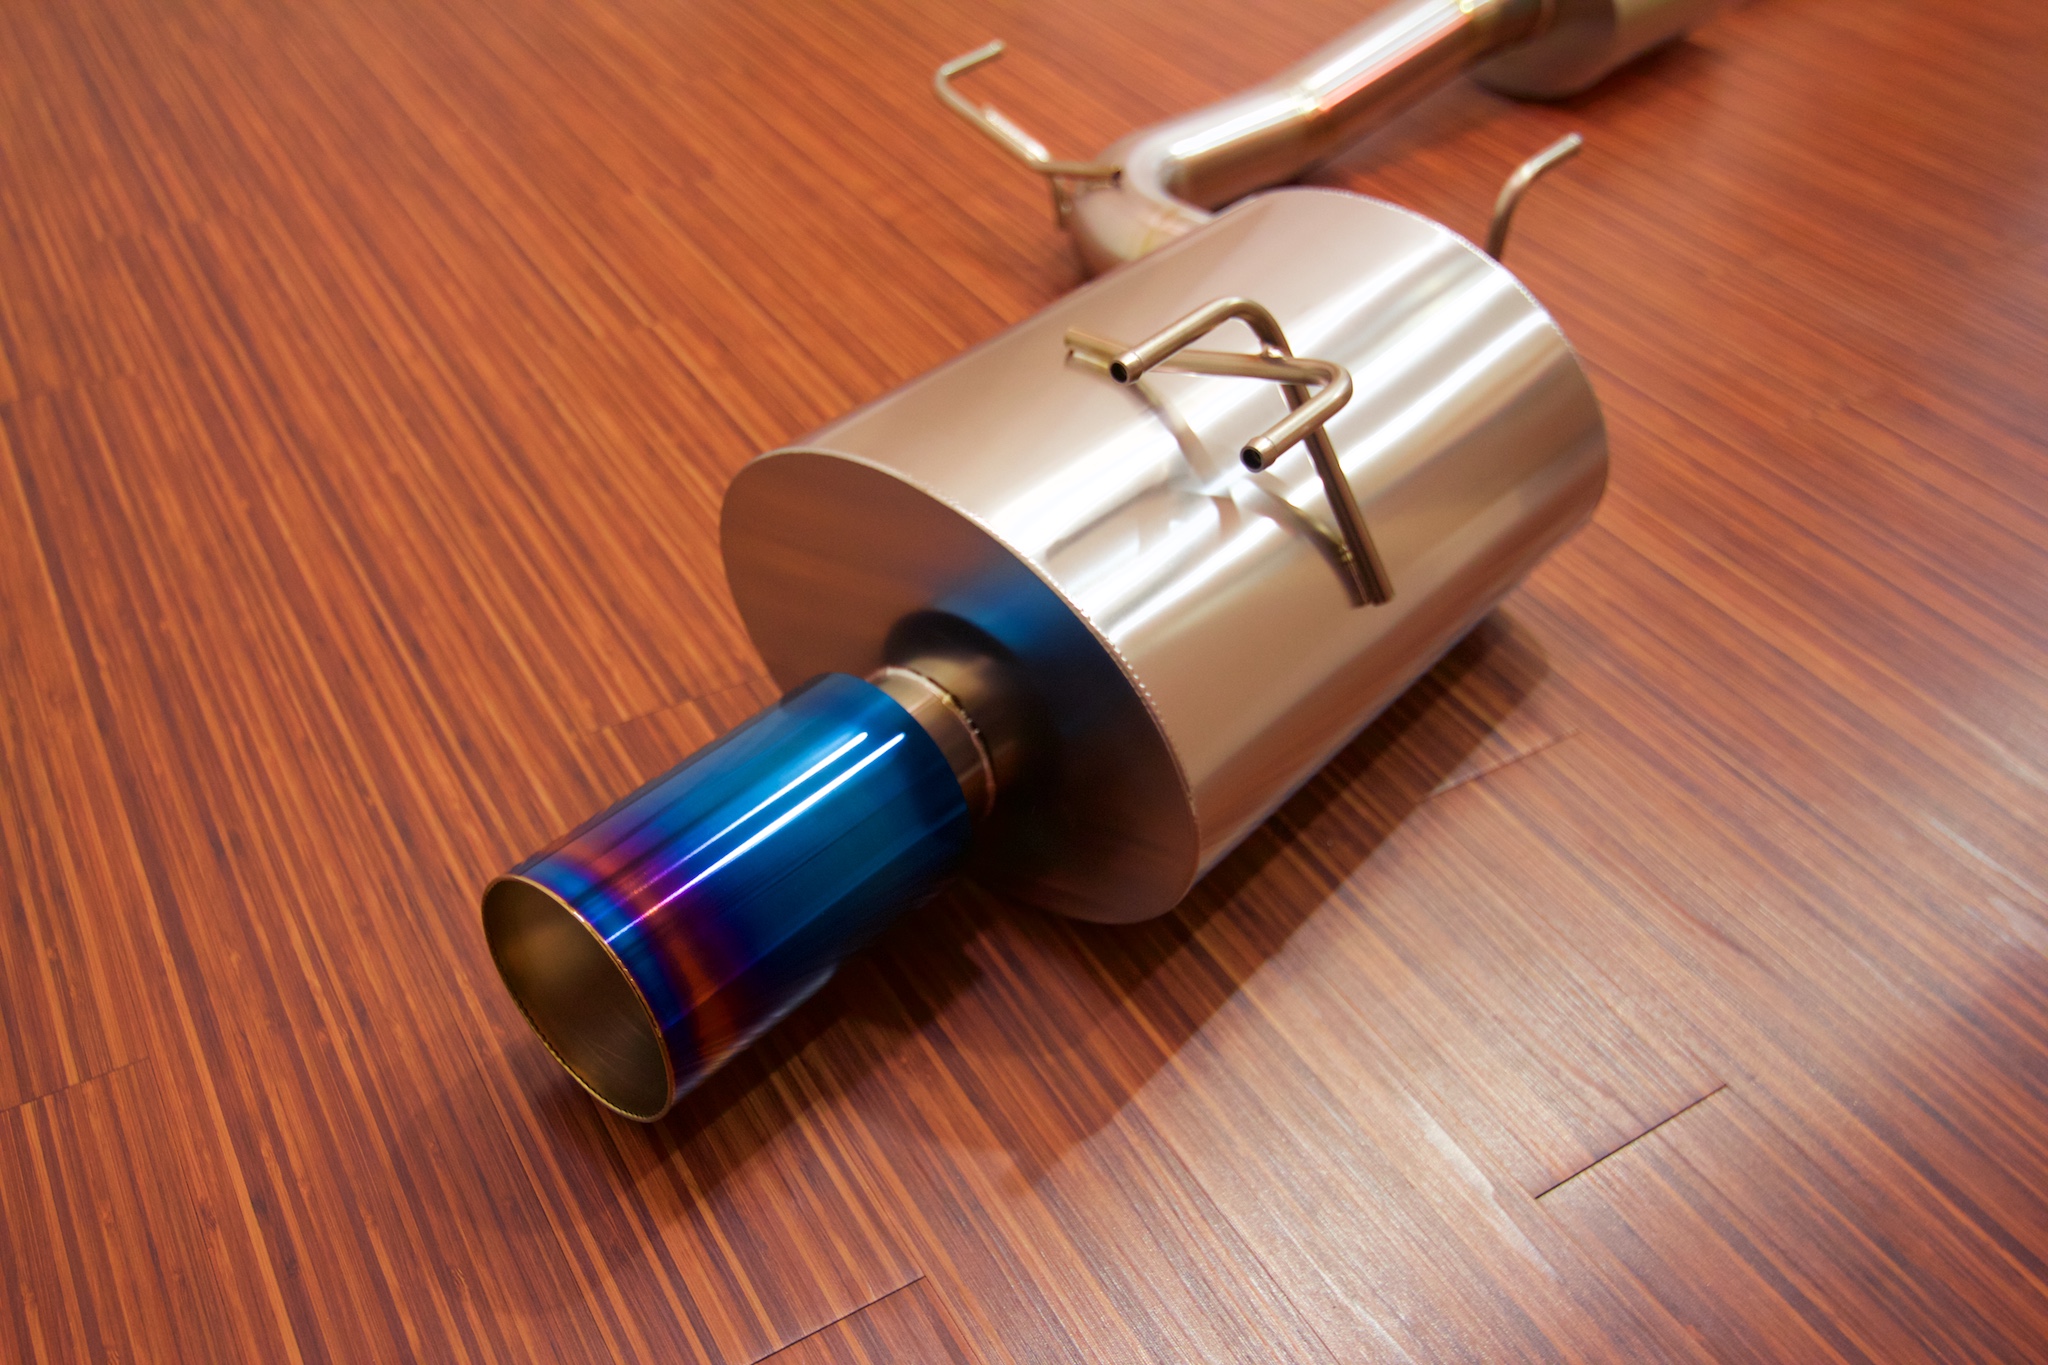
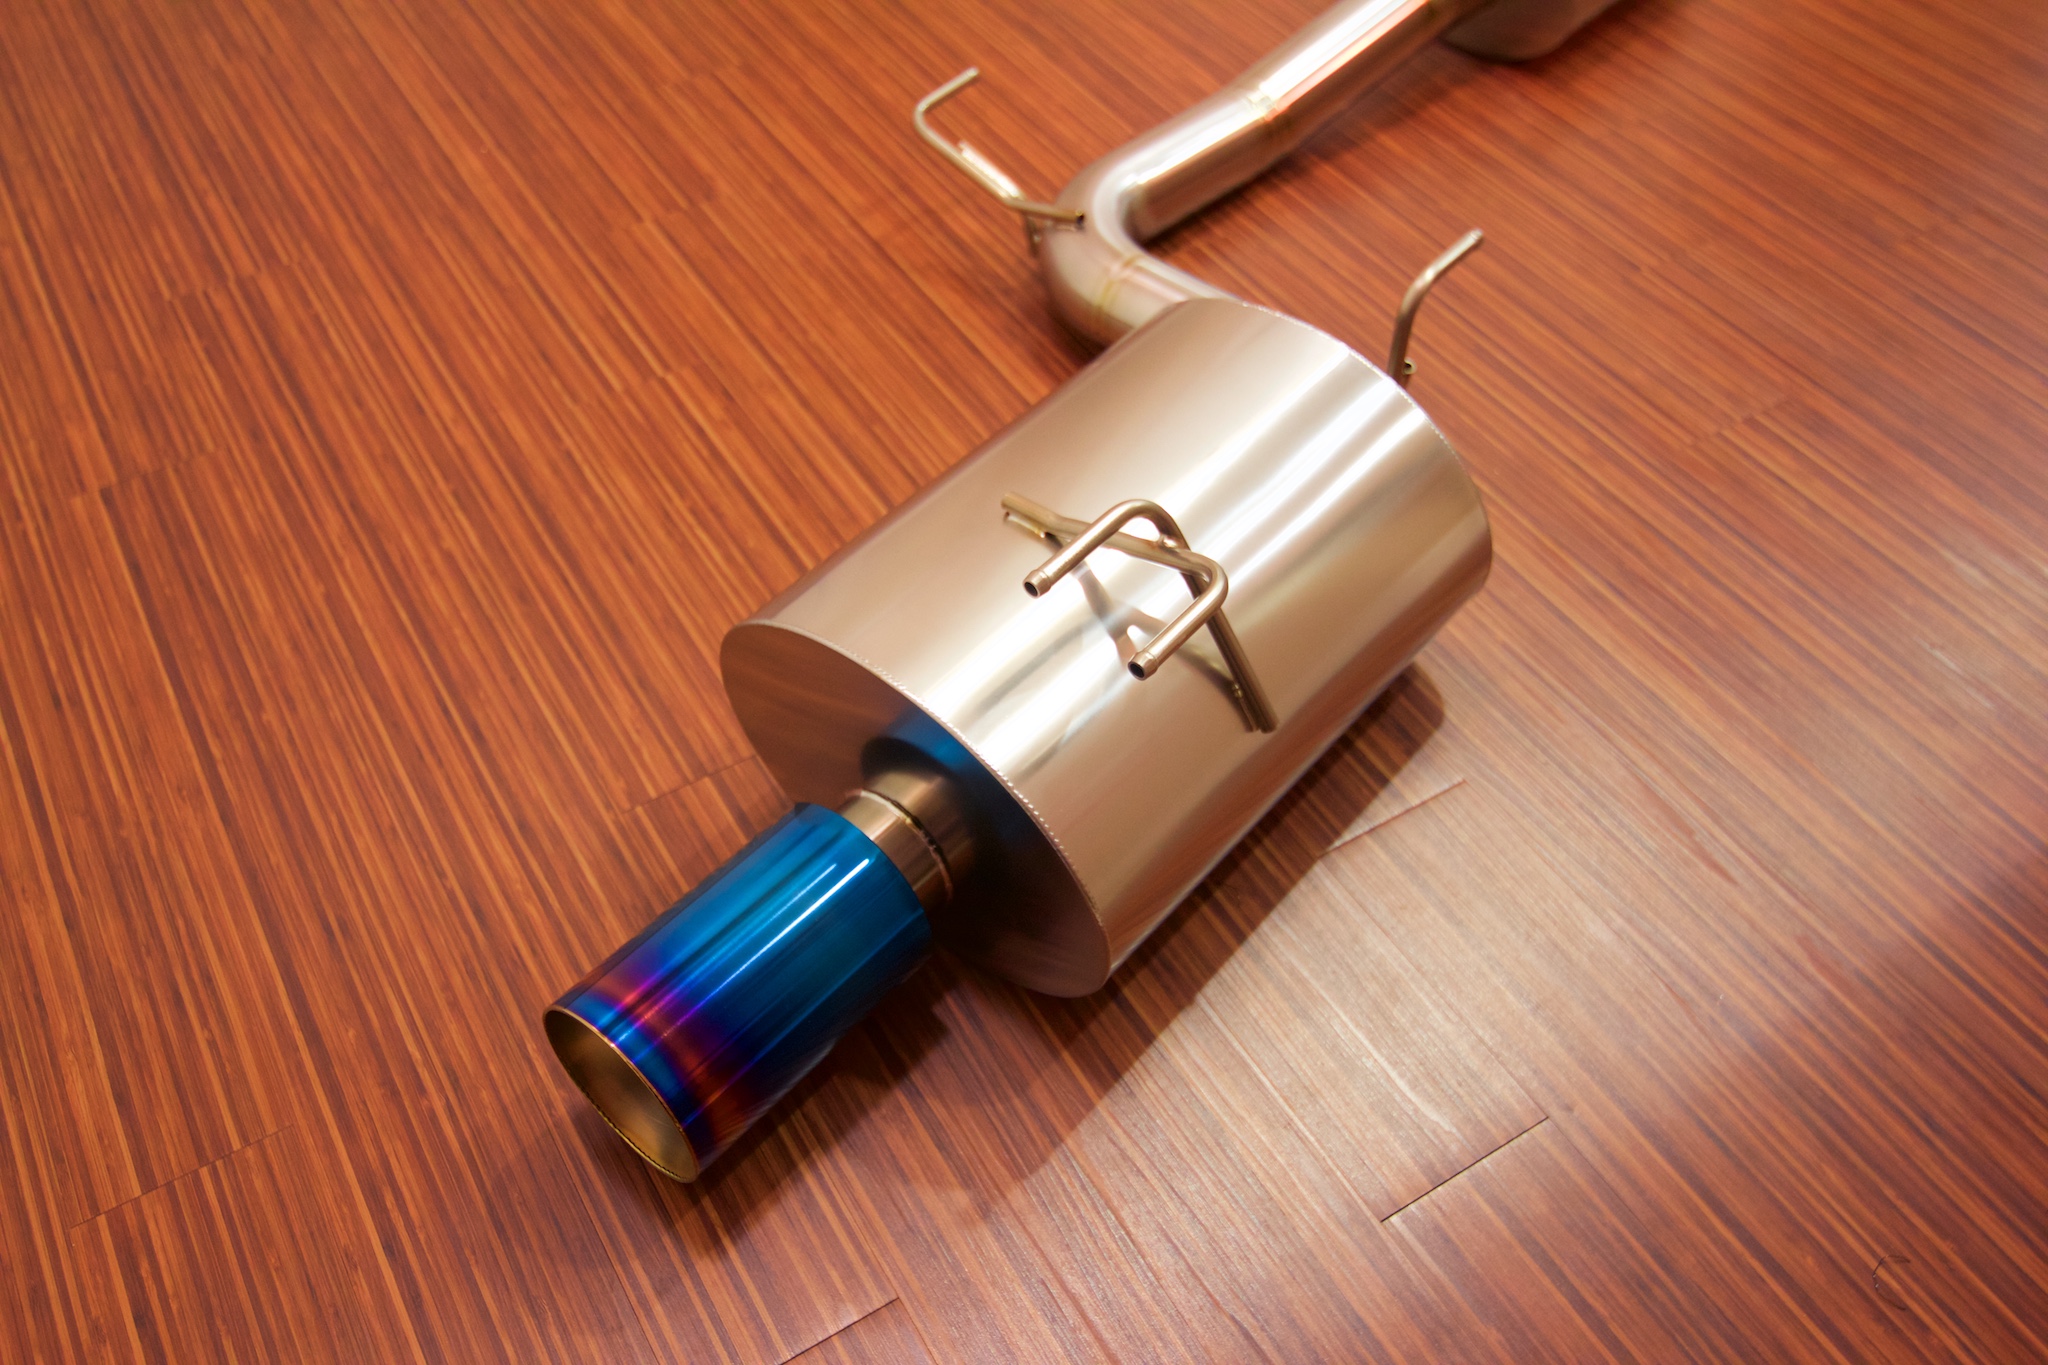
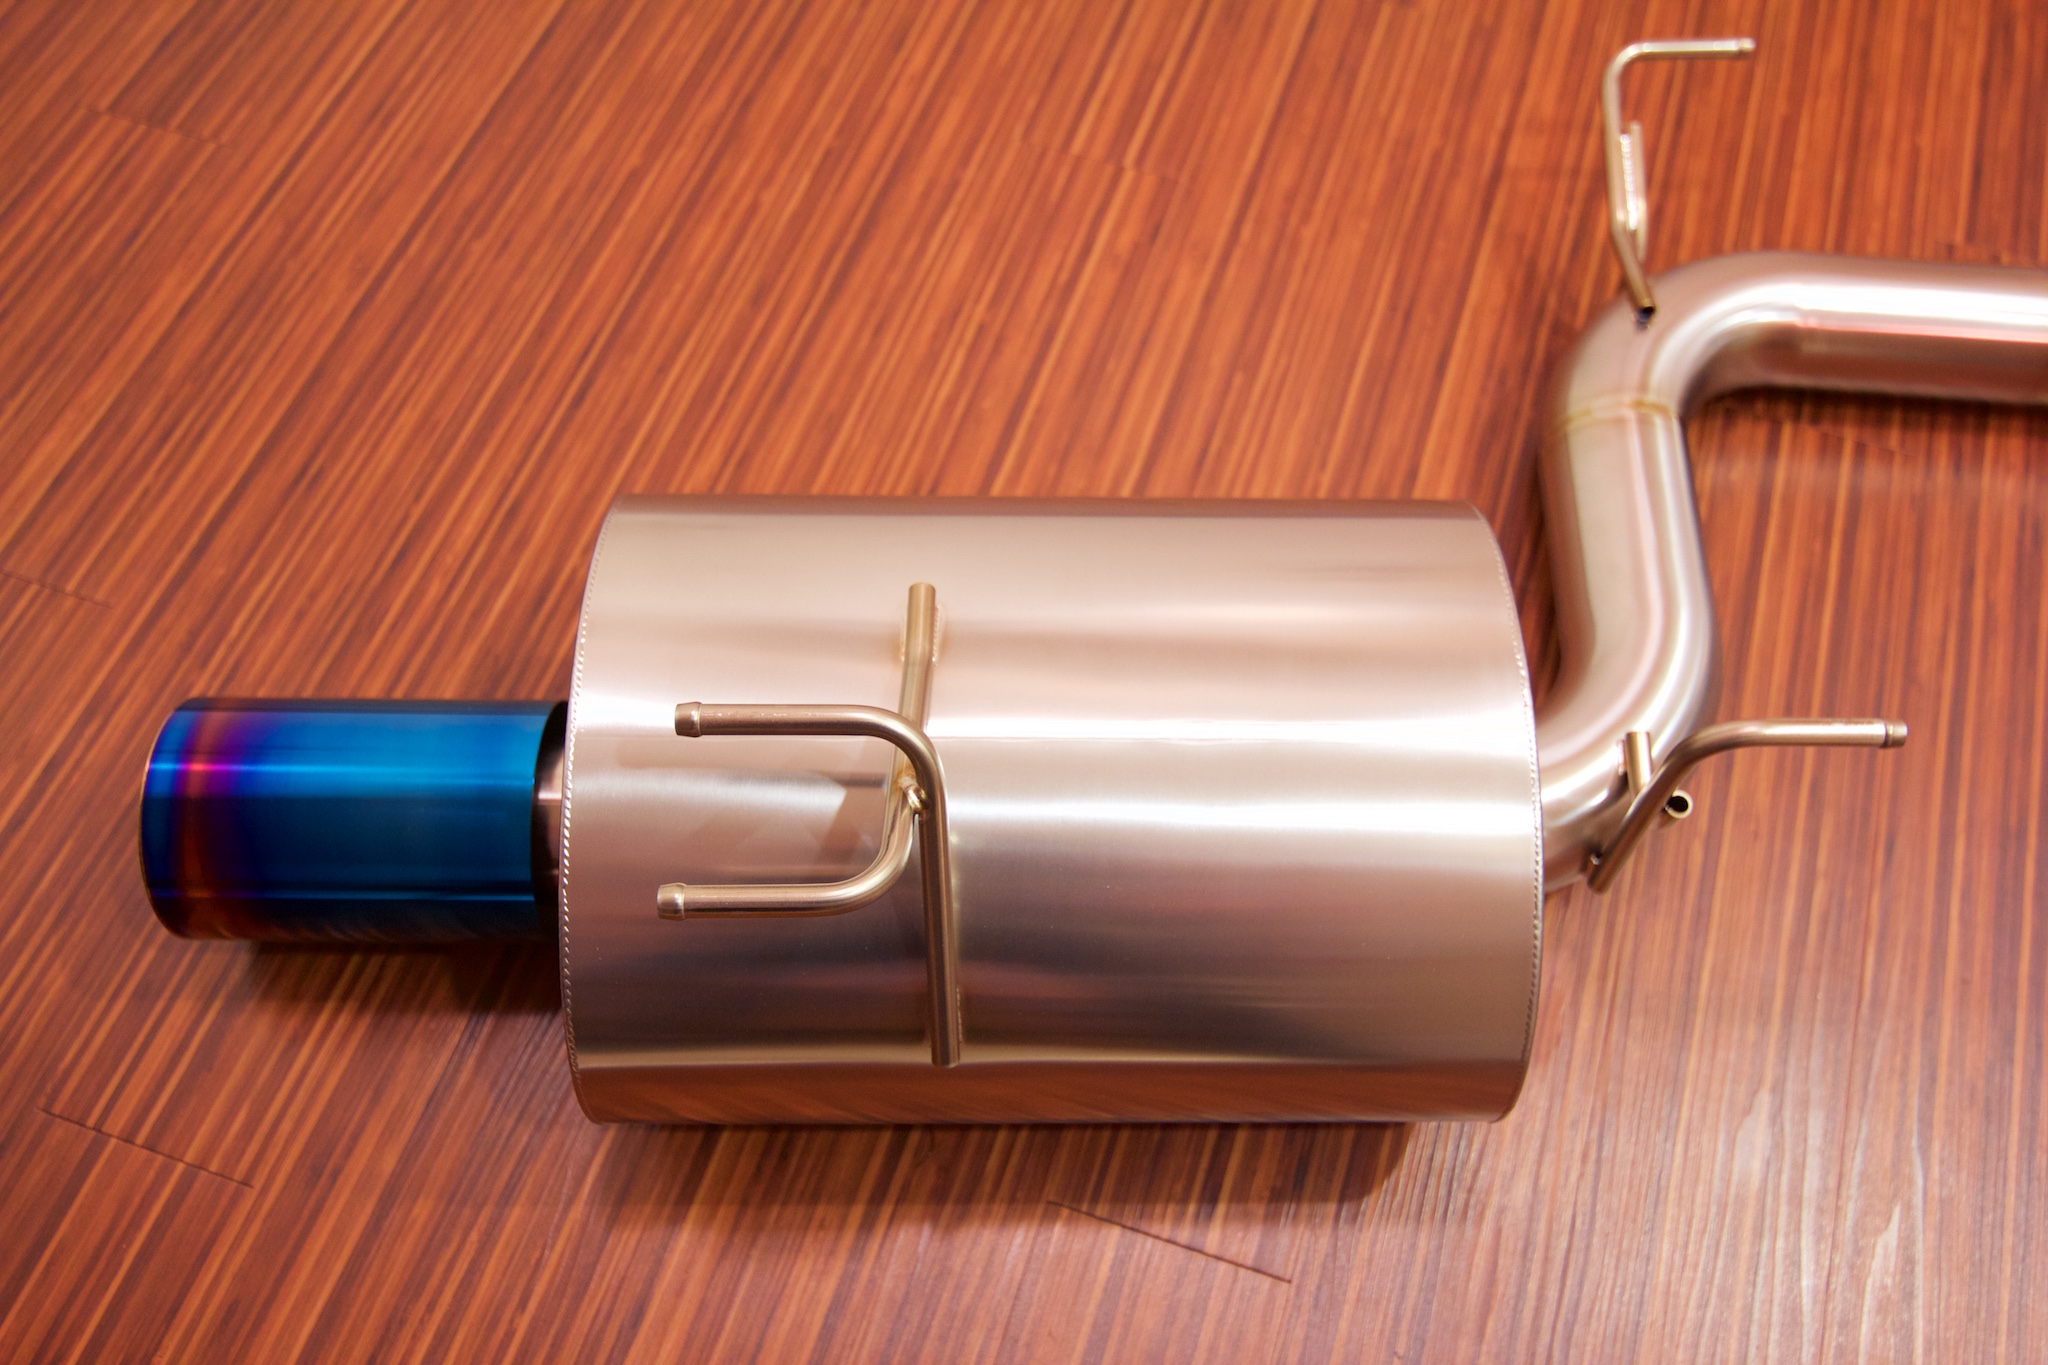
Powerhouse Amuse Euro-S 70mm exhaust
When I found out Amuse would make me a 70mm version of my favorite S2000 exhaust I was very happy to say the least. I contacted them direct through a vendor in Japan and was told they now have a 70mm piping option for the Euro-S. I placed an order immediately and got the exhaust from Amuse in less than a month. The turn around time is usually 3-4 months so pretty amazing to see it arrive at my doorstep so soon.
Had I known this 70mm version was available I probably wouldn't have gotten a second 60mm version (as I recently posted) but it is what it is and I am now the proud owner of 3 different Amuse exhausts haha.
Looking forward to seeing how this will fit with my current modified testpipe and HFC and I plan on having a 60 to 70mm transition test pipe made with the same jig if everything fits up as expected. The 60mm version definitely sounds great with a HFC and test pipe but the extra volume and snarls and power you can get with a 70mm exhaust are hard to resist. I plan on keeping all of the different exhausts I have at the moment. Who doesn't love options.


 03-26-2018, 01:10 PM
#3098
Thread Starter
03-28-2018, 11:32 PM
#3099
Thread Starter
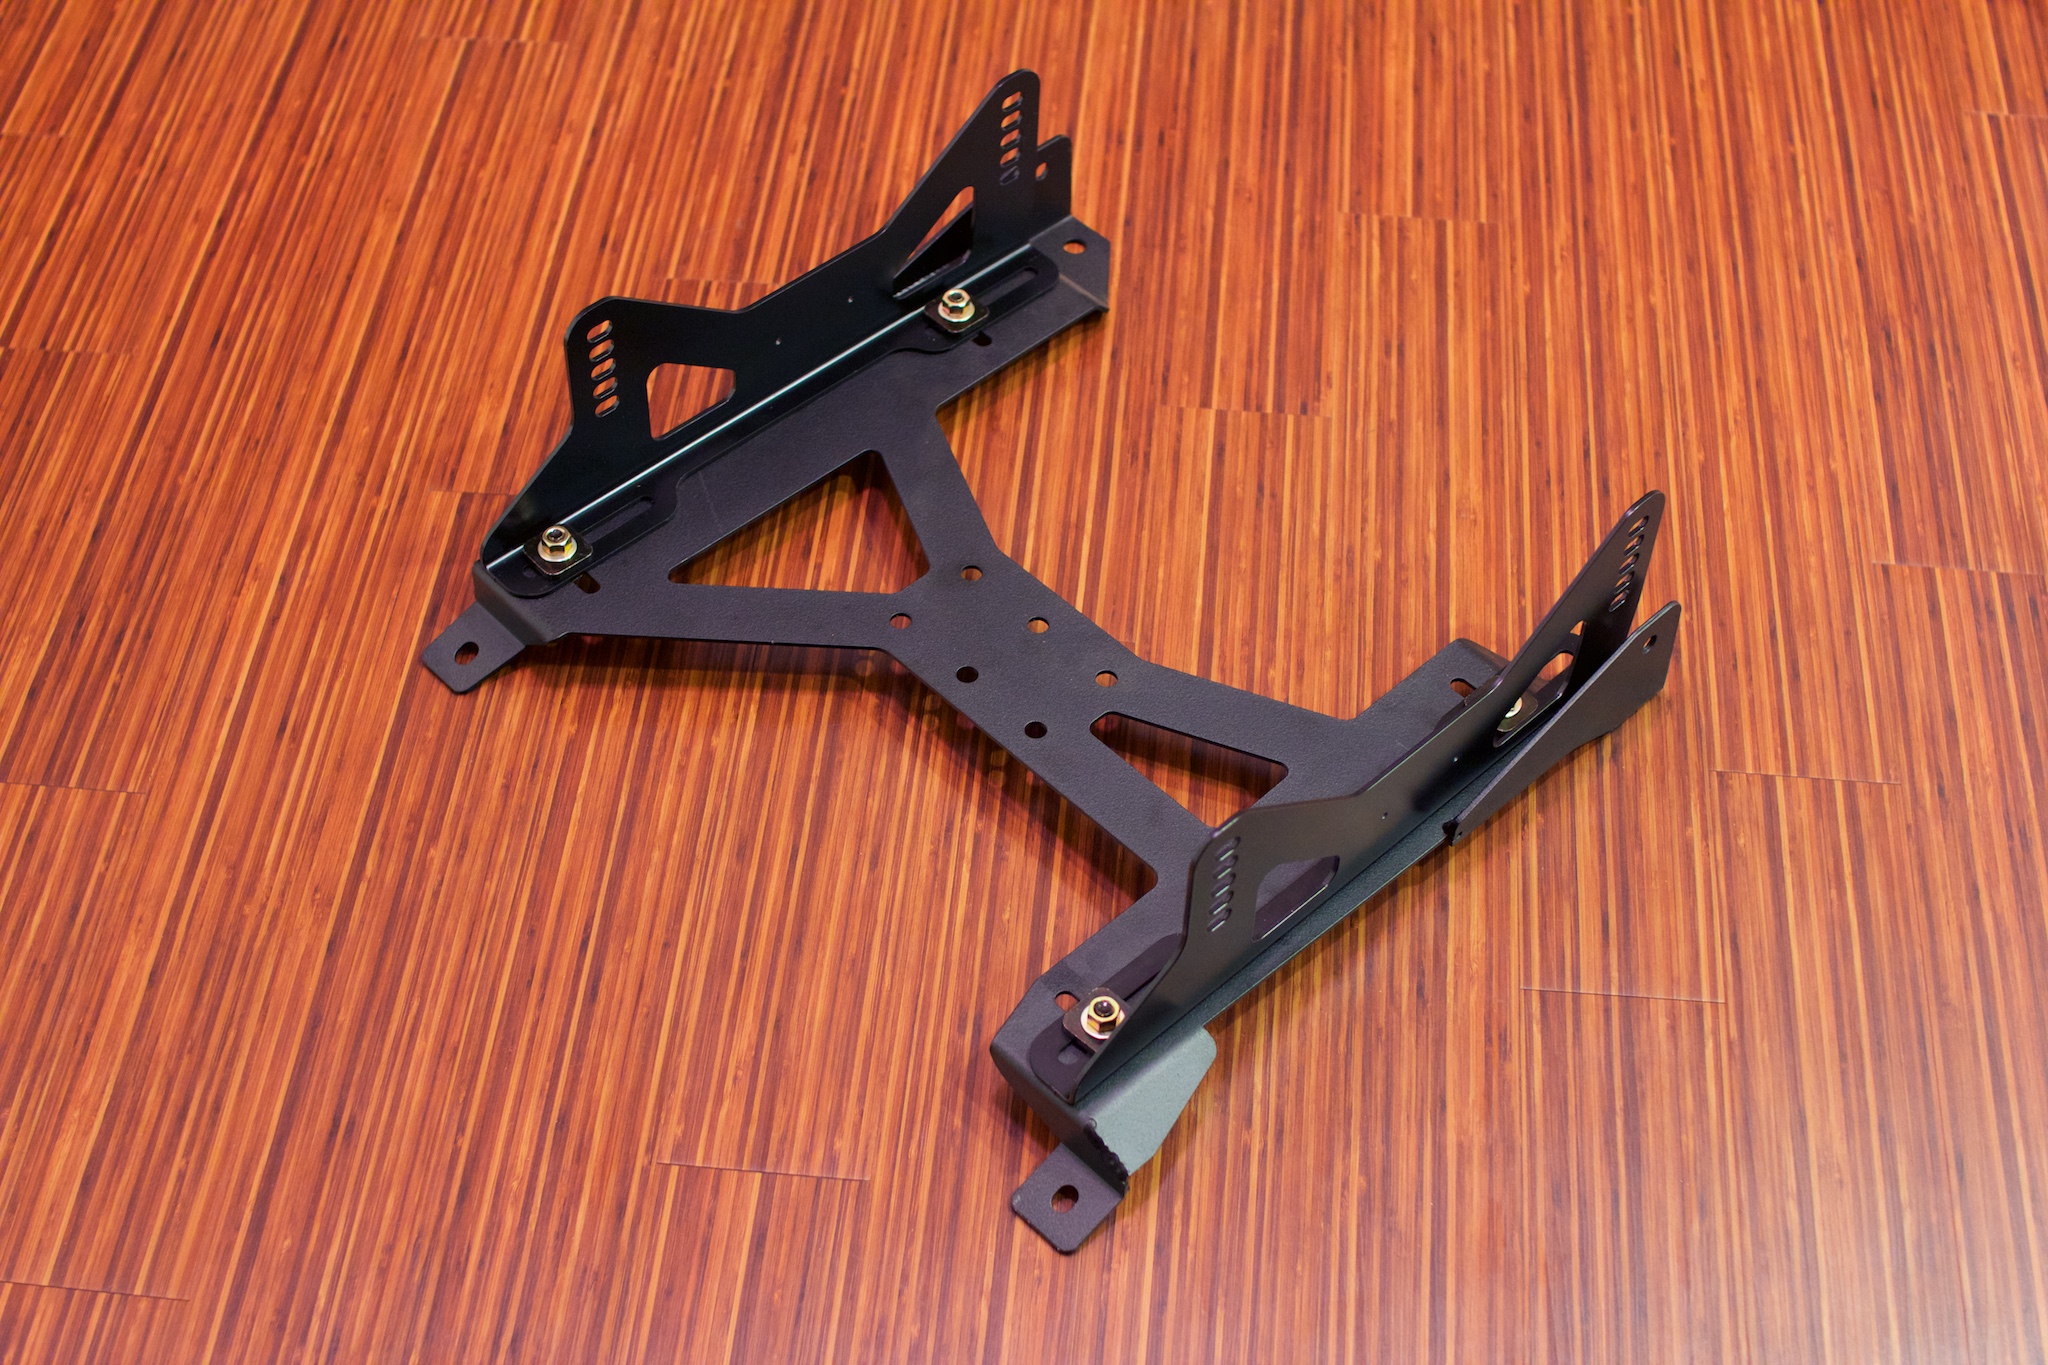
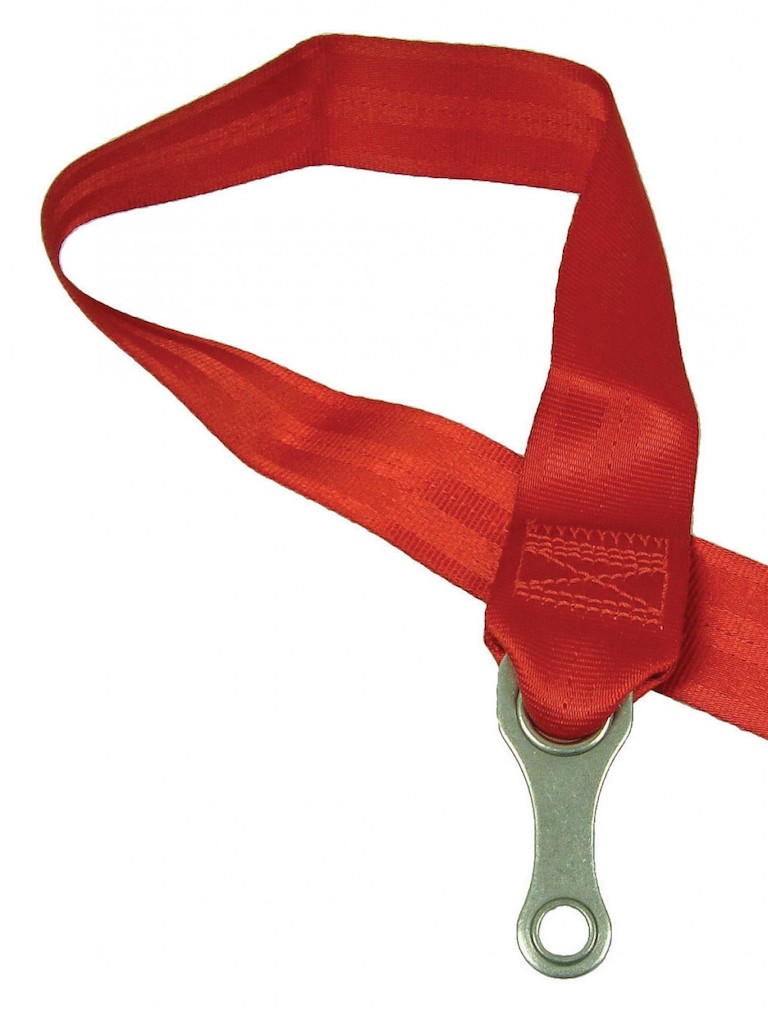
PCI slider mount for driver's side AP2 (06+) + Schroth Racing OEM belt mount
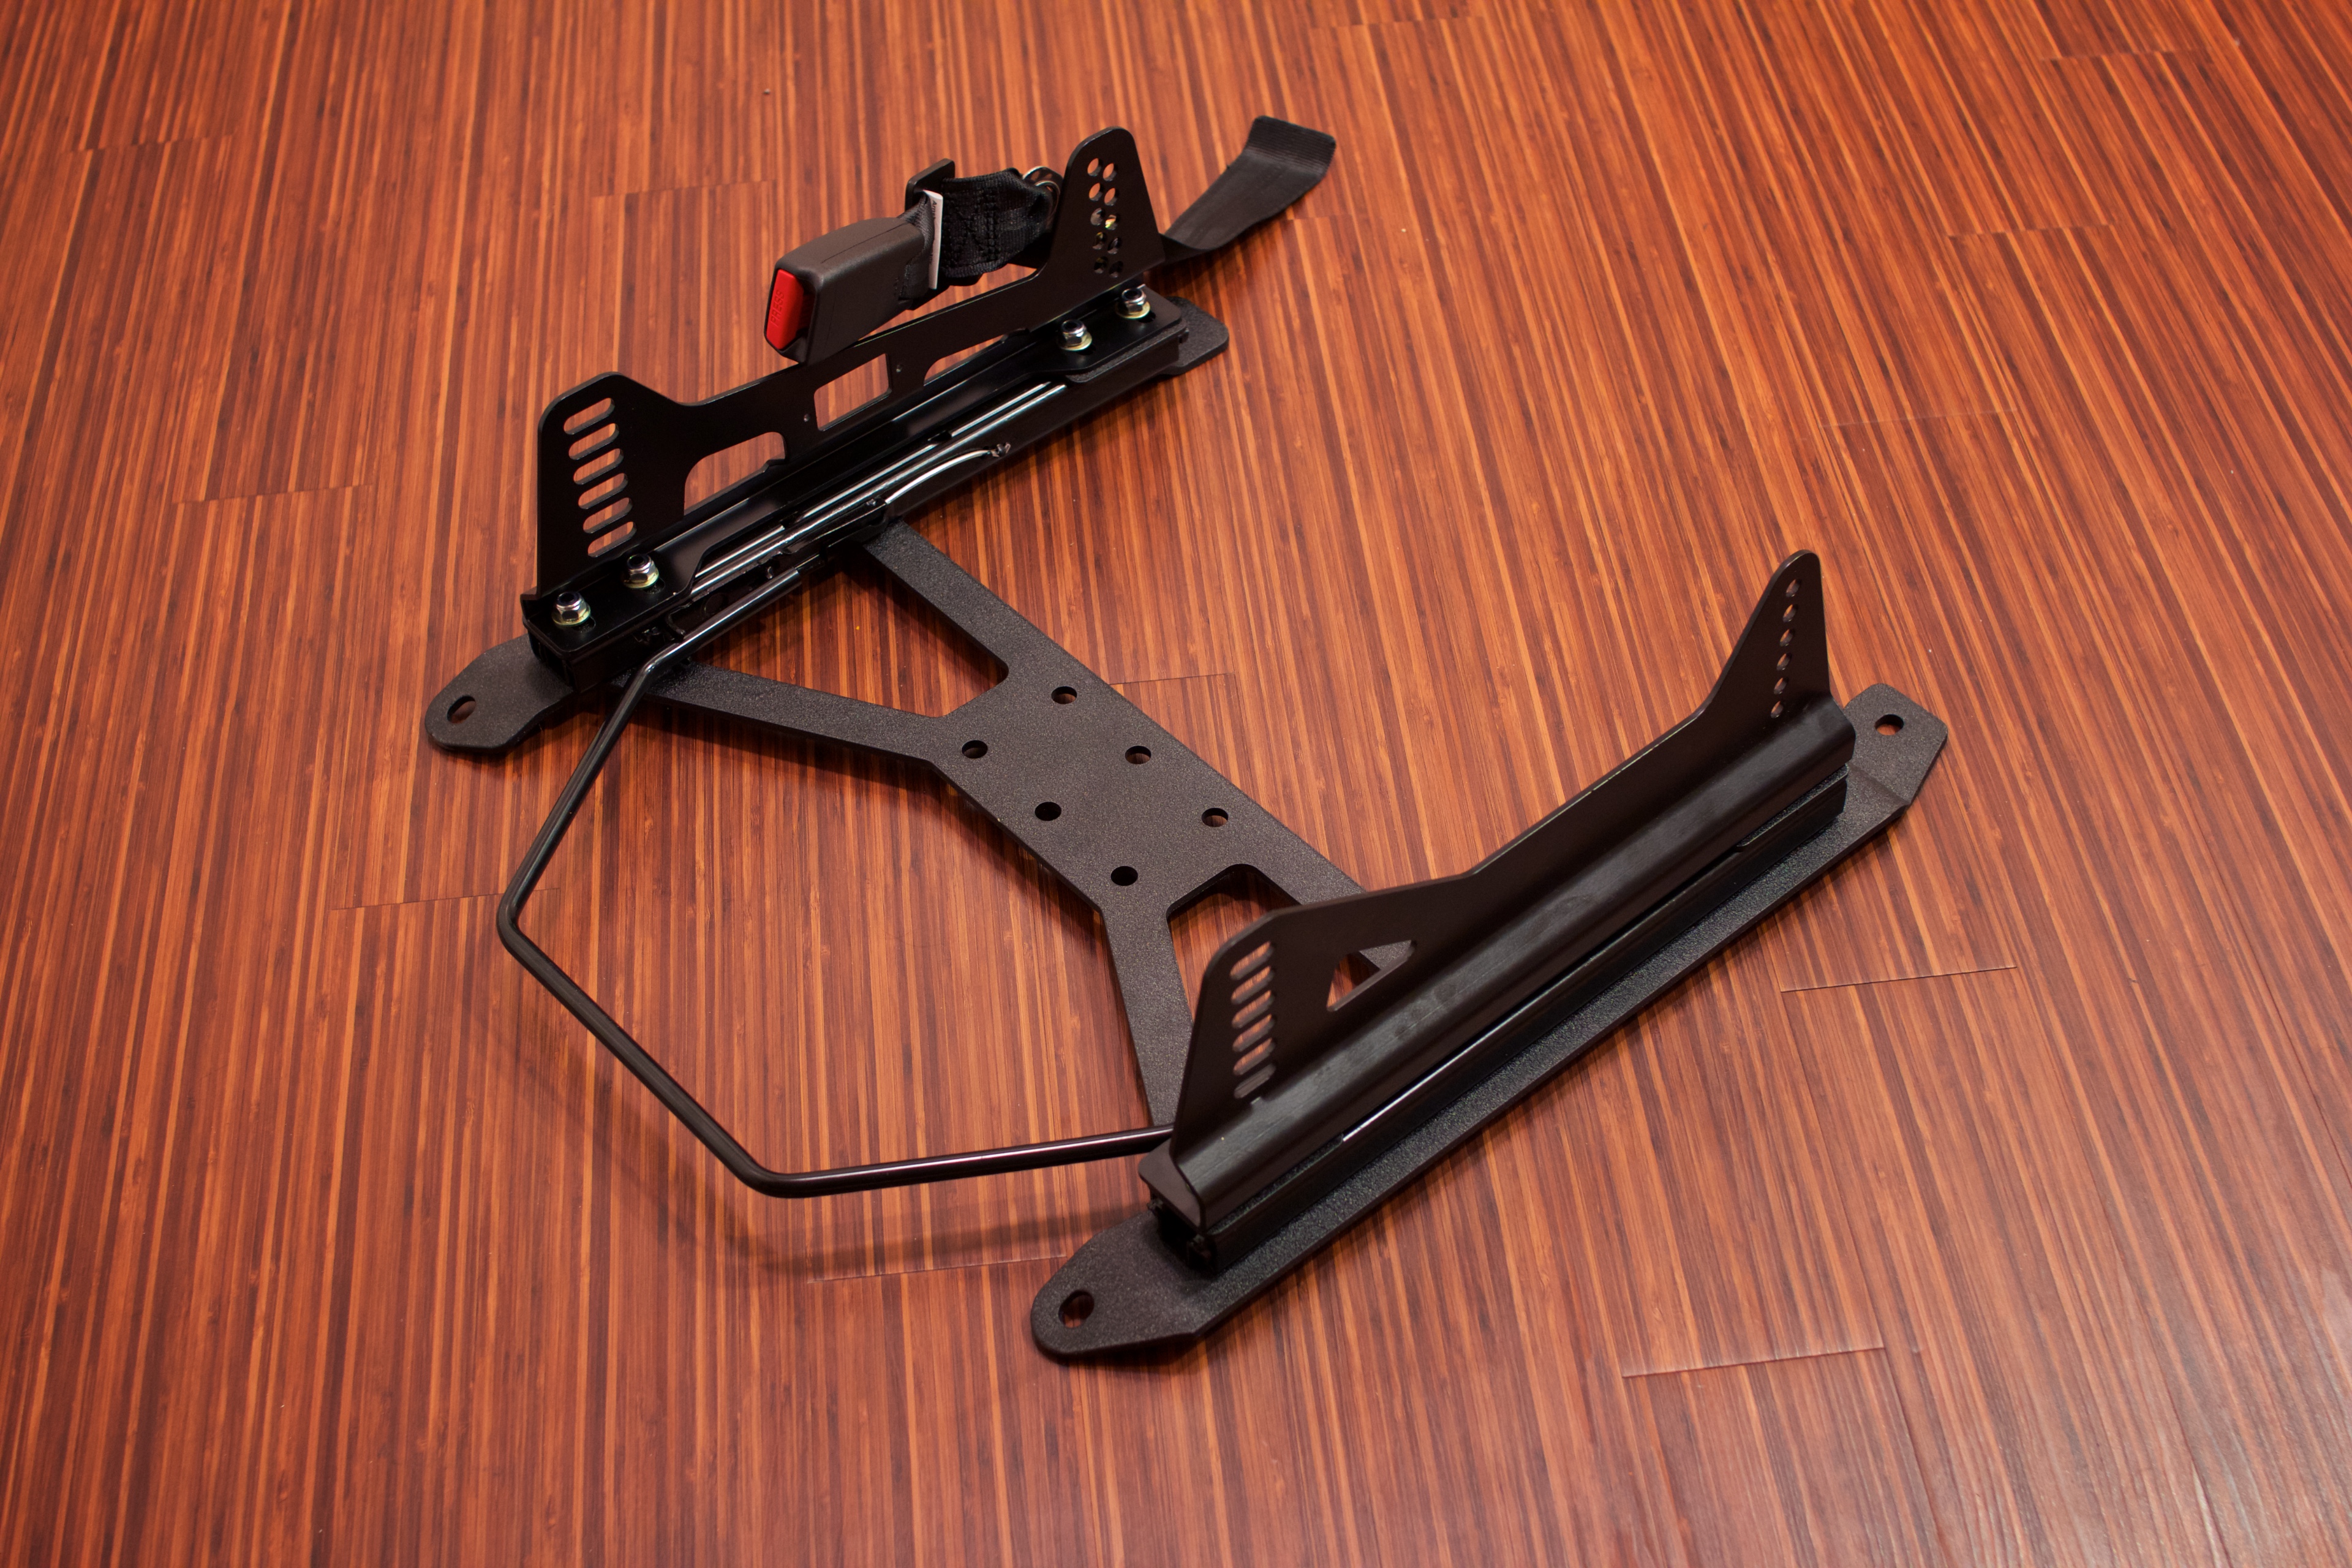

Just got one of the last parts of my new seat mount setup after PCI redesigned their S2000 mounts to be a little simpler and a more refined design. The rear section of the mount was opened up and simplified with a nice triangulated cross design to keep it just as sturdy. They also introduced a new side mount designed specifically for use with the Recaro Pole Position with finer adjustment points in the rear so the seat can sit a bit lower. In the photos you can see the new Pole Position side mount by lookin at the one with 2 columns of holes in the rear. That shape of the rear of the mount is also a bit different because the Pole Position rear mounts are very close to other parts of the seat. Obviously you would run the same side mounts on each side, I just took the photos with both mounted to show the differences.
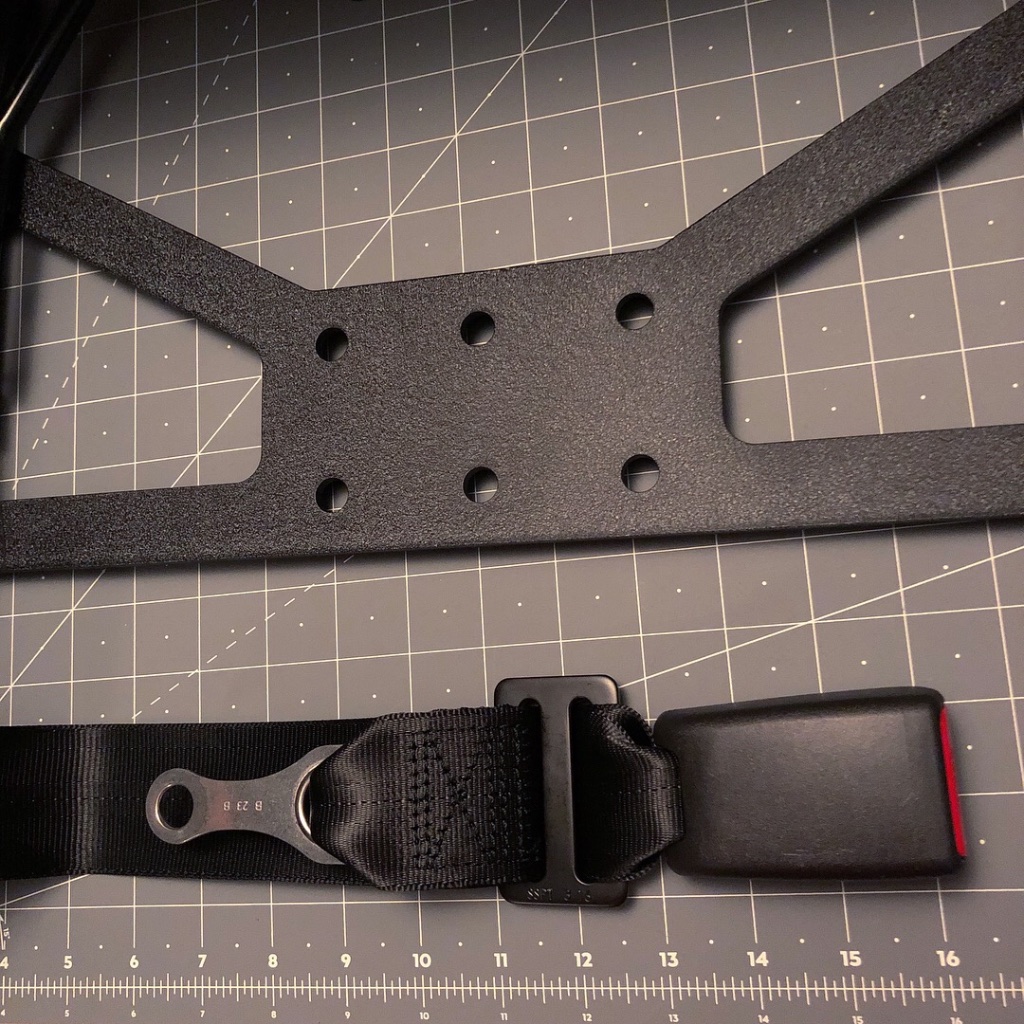
Schroth Racing OEM seat belt mount setup
I have also been ordering a bunch of different parts from Schroth Racing to figure out a better solution for attaching an OEM style belt receptacle to the seat mount. Right now I just use an extender and bolt that directly to the seat mount. It works great and is probably quite safe as the bolt going through the male connector of the seat belt extender doesn't leave any play. In the couple of years I have used this setup it has never come loose. Obviously though that seat belt extender is designed to clip into an existing OEM receptacle, so I found a better solution that has been properly load and safety tested by people that know what they are doing.
Schroth sells individual replacement lap belts for their harnesses that have a nice amount of length and already have a bolt on attachment point sewn into the webbing. They also sell brackets meant to attach end fittings and connectors as well as provide length adjustment. Using those two parts combined with the OEM style receptacle from one of my spare seat belt extenders I was able to come up with a nice adjustable solution that is setup exactly like the adjustable lap belts Schroth sells with their various harness kits.

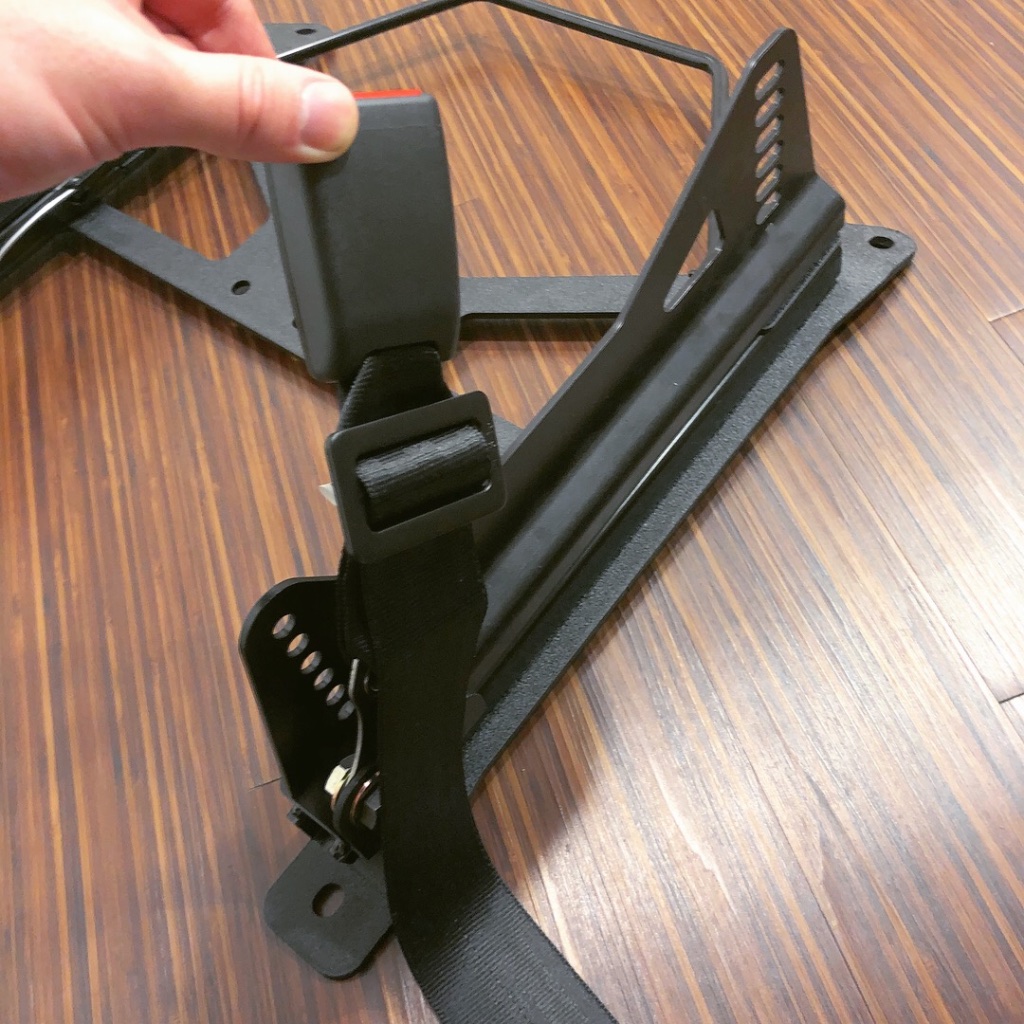
(the LV10 bracket isn't fully wrapped in this photo to better show how it mounts, to finish wrapping it you would weave the webbing through the bracket one more time, the wrapping instructions can be seen here - https://www.schrothracing.com/docs/3-bar-slide-wrap.pdf)
Here are the various parts I used:
SIDE BELT REPLACEMENTS - Black - (SR 01120) - https://www.schrothracing.com/produc...ent-parts#1614
(Note: I had to remove the small bit of stitching on the folded loose end of the webbing to properly fit through the receptacle and LV10 bracket, very easy to remove the stitching with any normal stick removal tool, I happened to have one from I bought a long time ago.)
3 BAR SLIDE (LV10) - https://www.schrothracing.com/produc...ar-slides#2475
OEM style seat belt receptacle (removed seat belt webbing from extender purchased from 4extender.com, any good extender should work fine, the receptacle from these particular extenders work well because they are quite short)
Mounting hardware:
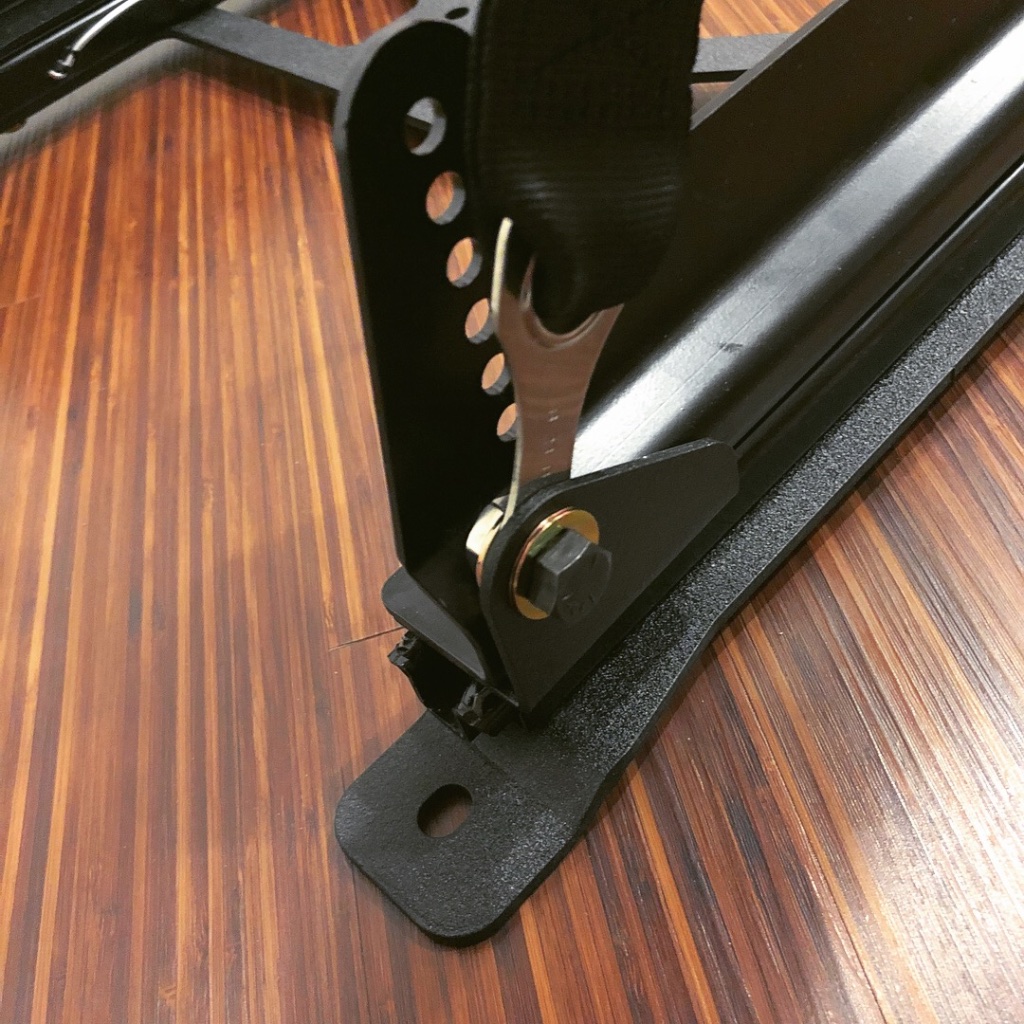
-7/16-20 bolt, 20 to 25mm length should work well Schroth actually sells nice hardware and washers on their site - https://www.schrothracing.com/produc...-and-eye-bolts
(In the photos I am using hardware I got from Fastenal.com) I would recommend getting the 25mm bolt and washers from Schroth when you get everything else. I used the Schroth 25mm bolts for mine.
-Schroth Racing SR S65 sleeves (SR S65) - https://www.schrothracing.com/produc...lt-in-brackets - These allow the mount to pivot at the mounting point when mounted properly with a washer, they can be pushed into the mounting bracket from one side and should sit up against the side mount, with a washer on the other side.
-7/16-20 narrow nut (these will be included with the PCI seat mounts)
You should mount everything like this from outside in: Schroth Racing 25mm bolt -> 7/16-20 washer -> side mount -> Schroth Racing sleeve -> Schroth Racing lap belt bracket -> 7/16-20 washer -> 7/16-20 nut.
Something nice about the hardware Schroth sells on their site is the bolt head is slimmed down compared to a normal hex or flange bolt, so it probably won't catch on the transmission tunnel carpet area as much as a larger head bolt. (I am not using this hardware in the photos here because it hasn't arrived yet.)
To mount the seat mount to the car you will obviously just use the OEM seat mount bolts that hold in the stock seat, and for mounting the side mounts to your seat you will need M8 x 1.25mm bolts and some M8 washers. Bolt length will depend on whether or not you use the include nylon spacers (Recaro Pole Position will require them), but 20mm, 25mm, or 30mm length will likely be what you need).
I will post up once I have installed everything into the car. You could definitely use a different combination of their various mounts and brackets to come up with a great solution for your particular setup. You could mount the seat belt receptacle directly to the floor of the car using a backing plate from scroth, or even mount eyebolts with snap on style brackets which the also sell. I recommend checking on their site and take a look at the instructions they provide to find a solution you think will work best for your setup.
I personally can't really recommend any other mounts besides the PCI with all the various mounts I have seen for the S2000. The idea here is that the OEM 3 point belt with be installed so it it goes through the lap belt holes of the bucket seat and can sit properly across both sides of your hips. These are the only ones that have ever offered a reasonable place to mount a receptacle properly to do this. Every other mount just assumes you will mount the OEM S2000 fixed receptacle designed for the reclining seats somewhere to the side of your seat, which makes no sense for a bucket seat. If you look at any sports car with a proper bucket seat you can see they all design the receptacle to fit through the side of the seat so it can properly sit across your hips. This mount combined with the non-slider version of the passenger rail should help save a few more pounds and let me sit my seats just a little bit lower which is great for anyone over 6 feet tall. Looking forward to getting everything mounted up!
Just got one of the last parts of my new seat mount setup after PCI redesigned their S2000 mounts to be a little simpler and a more refined design. The rear section of the mount was opened up and simplified with a nice triangulated cross design to keep it just as sturdy. They also introduced a new side mount designed specifically for use with the Recaro Pole Position with finer adjustment points in the rear so the seat can sit a bit lower. In the photos you can see the new Pole Position side mount by lookin at the one with 2 columns of holes in the rear. That shape of the rear of the mount is also a bit different because the Pole Position rear mounts are very close to other parts of the seat. Obviously you would run the same side mounts on each side, I just took the photos with both mounted to show the differences.
Schroth Racing OEM seat belt mount setup
I have also been ordering a bunch of different parts from Schroth Racing to figure out a better solution for attaching an OEM style belt receptacle to the seat mount. Right now I just use an extender and bolt that directly to the seat mount. It works great and is probably quite safe as the bolt going through the male connector of the seat belt extender doesn't leave any play. In the couple of years I have used this setup it has never come loose. Obviously though that seat belt extender is designed to clip into an existing OEM receptacle, so I found a better solution that has been properly load and safety tested by people that know what they are doing.
Schroth sells individual replacement lap belts for their harnesses that have a nice amount of length and already have a bolt on attachment point sewn into the webbing. They also sell brackets meant to attach end fittings and connectors as well as provide length adjustment. Using those two parts combined with the OEM style receptacle from one of my spare seat belt extenders I was able to come up with a nice adjustable solution that is setup exactly like the adjustable lap belts Schroth sells with their various harness kits.
(the LV10 bracket isn't fully wrapped in this photo to better show how it mounts, to finish wrapping it you would weave the webbing through the bracket one more time, the wrapping instructions can be seen here - https://www.schrothracing.com/docs/3-bar-slide-wrap.pdf)
Here are the various parts I used:
SIDE BELT REPLACEMENTS - Black - (SR 01120) - https://www.schrothracing.com/produc...ent-parts#1614
(Note: I had to remove the small bit of stitching on the folded loose end of the webbing to properly fit through the receptacle and LV10 bracket, very easy to remove the stitching with any normal stick removal tool, I happened to have one from I bought a long time ago.)
3 BAR SLIDE (LV10) - https://www.schrothracing.com/produc...ar-slides#2475
OEM style seat belt receptacle (removed seat belt webbing from extender purchased from 4extender.com, any good extender should work fine, the receptacle from these particular extenders work well because they are quite short)
Mounting hardware:
-7/16-20 bolt, 20 to 25mm length should work well Schroth actually sells nice hardware and washers on their site - https://www.schrothracing.com/produc...-and-eye-bolts
(In the photos I am using hardware I got from Fastenal.com) I would recommend getting the 25mm bolt and washers from Schroth when you get everything else. I used the Schroth 25mm bolts for mine.
-Schroth Racing SR S65 sleeves (SR S65) - https://www.schrothracing.com/produc...lt-in-brackets - These allow the mount to pivot at the mounting point when mounted properly with a washer, they can be pushed into the mounting bracket from one side and should sit up against the side mount, with a washer on the other side.
-7/16-20 narrow nut (these will be included with the PCI seat mounts)
You should mount everything like this from outside in: Schroth Racing 25mm bolt -> 7/16-20 washer -> side mount -> Schroth Racing sleeve -> Schroth Racing lap belt bracket -> 7/16-20 washer -> 7/16-20 nut.
Something nice about the hardware Schroth sells on their site is the bolt head is slimmed down compared to a normal hex or flange bolt, so it probably won't catch on the transmission tunnel carpet area as much as a larger head bolt. (I am not using this hardware in the photos here because it hasn't arrived yet.)
To mount the seat mount to the car you will obviously just use the OEM seat mount bolts that hold in the stock seat, and for mounting the side mounts to your seat you will need M8 x 1.25mm bolts and some M8 washers. Bolt length will depend on whether or not you use the include nylon spacers (Recaro Pole Position will require them), but 20mm, 25mm, or 30mm length will likely be what you need).
I will post up once I have installed everything into the car. You could definitely use a different combination of their various mounts and brackets to come up with a great solution for your particular setup. You could mount the seat belt receptacle directly to the floor of the car using a backing plate from scroth, or even mount eyebolts with snap on style brackets which the also sell. I recommend checking on their site and take a look at the instructions they provide to find a solution you think will work best for your setup.
I personally can't really recommend any other mounts besides the PCI with all the various mounts I have seen for the S2000. The idea here is that the OEM 3 point belt with be installed so it it goes through the lap belt holes of the bucket seat and can sit properly across both sides of your hips. These are the only ones that have ever offered a reasonable place to mount a receptacle properly to do this. Every other mount just assumes you will mount the OEM S2000 fixed receptacle designed for the reclining seats somewhere to the side of your seat, which makes no sense for a bucket seat. If you look at any sports car with a proper bucket seat you can see they all design the receptacle to fit through the side of the seat so it can properly sit across your hips. This mount combined with the non-slider version of the passenger rail should help save a few more pounds and let me sit my seats just a little bit lower which is great for anyone over 6 feet tall. Looking forward to getting everything mounted up!
The following users liked this post:
TKY (01-12-2021)
