

Buddy Club N+ Coilover Helpful Tips

Thread Starter


Joined: Aug 2011
Posts: 264
Likes: 8
From: Hilton, NY
I've had Buddy Club N+ coilovers for a few years now on my S2000 and wanted to share a few useful tips/tricks.
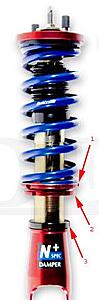
For adjusting I will use the following graphic to make it easy for everyone:
*Updated Thanks B serious!*
Step 1: Loosen #3
Step 2: To raise the car, turn #2 counter-clockwise
To lower the car, turn #1 clockwise
Step 3: Tighten #3
Note: For consistency on the opposite side, I measure from the bottom of #2 to the top of #3. Then make sure the opposite side is the same length.
Now for some other helpful tips. Over time the collars do tend to seize up and may not loosen properly when you want to adjust them.
My method to un-seize #1/#2 is first spray a bit of PB Blaster or penetrating oil in between the two collars being careful not to get any in the spring/shock area.
Then after a few minutes I use my spanner wrenches to first hold #1 pushing clockwise and then use the other wrench to push #2 counter-clockwise. I used a dead blow hammer to lightly tap the wrench I had on #2 til it frees itself.
For the lower collar (#3), if it seizes as well (as did mine). I did the same process of soaking it in a bit of PB Blaster, then use the spanner wrench with the 3/8" wrench hole in the end (I believe it is the smaller of the two). Put it on the collar so that you are turning counter-clockwise and put a 3/8" ratchet into the adapter hole. Have the ratchet set so it is allowing you to push counter-clockwise. With the added leverage it should allow you to loosen it.
After I freed each seized collar I loosened them up so I could spray a bit more PB on the threads/collar. I would then spin the collar up and down to coat it, then wipe off the excess with a rag.
Hope this helps some people that are new to adjusting coilovers and un-seizing stuck ones!
For adjusting I will use the following graphic to make it easy for everyone:

*Updated Thanks B serious!*
Step 1: Loosen #3
Step 2: To raise the car, turn #2 counter-clockwise
To lower the car, turn #1 clockwise
Step 3: Tighten #3
Note: For consistency on the opposite side, I measure from the bottom of #2 to the top of #3. Then make sure the opposite side is the same length.
Now for some other helpful tips. Over time the collars do tend to seize up and may not loosen properly when you want to adjust them.
My method to un-seize #1/#2 is first spray a bit of PB Blaster or penetrating oil in between the two collars being careful not to get any in the spring/shock area.
Then after a few minutes I use my spanner wrenches to first hold #1 pushing clockwise and then use the other wrench to push #2 counter-clockwise. I used a dead blow hammer to lightly tap the wrench I had on #2 til it frees itself.
For the lower collar (#3), if it seizes as well (as did mine). I did the same process of soaking it in a bit of PB Blaster, then use the spanner wrench with the 3/8" wrench hole in the end (I believe it is the smaller of the two). Put it on the collar so that you are turning counter-clockwise and put a 3/8" ratchet into the adapter hole. Have the ratchet set so it is allowing you to push counter-clockwise. With the added leverage it should allow you to loosen it.
After I freed each seized collar I loosened them up so I could spray a bit more PB on the threads/collar. I would then spin the collar up and down to coat it, then wipe off the excess with a rag.
Hope this helps some people that are new to adjusting coilovers and un-seizing stuck ones!


Joined: Nov 2007
Posts: 8,841
Likes: 1,705
From: Illnoise. WAY downtown, jerky.
No...you really shouldn't be adjusting height using the spring adjusters....unless you're running out of droop or upward travel or would like to bumpstop earlier.
The height should be adjusted via #3 almost exclusively unless there is some sort of other tuning you're performing by limiting or extending spring travel/preload.
The height should be adjusted via #3 almost exclusively unless there is some sort of other tuning you're performing by limiting or extending spring travel/preload.
Thread Starter
Joined: Aug 2011
Posts: 264
Likes: 8
From: Hilton, NY
No...you really shouldn't be adjusting height using the spring adjusters....unless you're running out of droop or upward travel or would like to bumpstop earlier.
The height should be adjusted via #3 almost exclusively unless there is some sort of other tuning you're performing by limiting or extending spring travel/preload.
The height should be adjusted via #3 almost exclusively unless there is some sort of other tuning you're performing by limiting or extending spring travel/preload.
Joined: Nov 2007
Posts: 8,841
Likes: 1,705
From: Illnoise. WAY downtown, jerky.
For a *full body* adjustable coilover, the generally correct method is to loosen ONLY #3 (make sure the other two are jammed tight).
Turn #1 CW to lower the car.
Turn #2 CCW to raise the car.
Doing this will screw or unscrew the *entire body* of the shock into/out of the bottom bracket.
Turn #1 CW to lower the car.
Turn #2 CCW to raise the car.
Doing this will screw or unscrew the *entire body* of the shock into/out of the bottom bracket.
Joined: Nov 2007
Posts: 8,841
Likes: 1,705
From: Illnoise. WAY downtown, jerky.
Imagine the shock body as a threaded stud.
The lower bracket is a nut.
#1 and #2 are jam nuts that you are using to turn the stud.
#3 is a jam nut to lock the stud after the height is set.
If you've ever installed or removed exhaust/intake manifold studs, this should be a very familar layout.
I'm sure buddy club has min/max adjustment ranges for all of of this. The disadvantage of a full body coilover is that you can develop problems with droop if you thread the body too far into the bottom collar for that max low, y0.
 good post! I'm sure it'll help people.
Trending Topics
Thread Starter
Joined: Aug 2011
Posts: 264
Likes: 8
From: Hilton, NY
Being the nut job that I am, I went back and re-preloaded the springs.
My method was loosening #1 until the spring could move a little up and down. Then hand tightening #1 as much as I could, after that did about two full turns tightening it with the spanner wrench.
My method was loosening #1 until the spring could move a little up and down. Then hand tightening #1 as much as I could, after that did about two full turns tightening it with the spanner wrench.

Thread
Thread Starter
Forum
Replies
Last Post
Adriank
S2000 Brakes and Suspension
18
Dec 18, 2010 10:48 AM
chillout18
Archived Member S2000 Classifieds and For Sale
11
Jun 12, 2008 08:39 AM