
BrockBs 700whp E85 build on a Mase Turbo Kit

Thread Starter
Registered User
Joined: Dec 2009
Posts: 2,396
Likes: 0
From: Auburn Hills, Michigan
BROCKB'S COMPLETE BUILD THREAD:
A timeline & full parts list from the day I bought my S2K, Boosted it, and then went back NA
CAR: Chicane Silver 2008 S2000
CURRENT MILES: 38,000 (as of June 2013)
POWER AND FUEL: Forced Induction/ E85 fuel system
TYPE/PURPOSE: Street car; built for max power achieved from a T3 turbo without sacrificing transient spool response
PEAK POWER: 698whp @22psi / 489wtq @21psi
MILESTONES:
If I'm not mistaken, it produced the most power ever on an AP2 S2K using a 6262 turbo with only a .63ar back
housing, and it also produced the best power and torque-to-psi ratio (lowest PSI to power and torque made)
__________________________________________________ ___________________________________
THREAD ORGANIZATION
First, I list my summary of parts. The second post below that contains the complete timeline of everything
I did from the time I bought my car until now with picture summaries for each developing upgrade stage.
Below the timeline are additional pictures corresponding to particular events that were listed in my timeline.
Finally, I display pictures of the finished product.
This has been a long, expensive road of trial and error for what works and what doesn't with the S2K.
I bought it, then I boosted it. Then I boosted it some more, and then i went back to stock because
I had to go to grad school and didnt have time to deal with the headaches anymore. This car had
soooo much potential beyond what it had already shown, and it never got to see the track!
But maybe in the distant future, it will be back again! Enjoy the read!
__________________________________________________ ___________________________________
AESTHETICS:
INTERIOR
Red/black two-tone racing seats
Red door panels
Aluminum Dash trim kit
S2000 dual gauge pod
AEM truboost gauge with solenoid
AEM oil pressure gauge
AEM uego wideband gauge
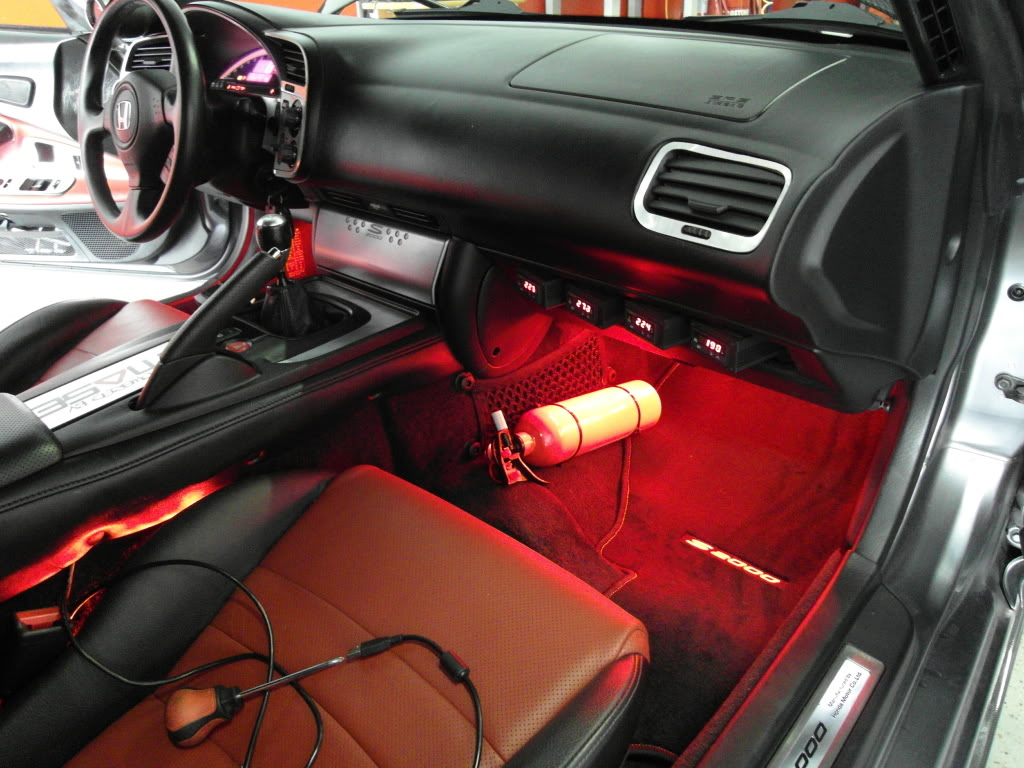
Auber Instruments 4 EGT meters with boxes, buzzers, & probes
Carbon fiber visor sections
Red interior glow lights
Aftermarket full floor S2K floormats
Red attaching fire extinguisher
98 Supra OEM black leather shift knob
AUDIO
Alpine IDA-X305s Head unit
Powerbass 1600 watt 5 channel amp + wiring
Custom sub box
Kicker 12 inch Subwoofer
Iphone, Pandora, & USB adapter
Kicker door speakers
Electric converter box for ground outlet applications
EXTERIOR
S Emblems X2
Red Exterior lights 4 piece X2
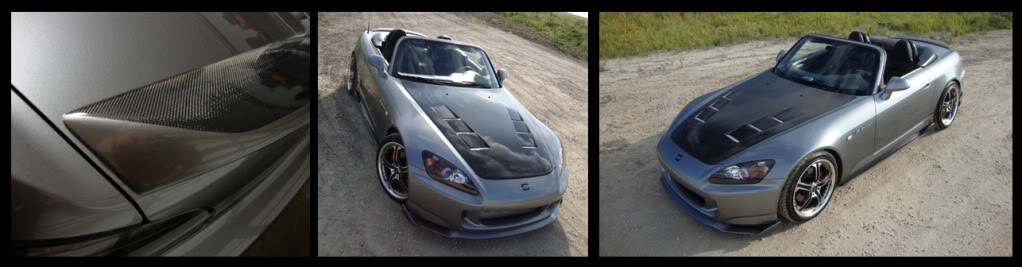
VIS carbon fiber terminator hood
Tented Windows
Toneau Top Cover
Painted Brake Calipers
Clear Side Light Canisters + White LED Lights
Carbon Fiber Spoiler + custom paint and install
Mase custom made decals
Volk LE 37's custom painted with caps, lug nuts
Mugen lip + painted
Chargespeed side diffusers
Chargespeed rear diffusers
Password JDM carbon fiber radiator cooling plate
Hood dampers
JS2K clear AP2 headlight turning markers
Double sided infused carbon fiber hardtop
Engine bling: powder coated ruby red valve cover
Engine bling: polished spark plug cover & strut bar braces
_________________________________________________
PERFORMANCE
ENGINE & TURBO
Ferrea dual valve springs
Ferrea retainers and guides
Ferrea stainless steel exhaust valves
Toda tensioner
ARP Headstuds
Hondata intake manifold gasket
Iridium high performance spark plugs
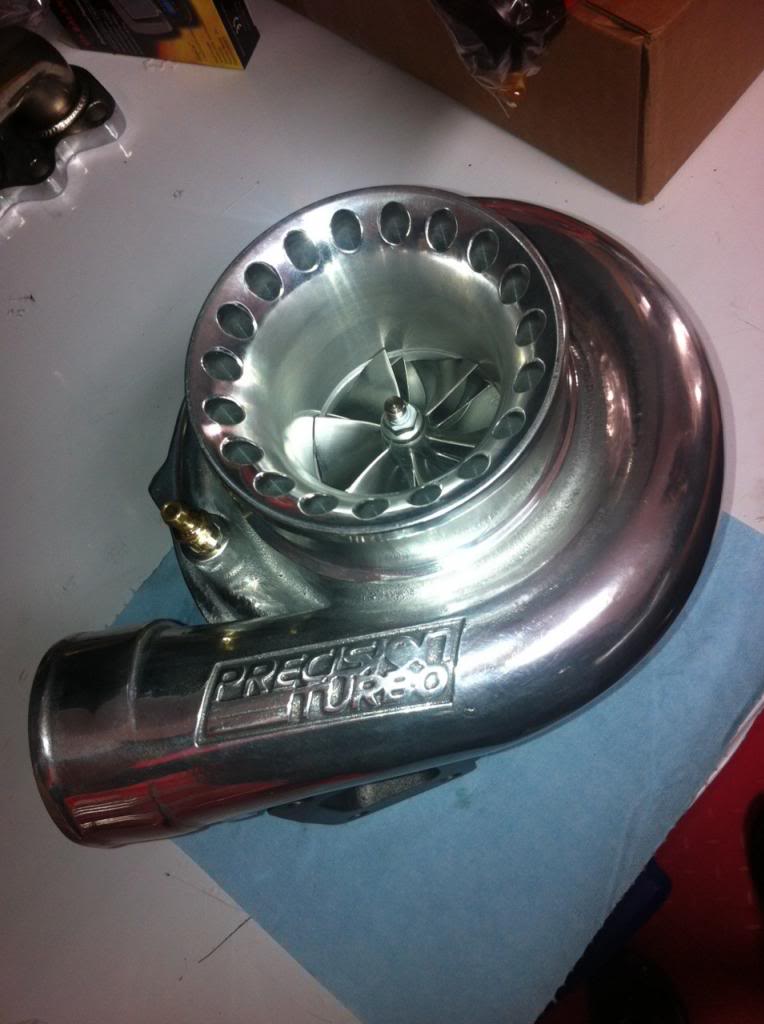
Precision bilet ball bearing 62/62 precision turbo
Racelab Custom 3" downpipe
Custom 3" single exhaust- magna flow muffler/borla tips (made to look like dual)
Tial 44mm wastegate with all spring sizes
Tial blow off valve
Mase engineering turbo chargepipe set
Mase engineering exhaust manifold
MCA Custom dump pipe
AEM dry air filter (and other miscellaneous air intakes)
BRMS oil catch can + head welded fittings and linings
All couplers, fittings, linings, and heatshields for turbo setup
Magnetic drain bolts
Hondata ECU boost by gear upgrade
Hondata Flashpro computer engine management system
Plug and Play Map sensor
T1 race development IAT sensor
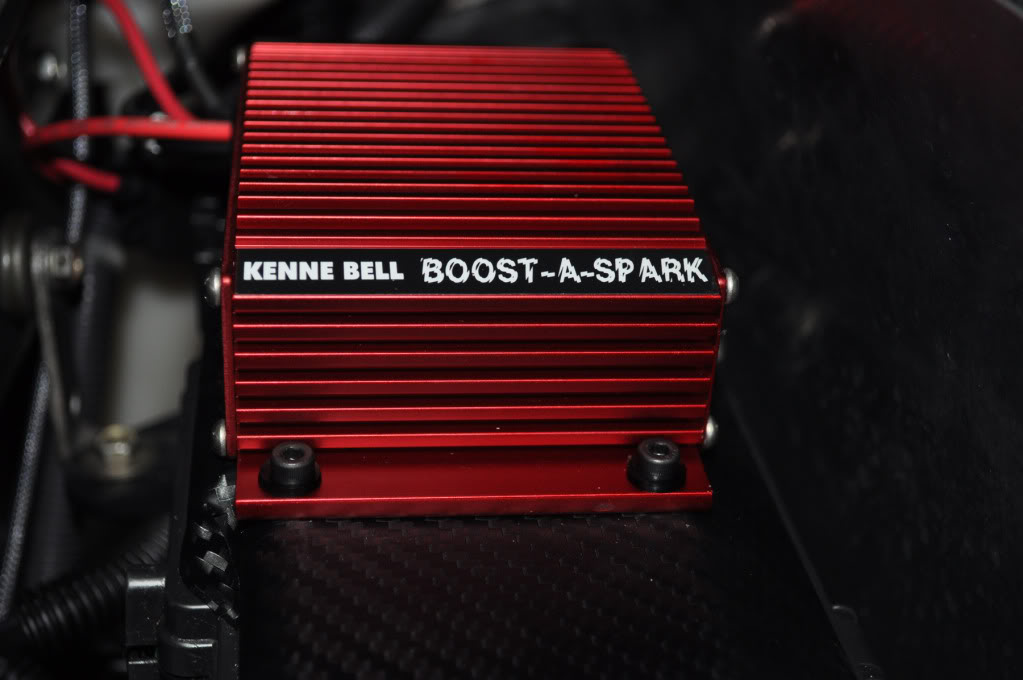
Kenne Bell boost-a-spark
Ceramic coated polished/chrome downpipe, turbo, & exhaust manifold
FUEL SYSTEM
ID2000 injectors + injector clips
Full Blown Dual pump hanger
AEM fuel rail
AEM fuel pressure regulator
AEM Fuel fittings and linings for E85 fuel conversion
AEM Fuel pressure gauge
100 Micron fuel filter (e85 safe)
Dual Walbro fuel pumps
COOLING
Battery relocation kit (for heat relief and clearance of downpipe, etc)
Mugen thermostat and thermoswitch
Full blown radiator and slim fan
Mushimoto oil cooling kit
Precision 600 intercooler
SUSPENSION & DRIVETRAIN
V160 Supra transmission
V160 steel DSS driveshaft
V160 Clutch masters twin disc clutch
V160 Full Blown Motorsports adapter kit
Puddymod stage 4 differential with 4.10 gears
Gator racing axles
Falken 452 street radial tires (for street)
AP1 rear rims w/Mickey Thompson 255/50/16 tires (for drag)
Buddy Club N+ coilover system + Installation and dampening
TCS suspension strut bar
R1 Cross drilled and slotted rotors
OEM extended performance brake pads
__________________________________________________ ___________________________________
TIME-LINE
November 2009 @ Honda: Purchased car with 16,000 miles, pre-certified, and completely stock.
December 2009- February 2010:
- Added a Seibon carbon fiber hood
- 18" Lorenzo rims
- Eibach lowering springs
- Complete audio system with a custom 12" box and subwoofer in the trunk
- Amp and a pioneer CD head unit.
__________________________________________________ ___________________________________
1st MAJOR UPGRADE EVOLUTION
Establishing a turbo kit
March 2010 @ TD Autowerkes Miami, FL:
I installed Mase Engineering's first drive-by wire turbo kit with a 58/57 Precision turbo,
ID1000 injectors, competition stage 4 clutch, hondata flashpro EMS, manual boost controller,
Autometer gauges; Mase tuned on 93 Octane; 428whp @14psi max on a dynojet. (stock exhaust)
April 2010: I experienced a bad turbo with distorted seals. Mase replaced it immediately and I
was back and running again. From this point on, I was gunning this turbo kit,
without any major problems for a year+ - it ran great!
Summer- Fall 2010:
- Added mugen front lip
- Chargespeed diffuser kit
- Rick's accessories,
- engine and interior bling,
- and yes, neons (I don't care; I will always love them)
- oem carbon fiber rear spoiler custom painted
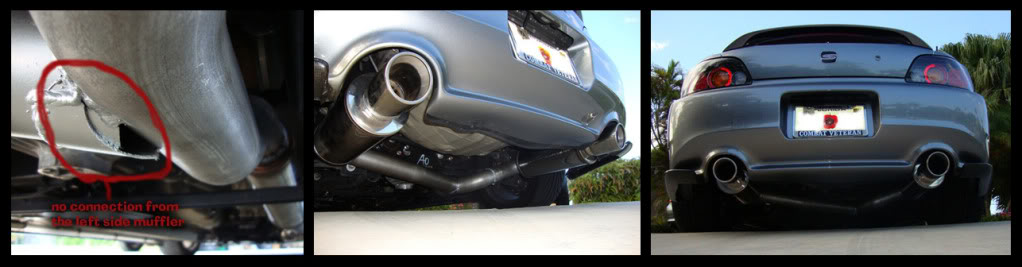
October 2010 @STP, Ft. Lauderdale, FL: I wanted more power so I upgraded to a single exhaust-
YES, SINGLE. hate it or love it, but what I did was make a single 3" straight through exhaust look like
a dual exhaust by welding another muffler to the single pipe with no opening. I did this to avoid
the empty ugliness of the missing hole in the rear, and I like the aggressive look of a dual. The
other options were to buy a single hole bumper paint it or do body shop work, but these were all
more expensive and unnecessary, so I decided to do this dual look-a-like.
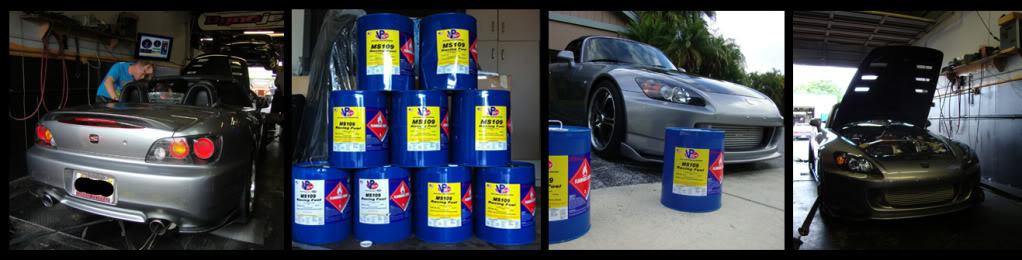
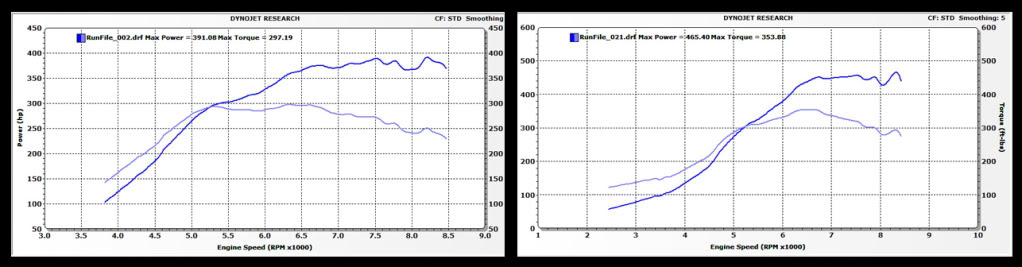
I made an MS109 race fuel map. I had Mase tune it at 465whp/354tq @19psi on a dyno dynamics (graph
on bottom right). The 58 precision turbo was making it very hard to reach 500, plus there were
some inconsistencies with my manual boost controller so the numbers were lower than expected (and on
a mustang dyno). On the bottom left graph, I ran my first dyno on pump before switching to MS109 just
to see the difference between a dyno jet and a dyno dynamics reading. It only read 391whp compared to
the dyno jet that was used to measure it when I first installed the kit- a difference of 37whp.
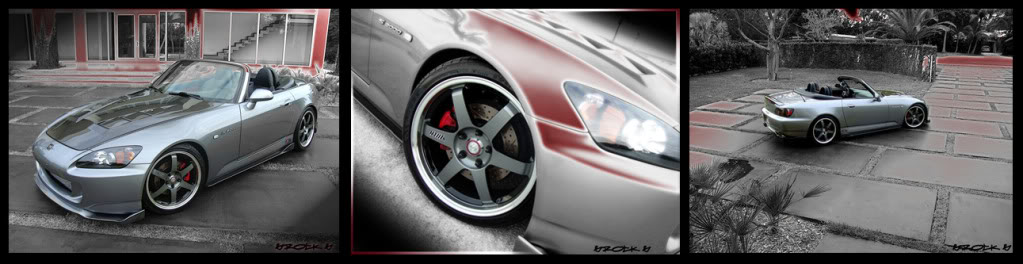
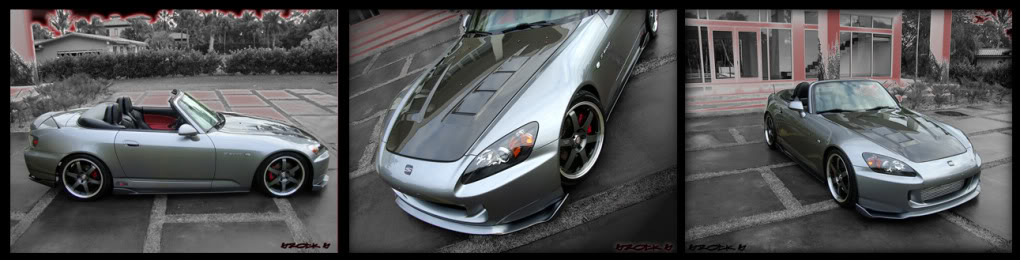
Winter 2010-Spring 2011: By now I was certain of the way I wanted my car to look, so I revised
and completed most of my major aesthetics.
- Swapped out the Lorenzo's with the rims with Volk LE37s.
- I custom painted the Volk le37s black on the inside of the spokes and added new wheel caps.
- Replaced my Seibon hood with a terminator VIS hood,
- Added buddy club coilovers, brake rotors and pads,
- traded black door panels with red ones, and other miscellaneous things.
- Switched my gauges from autometer to AEM, replaced manual controller with AEM truboost and solenoid
- Switched the glow lights from blue to red for a darker, matching red-on-silver theme.
__________________________________________________ __________________________________
2ND MAJOR UPGRADE EVOLUTION
adding an E85 fuel system
(refer to pictures from 2011 spring build below)
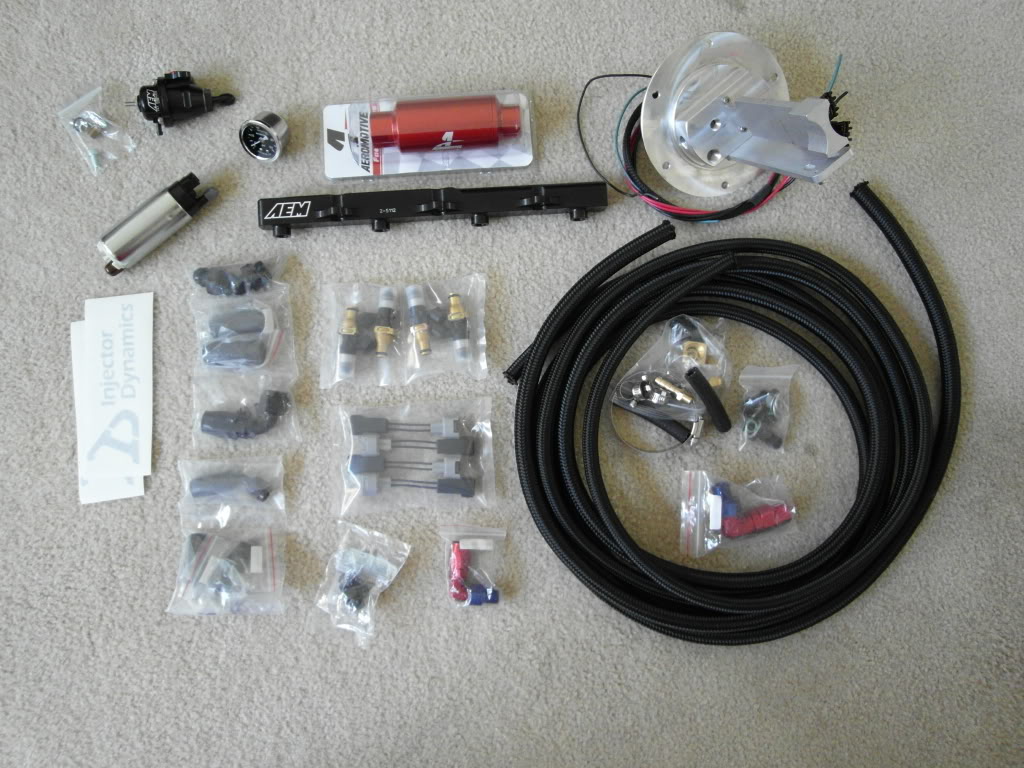
May 2011 @Racelab, Miami, Fl:
After the halt with the dump pipe issue, I was finally ready to upgrade the fuel system and turbo
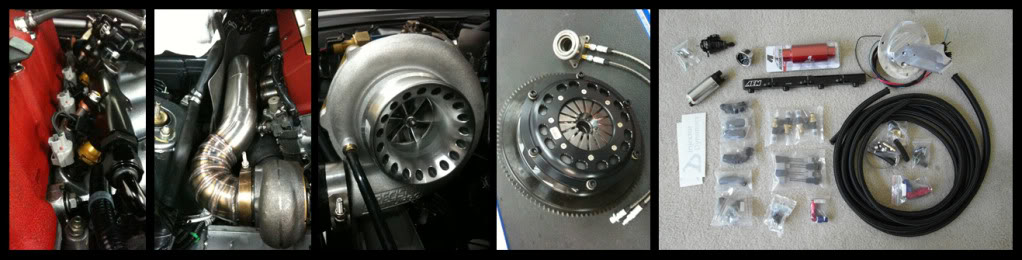
kit to get into the 600+whp range. So I ordered and installed all parts for a complete E85 fuel conversion;
- Full Blown Dual pump hanger and dual Walbro fuel pumps
- Fuel filter, AEM fuel rail, fuel pressure regulator, fuel pressure gauge, Fuel fittings and linings
- Upgraded from 1000 to ID2000 injectors;
- Upgraded from a 58 to a ball bearing 62/62 precision turbo
- Upgraded from mase engineering 2.5" downpipe to a racelab 3" custom downpipe.
- Upgraded from a comp stage 4 to a Competition twin disc clutch.
After the transition, the engine was running nicely, but unfortunately I was too impulsive for this kind
of power. I left the entire drivetrain stock and had Mase come down to tune it. It made 540whp on
a dynodynamics @ only 15psi, which is a really good power-to-psi ratio. We were going to push it to
a good limit between 19psi-21psi, but a charge pipe blew off before we could. It was getting late so I
could not run it again.
The next day I fixed the chargepipe and I drove it around to play with the boost levels and I blew 4th
gear in my transmission. I expected this to happen eventually, but not this quickly. Luckily, I picked
up an oem used local tranny for sale and had it installed the next day. It was at this point I knew that
I still had a lot of work to do to perfect this build for efficiency, so I proceeded to upgrade again...
__________________________________________________ ___________________________________
3rd MAJOR UPGRADE EVOLUTION
Building a Drivetrain and Cooling system
(Refer to pictures from 2011 summer build below)
June- October 2011 @ MCA motorsports, Miami, FL:
This was a makeover to make my E85 build efficient and safe...
First of all, for anyone in South Florida, do NOT EVER take your car to MCA motorsports. EVER! This turned
out to be the greatest mistake of my life. They ended up screwing up my head with misfires from bad
installation (which I would later fix). On top of that, they were unresponsive and gave me the shittiest
customer service I've ever experienced. They did not keep me informed for weeks on end, and they took over
a HALF A YEAR to finish my car. They also cracked my right chargespeed diffuser, and that was after the
owner disappeared for 3 months and didn't answer calls while my car was still in his shop. Needless to say,
they were working without a license too. I ended up demanding my car back and at least fining them for the
operation. Anyhow, here is what I had done (until I found out they didn't guide the valves in the head correctly):
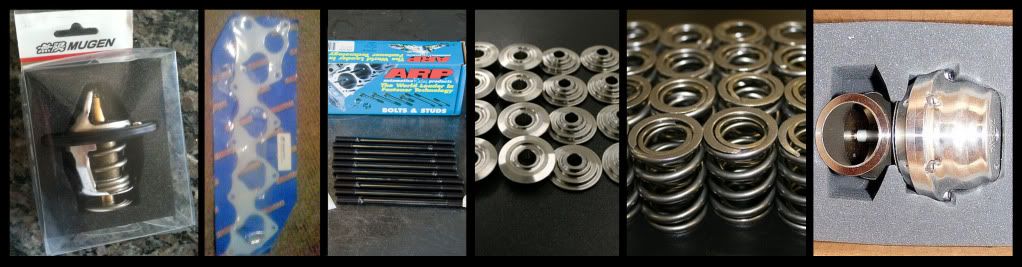
- A complete valve job and internal steam cleaning, and replaced the oem block springs, retainers, and valves
- installed a toda tensioner, hondata intake gasket, and ARP headstuds
- Installed a BRMS oil catch can and fixed major blow-by issues with proper drilling into the head
- Relocated the battery, flipped the fuse box sideways, and adjusted wiring in that area for more heat relief
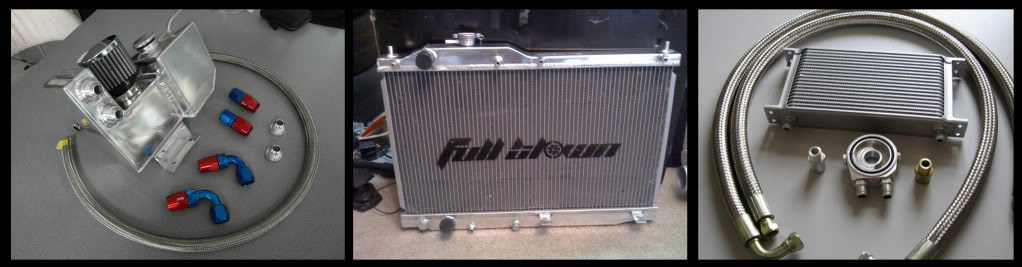
- Installed Moshimoto oil cooling kit,
- Installed a full blown radiator coupled with 2 slimline fans (to clear the the charge pipe)
- Installed a Mugen thermostat and thermoswitch.
- Upgraded from a 38mm to a 44mm wastegate, and had a better dumppipe made
- Mailed in my flashpro ecu to hondata to upgrade it for boost by gear and boost control.
And while MCA was "working" on the car, I:
- Upgraded the drive train with a Puddymod stage 4 built differential (4.10 gears)
- gator racing axles
- added new 16" ap1 rims coupled with MT drag radials to hold down the power.
- Ordered a full supply of amsoil fluids and oils to last me a good 2 years or so
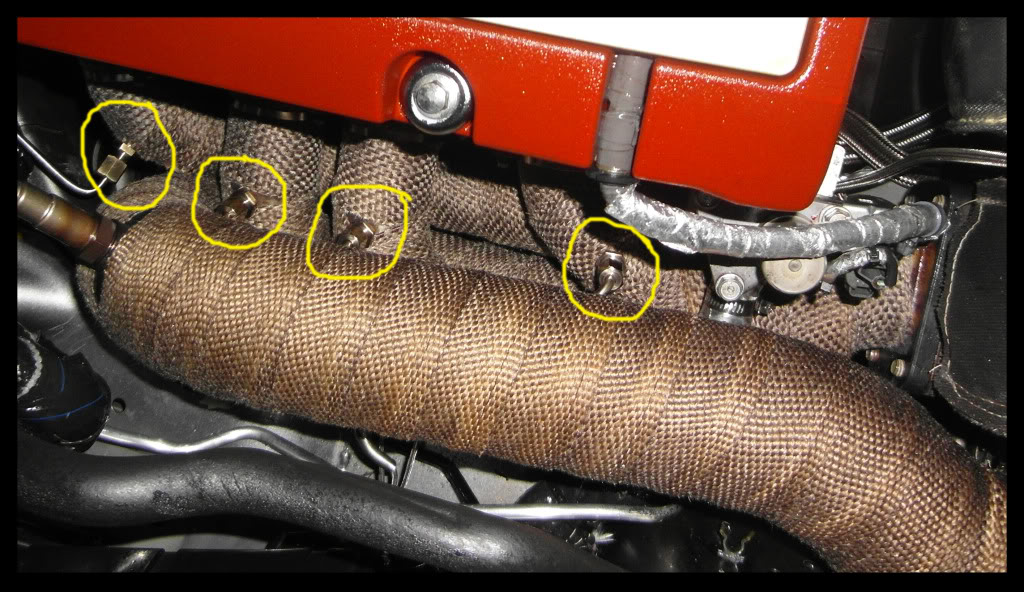
- Added plenty more heat wrap on the exhaust manifold side.
- Installed 4 separate pyrometers to initially measure EGT's for fine tuning. I placed them in the
passenger side compartments below the dash to be discrete yet match the aem red gauge theme i have.
I had a probe drilled into each cylinder of the exhaust manifold.
October, 2011-January 2012
- installed hood dampers
- switched out my black leather OEM seats with two tone red/black seats
- Installed an Alpine IDA X305s head unit to replace my pioneer (now all the interior is glowing red)
- Installed JS2K clear lights
- Installed Carbon fiber hardtop I ordered on S2KI
January- March 2012
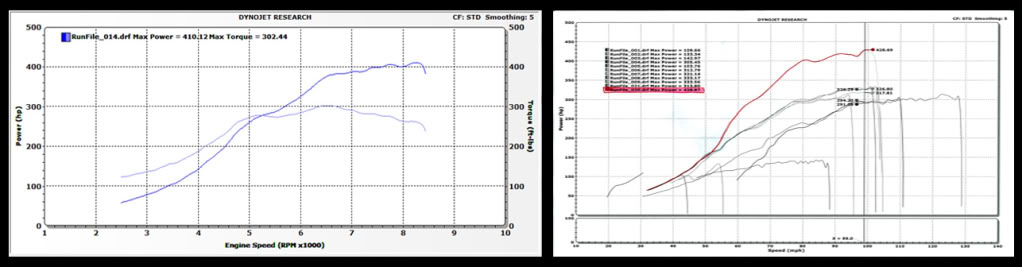
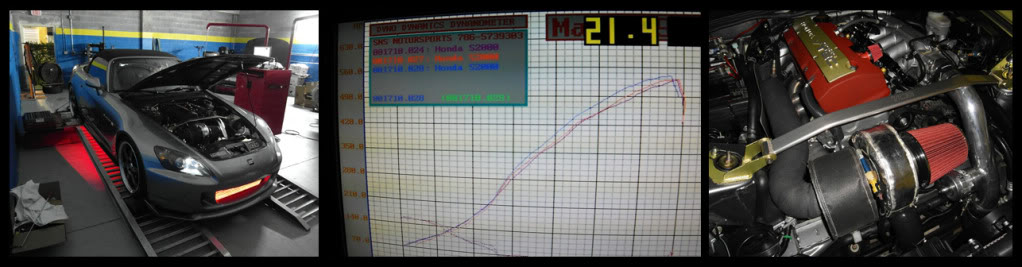
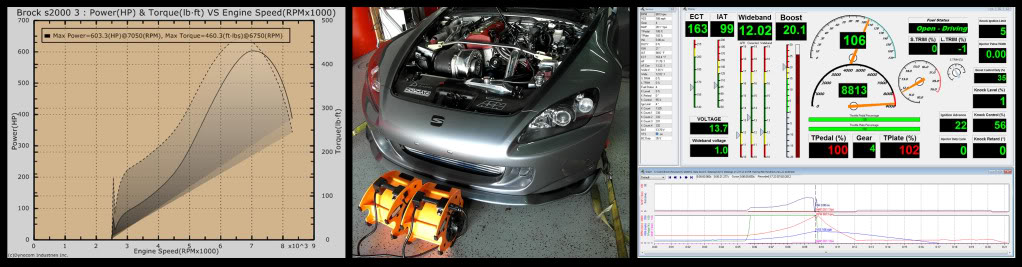
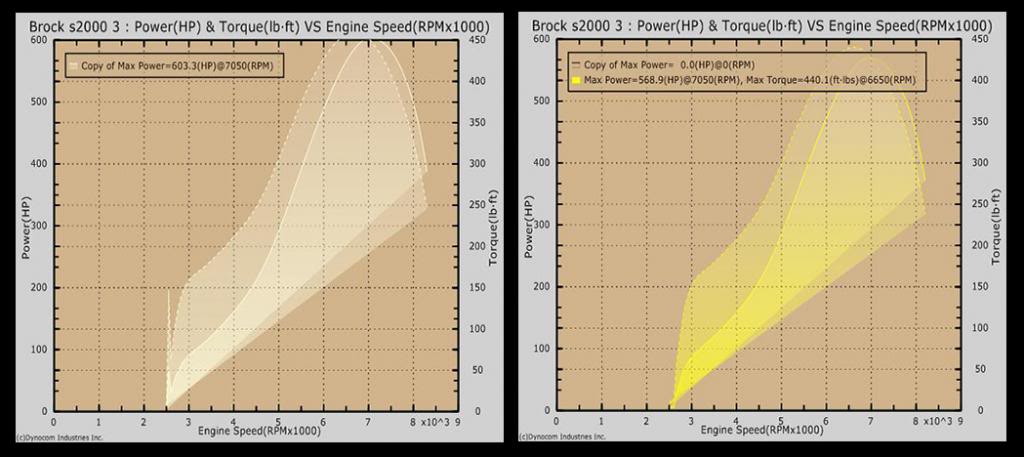
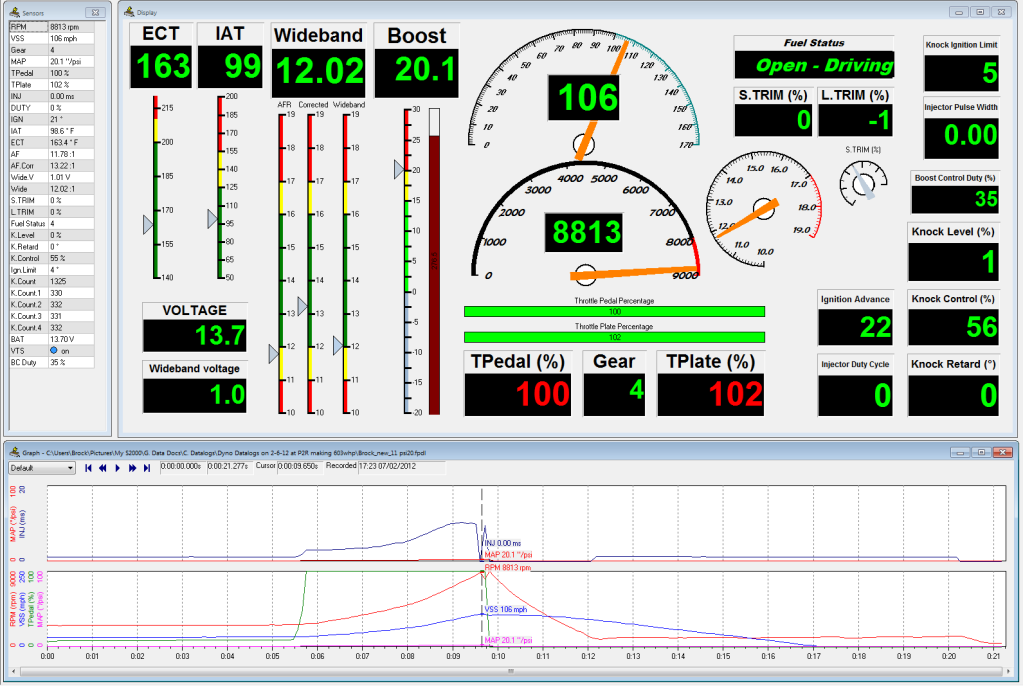
When I thought all my issues were cleared, I put it on the dynocom and made 485whp at only 10psi (all
wastegate), and 603whp and 460 wtq @ 20psi. (see graph below), but I was still getting misfires. I took
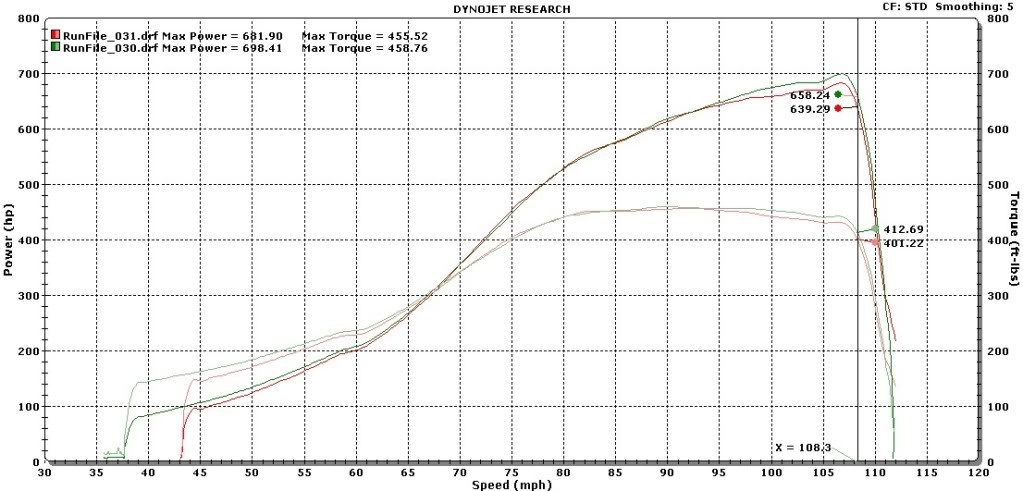
it to a racelab's dynojet and it made 652whp/489wtq at 21psi; but it was still breaking up from misfires
at that level. My new tuner, Kenny (turbogixxer) gapped the plugs from 25 to 15 and we took it to TD
autowerkes' dyno jet- this time making 698whp, but still with some misfires and head issues that were
caused by MCA. In addition to the plugs gapped at 15, a little crack in the exhaust manifold, and the fact
that the back housing of my turbo was only a .63 a/r the numbers put up from this car STILL set records.
Which leaves to imagine: WHAT IF it was at 100%?

__________________________________________________ _____
4th & FINAL MAJOR UPGRADE EVOLUTION
Ferrea head build (fixing MCA's mistakes/misfires, V160 Supra transmission
(Refer to pictures from 2012 spring-summer build below)
April 2012- July 2012
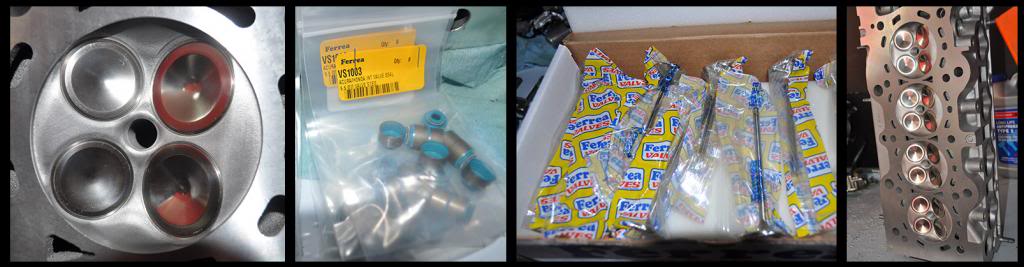
To finally fix these misfire issues I had after the MCA head work, I got the help from GSX2004. We
examined the head and found that the front intake valve stem had broken off and there was a lot of play
in-between the valve and the pushing. We found the valve stem under the valve seat- it was a good thing
nothing dropped into the cylinder.

While the cover was off, we additionally found the valves worn from the bottom, So I just decided to clean the
internals again and replace my entire valve train with the brand new Ferrea line. Needless to say, the misfires
stopped after this. leak down tests came out a winner (Cyl1: 5% / Cyl2: 6% / Cyl3: 8% / Cyl4: 7%)
We also installed a Kenne bell BAS to alleviate the top end misfires in WOT. Finally, the grand finale:
the very expensive Supra V160 transmission and fullblown twin disk setup was installed with success!
It was rugged and noisy, but it was the missing link we needed to finally be able to hold down the power
without breaking gears. To power shift without regret was a beautiful thing.

Sum of main Work done by GSX2004:
- Installed V160 transmission/ twin disk clutch/ Steel drive shaft replacing oem tranny and s2k twin disk
- Head resurfaced and steam cleaned to perfection; new gasket
- installed brand new Ferrea dual exhaust valve springs, valves, retainers, seals, and guides
- Installed Kenne Bell boost-a-spark and regapped the sparkplugs from .015 to .025
- Refurbished turbo/replaced bearings and welded 3" flange to turbo and downpipe for even flow
- Welded a T1 race development IAT sensor to chargepipe
- Powder coated valve cover red/ spark plug cover polished silver
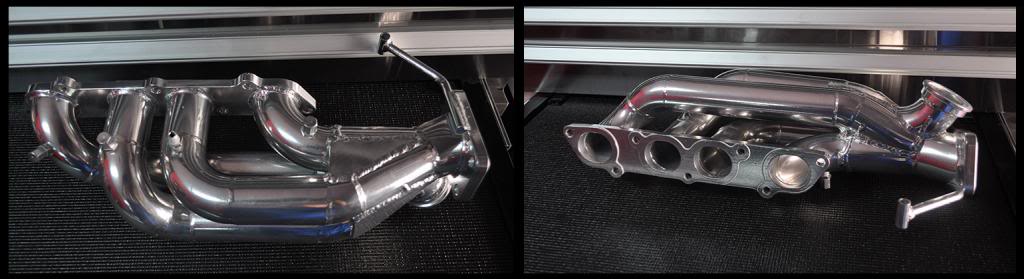
- Replaced Mase engineering hot side with a straightline motorsports custom fab set up which included:
- T3 single scroll sidewinder equal length tubular exhaust manifold
- Custom 3" downpipe/chargepipe/ and dumptube
So now that we had everything setup after a long time coming, we could finally dyno it at 100% and get it
track ready, right?? Wrong. My exhaust manifold was cracking again, so I had it fixed and welded for
additional reinforcement. Then I had my turbo refurbished and ceramic coated polished silver along with
the down pipe and exhaust manifold. That didn't last long before it started cracking again. Meanwhile,
my finances were finally catching up to me and grad school time was just around the corner in which case I
would be moving out of state in a month. This is why me and GSX2004 for trying to beat the time, but we did
not anticipate a major problem like a new custom manifold/replacement being needed. In addition, my beater
broke down on me the same week! So I was faced with an ultimate decision: continue working on the car until
I was broke, orrrrrr get out of this addicting life, sale off everything, get financially stable again,
and focus on priorities. I chose option B.
__________________________________________________ ___________________________________
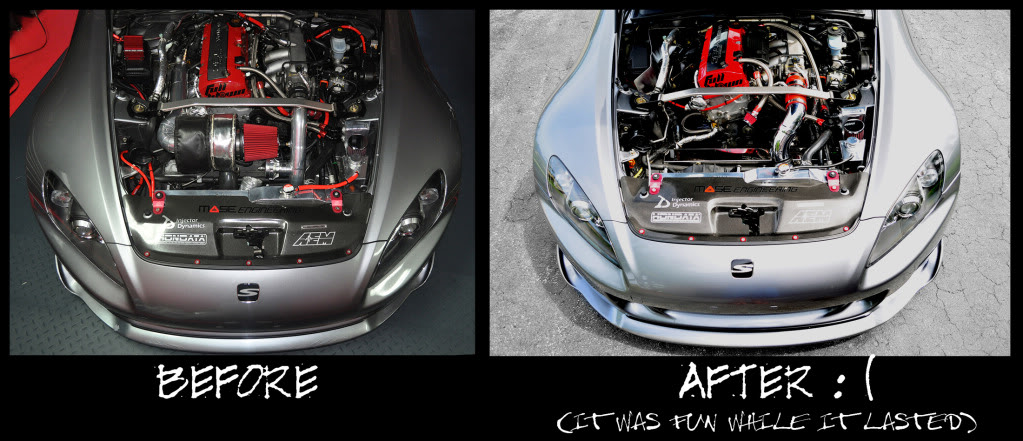
PRESENT STATUS
After making that ultimate decision, the car is no longer boosted. The turbo kit and entire V160 drivetrain
setup was sold off, the fuel was converted back to 93oct, and the car is back to NA. However, it still looks
exactly the same, and the engine still has the fully built (practically new) ferrea built head, hondata ems, and
supporting parts to be instantly boosted again. It is now running better than ever and has not had any issues
since the switch was made back to NA about a year ago. This car is for sale now with only 38k miles so if
anyone is interested in it, please pm me (refer to my other thread in my signature for its current pictures
in stock form). Im in no rush, because I'll still have fun driving it until the right offer comes. Its monster days
will always be remembered. Big thanks goes out to Mase, Racelab, Turbogixxer, and especially GSX2004
for all the work that went into tuning and building this monster
A timeline & full parts list from the day I bought my S2K, Boosted it, and then went back NA
CAR: Chicane Silver 2008 S2000
CURRENT MILES: 38,000 (as of June 2013)
POWER AND FUEL: Forced Induction/ E85 fuel system
TYPE/PURPOSE: Street car; built for max power achieved from a T3 turbo without sacrificing transient spool response
PEAK POWER: 698whp @22psi / 489wtq @21psi
MILESTONES:
If I'm not mistaken, it produced the most power ever on an AP2 S2K using a 6262 turbo with only a .63ar back
housing, and it also produced the best power and torque-to-psi ratio (lowest PSI to power and torque made)
__________________________________________________ ___________________________________
THREAD ORGANIZATION
First, I list my summary of parts. The second post below that contains the complete timeline of everything
I did from the time I bought my car until now with picture summaries for each developing upgrade stage.
Below the timeline are additional pictures corresponding to particular events that were listed in my timeline.
Finally, I display pictures of the finished product.
This has been a long, expensive road of trial and error for what works and what doesn't with the S2K.
I bought it, then I boosted it. Then I boosted it some more, and then i went back to stock because
I had to go to grad school and didnt have time to deal with the headaches anymore. This car had
soooo much potential beyond what it had already shown, and it never got to see the track!
But maybe in the distant future, it will be back again! Enjoy the read!
__________________________________________________ ___________________________________
AESTHETICS:
INTERIOR
Red/black two-tone racing seats
Red door panels
Aluminum Dash trim kit
S2000 dual gauge pod
AEM truboost gauge with solenoid
AEM oil pressure gauge
AEM uego wideband gauge
Auber Instruments 4 EGT meters with boxes, buzzers, & probes
Carbon fiber visor sections
Red interior glow lights
Aftermarket full floor S2K floormats
Red attaching fire extinguisher
98 Supra OEM black leather shift knob
AUDIO
Alpine IDA-X305s Head unit
Powerbass 1600 watt 5 channel amp + wiring
Custom sub box
Kicker 12 inch Subwoofer
Iphone, Pandora, & USB adapter
Kicker door speakers
Electric converter box for ground outlet applications
EXTERIOR
S Emblems X2
Red Exterior lights 4 piece X2
VIS carbon fiber terminator hood
Tented Windows
Toneau Top Cover
Painted Brake Calipers
Clear Side Light Canisters + White LED Lights
Carbon Fiber Spoiler + custom paint and install
Mase custom made decals
Volk LE 37's custom painted with caps, lug nuts
Mugen lip + painted
Chargespeed side diffusers
Chargespeed rear diffusers
Password JDM carbon fiber radiator cooling plate
Hood dampers
JS2K clear AP2 headlight turning markers
Double sided infused carbon fiber hardtop
Engine bling: powder coated ruby red valve cover
Engine bling: polished spark plug cover & strut bar braces
_________________________________________________
PERFORMANCE
ENGINE & TURBO
Ferrea dual valve springs
Ferrea retainers and guides
Ferrea stainless steel exhaust valves
Toda tensioner
ARP Headstuds
Hondata intake manifold gasket
Iridium high performance spark plugs
Precision bilet ball bearing 62/62 precision turbo
Racelab Custom 3" downpipe
Custom 3" single exhaust- magna flow muffler/borla tips (made to look like dual)
Tial 44mm wastegate with all spring sizes
Tial blow off valve
Mase engineering turbo chargepipe set
Mase engineering exhaust manifold
MCA Custom dump pipe
AEM dry air filter (and other miscellaneous air intakes)
BRMS oil catch can + head welded fittings and linings
All couplers, fittings, linings, and heatshields for turbo setup
Magnetic drain bolts
Hondata ECU boost by gear upgrade
Hondata Flashpro computer engine management system
Plug and Play Map sensor
T1 race development IAT sensor
Kenne Bell boost-a-spark
Ceramic coated polished/chrome downpipe, turbo, & exhaust manifold
FUEL SYSTEM
ID2000 injectors + injector clips
Full Blown Dual pump hanger
AEM fuel rail
AEM fuel pressure regulator
AEM Fuel fittings and linings for E85 fuel conversion
AEM Fuel pressure gauge
100 Micron fuel filter (e85 safe)
Dual Walbro fuel pumps
COOLING
Battery relocation kit (for heat relief and clearance of downpipe, etc)
Mugen thermostat and thermoswitch
Full blown radiator and slim fan
Mushimoto oil cooling kit
Precision 600 intercooler
SUSPENSION & DRIVETRAIN
V160 Supra transmission
V160 steel DSS driveshaft
V160 Clutch masters twin disc clutch
V160 Full Blown Motorsports adapter kit
Puddymod stage 4 differential with 4.10 gears
Gator racing axles
Falken 452 street radial tires (for street)
AP1 rear rims w/Mickey Thompson 255/50/16 tires (for drag)
Buddy Club N+ coilover system + Installation and dampening
TCS suspension strut bar
R1 Cross drilled and slotted rotors
OEM extended performance brake pads
__________________________________________________ ___________________________________
TIME-LINE
November 2009 @ Honda: Purchased car with 16,000 miles, pre-certified, and completely stock.
December 2009- February 2010:
- Added a Seibon carbon fiber hood
- 18" Lorenzo rims
- Eibach lowering springs
- Complete audio system with a custom 12" box and subwoofer in the trunk
- Amp and a pioneer CD head unit.
__________________________________________________ ___________________________________
1st MAJOR UPGRADE EVOLUTION
Establishing a turbo kit
March 2010 @ TD Autowerkes Miami, FL:
I installed Mase Engineering's first drive-by wire turbo kit with a 58/57 Precision turbo,
ID1000 injectors, competition stage 4 clutch, hondata flashpro EMS, manual boost controller,
Autometer gauges; Mase tuned on 93 Octane; 428whp @14psi max on a dynojet. (stock exhaust)
April 2010: I experienced a bad turbo with distorted seals. Mase replaced it immediately and I
was back and running again. From this point on, I was gunning this turbo kit,
without any major problems for a year+ - it ran great!
Summer- Fall 2010:
- Added mugen front lip
- Chargespeed diffuser kit
- Rick's accessories,
- engine and interior bling,
- and yes, neons (I don't care; I will always love them)
- oem carbon fiber rear spoiler custom painted
October 2010 @STP, Ft. Lauderdale, FL: I wanted more power so I upgraded to a single exhaust-
YES, SINGLE. hate it or love it, but what I did was make a single 3" straight through exhaust look like
a dual exhaust by welding another muffler to the single pipe with no opening. I did this to avoid
the empty ugliness of the missing hole in the rear, and I like the aggressive look of a dual. The
other options were to buy a single hole bumper paint it or do body shop work, but these were all
more expensive and unnecessary, so I decided to do this dual look-a-like.
I made an MS109 race fuel map. I had Mase tune it at 465whp/354tq @19psi on a dyno dynamics (graph
on bottom right). The 58 precision turbo was making it very hard to reach 500, plus there were
some inconsistencies with my manual boost controller so the numbers were lower than expected (and on
a mustang dyno). On the bottom left graph, I ran my first dyno on pump before switching to MS109 just
to see the difference between a dyno jet and a dyno dynamics reading. It only read 391whp compared to
the dyno jet that was used to measure it when I first installed the kit- a difference of 37whp.
Winter 2010-Spring 2011: By now I was certain of the way I wanted my car to look, so I revised
and completed most of my major aesthetics.
- Swapped out the Lorenzo's with the rims with Volk LE37s.
- I custom painted the Volk le37s black on the inside of the spokes and added new wheel caps.
- Replaced my Seibon hood with a terminator VIS hood,
- Added buddy club coilovers, brake rotors and pads,
- traded black door panels with red ones, and other miscellaneous things.
- Switched my gauges from autometer to AEM, replaced manual controller with AEM truboost and solenoid
- Switched the glow lights from blue to red for a darker, matching red-on-silver theme.
__________________________________________________ __________________________________
2ND MAJOR UPGRADE EVOLUTION
adding an E85 fuel system
(refer to pictures from 2011 spring build below)
May 2011 @Racelab, Miami, Fl:
After the halt with the dump pipe issue, I was finally ready to upgrade the fuel system and turbo
kit to get into the 600+whp range. So I ordered and installed all parts for a complete E85 fuel conversion;
- Full Blown Dual pump hanger and dual Walbro fuel pumps
- Fuel filter, AEM fuel rail, fuel pressure regulator, fuel pressure gauge, Fuel fittings and linings
- Upgraded from 1000 to ID2000 injectors;
- Upgraded from a 58 to a ball bearing 62/62 precision turbo
- Upgraded from mase engineering 2.5" downpipe to a racelab 3" custom downpipe.
- Upgraded from a comp stage 4 to a Competition twin disc clutch.
After the transition, the engine was running nicely, but unfortunately I was too impulsive for this kind
of power. I left the entire drivetrain stock and had Mase come down to tune it. It made 540whp on
a dynodynamics @ only 15psi, which is a really good power-to-psi ratio. We were going to push it to
a good limit between 19psi-21psi, but a charge pipe blew off before we could. It was getting late so I
could not run it again.
The next day I fixed the chargepipe and I drove it around to play with the boost levels and I blew 4th
gear in my transmission. I expected this to happen eventually, but not this quickly. Luckily, I picked
up an oem used local tranny for sale and had it installed the next day. It was at this point I knew that
I still had a lot of work to do to perfect this build for efficiency, so I proceeded to upgrade again...
__________________________________________________ ___________________________________
3rd MAJOR UPGRADE EVOLUTION
Building a Drivetrain and Cooling system
(Refer to pictures from 2011 summer build below)
June- October 2011 @ MCA motorsports, Miami, FL:
This was a makeover to make my E85 build efficient and safe...
First of all, for anyone in South Florida, do NOT EVER take your car to MCA motorsports. EVER! This turned
out to be the greatest mistake of my life. They ended up screwing up my head with misfires from bad
installation (which I would later fix). On top of that, they were unresponsive and gave me the shittiest
customer service I've ever experienced. They did not keep me informed for weeks on end, and they took over
a HALF A YEAR to finish my car. They also cracked my right chargespeed diffuser, and that was after the
owner disappeared for 3 months and didn't answer calls while my car was still in his shop. Needless to say,
they were working without a license too. I ended up demanding my car back and at least fining them for the
operation. Anyhow, here is what I had done (until I found out they didn't guide the valves in the head correctly):
- A complete valve job and internal steam cleaning, and replaced the oem block springs, retainers, and valves
- installed a toda tensioner, hondata intake gasket, and ARP headstuds
- Installed a BRMS oil catch can and fixed major blow-by issues with proper drilling into the head
- Relocated the battery, flipped the fuse box sideways, and adjusted wiring in that area for more heat relief
- Installed Moshimoto oil cooling kit,
- Installed a full blown radiator coupled with 2 slimline fans (to clear the the charge pipe)
- Installed a Mugen thermostat and thermoswitch.
- Upgraded from a 38mm to a 44mm wastegate, and had a better dumppipe made
- Mailed in my flashpro ecu to hondata to upgrade it for boost by gear and boost control.
And while MCA was "working" on the car, I:
- Upgraded the drive train with a Puddymod stage 4 built differential (4.10 gears)
- gator racing axles
- added new 16" ap1 rims coupled with MT drag radials to hold down the power.
- Ordered a full supply of amsoil fluids and oils to last me a good 2 years or so
- Added plenty more heat wrap on the exhaust manifold side.
- Installed 4 separate pyrometers to initially measure EGT's for fine tuning. I placed them in the
passenger side compartments below the dash to be discrete yet match the aem red gauge theme i have.
I had a probe drilled into each cylinder of the exhaust manifold.
October, 2011-January 2012
- installed hood dampers
- switched out my black leather OEM seats with two tone red/black seats
- Installed an Alpine IDA X305s head unit to replace my pioneer (now all the interior is glowing red)
- Installed JS2K clear lights
- Installed Carbon fiber hardtop I ordered on S2KI
January- March 2012
When I thought all my issues were cleared, I put it on the dynocom and made 485whp at only 10psi (all
wastegate), and 603whp and 460 wtq @ 20psi. (see graph below), but I was still getting misfires. I took
it to a racelab's dynojet and it made 652whp/489wtq at 21psi; but it was still breaking up from misfires
at that level. My new tuner, Kenny (turbogixxer) gapped the plugs from 25 to 15 and we took it to TD
autowerkes' dyno jet- this time making 698whp, but still with some misfires and head issues that were
caused by MCA. In addition to the plugs gapped at 15, a little crack in the exhaust manifold, and the fact
that the back housing of my turbo was only a .63 a/r the numbers put up from this car STILL set records.
Which leaves to imagine: WHAT IF it was at 100%?
__________________________________________________ _____
4th & FINAL MAJOR UPGRADE EVOLUTION
Ferrea head build (fixing MCA's mistakes/misfires, V160 Supra transmission
(Refer to pictures from 2012 spring-summer build below)
April 2012- July 2012
To finally fix these misfire issues I had after the MCA head work, I got the help from GSX2004. We
examined the head and found that the front intake valve stem had broken off and there was a lot of play
in-between the valve and the pushing. We found the valve stem under the valve seat- it was a good thing
nothing dropped into the cylinder.

While the cover was off, we additionally found the valves worn from the bottom, So I just decided to clean the
internals again and replace my entire valve train with the brand new Ferrea line. Needless to say, the misfires
stopped after this.
leak down tests came out a winner (Cyl1: 5% / Cyl2: 6% / Cyl3: 8% / Cyl4: 7%)
We also installed a Kenne bell BAS to alleviate the top end misfires in WOT. Finally, the grand finale:
the very expensive Supra V160 transmission and fullblown twin disk setup was installed with success!
It was rugged and noisy, but it was the missing link we needed to finally be able to hold down the power
without breaking gears. To power shift without regret was a beautiful thing.

Sum of main Work done by GSX2004:
- Installed V160 transmission/ twin disk clutch/ Steel drive shaft replacing oem tranny and s2k twin disk
- Head resurfaced and steam cleaned to perfection; new gasket
- installed brand new Ferrea dual exhaust valve springs, valves, retainers, seals, and guides
- Installed Kenne Bell boost-a-spark and regapped the sparkplugs from .015 to .025
- Refurbished turbo/replaced bearings and welded 3" flange to turbo and downpipe for even flow
- Welded a T1 race development IAT sensor to chargepipe
- Powder coated valve cover red/ spark plug cover polished silver
- Replaced Mase engineering hot side with a straightline motorsports custom fab set up which included:
- T3 single scroll sidewinder equal length tubular exhaust manifold
- Custom 3" downpipe/chargepipe/ and dumptube
So now that we had everything setup after a long time coming, we could finally dyno it at 100% and get it
track ready, right?? Wrong. My exhaust manifold was cracking again, so I had it fixed and welded for
additional reinforcement. Then I had my turbo refurbished and ceramic coated polished silver along with
the down pipe and exhaust manifold. That didn't last long before it started cracking again. Meanwhile,
my finances were finally catching up to me and grad school time was just around the corner in which case I
would be moving out of state in a month. This is why me and GSX2004 for trying to beat the time, but we did
not anticipate a major problem like a new custom manifold/replacement being needed. In addition, my beater
broke down on me the same week! So I was faced with an ultimate decision: continue working on the car until
I was broke, orrrrrr get out of this addicting life, sale off everything, get financially stable again,
and focus on priorities. I chose option B.

__________________________________________________ ___________________________________
PRESENT STATUS
After making that ultimate decision, the car is no longer boosted. The turbo kit and entire V160 drivetrain
setup was sold off, the fuel was converted back to 93oct, and the car is back to NA. However, it still looks
exactly the same, and the engine still has the fully built (practically new) ferrea built head, hondata ems, and
supporting parts to be instantly boosted again. It is now running better than ever and has not had any issues
since the switch was made back to NA about a year ago. This car is for sale now with only 38k miles so if
anyone is interested in it, please pm me (refer to my other thread in my signature for its current pictures
in stock form). Im in no rush, because I'll still have fun driving it until the right offer comes. Its monster days
will always be remembered.
Big thanks goes out to Mase, Racelab, Turbogixxer, and especially GSX2004 for all the work that went into tuning and building this monster
Thread Starter
Registered User
Joined: Dec 2009
Posts: 2,396
Likes: 0
From: Auburn Hills, Michigan
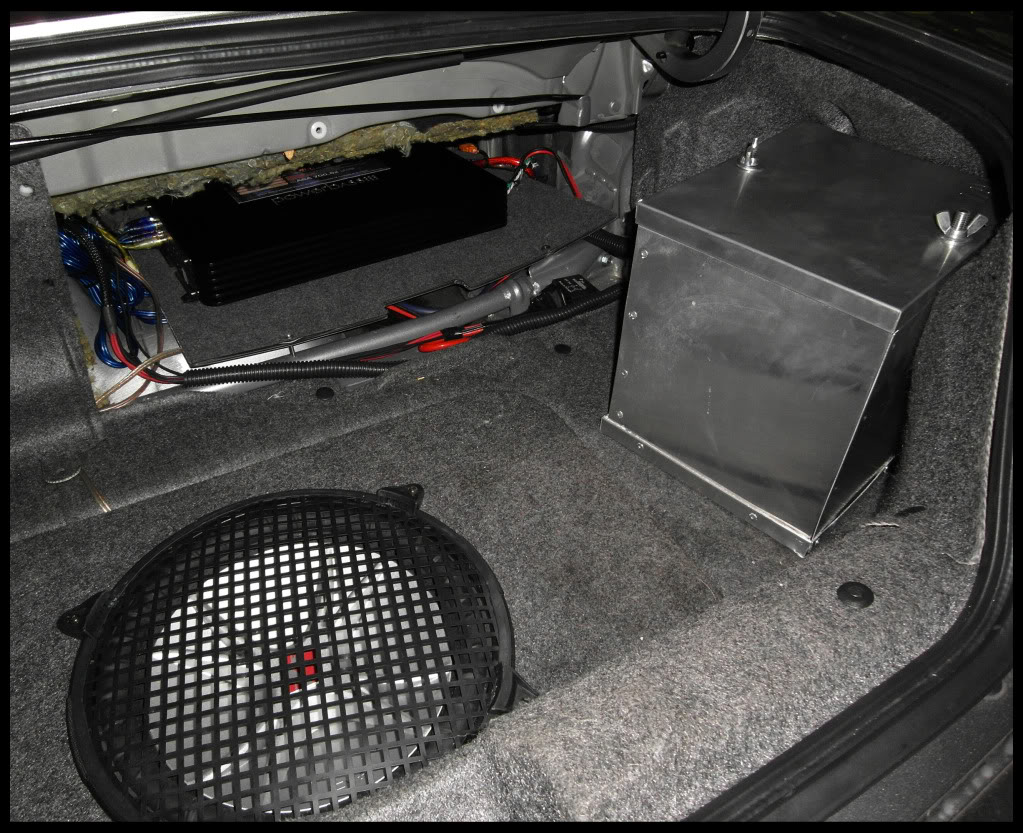
ADDITIONAL PICS FROM 2nd UPGRADE EVOLUTION
2011 spring build at RACELAB
Goal: 500+ capability
Achieved: yes (540whp @15psi on mustang dyno)
__________________________________________
The fuel system for E85. In hindsight, the ID2000's may have been overkill, and the 1600's
would've been a little better on the DD side of driving, but no biggie. At least I know
theres no shortcomings at ALL with the 2000's- thats for sure
The 3" downpipe replacing the 2.5" mase downpipe that came with the kit was a VERY tight fit.
To distribute heat better and solve the occasional knock-prone rattling, I would relocate the battery later
Competition twin disc clutch installed

id 2000 injectors

AEM fuel rail and injectors installed
during its first tune on E85... 540whp @ only 15psi on a MUSTANG dyno

Finished product from the spring, until it went right back into the shop a week later (lol)
2011 spring build at RACELAB
Goal: 500+ capability
Achieved: yes (540whp @15psi on mustang dyno)
__________________________________________
The fuel system for E85. In hindsight, the ID2000's may have been overkill, and the 1600's
would've been a little better on the DD side of driving, but no biggie. At least I know
theres no shortcomings at ALL with the 2000's- thats for sure
The 3" downpipe replacing the 2.5" mase downpipe that came with the kit was a VERY tight fit.
To distribute heat better and solve the occasional knock-prone rattling, I would relocate the battery later
Competition twin disc clutch installed
id 2000 injectors

AEM fuel rail and injectors installed
during its first tune on E85... 540whp @ only 15psi on a MUSTANG dyno

Finished product from the spring, until it went right back into the shop a week later (lol)
Thread Starter
Registered User
Joined: Dec 2009
Posts: 2,396
Likes: 0
From: Auburn Hills, Michigan
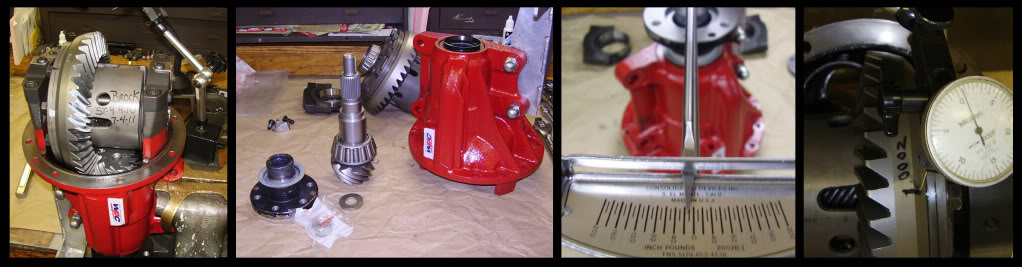
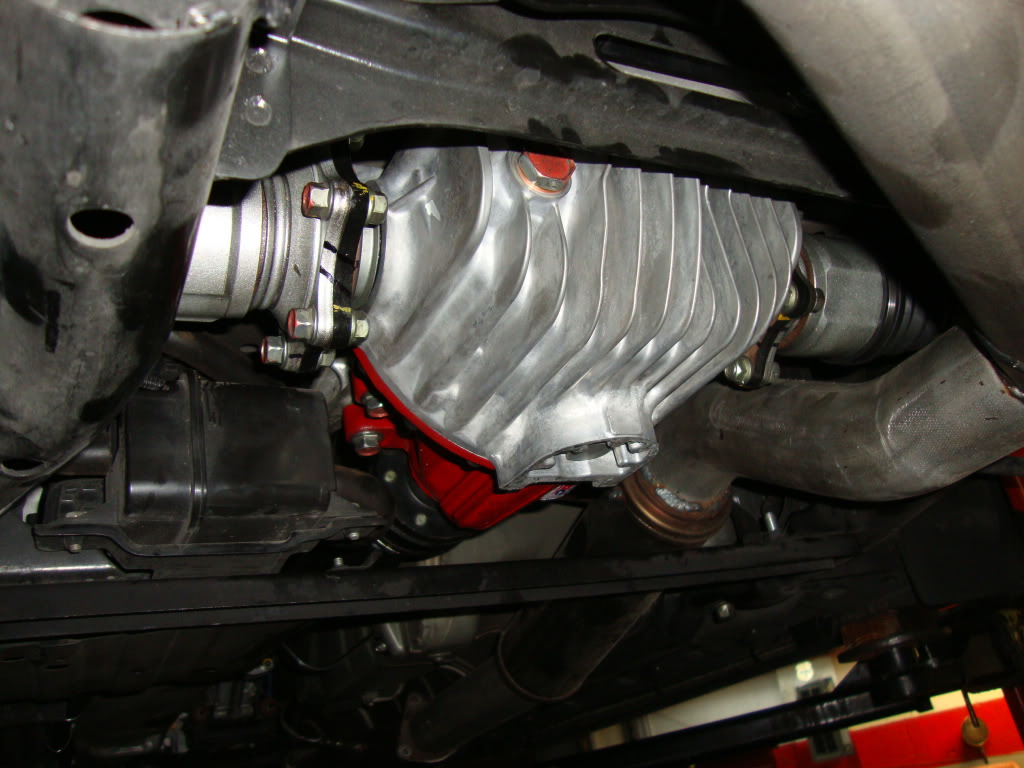
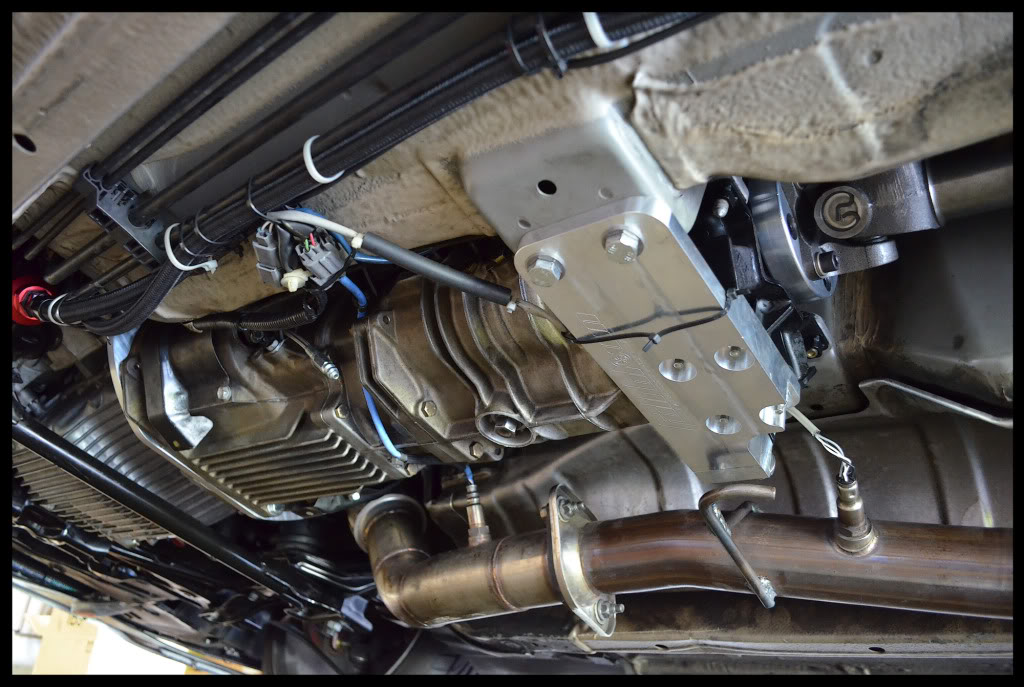
ADDITIONAL PICTURES FROM 3rd UPGRADE EVOLUTION
from the 2011 summer/fall build at MCA Motorsports
Goal: 600+ capability
Achieved: yes; 698whp @22psi / 489wtq @21psi (both on dynojet)
__________________________________________________
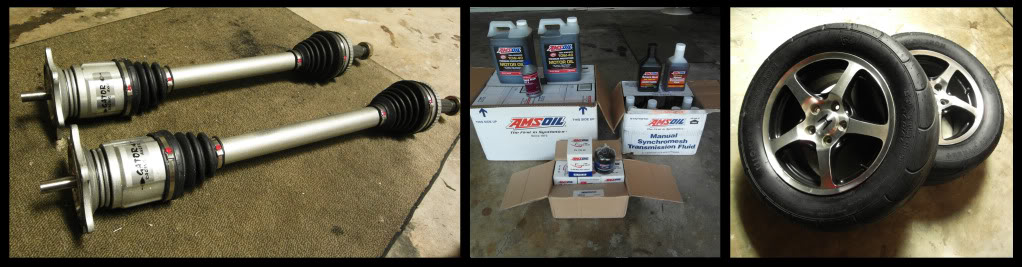
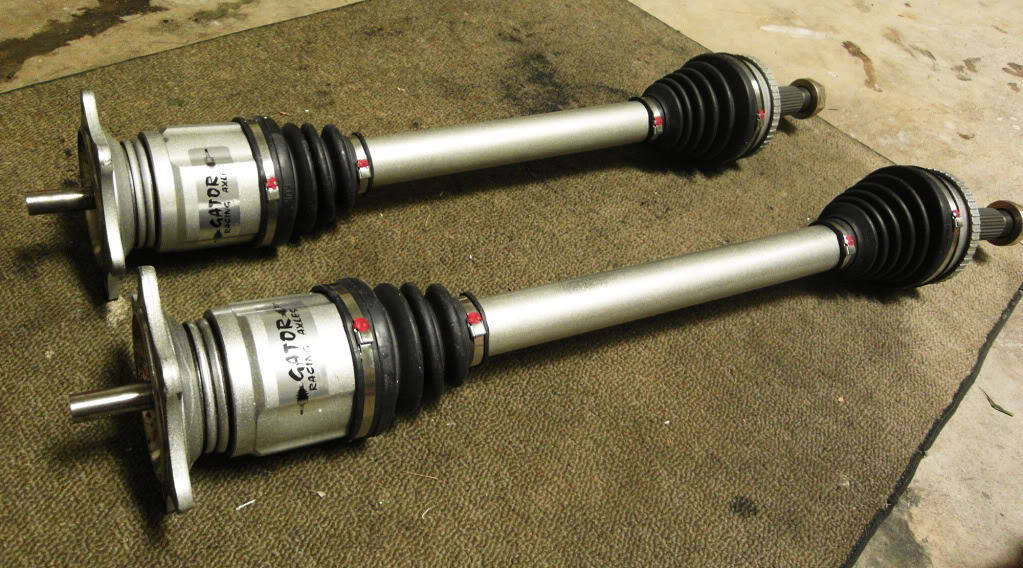
Gator racing axles
Stage 4 Puddymod differential before being put on the car:
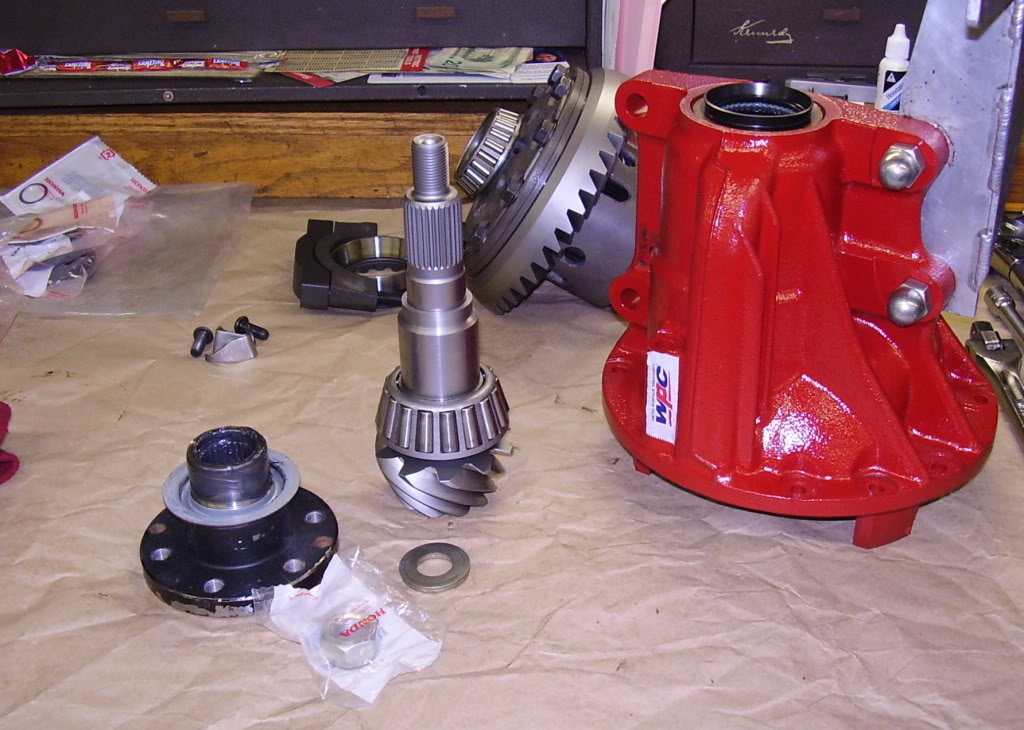
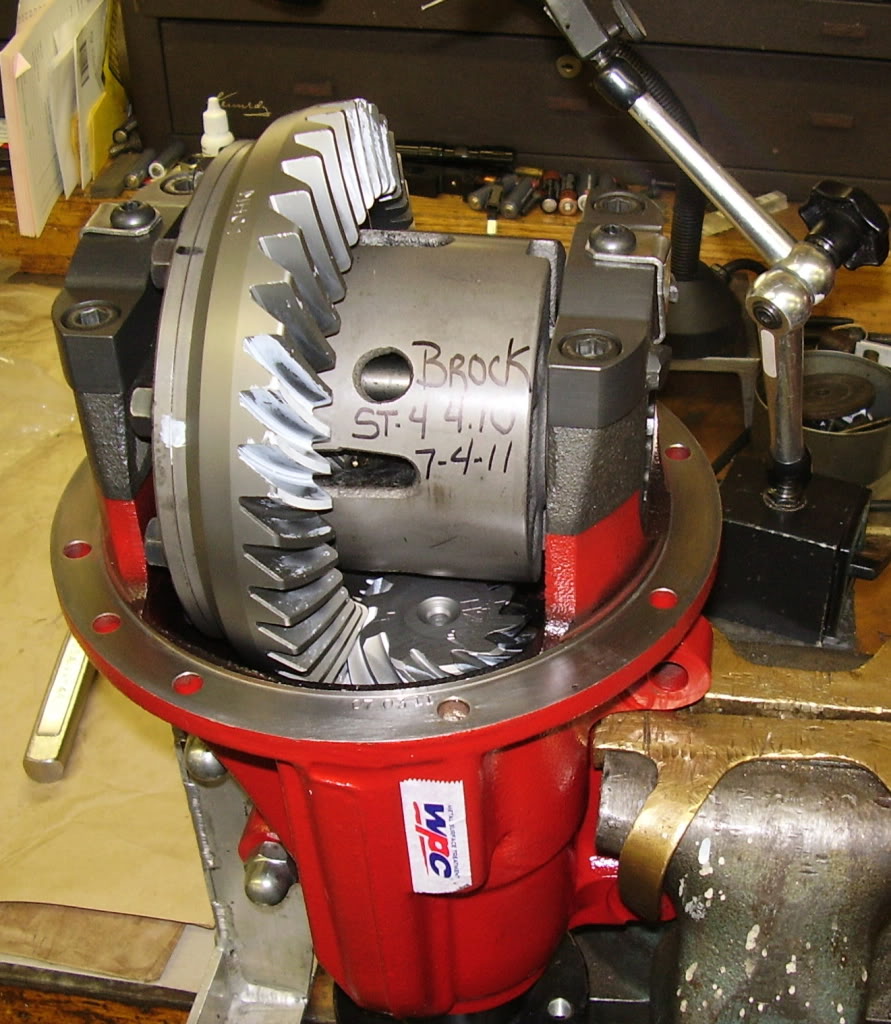
And when it was installed:
Additional valve work installing the toda springs, retainers, etc.
This is where MCA screwed up with the valve/retainer job
Initial installement of BRMS Oil Catch Can installed without fittings.
As you can see, the pcv valve was closed along with the vacuum hole to its
right in order to allow blow-by to escape into the 10an linings.
(the valve cover was later repainted)
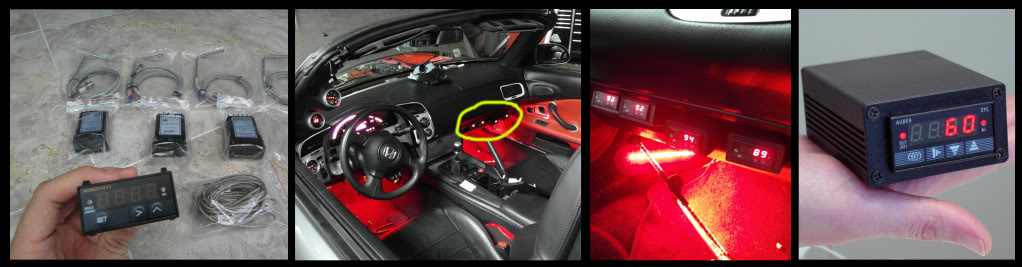
Here are my Pyrometers from Auber Instruments while they were being installed during the build.
They fit perfectly underneath the pasenger side of the dash. They each have a sound alarm attached
to them in case temperatures rise past the peak setting.
Relocation of the battery and my new amp installed behind the backing
Here is my mushimoto 19" oil cooler

And this is the oil cooler bring installed. It could not fit it properly on the lower side of the car
to possibly run an air duct through the fake air dams where I wanted it, so I had no choice but to install
it in the center behind the front bumper. I ended up making an air duct out of aluminum and yes, duct tape.
You can see the details of this air damn I built for it here:
https://www.s2ki.com/s2000/topic/910...#entry21170423
Here are my Mickey Thompson 255/50/16 tires.
I painted them black on the inside spokes, just like my volks.
I always liked the skinnier, color-contrasting appearance it gives.
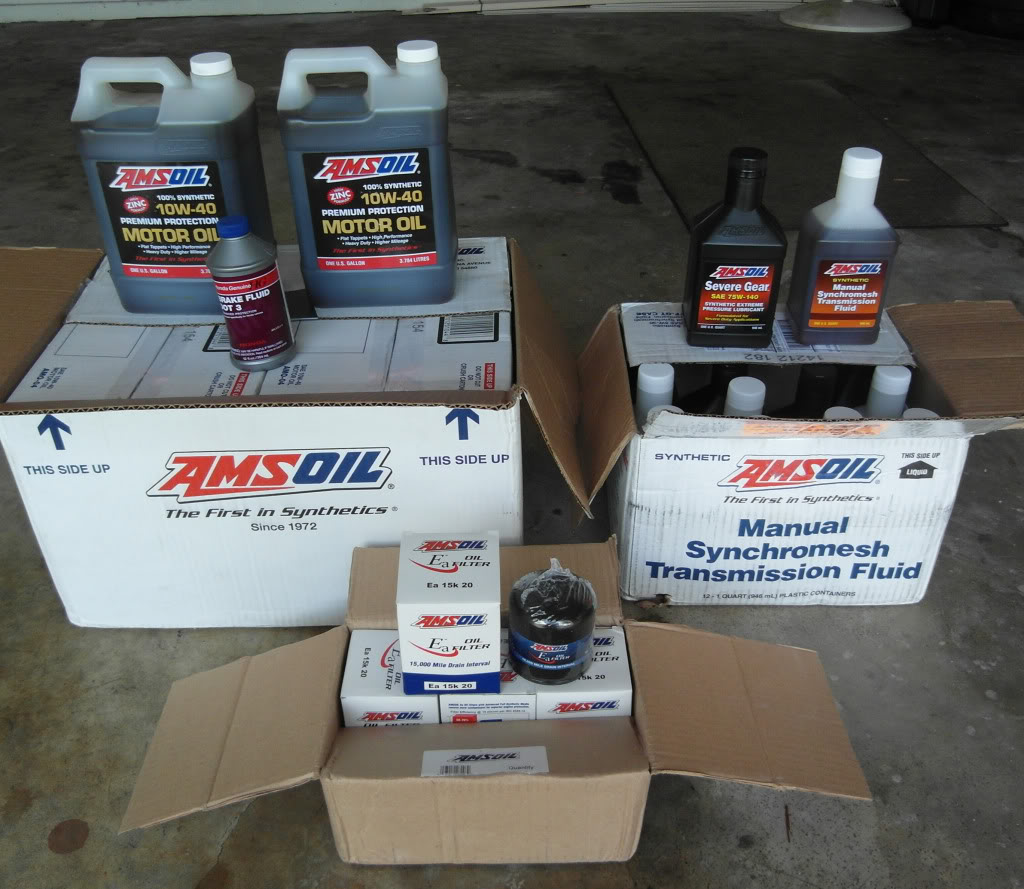
And about a 2-3 year supply of all the fluids and oils I need from Amsoil
The high tbn rating of 12.1 among other things makes it a respectable oil for the e85 system
-5 Amsoil Synthetic Nanofiber Oil Filters
-5 quarts of Amsoil Severe Gear Synthetic Extreme Pressure (EP) Gear Lube 75W-140
-8 quarts of Amsoil Manual Synchromesh Transmission Fluid 5W-30
-8 Gallons of Amsoil SAE 10W-40 Synthetic Motor Oil (AMO)
-3 bottles of oem dot3 brake/clutch fluid from honda
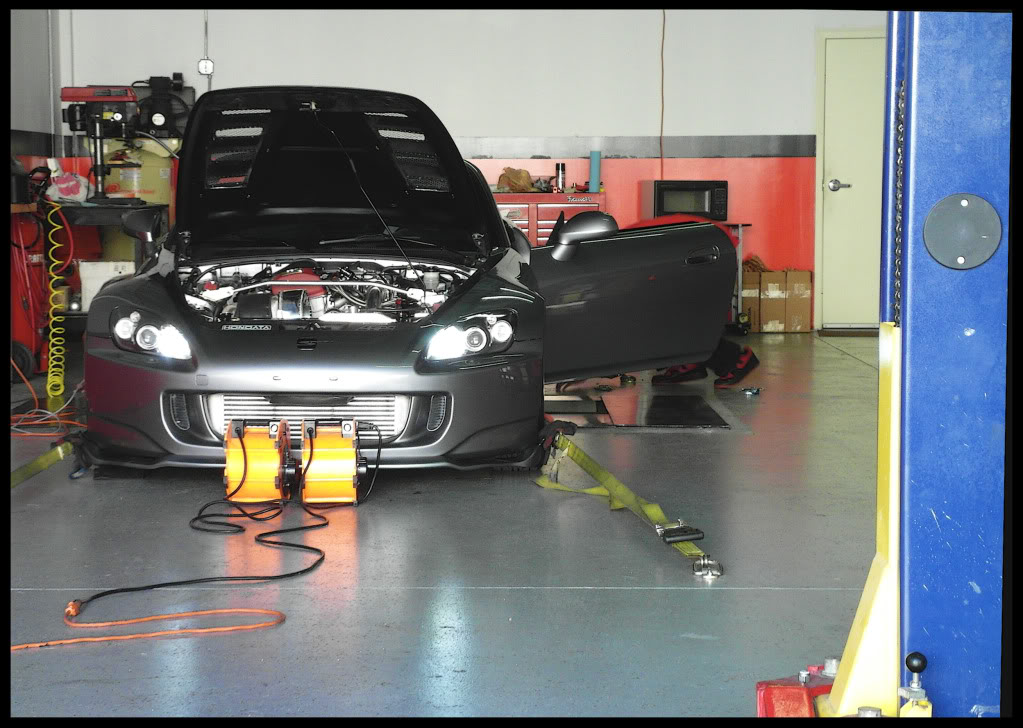
Making some runs on a dynocom (PTR)
A couple charts from the dyno com showing 603/568whp runs around 16psi
And on the dyno jet (racelab)

from the 2011 summer/fall build at MCA Motorsports
Goal: 600+ capability
Achieved: yes; 698whp @22psi / 489wtq @21psi (both on dynojet)
__________________________________________________
Gator racing axles
Stage 4 Puddymod differential before being put on the car:
And when it was installed:
Additional valve work installing the toda springs, retainers, etc.
This is where MCA screwed up with the valve/retainer job
Initial installement of BRMS Oil Catch Can installed without fittings.
As you can see, the pcv valve was closed along with the vacuum hole to its
right in order to allow blow-by to escape into the 10an linings.
(the valve cover was later repainted)
Here are my Pyrometers from Auber Instruments while they were being installed during the build.
They fit perfectly underneath the pasenger side of the dash. They each have a sound alarm attached
to them in case temperatures rise past the peak setting.
Relocation of the battery and my new amp installed behind the backing
Here is my mushimoto 19" oil cooler

And this is the oil cooler bring installed. It could not fit it properly on the lower side of the car
to possibly run an air duct through the fake air dams where I wanted it, so I had no choice but to install
it in the center behind the front bumper. I ended up making an air duct out of aluminum and yes, duct tape.
You can see the details of this air damn I built for it here:
https://www.s2ki.com/s2000/topic/910...#entry21170423
Here are my Mickey Thompson 255/50/16 tires.
I painted them black on the inside spokes, just like my volks.
I always liked the skinnier, color-contrasting appearance it gives.
And about a 2-3 year supply of all the fluids and oils I need from Amsoil
The high tbn rating of 12.1 among other things makes it a respectable oil for the e85 system
-5 Amsoil Synthetic Nanofiber Oil Filters
-5 quarts of Amsoil Severe Gear Synthetic Extreme Pressure (EP) Gear Lube 75W-140
-8 quarts of Amsoil Manual Synchromesh Transmission Fluid 5W-30
-8 Gallons of Amsoil SAE 10W-40 Synthetic Motor Oil (AMO)
-3 bottles of oem dot3 brake/clutch fluid from honda
Making some runs on a dynocom (PTR)
A couple charts from the dyno com showing 603/568whp runs around 16psi

And on the dyno jet (racelab)


Thread Starter
Registered User
Joined: Dec 2009
Posts: 2,396
Likes: 0
From: Auburn Hills, Michigan
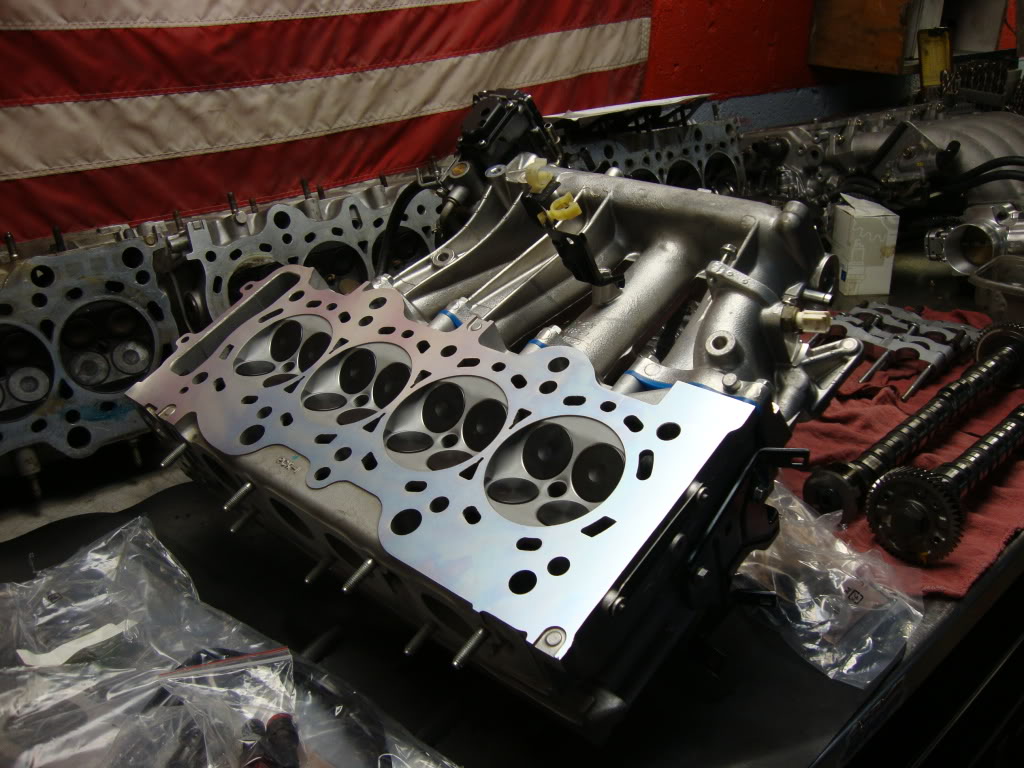
ADDITIONAL PICS FROM 4th (FINAL) UPGRADE EVOLUTION
2012 spring/summer build by GSX2004
Goal: 720+ capability
Achieved: Will never know; manifold issues halted project
__________________________________________________
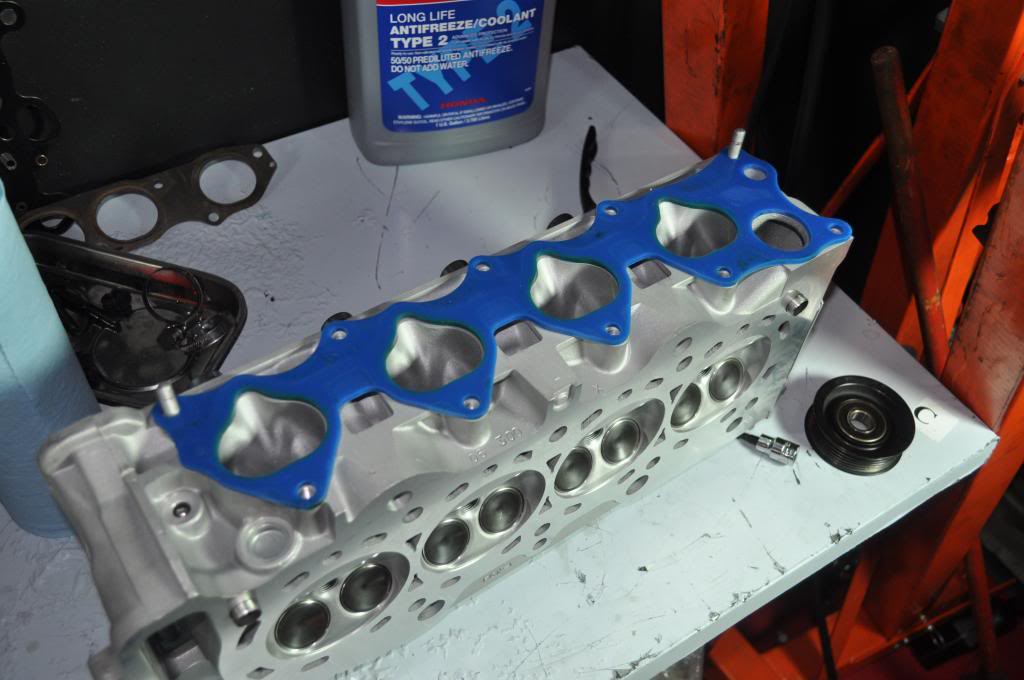
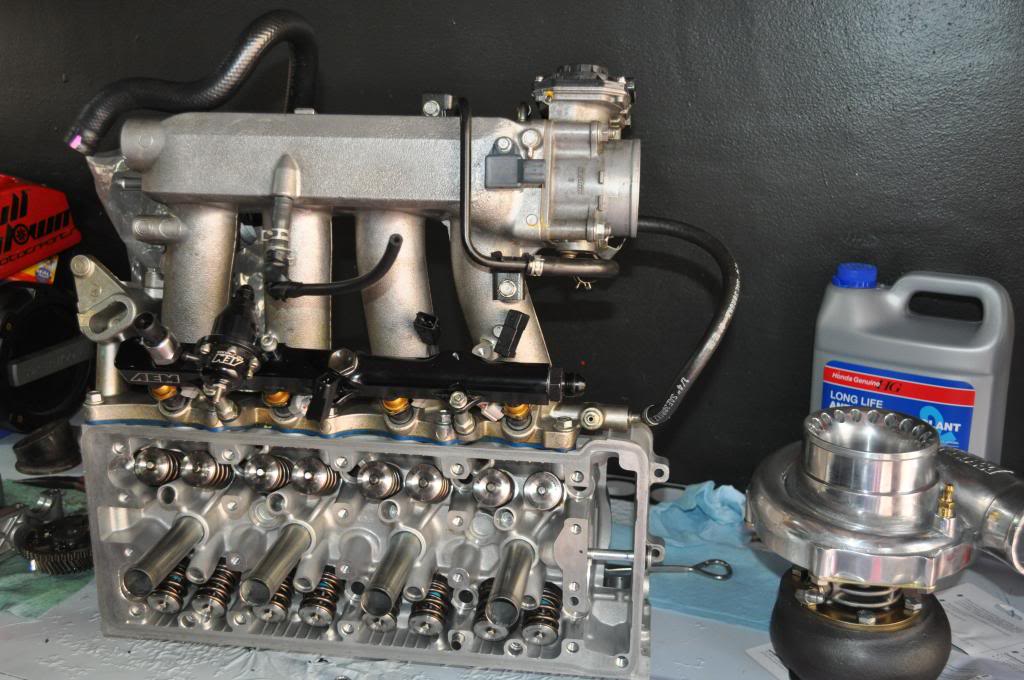
Hondata intake manifold Gasket
Head before and after the cleaning and ferrea valve replacements
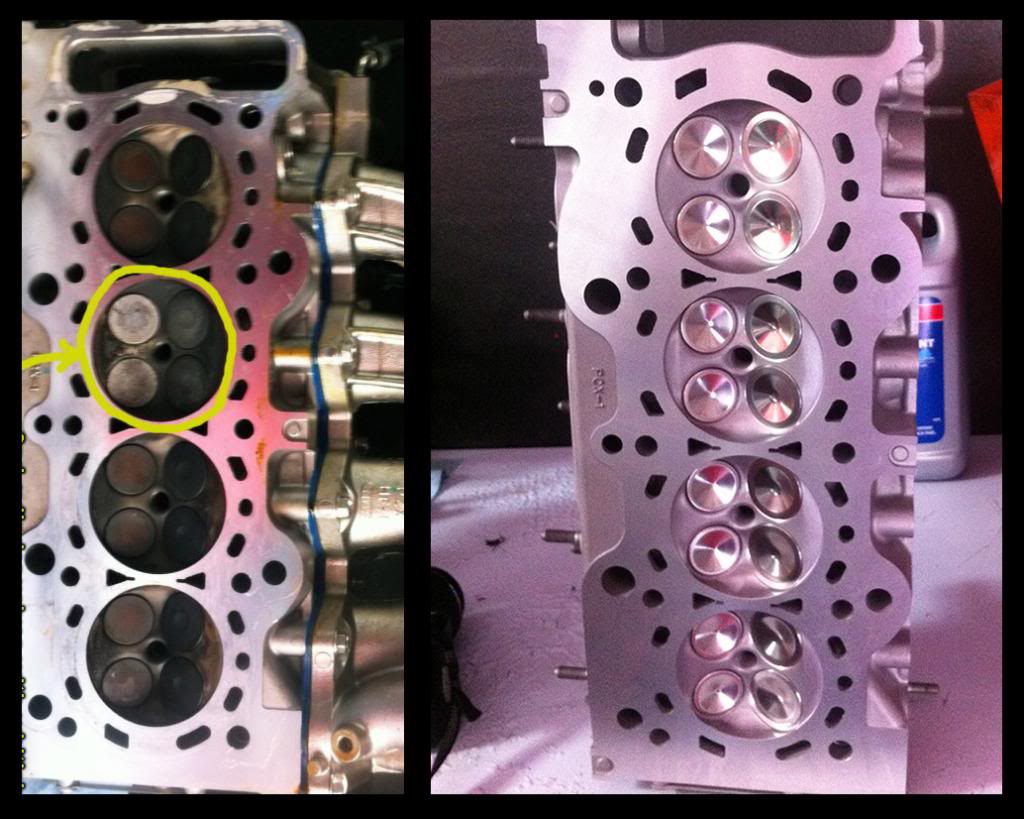
head with ferrea valves

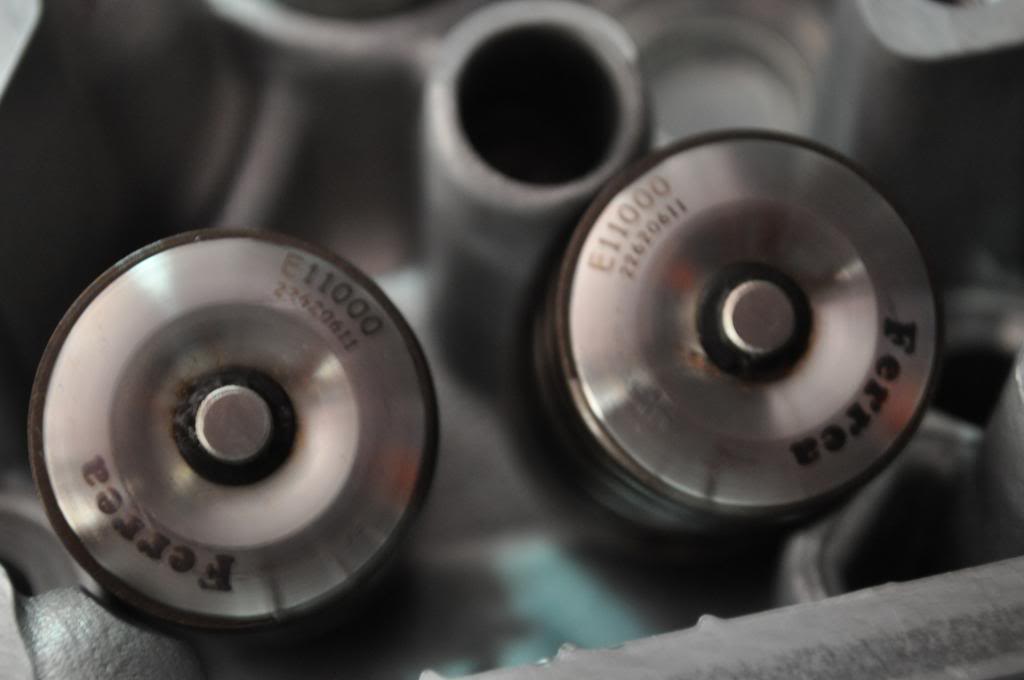
close up ferrea springs and retainers
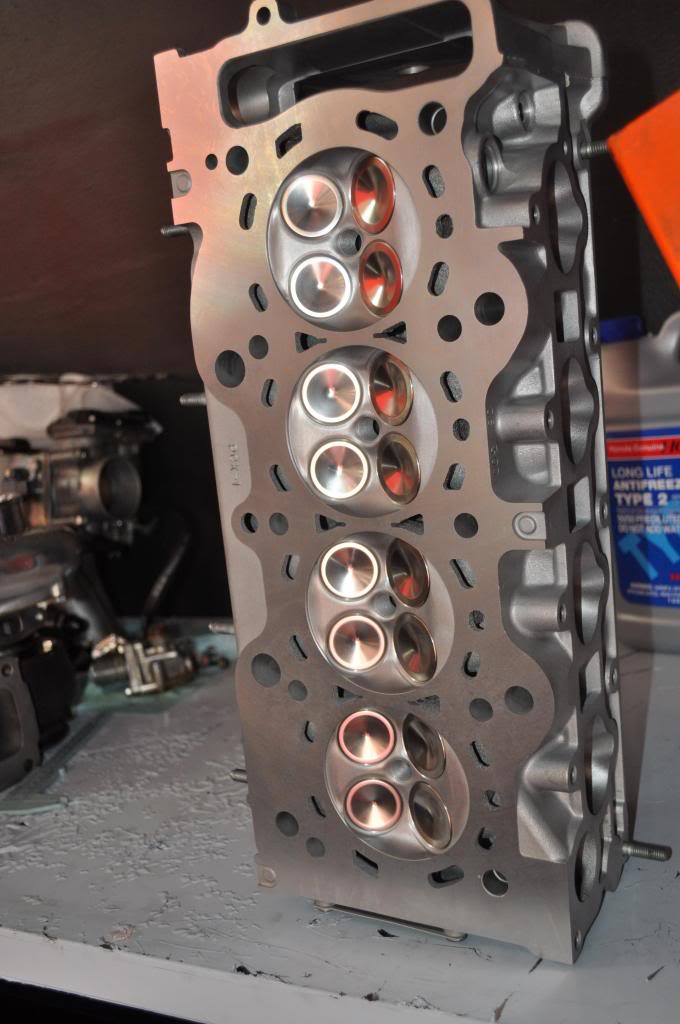
Ferrea fully built head ready to be installed
Cracking manifold issues which would end up being the downfall of this project.
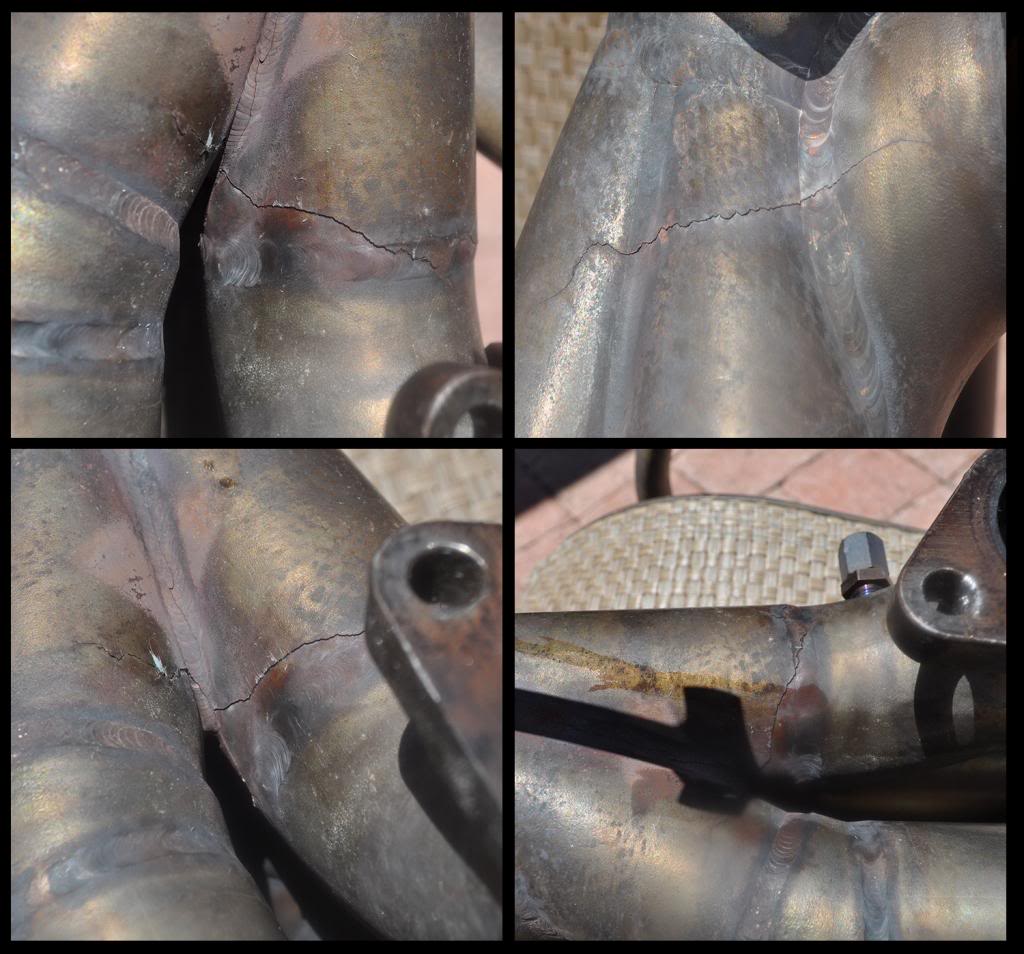
Manifold ceramic coated and rewelded in an attempt to revive it one more time
(and it just so happened to make it look really nice )
)
But nevertheless, it would eventually crack again.
The manifold just couldn't hold this kind of power without continuing to crack
Since everything was off, I ceramic coated the downpipe too...

And I ceramic coated the 62/62 precision BB turbo
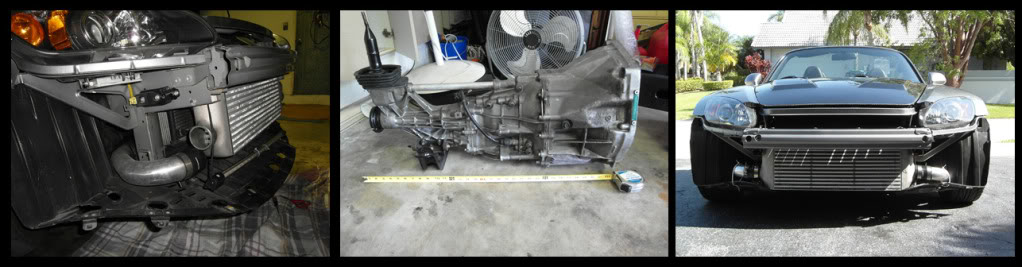
The Supra getrag V160 Transmission arrives!
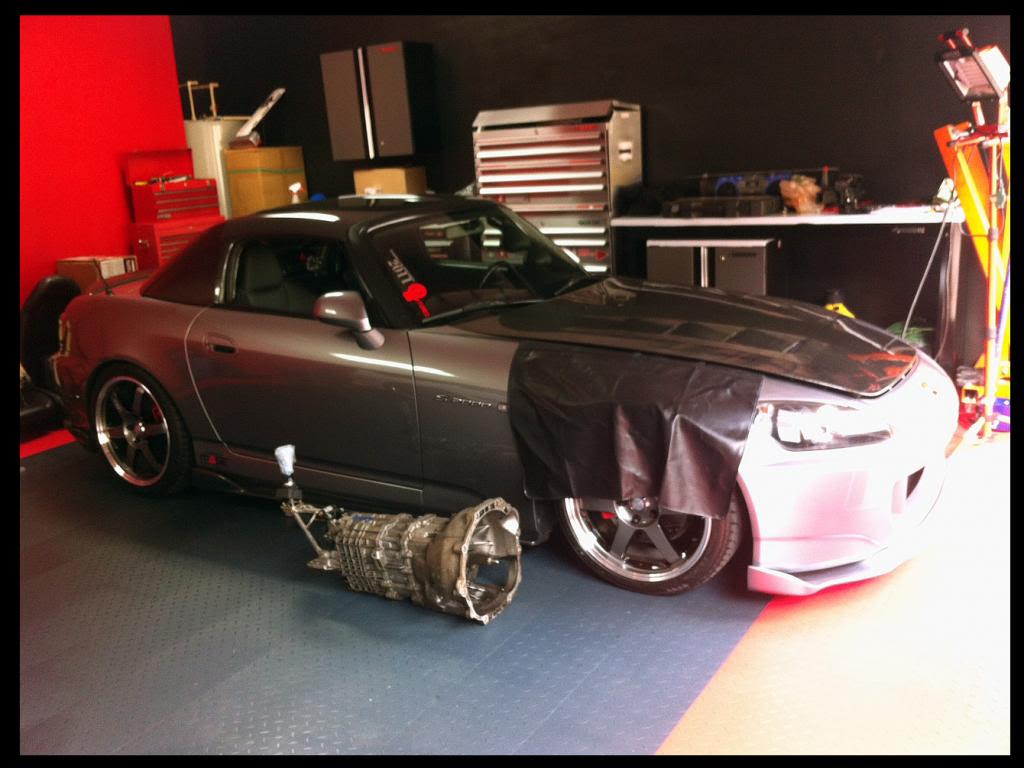
And so does my full blown mounting kit and getrag twin disk clutch for the V160
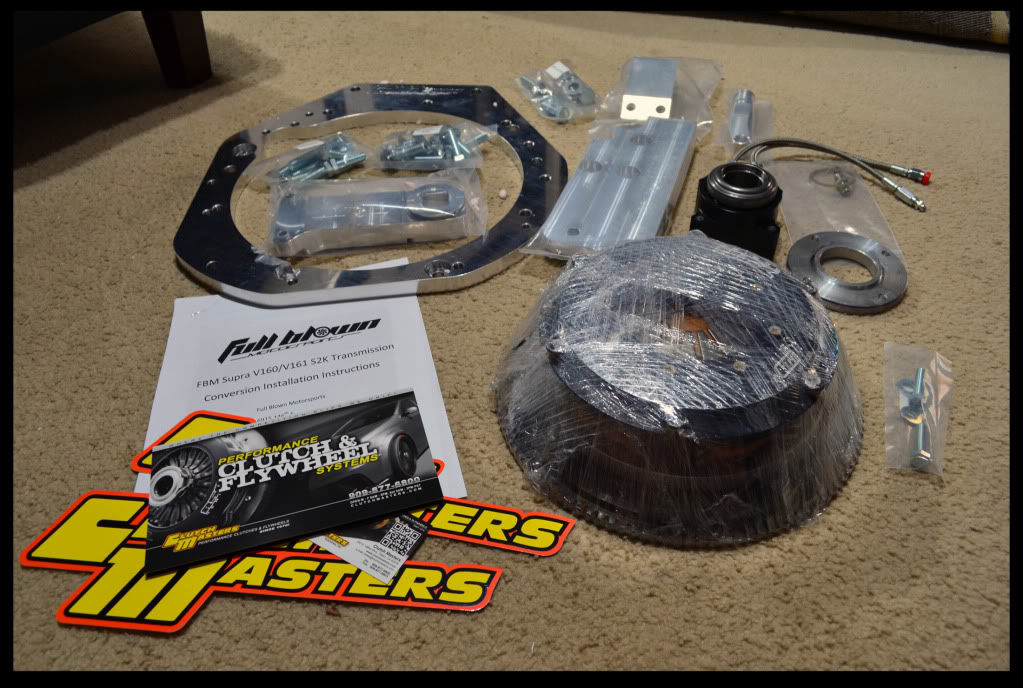
My Full V160 transmission conversion setup
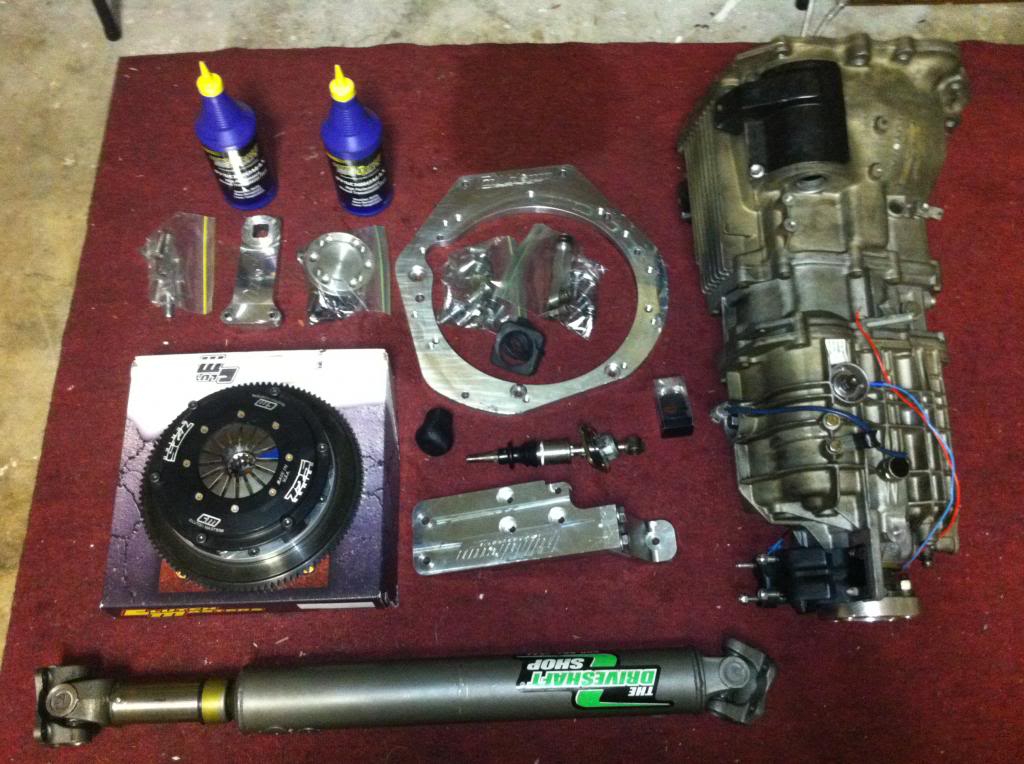
Installing twin disk on the v160, etc...
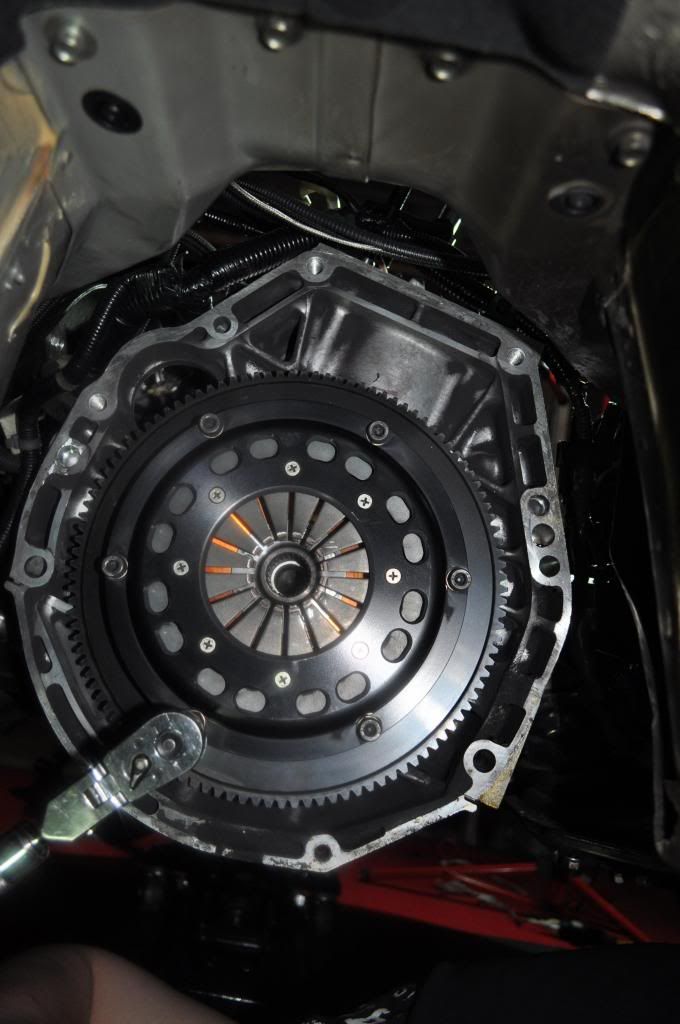
The v160 installed underneath along with the drivetrain connected to my stage 4 puddymod diff
Installation of the Kenne Bell Boost-a-spark
Some datalogging for fun
LOL

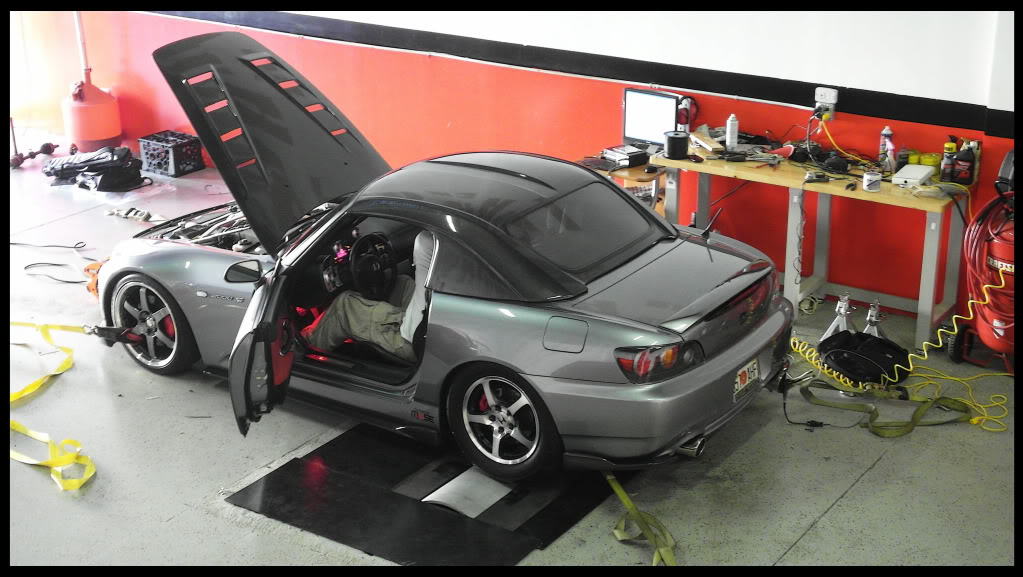
Getting all fixed up in the garage
2012 spring/summer build by GSX2004
Goal: 720+ capability
Achieved: Will never know; manifold issues halted project
__________________________________________________
Hondata intake manifold Gasket

Head before and after the cleaning and ferrea valve replacements

head with ferrea valves


close up ferrea springs and retainers

Ferrea fully built head ready to be installed

Cracking manifold issues which would end up being the downfall of this project.

Manifold ceramic coated and rewelded in an attempt to revive it one more time
(and it just so happened to make it look really nice
)But nevertheless, it would eventually crack again.
The manifold just couldn't hold this kind of power without continuing to crack

Since everything was off, I ceramic coated the downpipe too...

And I ceramic coated the 62/62 precision BB turbo

The Supra getrag V160 Transmission arrives!

And so does my full blown mounting kit and getrag twin disk clutch for the V160

My Full V160 transmission conversion setup

Installing twin disk on the v160, etc...

The v160 installed underneath along with the drivetrain connected to my stage 4 puddymod diff

Installation of the Kenne Bell Boost-a-spark

Some datalogging for fun

LOL

Getting all fixed up in the garage


Thread Starter
Registered User
Joined: Dec 2009
Posts: 2,396
Likes: 0
From: Auburn Hills, Michigan
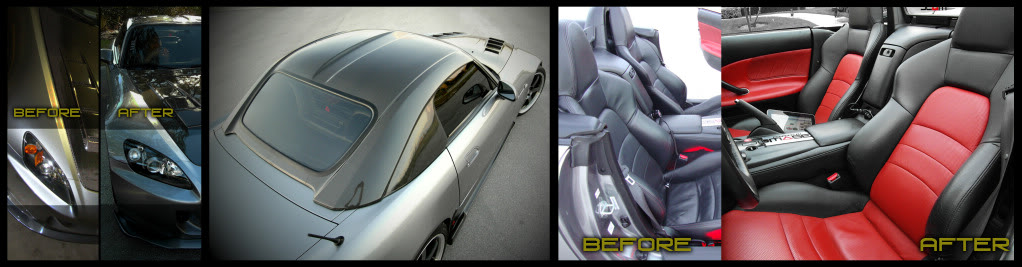
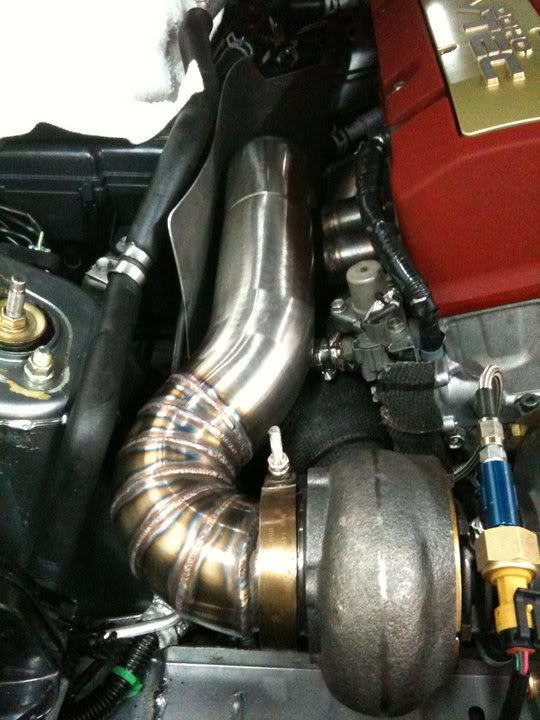
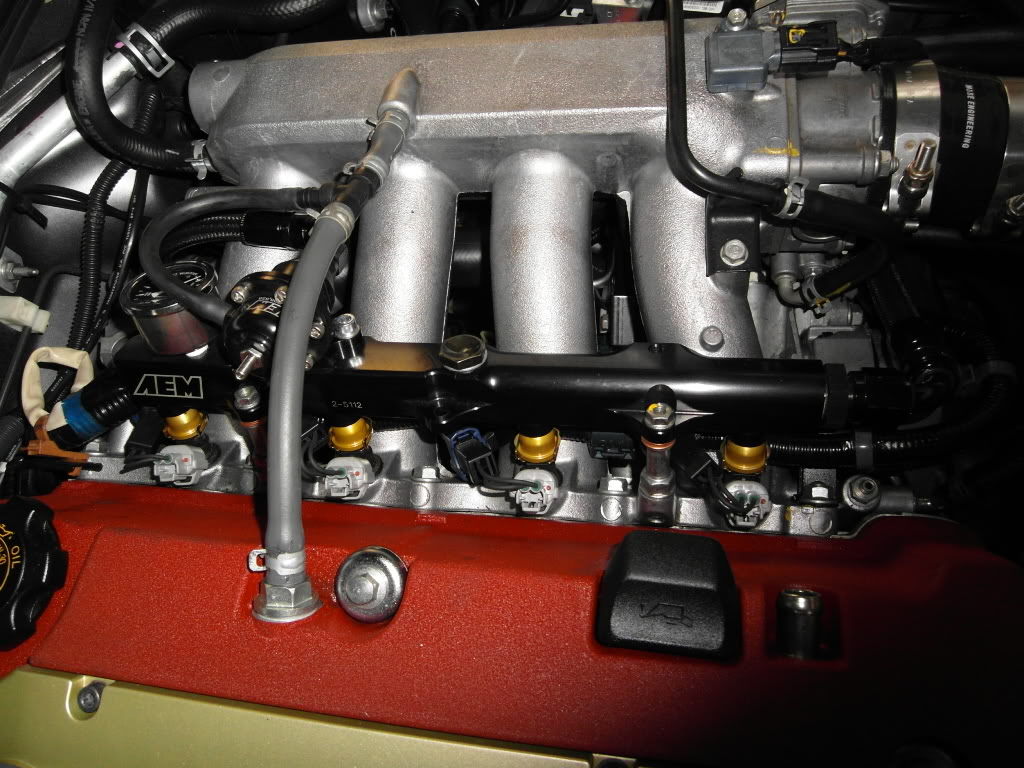
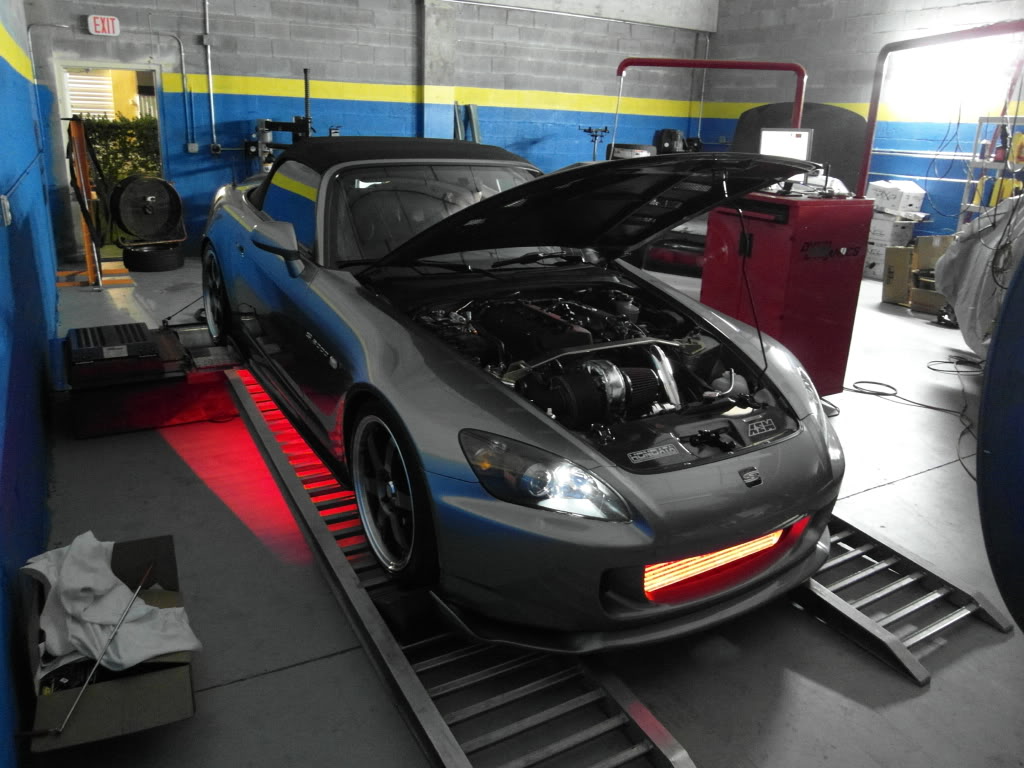
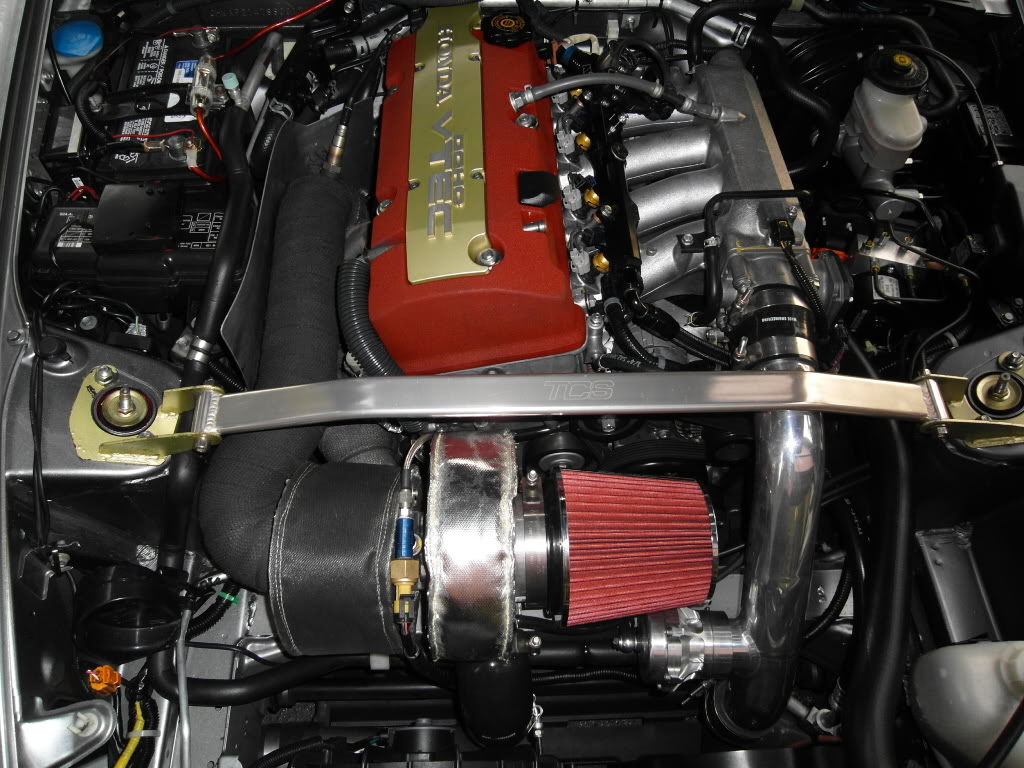
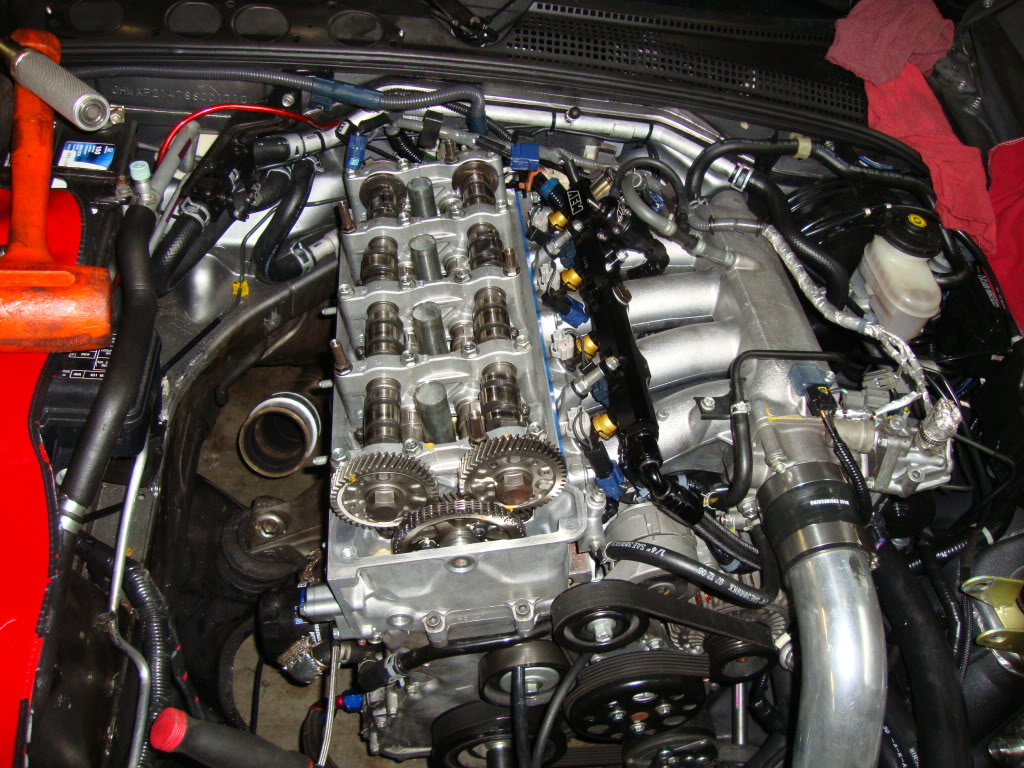
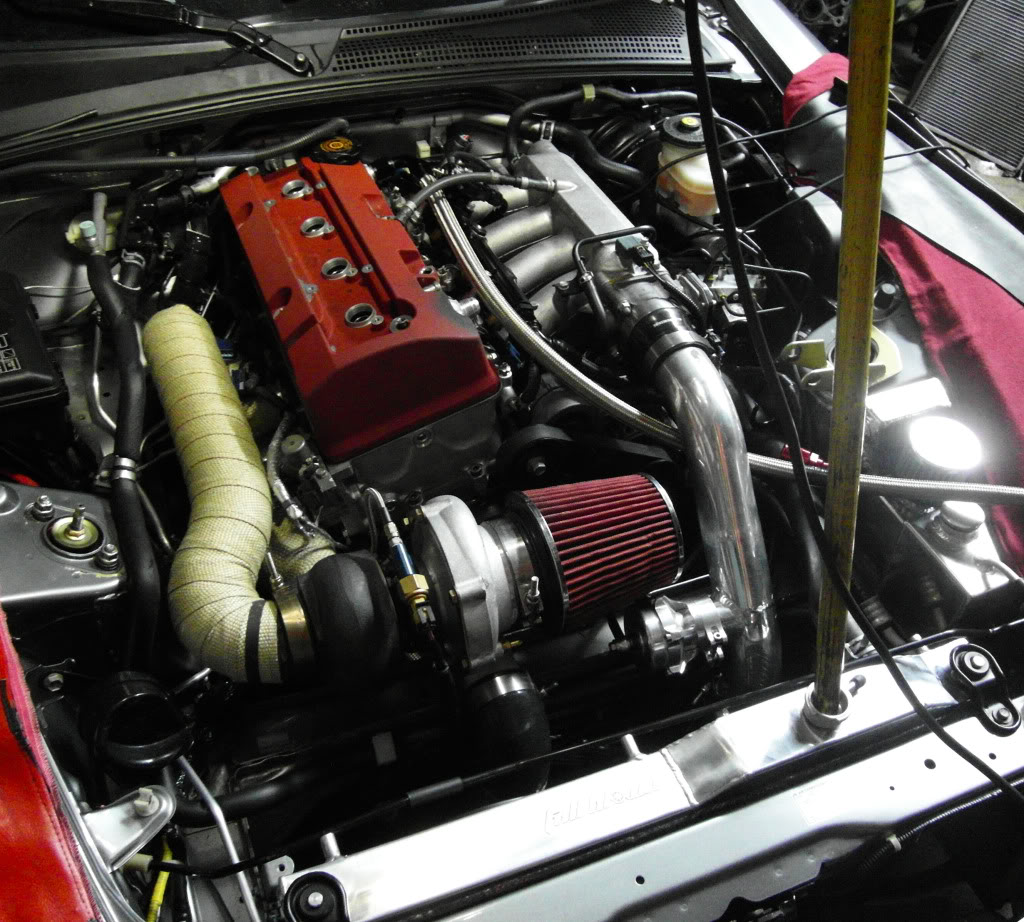
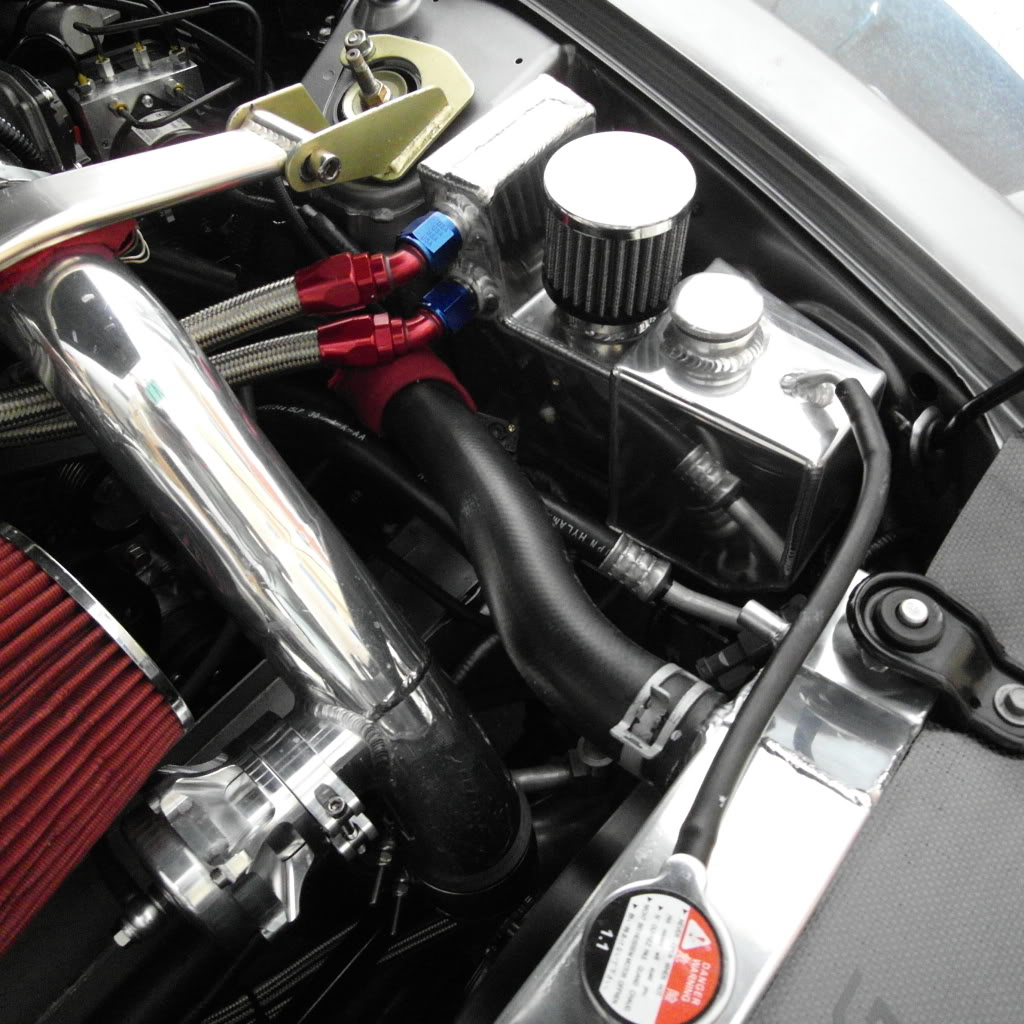
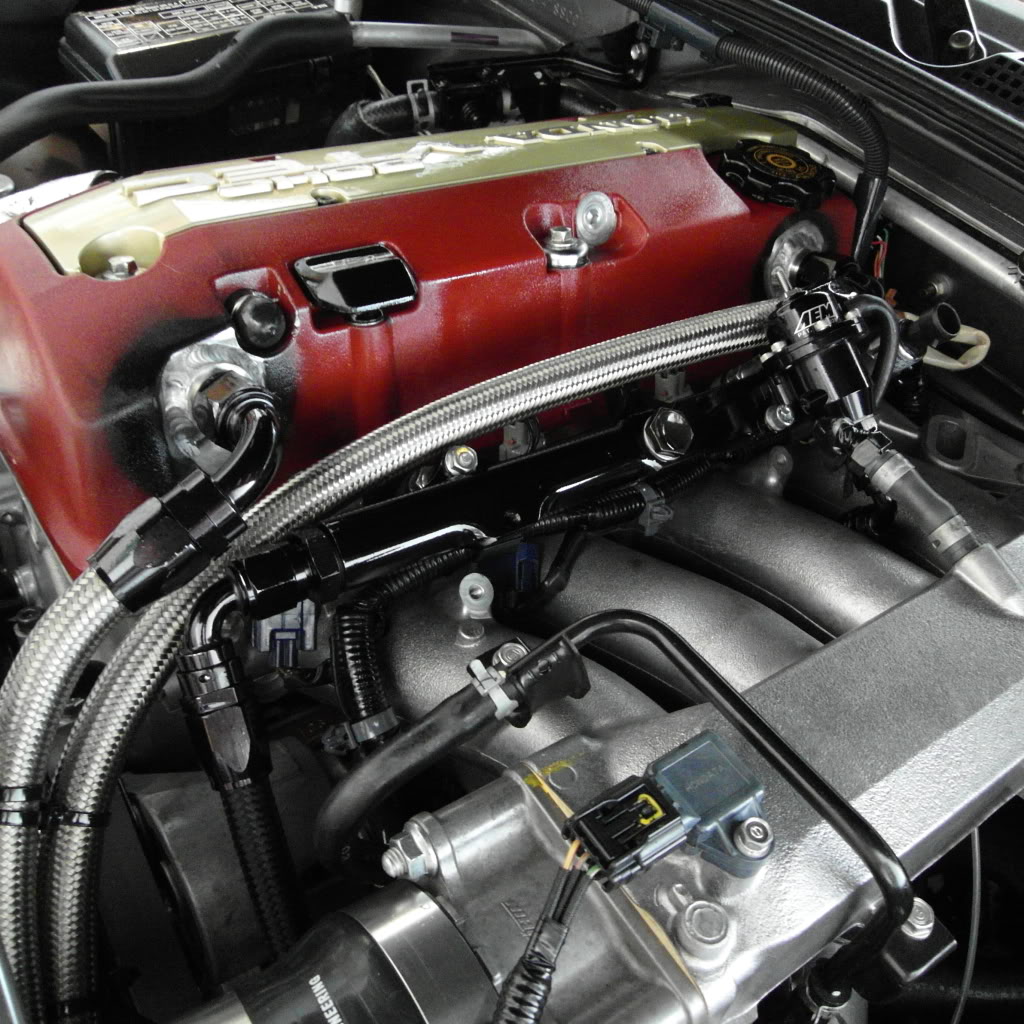
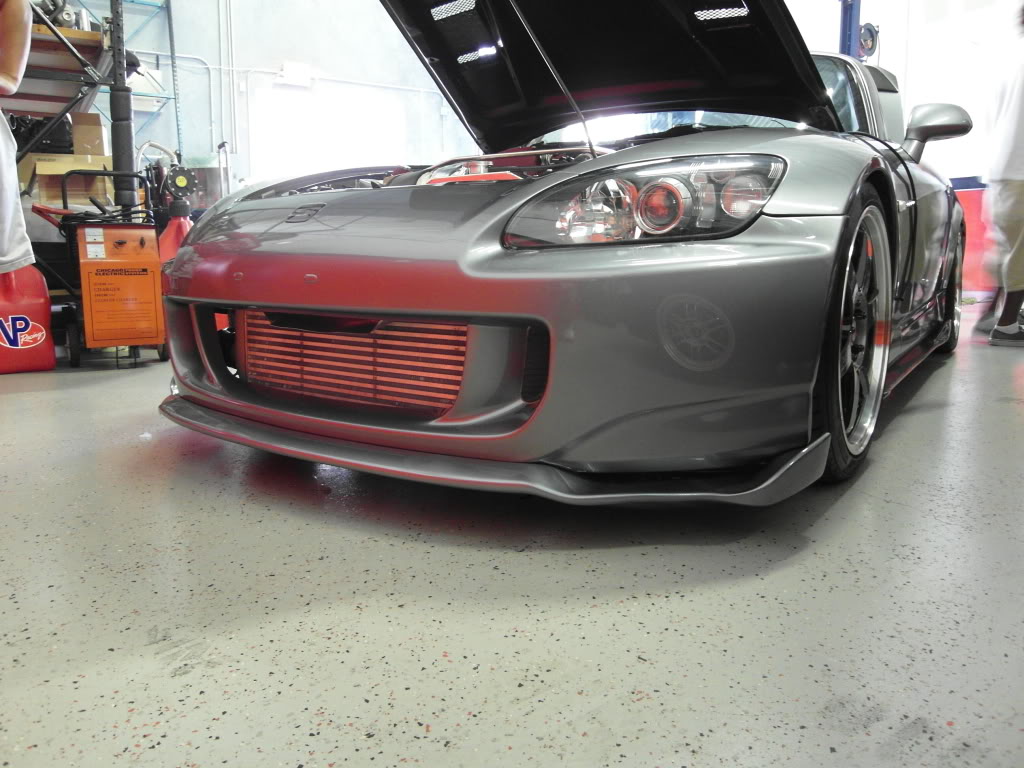
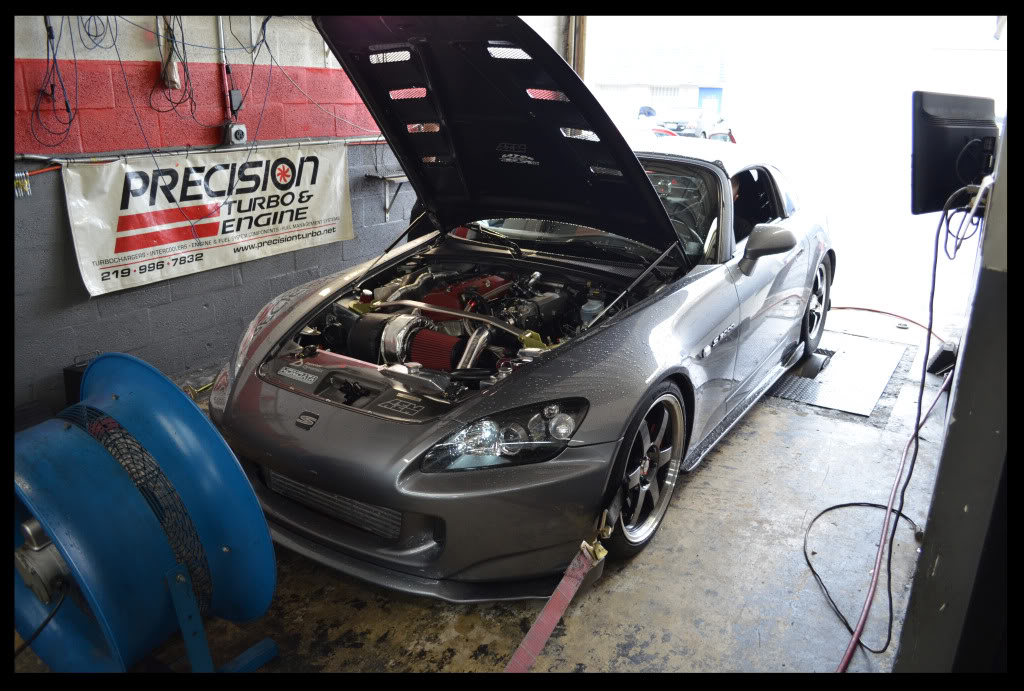
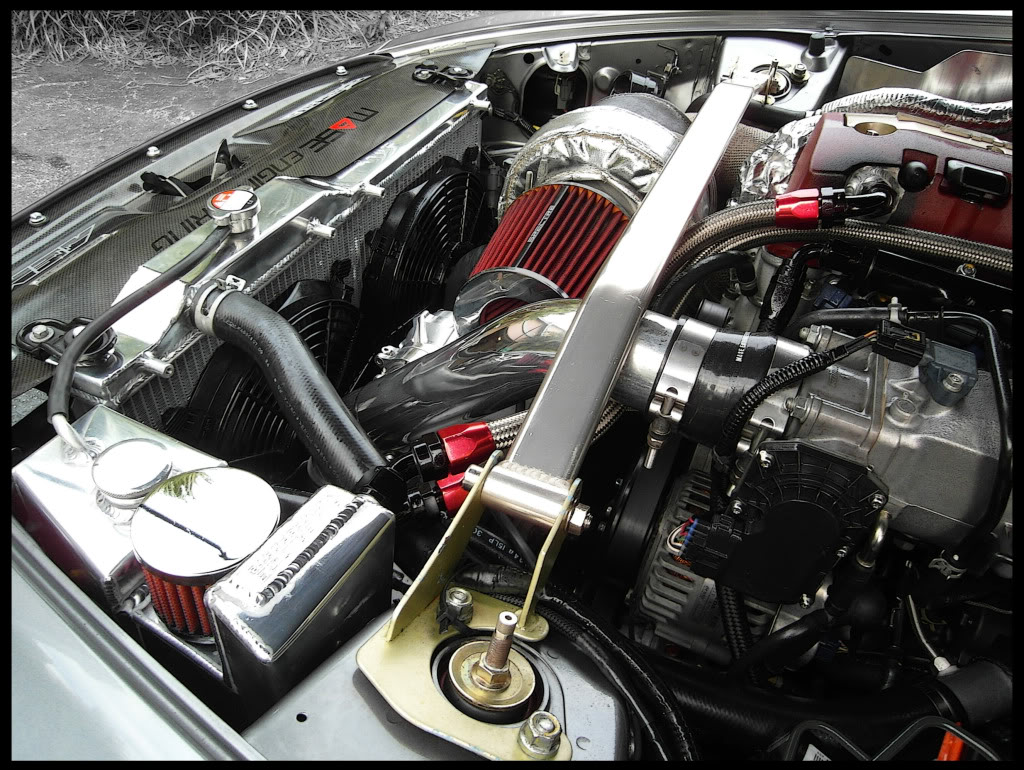
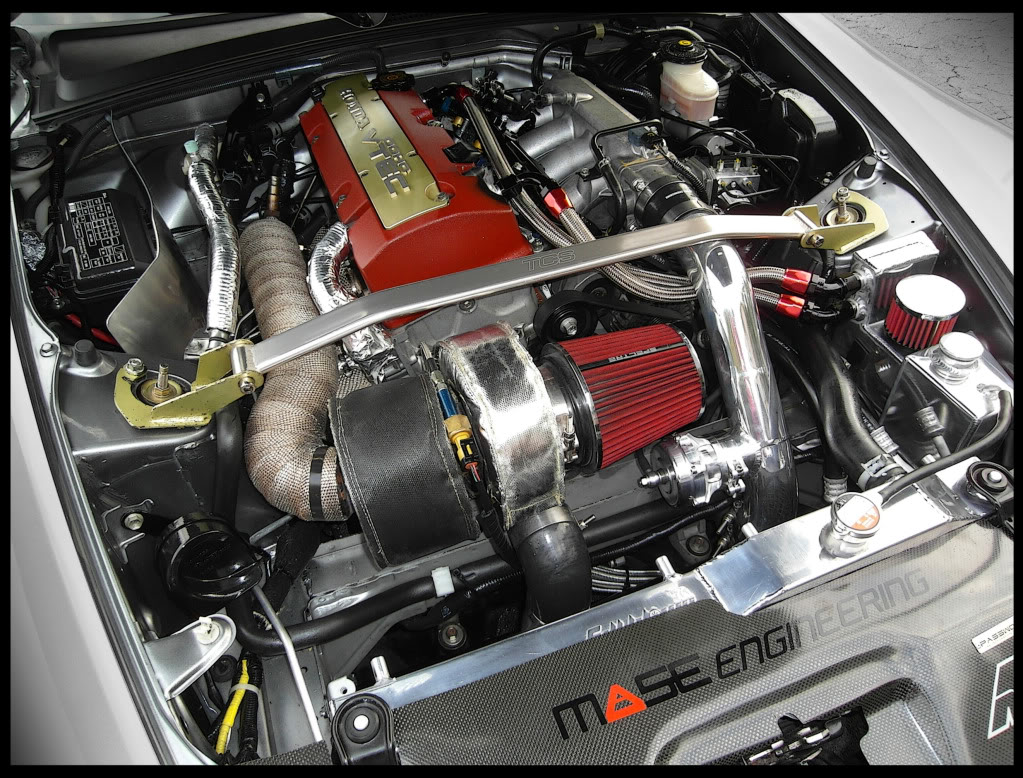
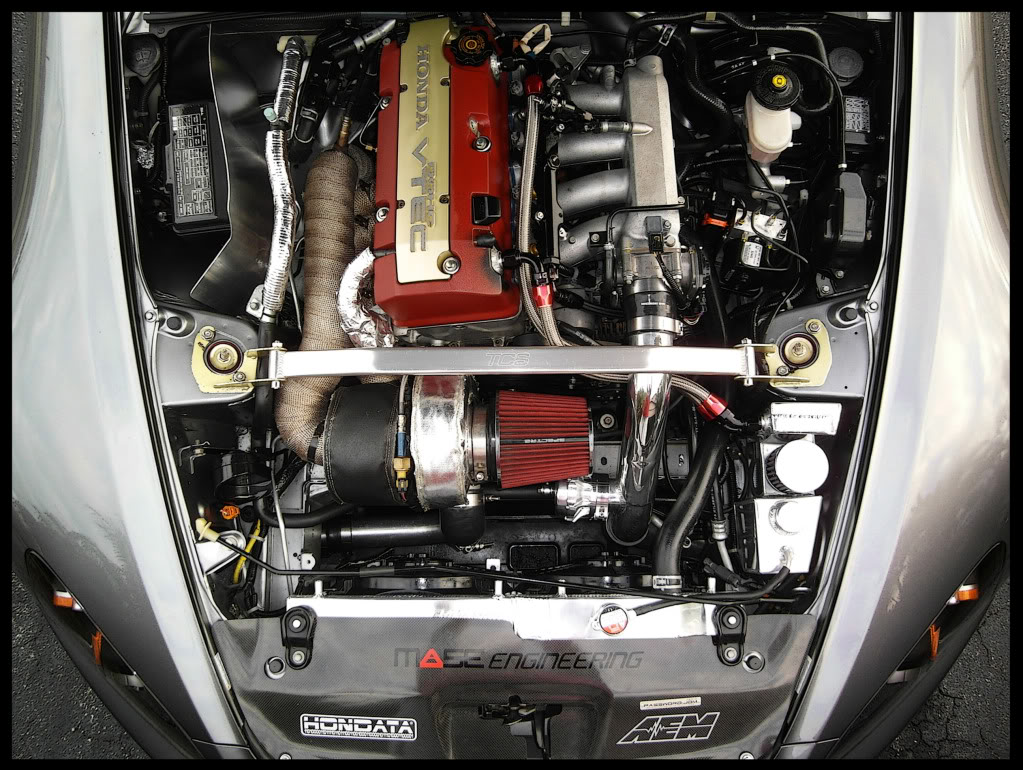
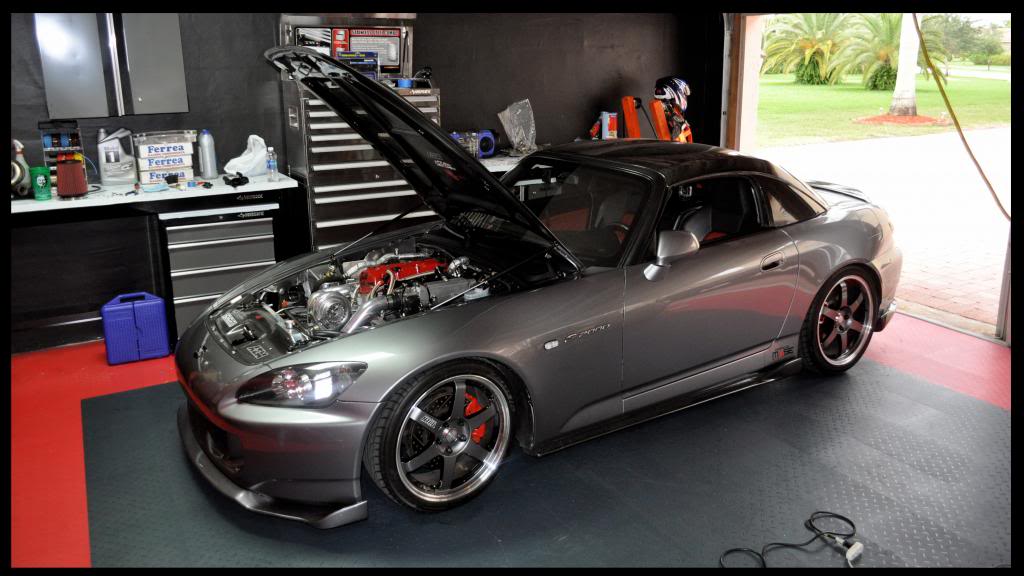
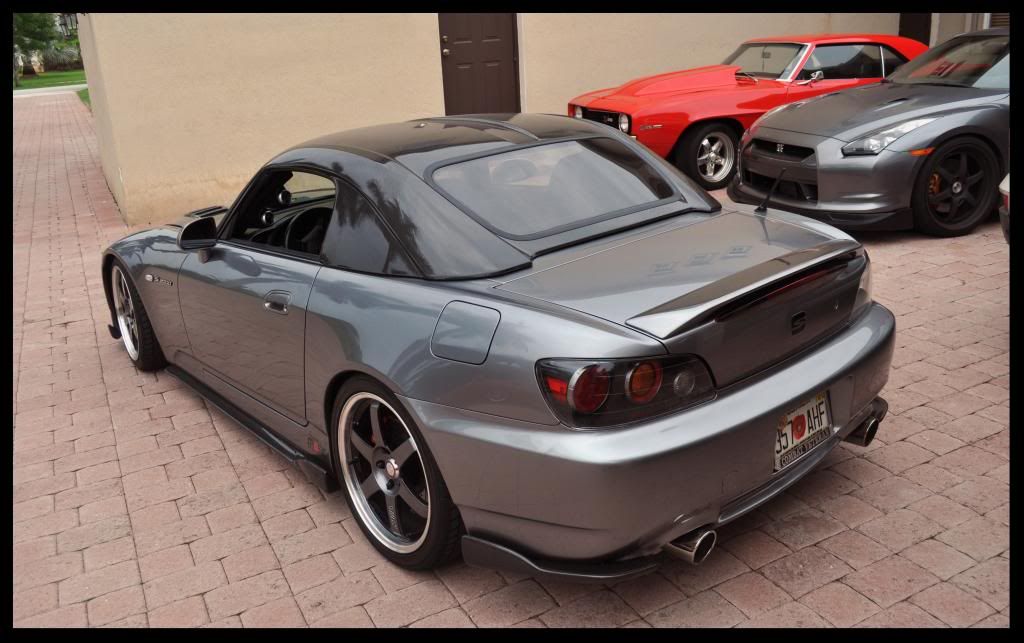
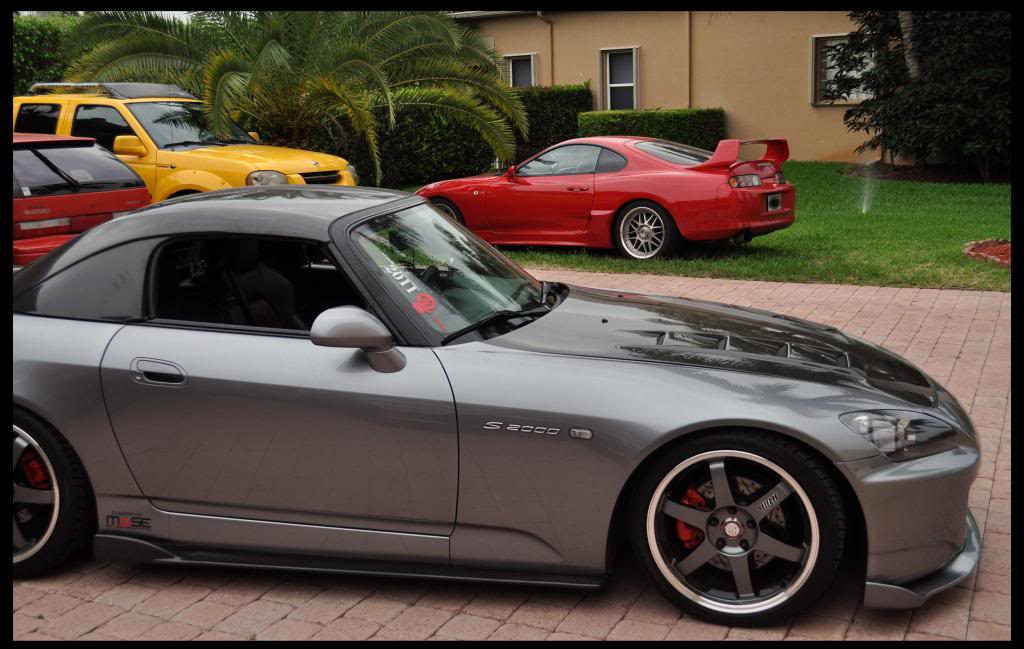
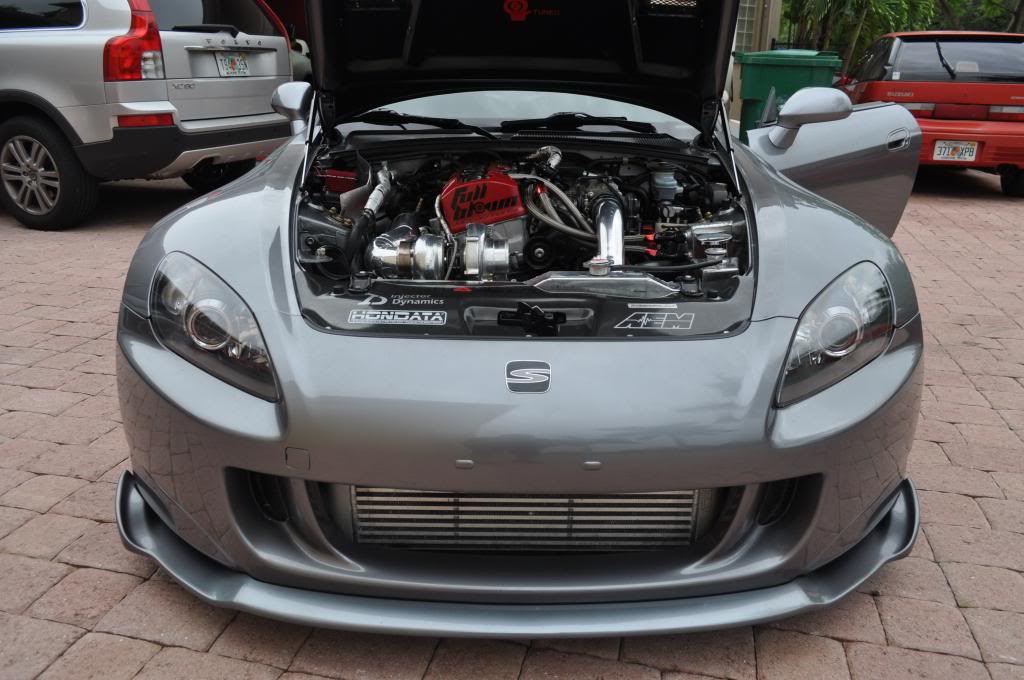
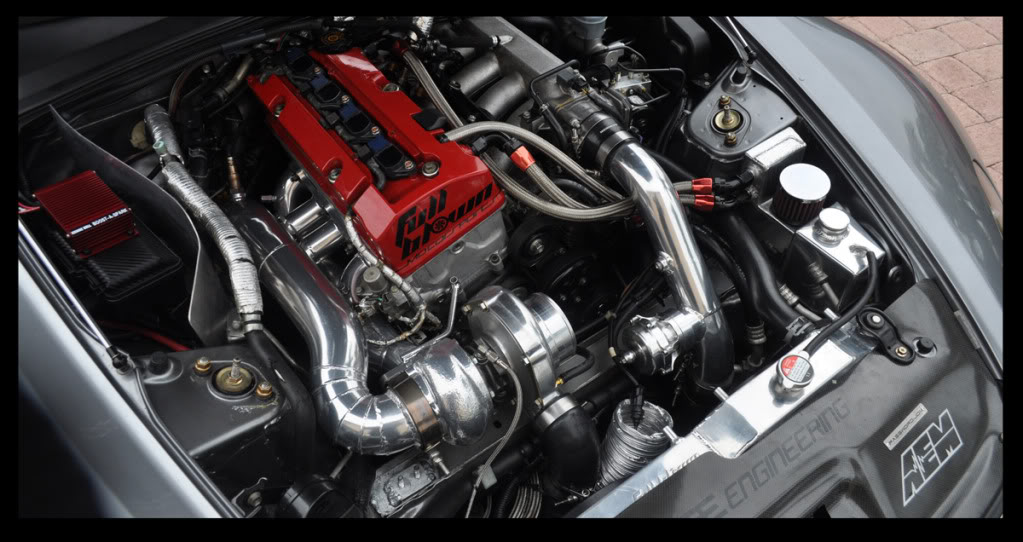
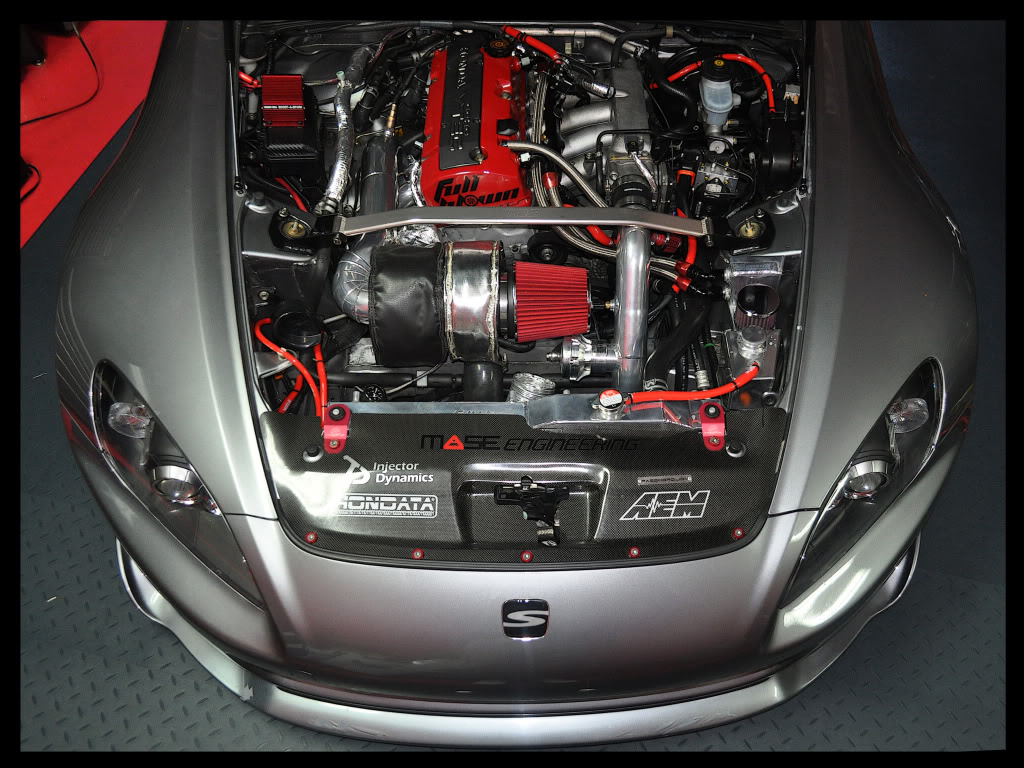
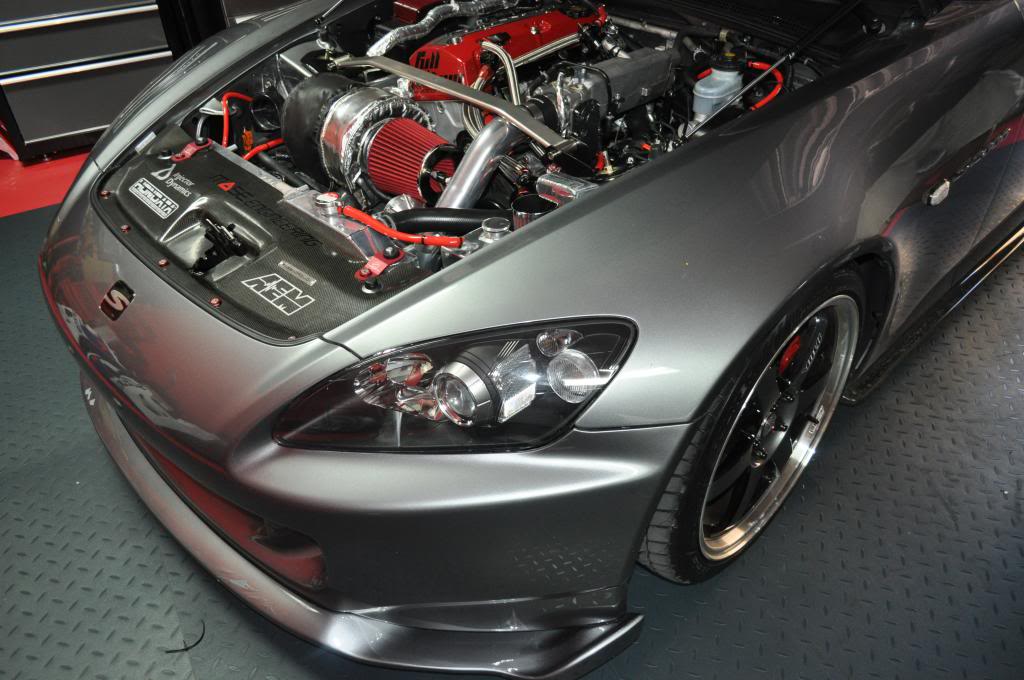
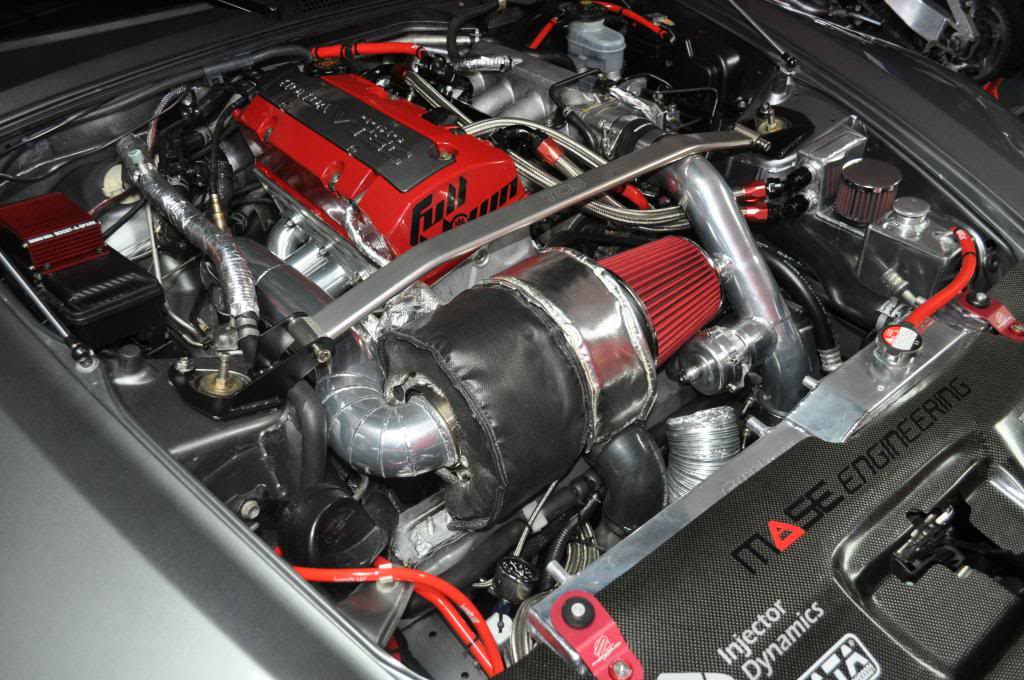
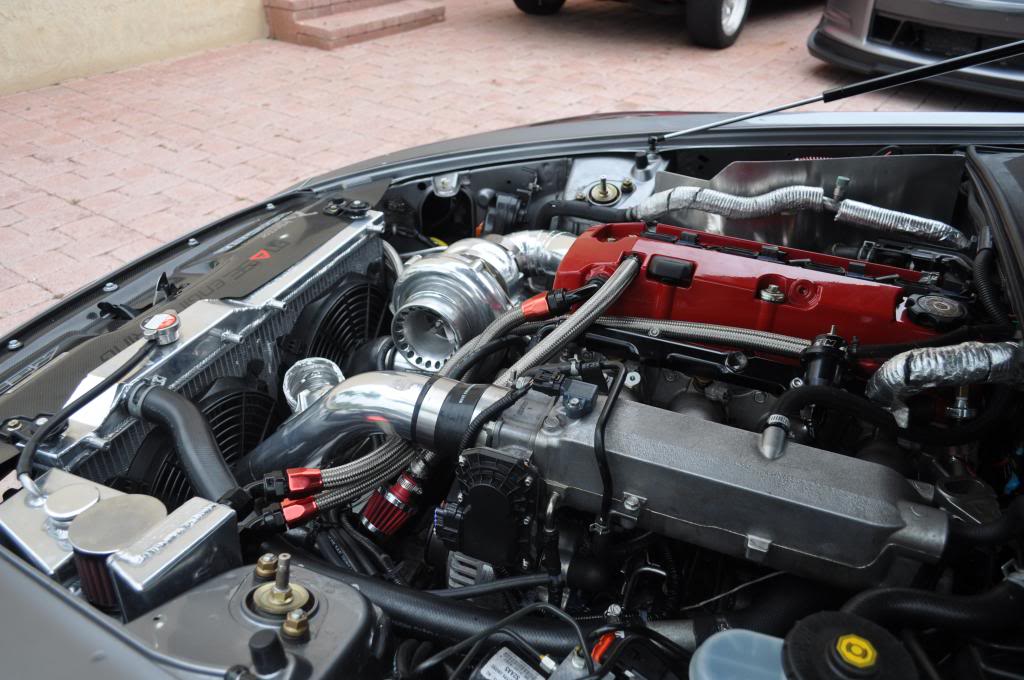
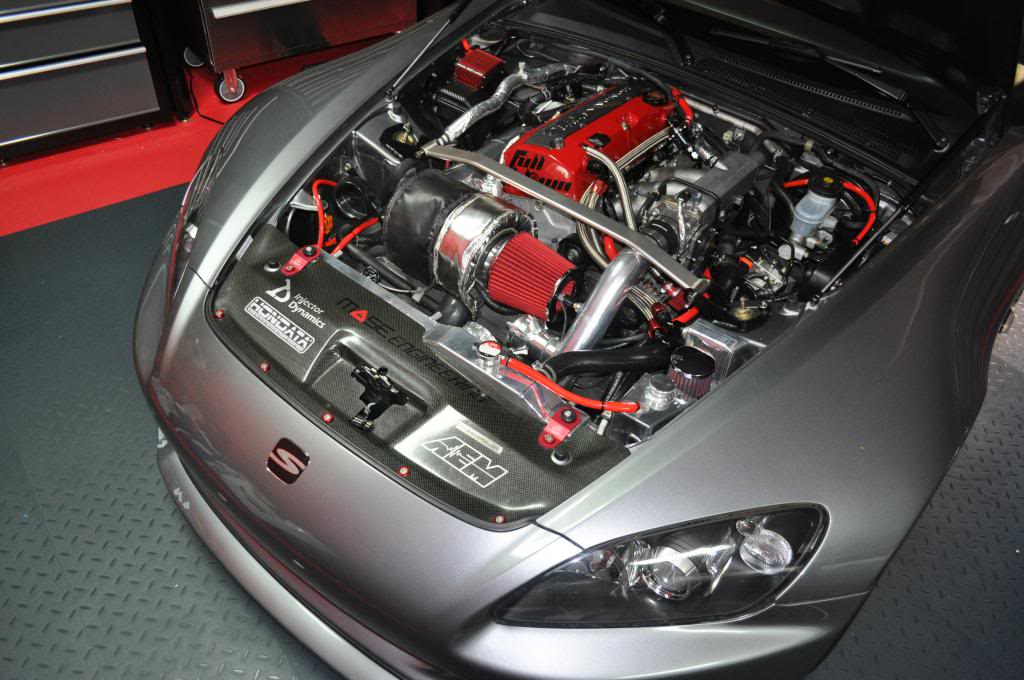
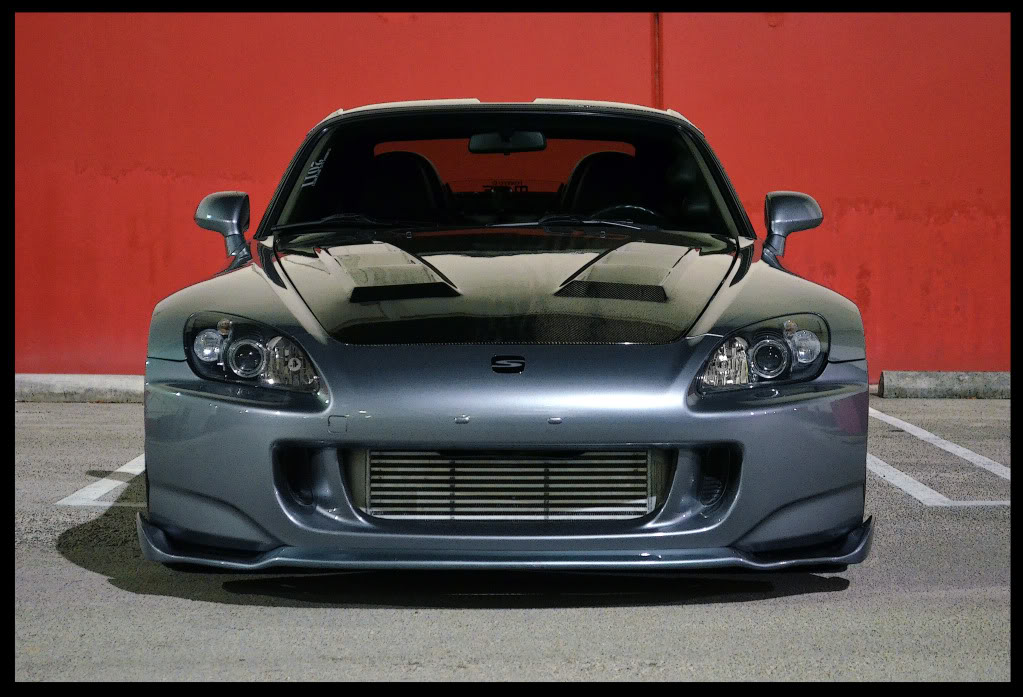
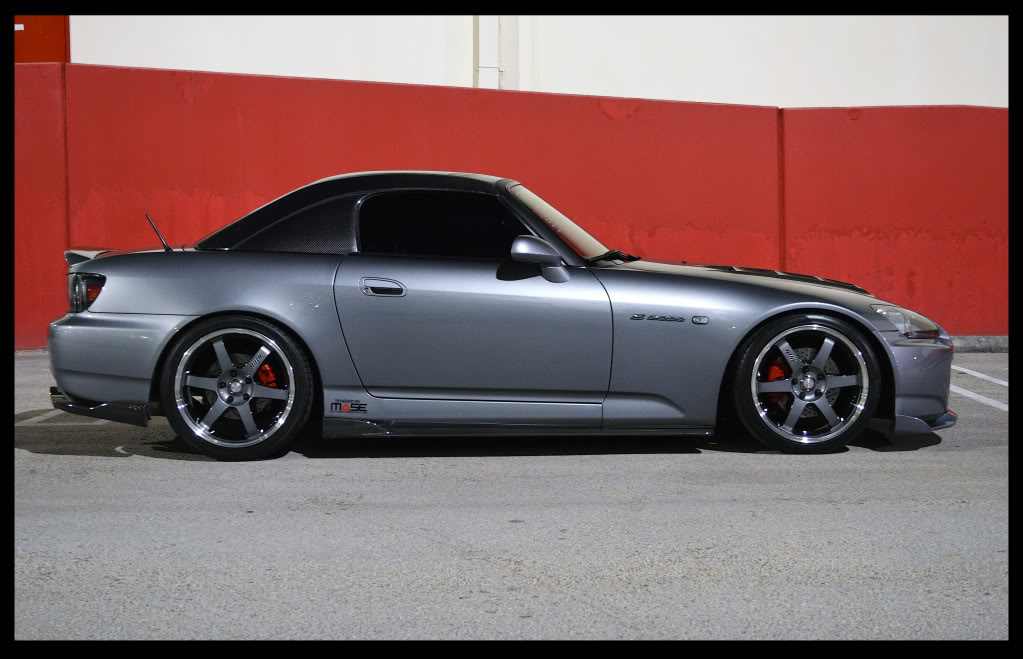
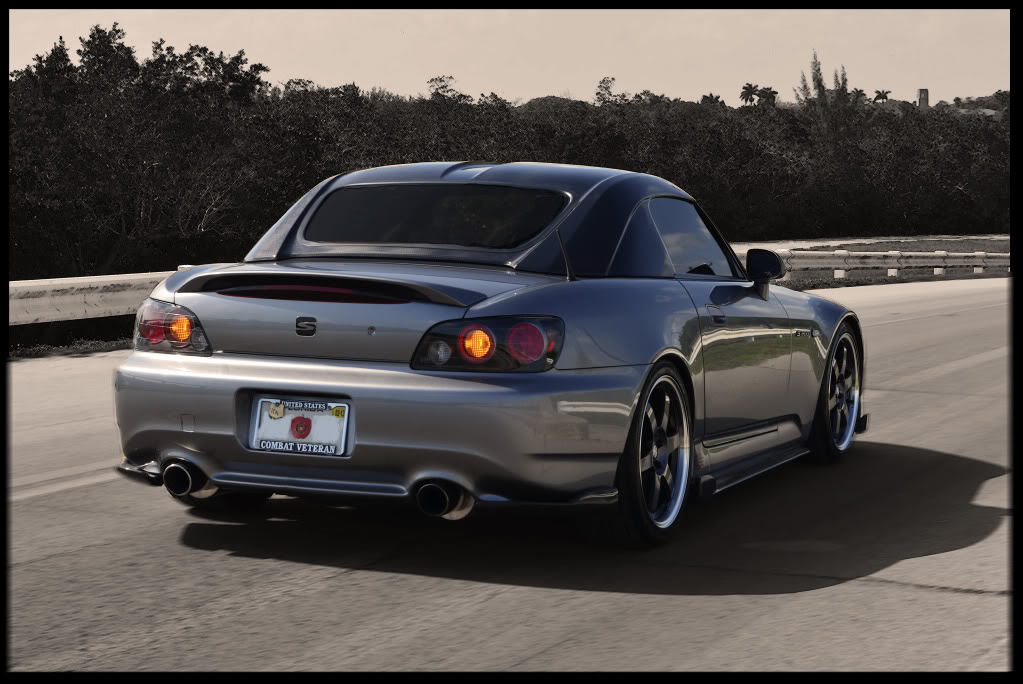
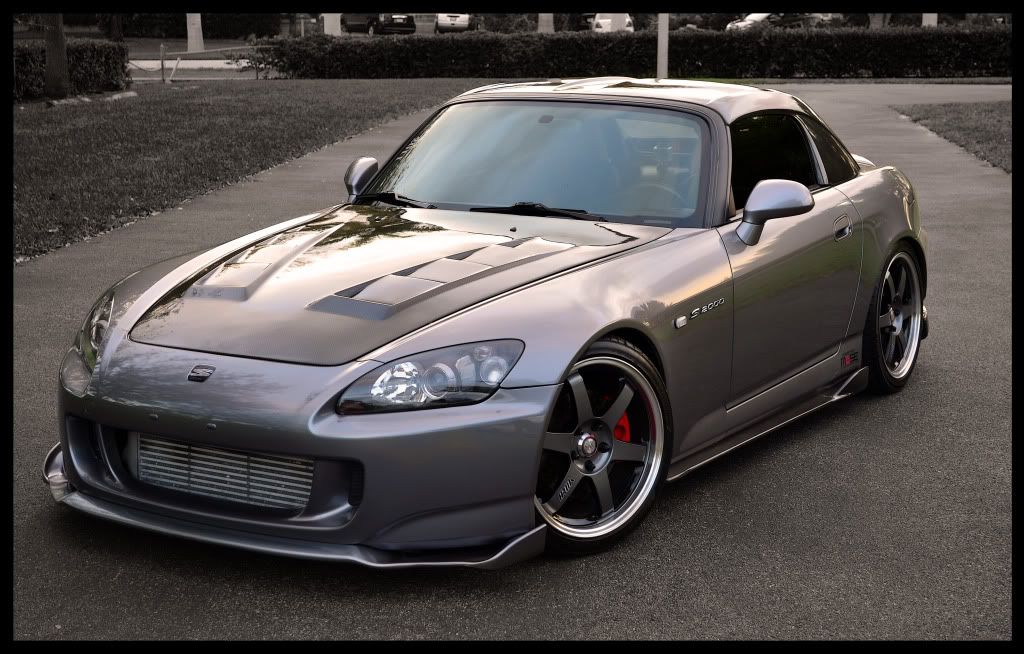
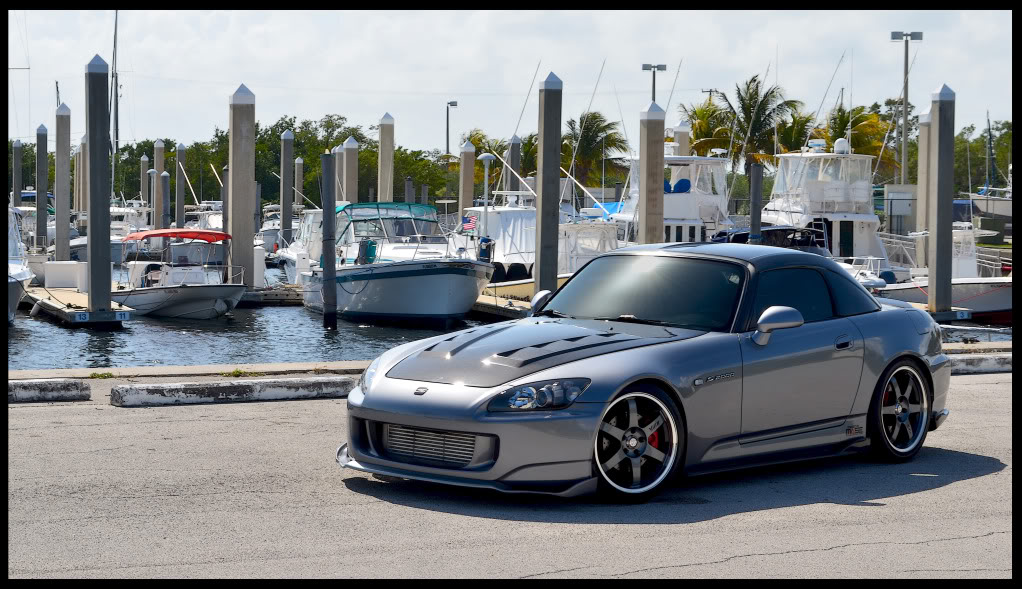
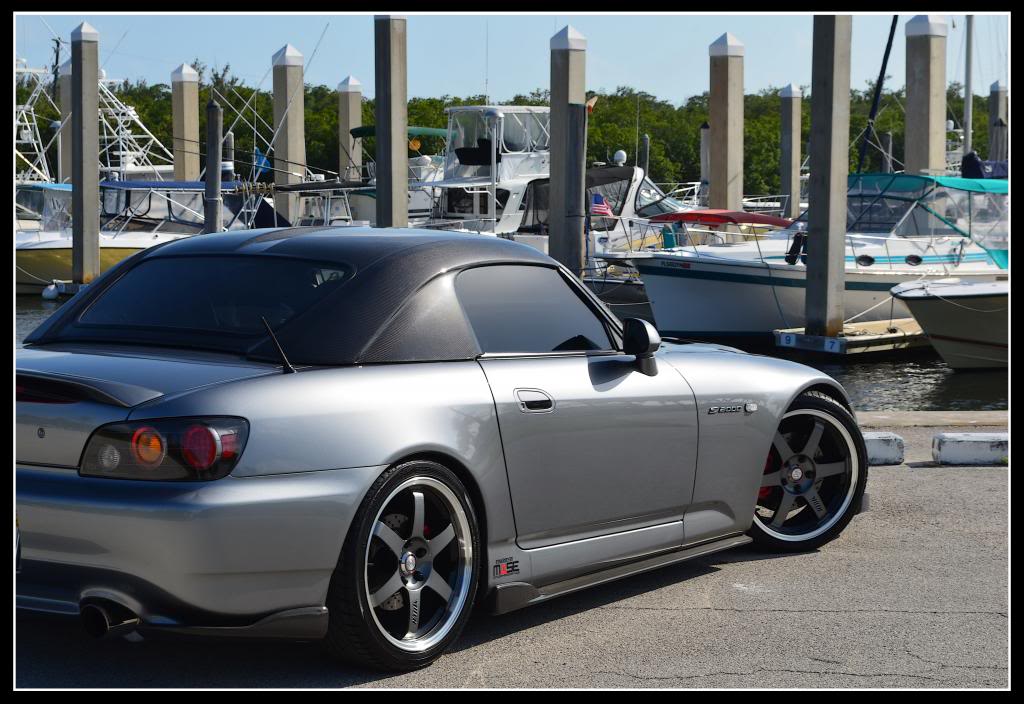
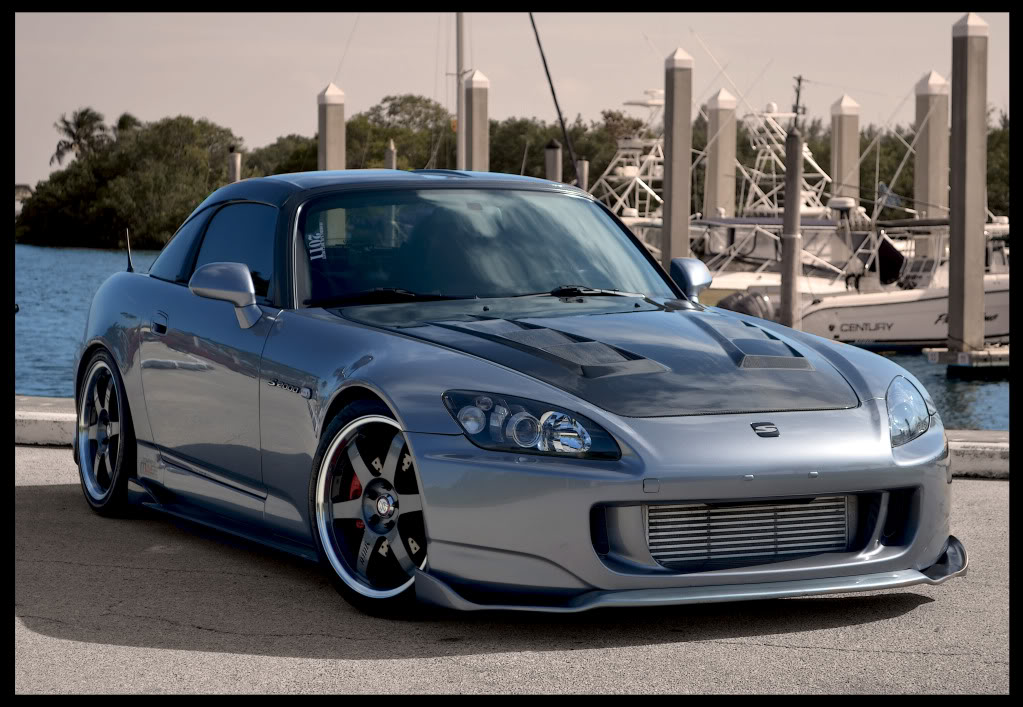
THE FINISHED PRODUCT:
_______________________________________
FINISHED ENGINE BAY
http://www.youtube.com/watch?v=nqT1Ft_DnqM
Peak wheel torque: 489wtq @ 21psi
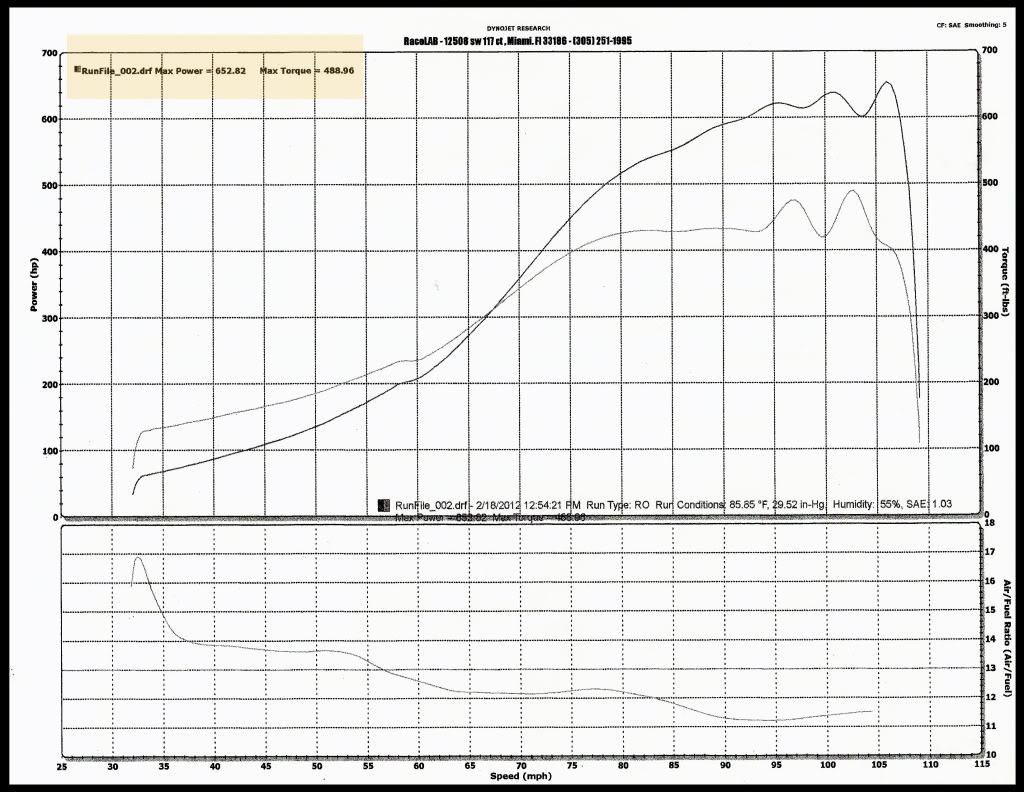
Peak wheel horsepower: 698whp @ 22psi
__________________________________________________ _____________
FINISHED INTERIOR
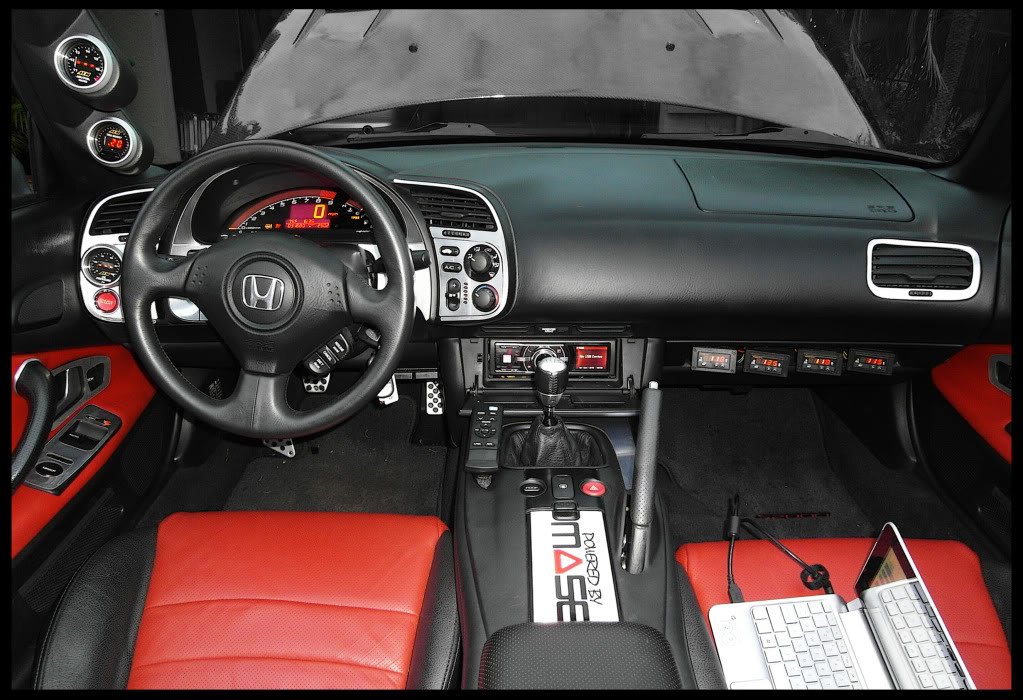
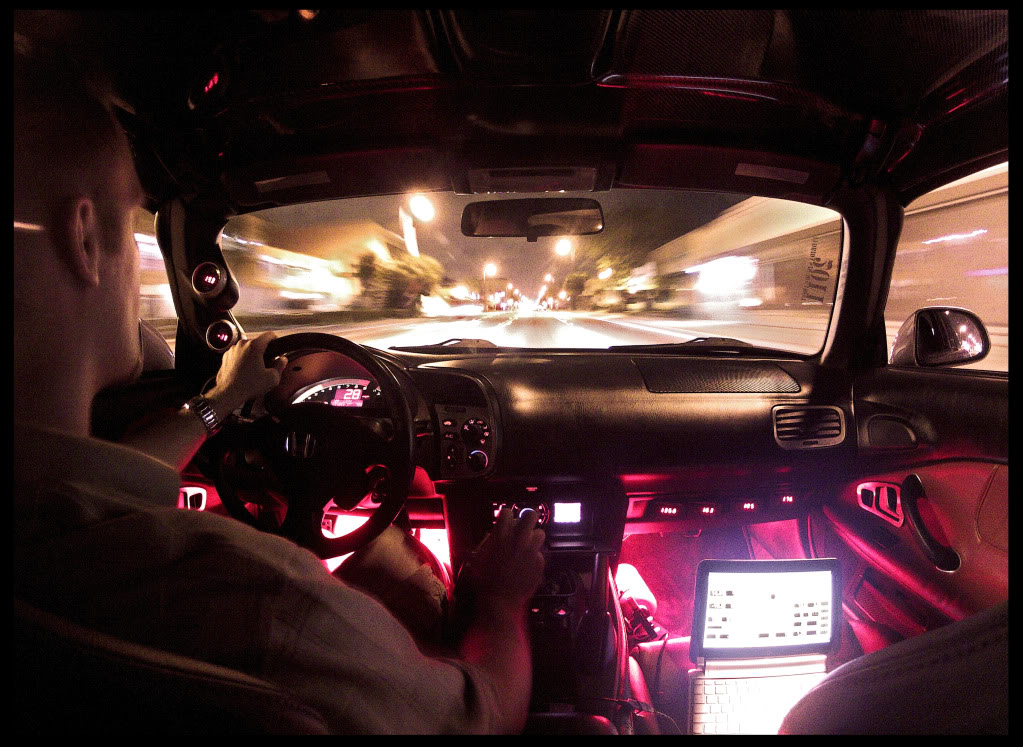
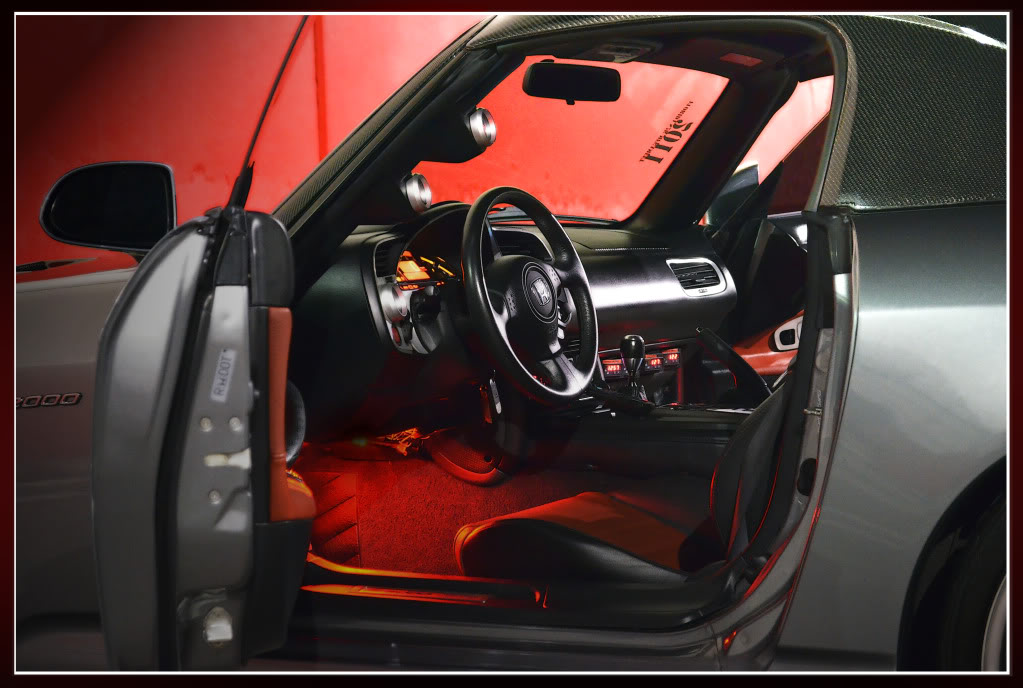
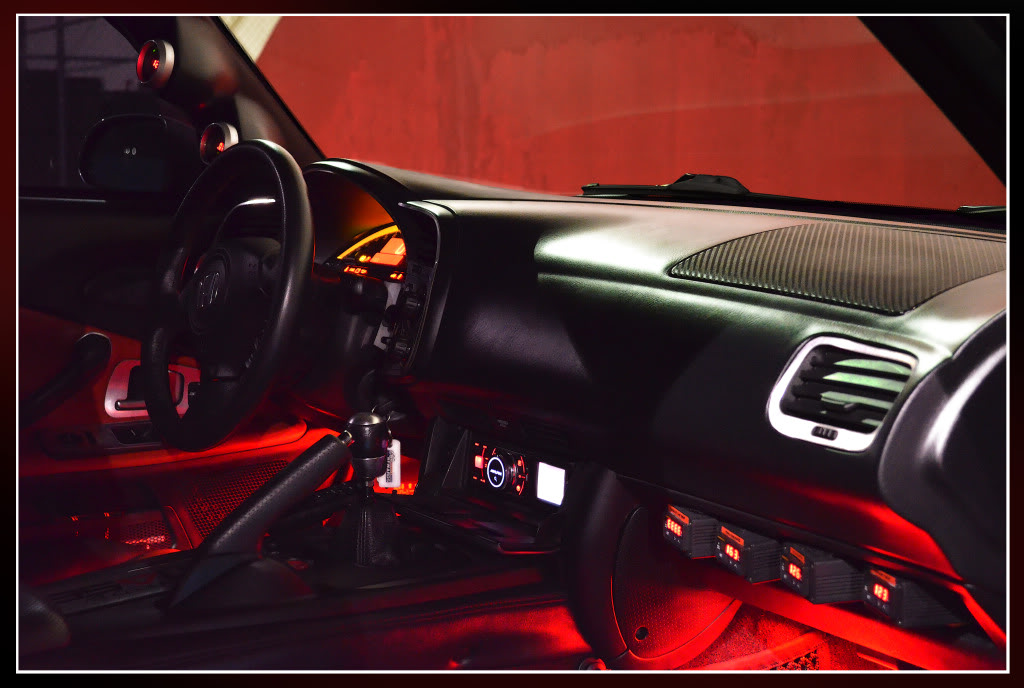
__________________________________________________ _____________
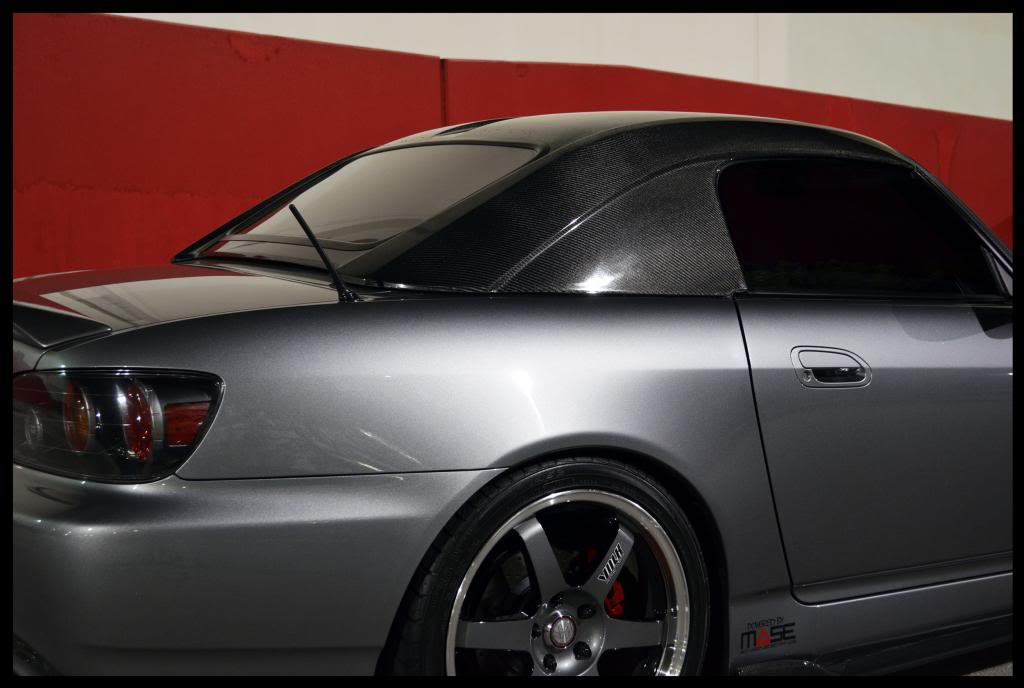
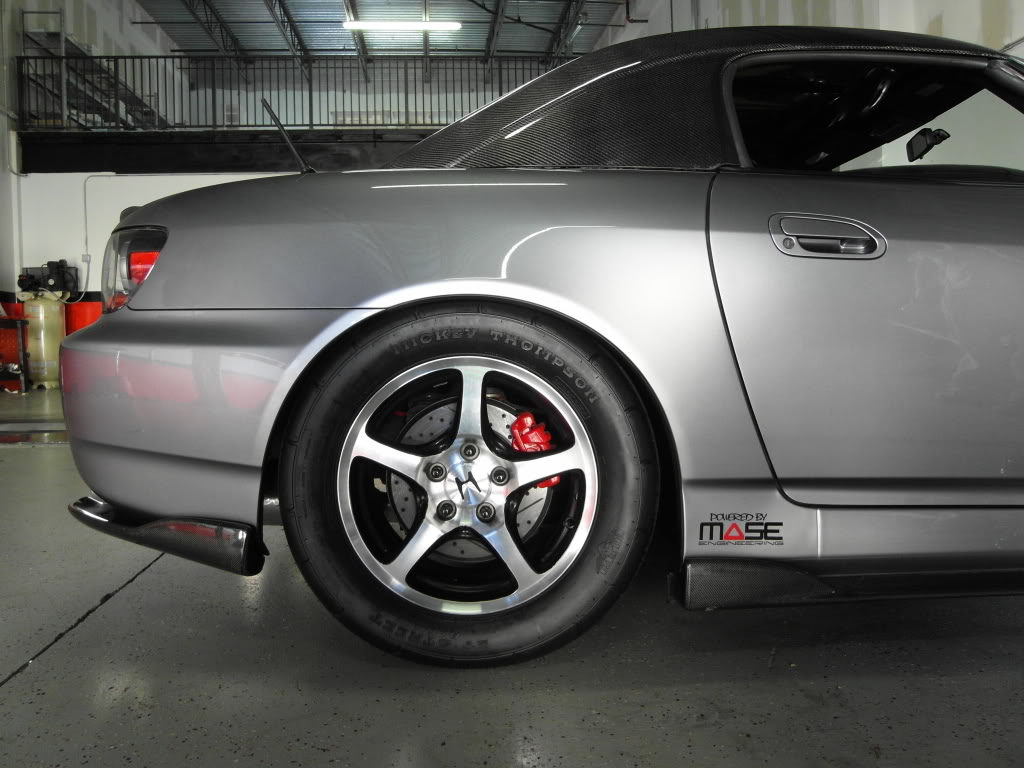
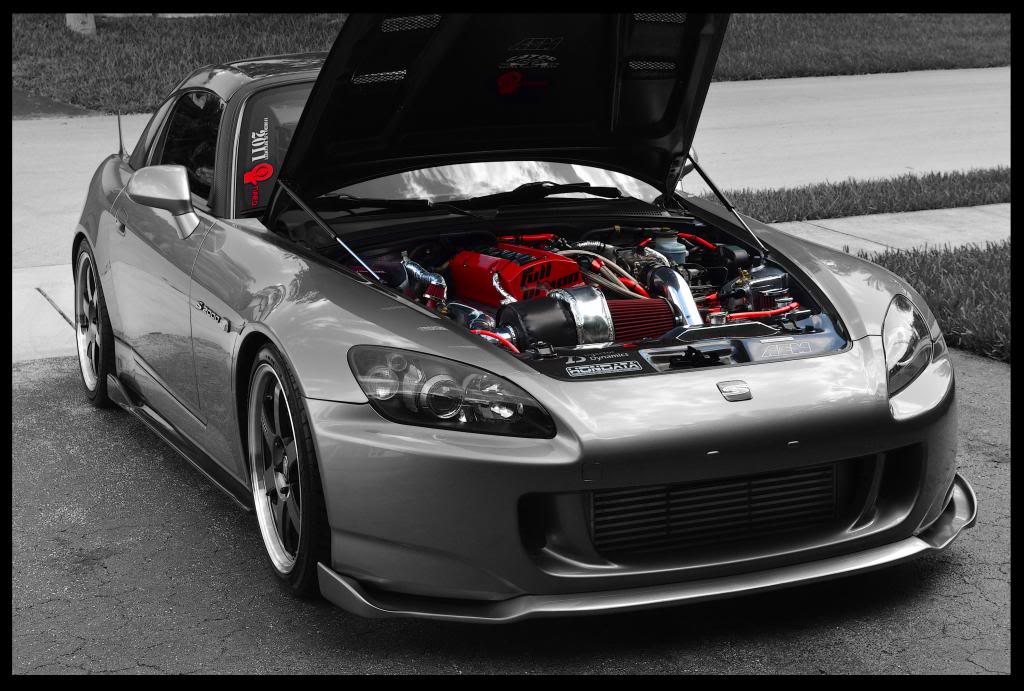
FINISHED EXTERIOR
_________________________________________________
Thank you for visiting my complete build thread! Any comments, suggestions, or critiques are welcome.
I don't care if you copy my build in any way- it's here to help others that are questionable about
things and may need a build path just as I did when I first started out.
And be sure to check out my video thread where I post all my races and dyno runs:
https://www.s2ki.com/s2000/topic/878...rld-literally/
_______________________________________
FINISHED ENGINE BAY
http://www.youtube.com/watch?v=nqT1Ft_DnqM
Peak wheel torque: 489wtq @ 21psi
Peak wheel horsepower: 698whp @ 22psi


__________________________________________________ _____________
FINISHED INTERIOR
__________________________________________________ _____________
FINISHED EXTERIOR


_________________________________________________
Thank you for visiting my complete build thread! Any comments, suggestions, or critiques are welcome.
I don't care if you copy my build in any way- it's here to help others that are questionable about
things and may need a build path just as I did when I first started out.
And be sure to check out my video thread where I post all my races and dyno runs:
https://www.s2ki.com/s2000/topic/878...rld-literally/


Trending Topics

Thread Starter
Registered User
Joined: Dec 2009
Posts: 2,396
Likes: 0
From: Auburn Hills, Michigan
Yea, well the shop is killing me. I still have to let them do the finishing touch-ups and fisnish putting it all back together, and then I have to break in the differential! so the numbers wont come for maybe a month or so. sucks i know. sorry.