
Cold'ish air intake for KW v2.2


Thread Starter
Registered User
Joined: Mar 2014
Posts: 42
Likes: 0
From: Rio Rancho, New Mexico
I had a spare intake lying around so I decided to fab up something for my car. Most of you guys have Ap2's or atleast the front ends but I'm still a huge fan of the Ap1 and its fascia design. The huge benefit being large, unfunctional (oem atleast), air dams. Now I do track my car and brake ducts sound great, but until I'm more skilled to really push the car and need the extra cooling (my local road course is rather small anyhow) I decided to put the extra space to use. I cut the intake into a large L shape and used a shorter section of large radius bend to point my K&N filter out to the air dam. The car idled better and felt (obviously no data to backup any gains) much better partial throttle and as boost climbs. Maybe feeding the supercharger from a more stable and consistent column of air beats just tossing a filter onto a 90 degree bend and locating it directly behind to fans adding turbulent airflow. It did require removing the front dam via dremel and making some slight modifications to the A frame mount under the headlight but that was it. The red coupler near the filter is there to aid in keeping the piping from rubbing on the headlight A frame.


Yeah my engine bay is terribly dirty, cold weather and track days have taken its toll. It's getting a much needed deep cleaning this weekend.
Yeah my engine bay is terribly dirty, cold weather and track days have taken its toll. It's getting a much needed deep cleaning this weekend.

Thread Starter
Registered User
Joined: Mar 2014
Posts: 42
Likes: 0
From: Rio Rancho, New Mexico
I could tell you guys all day I feel like I picked up 10-15whp and maybe some would believe, most would call it complete and utter BS. What I can do is explain how I did it and hope some more will try it and see if they feel an improvement. Hell, the very slight decrease in IAT alone on a warm day warrants trying it. I'm in NM and its currently 30-50 degree's lately so I can't say what it's going to do for warm days but we can all agree that decreasing temperatures and increasing air velocity increases whp. And some may argue that it still has to get to the blower where it is spun and compressed causing all types of turbulence but it still enters the impeller at a more consistent rate and likely higher velocity when it is chambered through intake piping.
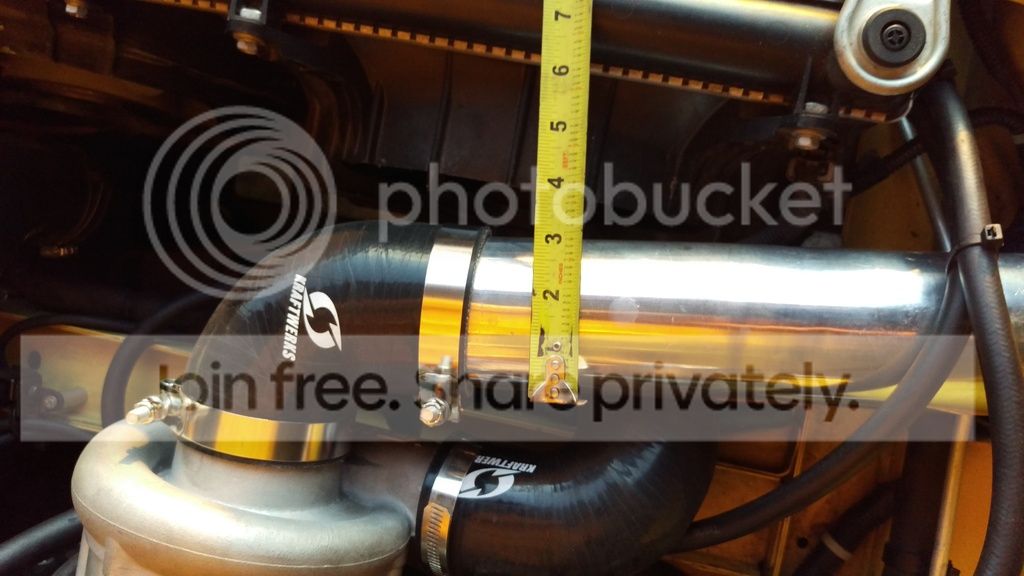
The piping is 3", again, was from a generic ebay cold air intake for our cars, you know the ones that drop down between the front crossbeam and radiator fans then turn before going behind the passenger front side of the car. I had chopped it up to help a friend out with some piping and had a few chunks of it left. I had to trim the A frame (posted below, pic stolen from google and poor ms paint highlighted, sorry!) below the headlight.
If you peek into that hole where the headlight wiring exits the engine bay and goes into the headlight you will see something like this.

As you can see, this is the driverside but it is also the same on the passenger. It's maybe 1/16" light steel, it has 3 10mm bolts mounting it vertically to the chassis, 1 to the headlight, and the last mounts to the front bumper far end mount directly below the headlight. If you chop the area I've circled in red off, leaving only what will shaped as a large somewhat-flat triangle you will now have plenty of room to route the piping into the air dam area. I removed some meterial just before the hole and pushed it flat against the frame but only because I was 2" shy of the length I truly needed. Had I of had that I wouldn't have had to cut that area at all.
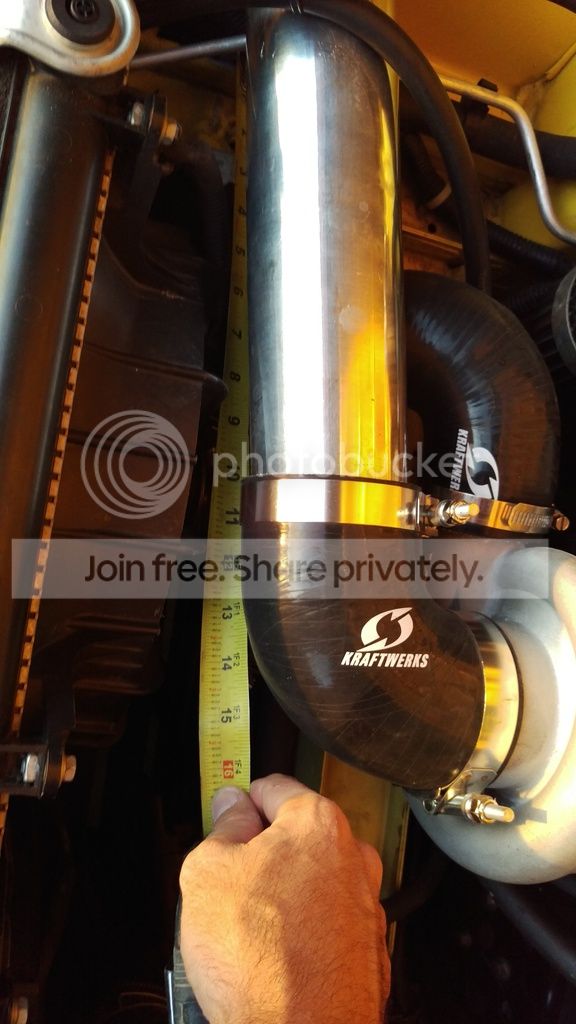
I would say from the inside of the L shaped intake tubing to the 90 degree kw bend you would want atleast 14". So roughly 17-18" would be plenty and you could shape it to fit perfectly. I didn't have to modify the hole itself that leaves the engine bay, I used some 1/4" rubber tubing split down one side to make something like a rubber sheild to keep the piping from rubbing the steel there. You could also get some door trim from Autozone/Pepboys in the Ricer isle and do the same.
Again, I'm rather certain this is 3" piping.
Ebay intake shape is something like this...The cut was made just after the aluminum tab on the upper pipe, close to the 90 degree bend. That should leave you with the needed pipe to get you into the hole and aimed down at the air dam. Then splitting the second tube in half will net you the remaining piping and bend putting your filter location right by mine. Fitting all this in between the fender liner and the headlight A frame bracket is no small feat, I made a small notch just to gain another 1/4" or so of clearance. I'm dropped on Swift Spec R's and have 235-45-17s up front, the tire sits very close to the splash guard now but has yet to make contact, I even purposefully went to some dips and speedbumps trying to get it to make contact as a precaution. I used a spare coupler to attach the long L and lower section of piping together above the filter as you can see in my Vimeo video I posted in the first post on this thread.

I'm not ready to pull the bumper off again to get the exact filter, it was sourced from a friends turbo FRS and just happened to be in better shape than the KW one I had. I would suggest finding a good small K&N to make the room even easier for you 255 square guys.
Here's a series of #'s I can see on the filter, not sure if it will actually be the correct part number, but again I'm not interested in taking off the bumper until after the next track day. ***EDIT FOUND THE CORRECT FILTER LINKY!***

Hopefully, one of you crafty guys will come up with something as good or better and post your feelings on if it improved it or not. But as cheap intakes can be had on your local craigslist or ebay I'm sure someone else wants to try it. If so please post your thoughts on it here. We all know the butt dyno lies, washing your car feels like you gain 8whp but this has some logic behind it. Cheers!
The piping is 3", again, was from a generic ebay cold air intake for our cars, you know the ones that drop down between the front crossbeam and radiator fans then turn before going behind the passenger front side of the car. I had chopped it up to help a friend out with some piping and had a few chunks of it left. I had to trim the A frame (posted below, pic stolen from google and poor ms paint highlighted, sorry!) below the headlight.
If you peek into that hole where the headlight wiring exits the engine bay and goes into the headlight you will see something like this.
As you can see, this is the driverside but it is also the same on the passenger. It's maybe 1/16" light steel, it has 3 10mm bolts mounting it vertically to the chassis, 1 to the headlight, and the last mounts to the front bumper far end mount directly below the headlight. If you chop the area I've circled in red off, leaving only what will shaped as a large somewhat-flat triangle you will now have plenty of room to route the piping into the air dam area. I removed some meterial just before the hole and pushed it flat against the frame but only because I was 2" shy of the length I truly needed. Had I of had that I wouldn't have had to cut that area at all.
I would say from the inside of the L shaped intake tubing to the 90 degree kw bend you would want atleast 14". So roughly 17-18" would be plenty and you could shape it to fit perfectly. I didn't have to modify the hole itself that leaves the engine bay, I used some 1/4" rubber tubing split down one side to make something like a rubber sheild to keep the piping from rubbing the steel there. You could also get some door trim from Autozone/Pepboys in the Ricer isle and do the same.
Again, I'm rather certain this is 3" piping.
Ebay intake shape is something like this...The cut was made just after the aluminum tab on the upper pipe, close to the 90 degree bend. That should leave you with the needed pipe to get you into the hole and aimed down at the air dam. Then splitting the second tube in half will net you the remaining piping and bend putting your filter location right by mine. Fitting all this in between the fender liner and the headlight A frame bracket is no small feat, I made a small notch just to gain another 1/4" or so of clearance. I'm dropped on Swift Spec R's and have 235-45-17s up front, the tire sits very close to the splash guard now but has yet to make contact, I even purposefully went to some dips and speedbumps trying to get it to make contact as a precaution. I used a spare coupler to attach the long L and lower section of piping together above the filter as you can see in my Vimeo video I posted in the first post on this thread.
I'm not ready to pull the bumper off again to get the exact filter, it was sourced from a friends turbo FRS and just happened to be in better shape than the KW one I had. I would suggest finding a good small K&N to make the room even easier for you 255 square guys.
Here's a series of #'s I can see on the filter, not sure if it will actually be the correct part number, but again I'm not interested in taking off the bumper until after the next track day. ***EDIT FOUND THE CORRECT FILTER LINKY!***
Hopefully, one of you crafty guys will come up with something as good or better and post your feelings on if it improved it or not. But as cheap intakes can be had on your local craigslist or ebay I'm sure someone else wants to try it. If so please post your thoughts on it here. We all know the butt dyno lies, washing your car feels like you gain 8whp but this has some logic behind it. Cheers!


Joined: Mar 2010
Posts: 927
Likes: 35
From: ATL, GA
I'm going to be changing a few things on my setup in January so if time and finances allow I will try to do a before and after dyno comparison without and with a CAI in the passenger front bumper. I will definitely share my results if this happens.
Trending Topics
Thread Starter
Registered User
Joined: Mar 2014
Posts: 42
Likes: 0
From: Rio Rancho, New Mexico
It sounds slightly quieter at idle, I'm currently venting to atmosphere so the car typically sounds like I have a vacuum leak or a leaf blower under the hood. But it is somewhat diminished, but when passing stuff on the road, ie: a wall, building, ect there is a distinct induction noise that wasn't there before.


Thread
Thread Starter
Forum
Replies
Last Post
GT Motoring
Sponsor S2000 Engine and S2000 Drivetrain Deals
1
Nov 30, 2011 09:21 AM