
Comptech kit installed now issues

Thread Starter
Registered User
Joined: Mar 2010
Posts: 217
Likes: 0
From: Santa Clara CA
Yea its kinda sad that I had this installed and can't even drive my car now, tomorrow I will try and fix all the wiring or at least disconnect what is wrong and hopefully I get it running correctly the rest of the install looks to be right but all the electrical seems to be the problem and it's highly probable that this is my issue
Registered User
Joined: Jun 2011
Posts: 2,364
Likes: 0
Yea its kinda sad that I had this installed and can't even drive my car now, tomorrow I will try and fix all the wiring or at least disconnect what is wrong and hopefully I get it running correctly the rest of the install looks to be right but all the electrical seems to be the problem and it's highly probable that this is my issue
Im up here in Canada, so I can't suggest a shop in or near Santa Clara California. Maybe one of the other members could chime in ?


Registered User
Joined: Jun 2011
Posts: 2,364
Likes: 0
No that doesn't look right at all. The factory O2 sensor is still there, you can see it on the OEM header by the orange painted bolt. This bung in the side of the header was welded in, however at the complete wrong angle.
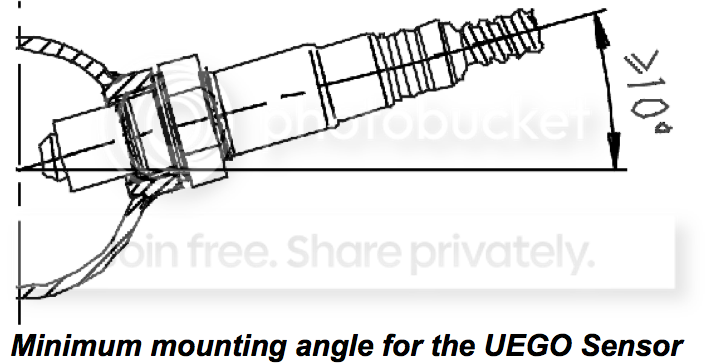
To prevent collection of liquids between the sensor housing and sensor element during the cold start phase, the installation angle should be inclined at least 10° towards horizontal with the electrical connection upwards.
Whoever did your install is a butcher and doesn't know what the hell they're doing....
Thread Starter
Registered User
Joined: Mar 2010
Posts: 217
Likes: 0
From: Santa Clara CA
No that doesn't look right at all. The factory O2 sensor is still there, you can see it on the OEM header by the orange painted bolt. This bung in the side of the header was welded in, however at the complete wrong angle.
To prevent collection of liquids between the sensor housing and sensor element during the cold start phase, the installation angle should be inclined at least 10° towards horizontal with the electrical connection upwards.
Whoever did your install is a butcher and doesn't know what the hell they're doing....
Registered User
Joined: Jun 2011
Posts: 2,364
Likes: 0
The sensor that is in the straight up position is the OEM O2 Sensor. The one located on the side of the header is the AEM Wideband. It was welded incorrectly which will cause the sensor to fail prematurely costing you 100 bucks every time you have to replace it. It can also cause it to show false readings. As it stands right now the wideband should be setup as a passive device just to display your AFR since you are still using the OEM computer.
At this point I would assume that there are other more serious errors to do with your install and you should have the car taken to a reputable shop to have the install fixed, cut your losses and hope they didn't cause any permanent damage to your engine.
At this point I would assume that there are other more serious errors to do with your install and you should have the car taken to a reputable shop to have the install fixed, cut your losses and hope they didn't cause any permanent damage to your engine.

Registered User
Joined: May 2004
Posts: 5,094
Likes: 6
From: Vienna, VA
The wideband O2 sensor was installed incorrectly, but it's probably still usable where it is...for now.
Mine got installed in that location, too, but at least they did it so that it is at a positive angle (barely pointing up), but mine's not 10 degrees. Even though that's what I asked the shop to do and I would pay for removing the manifold if needed, they still did it the way they did it. When I commented their response was along the lines of "I've been doing this over 10 years so I know a few things about this" and they did only charge $10 so I let it go...but still.
Mine does at least read consistent and it has lasted over a year. Ideally you want to get your bung moved to a more appropriate place, but you'll be fine for a little while. The cold start uses an air pump heat things up there real quick so I don't think condensation will be much of a problem...but you still want it done right.
As others have said, look at other things to ensure this was done right.
Critical areas:
Fuel pressure regulator: Leaks can develop here if the installer was lazy. It should be on the driver's side near the brake master cylinder. Ensure both ~1/2" hoses are on there tight and that you don't smell gas...and check MANY times. Also, there should be a 4mm hose going from the fuel pressure regulator to the intake manifold. If you don't see the big red fuel pressure regulator...yikes....don't drive the car. The stock regulator (on the fuel rail) should be removed (installer gave it to you right...it's about 1 inch in diameter with hose 2 hose barbs) will not work as it will not increase fuel pressure...you will lean out when any boost hits and could pop the motor on your first run. Also, if you are using an AP2 fuel pressure regulator, you will likely run too rich...and won't be able to tune it right. Try to find an AP1 comptech regulator.
crank pulley...hopefully the installer torqued this down. Fortunately an air wrench won't reach it, but if he didn't torque it down...195lb-ft I think is the number...that could be bad.
belt: ensure it's on there tight, but not too tight. You should be able to twist the belt (the part not on a pulley) 90 degrees...any more than that is too tight.
aftercooler: make sure you hear the water pump when the ignition is on but the car not started. It is inside the front bumper on the driver's side (US car). If you don't have an aftercooler...don't use that AP2 pulley.