Discrete locations for AFR gauges and boost gauges


 02-03-2012, 03:55 PM
#92

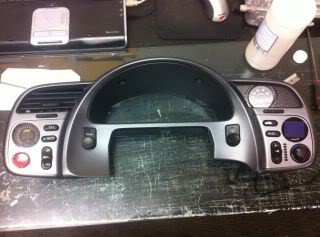
I have been wanted to do this when I first saw the gauge in the audio controls two years ago. After having my s2k sit for 2 years finally getting around to get it s/c and putting all my parts on that have been sitting. Since Qube will be doing my led conversion to update things in the cabin I took it as a good time to get the gauge in there while everything is torn apart.
There is a small lip around the gauge as seen in the pics but it's the most flush you can get the Serial Gauge due to the button covers lip but all in it came out great. Looks factory install and I'm glad it to be replacing the three AEM digital gauges for a cleaner look since this one will be doing my boost, AFR & oil pressure.
4 hours later over the span of two days gets you this


Mike
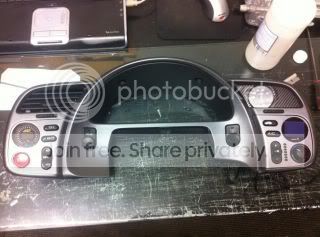
Exact same setup I am doing. How did you mount the gauge without the front bezel?
02-04-2012, 10:31 AM
#93
Registered User


Join Date: Nov 2005
Location: Wappinger Falls, NY
Posts: 1,064
Likes: 0
Received 0 Likes
on
0 Posts
VTECS2K I took pictures just in case someone asked lol.
First you have to take it apart and pull out the button overlay, the screen, rubber ring, gauge overlay, and then the last to overlays until you see the circuits. Once that's all off you need to use the digrinder with a metal cutting wheel and cut off the metal post that you screw on in the back to give you room for putting the radio control board back in.

Then use the digrinder with the round sander bit (looks like an .5" cylinder) to work away the ring of threads that the gauges metal ring screws around. Make it flush so it's rounded with the body of the gauge. Second you need to line everything back up and I used some duct tape to keep everything lined up.

Then you need to cut a lot of plastic away on the second plastic overlay once you separate the gray dash piece (so it doesn't get damage).


Once that's done it will be a tight fit but once you work the gauge into the second plastic opening Your good. It can still be turned so position so it's even on the control overlay and then you will need to dab just a small of amount of gorilla glue on the bottom left and right corners to make it sit flush with the overlay.


This is because of the buttons on the serial gauge. Any other gauge would sit flush without the need of glue. To make it so you have no inside lip you will need to enlarge the opening on the silver overlay but I didn't want to take a chance of damage it since that is the piece you can see and also the button overlay would have nowhere to sit since it needs to be pressed in to hold everything together. Plus if you look at the photos from my first post and these two extra you will see that it sits pretty damn flush. The small lip is barely noticeable.


Next step when I get back everything from Qube for my new led dash I will need to extend the black clyinders to the leds so the buttons still illuminate when my headlights are turn on. Also most likely will be using long screws to keep the board mounted to the new cut bezel due to the added depth from the gauge.
Any other questions just let me know. Thanks.
Mike


 04-04-2012, 12:43 PM
#99


Join Date: Aug 2011
Posts: 332
Likes: 0
Received 0 Likes
on
0 Posts
Originally Posted by kels_2k' timestamp='1314554269' post='20921613
i kind of like this
http://www.rallyroad.net/content/e36...ted-gauge-pods
http://www.rallyroad.net/content/e36...ted-gauge-pods
04-08-2012, 08:49 AM
#100
Registered User

Join Date: Feb 2011
Posts: 229
Likes: 0
Received 0 Likes
on
0 Posts
? anyone ?

detailing my car for the dragon run. Until i saw the post w/ the flush PLX guage I liked mine, but now after seeing it another way mine sticks out like a sore thumb.