
project V-mount

Joined: May 2012
Posts: 4,252
Likes: 3
From: SOMD
I've been worried about my car overheating during spirited driving (which I do quite often). I had some issues with my last setup but a vmount would certainly alleviate my concerns. This thread my push me to make the change, only issue is that my turbo sits pretty far forward and may not leave enough room for the intercooler core

Thread Starter

Joined: Aug 2009
Posts: 874
Likes: 7
From: Edmonton
Over the holidays I had a lot going on and never really got a chance to get rolling on the car. I did make a little bit of progress though. And I pretty much failed at taking pics of the important stuff.
Removed the interior so I can weld the A/C hole closed on the firewall. Gotta be a record to get this out in under an hour with the help of a buddy.

Finalized location of Radiator. Terrible job by me here of taking pics of the stuff that matters. I will try to remember to take pictures of the brackets I made up and welded in to hang this. Simple stuff, but would be nice to share with anyone else interested in doing this. The big point to watch here is the 90* -16 fitting coming off the back of the rad. It's very tight to squeeze it between the sway bar and the steering rack. I have at least 1/4 to 1/2" of clearance from fitting to sway bar. I really hope that's enough but I can't see a sway bar moving that much.
Up on a box for the last time.

Hanging out!

Designing the end tanks, and making some templates for my welder. My buddy Josh showed me a pretty slick trick on making these all out of one piece. This is version 1, later I built V2, and I already have V3 in my mind to get the inlet/outlet right smack in the middle of the tower.

Tessa the helper... isn't much of a helper but she adds some comedy to the garage.

And V1 of the end tanks all built mocked in. As you can tell I couldn't get the radiator as tight to the crossmember as I wanted due to the top AN fitting on the rad. So I had to compromise and slide both forward a bit. On the plus side you now get a view of the speedfactory engraving on the top of the rad.

I have a few slick ideas for mounting the intercooler. It should look like its floating with no visible hardware if I can pull it off.
Removed the interior so I can weld the A/C hole closed on the firewall. Gotta be a record to get this out in under an hour with the help of a buddy.
Finalized location of Radiator. Terrible job by me here of taking pics of the stuff that matters. I will try to remember to take pictures of the brackets I made up and welded in to hang this. Simple stuff, but would be nice to share with anyone else interested in doing this. The big point to watch here is the 90* -16 fitting coming off the back of the rad. It's very tight to squeeze it between the sway bar and the steering rack. I have at least 1/4 to 1/2" of clearance from fitting to sway bar. I really hope that's enough but I can't see a sway bar moving that much.
Up on a box for the last time.
Hanging out!
Designing the end tanks, and making some templates for my welder. My buddy Josh showed me a pretty slick trick on making these all out of one piece. This is version 1, later I built V2, and I already have V3 in my mind to get the inlet/outlet right smack in the middle of the tower.
Tessa the helper... isn't much of a helper but she adds some comedy to the garage.
And V1 of the end tanks all built mocked in. As you can tell I couldn't get the radiator as tight to the crossmember as I wanted due to the top AN fitting on the rad. So I had to compromise and slide both forward a bit. On the plus side you now get a view of the speedfactory engraving on the top of the rad.
I have a few slick ideas for mounting the intercooler. It should look like its floating with no visible hardware if I can pull it off.
Registered User
Joined: Sep 2009
Posts: 871
Likes: 0
From: 540
I've been worried about my car overheating during spirited driving (which I do quite often). I had some issues with my last setup but a vmount would certainly alleviate my concerns. This thread my push me to make the change, only issue is that my turbo sits pretty far forward and may not leave enough room for the intercooler core
Thread Starter
Joined: Aug 2009
Posts: 874
Likes: 7
From: Edmonton
Finally had a chance to work on this thing again a little bit last night. So I took some better pics of the stuff I could and used my actually camera this time.
These are the very simple brackets I made out of 1/8" steel plate, welded flush to frame rail and the old rad stay. Keeping the old rad stay allows me to retain the fender plastics mounting location on the inside, and on the outside of my splitter I have drilled a hole through it to get a second mounting hole on OEM trimmed fender liners.


Engine point of view out the front. Primary concern here is the top coolant fitting. It just barely sneaks by the sway bar (3/8" of room) and also misses the steering rack when the subframe pushes back up

Just another angle

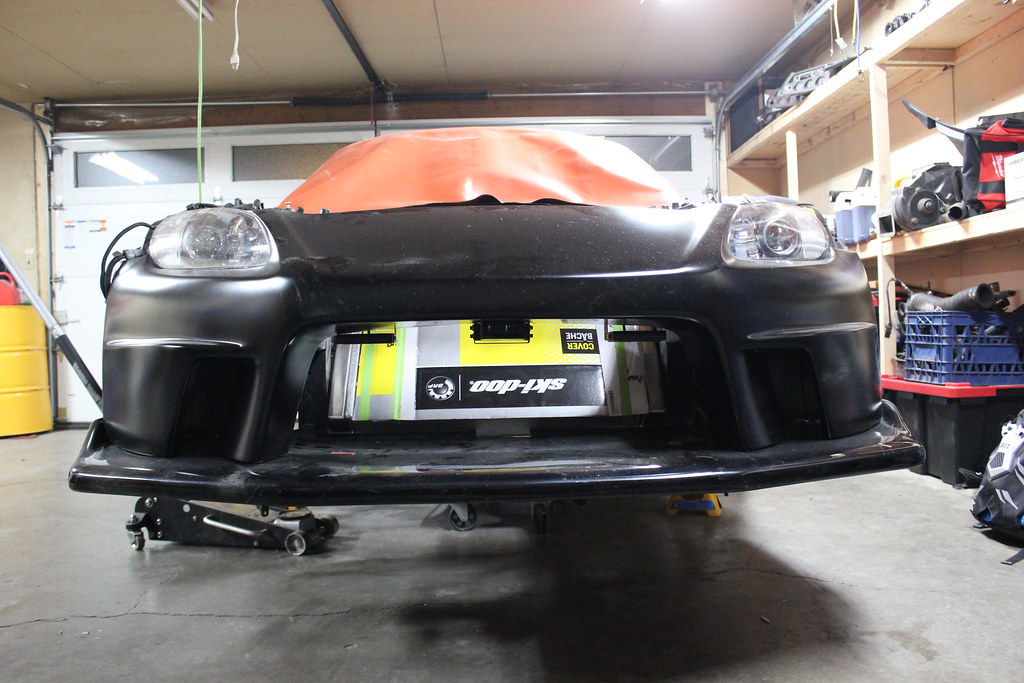
Fitment is pretty well perfect with the splitter/front bumper.

And the full view of the bumper with radiator mounted and in place.
Next up, finalize intercooler mounting. Hopefully my new turbo shows up so I can have my buddy weld a 90* on it at the same time he does the end tanks. And get started on piping next time I'm home. That's all for today.
These are the very simple brackets I made out of 1/8" steel plate, welded flush to frame rail and the old rad stay. Keeping the old rad stay allows me to retain the fender plastics mounting location on the inside, and on the outside of my splitter I have drilled a hole through it to get a second mounting hole on OEM trimmed fender liners.
Engine point of view out the front. Primary concern here is the top coolant fitting. It just barely sneaks by the sway bar (3/8" of room) and also misses the steering rack when the subframe pushes back up
Just another angle
Fitment is pretty well perfect with the splitter/front bumper.
And the full view of the bumper with radiator mounted and in place.
Next up, finalize intercooler mounting. Hopefully my new turbo shows up so I can have my buddy weld a 90* on it at the same time he does the end tanks. And get started on piping next time I'm home. That's all for today.
Thread Starter
Joined: Aug 2009
Posts: 874
Likes: 7
From: Edmonton
A couple new updates:
Since I was forced to move the radiator forward a bit to fit the AN fitting on the back I had to also move the intercooler a bit forward. It was either cut out the old upper rad bracket (which was bent from the jack mishap anyways) or tuck the intercooler underneath of it. This created a bit of extra work for me like a cooling plate that will need to be custom to fit. But also makes mounting the intercooler, and hood pins a bunch easier. I wanted to learn how to make some carbon fiber stuff anyways so using my old cooling plate to make a new one for my needs shouldn't be too hard.

So here's the new bar I welded in. 1.5"x.5" 1/8 wall tubing. Stiff enough that I can press a good amount of weight on it without really making it flex. Although I'm going to add a couple gussets just to make sure. I always seem to lean on this part while I'm working in the bay.

Intercooler test fit, and as you can tell I cleaned quite a bit up on the shock towers too.

Here's a pic of the root cause of moving the rad forward and not being able to use the crossbrace as the mount for the intercooler. This fitting just pops through with enough space.

Kinda shows how much of the intercooler would of been covered with the original setup.

And some more end tank fitment pics


And I finally got the 6266 off of my buddies car. It came with a 1.15 hotside, contemplating switching to a 1.00. If anyone wants to chime in on that I'd be curious to hear some debates. I won't be going higher than 650 whp due to my ST valve train, so quicker spool is more important to me then horsepower over that range.
Here's a few pics of the fitment... it's going to be very tight :S.

Will be cutting a tight radius elbow, and trimming the turbo so it can fit in there and come straight out like the GT35R


Since I was forced to move the radiator forward a bit to fit the AN fitting on the back I had to also move the intercooler a bit forward. It was either cut out the old upper rad bracket (which was bent from the jack mishap anyways) or tuck the intercooler underneath of it. This created a bit of extra work for me like a cooling plate that will need to be custom to fit. But also makes mounting the intercooler, and hood pins a bunch easier. I wanted to learn how to make some carbon fiber stuff anyways so using my old cooling plate to make a new one for my needs shouldn't be too hard.
So here's the new bar I welded in. 1.5"x.5" 1/8 wall tubing. Stiff enough that I can press a good amount of weight on it without really making it flex. Although I'm going to add a couple gussets just to make sure. I always seem to lean on this part while I'm working in the bay.
Intercooler test fit, and as you can tell I cleaned quite a bit up on the shock towers too.
Here's a pic of the root cause of moving the rad forward and not being able to use the crossbrace as the mount for the intercooler. This fitting just pops through with enough space.
Kinda shows how much of the intercooler would of been covered with the original setup.
And some more end tank fitment pics
And I finally got the 6266 off of my buddies car. It came with a 1.15 hotside, contemplating switching to a 1.00. If anyone wants to chime in on that I'd be curious to hear some debates. I won't be going higher than 650 whp due to my ST valve train, so quicker spool is more important to me then horsepower over that range.
Here's a few pics of the fitment... it's going to be very tight :S.
Will be cutting a tight radius elbow, and trimming the turbo so it can fit in there and come straight out like the GT35R


Joined: Aug 2010
Posts: 1,042
Likes: 1
From: bacon
Might I suggest you tweak your end tank design? If you want to keep that design, flip the end tanks around so the thicker portion is up top. Then take the bottom of it and make it meet the top edge making a triangle end tank instead of a rectangle end tank. As you have it positioned now, the air will come in from your charge pipe, hit a flat surface, turn, go into your core, primarily pass through the top channels, hit the wall of the other side of the end tank and then go through the cold charge pipe. I'd also suggest your charge pipes coming in towards the bottom of the core at oblique angles to force the air to use the entirety of the surface area of the core.
Take a look at this:
It's just 3 pieces of metal. You take a rectangle, cut the edges, bend it around a pipe and then mock it up to the core until you get the edges to meet and tack it up. Then you get another piece and just cut some metal to shape. Used 14 gauge 3003 aluminum.
Attachment 173731 You can follow the line from the charge pipe outlet with that smooth radius from the end tank there.
another shot of the core:
Attachment 173732
Lastly, I really dig the cross member support. Did you end up putting nutserts in or something else? Also are you gonna have to clearance the framerail to get all that stuff to fit? The spot we chose is super tight and I had to hammer mine in a little