
My s2k Rebuild Thread

Thread Starter


Joined: Nov 2010
Posts: 6,324
Likes: 206
From: Ballston Spa, NY
2/16/2011
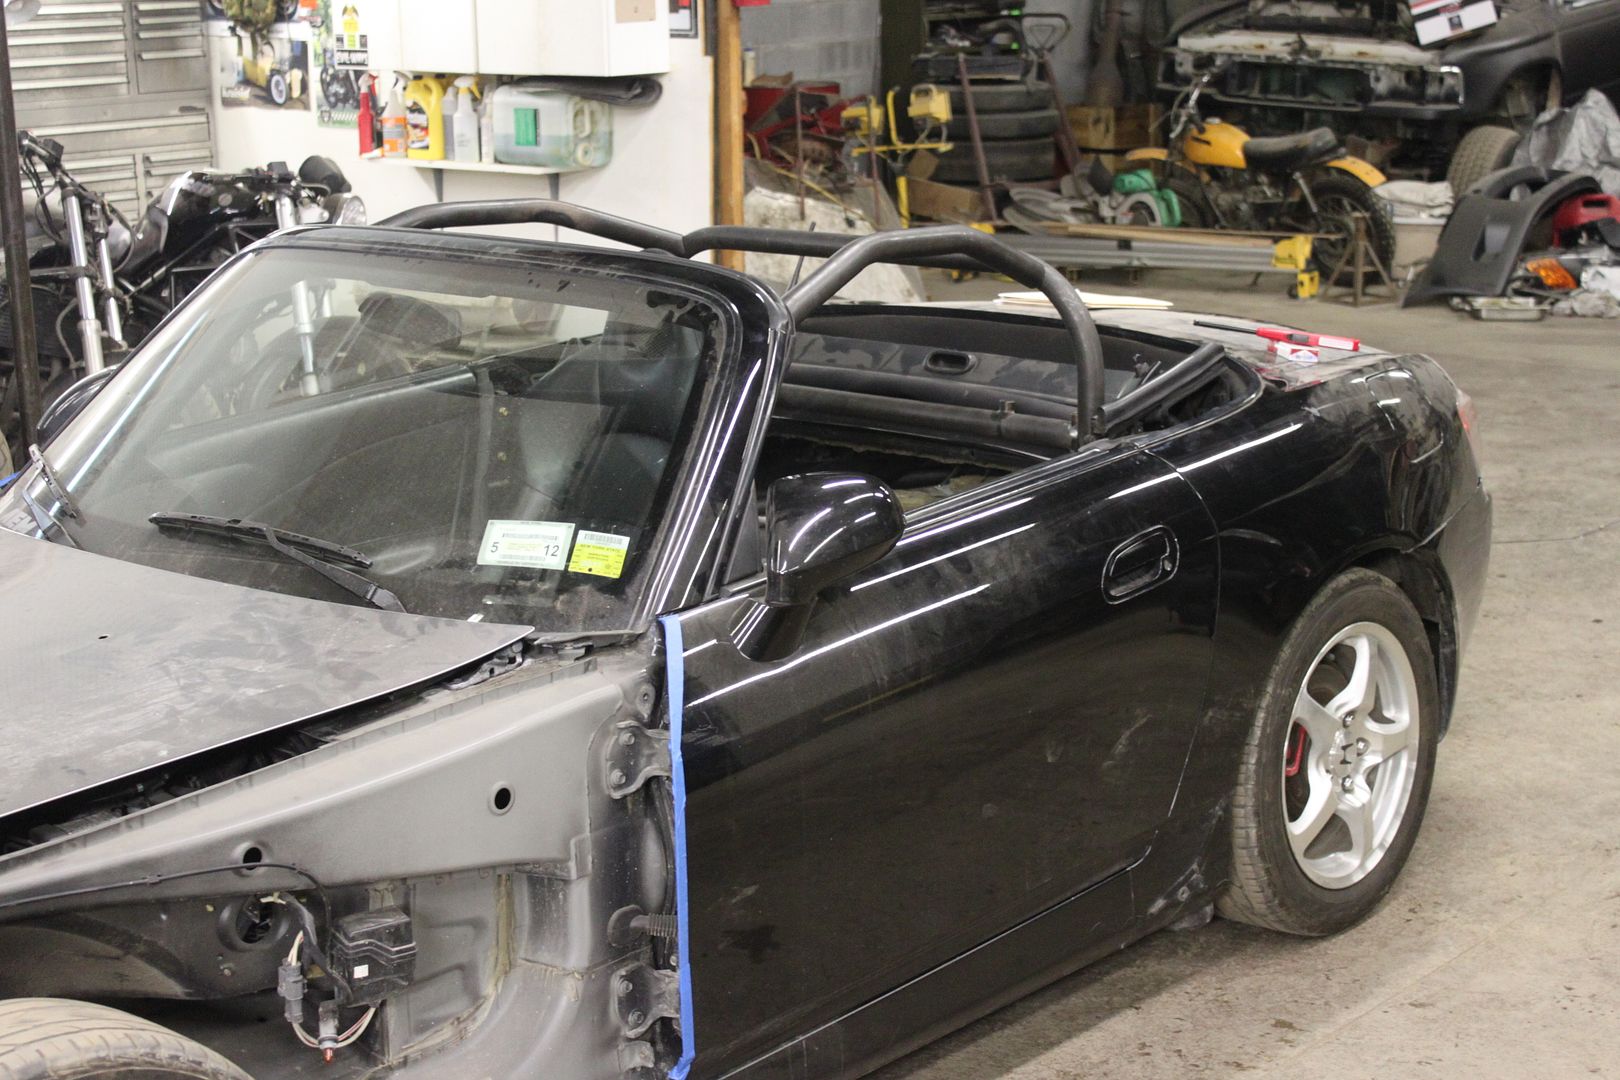
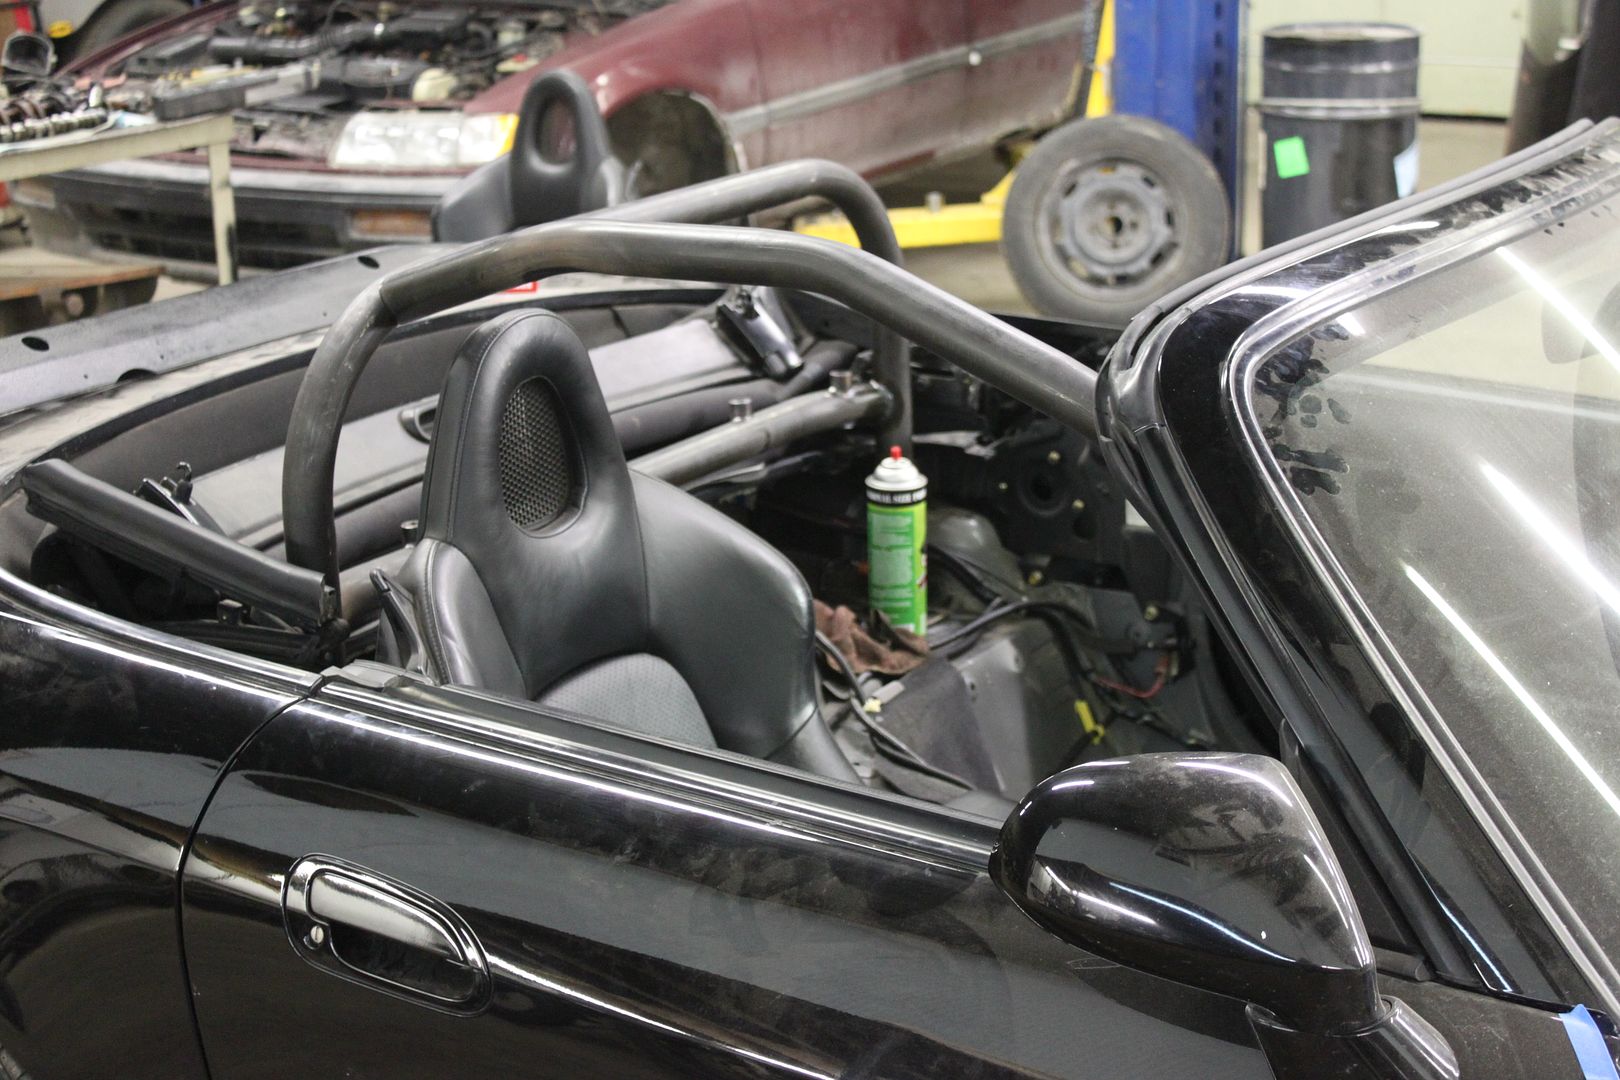
Worked on the cage a litttle bit last night. Spent a lot of time bullshitting and drinking but that's just fine with me. We ended up getting the rear section done and both pieces bent and knotched with the base plades done also. This has been and will be the hardest part of the entire cage. It is also the smallest part but it's just tricky because it bends in two different planes that are probably about 80degress to one another. I didn't take any pictures last night because we still need to weld this all in but here is pretty much what it looks like minus the downtubes behind the seats:
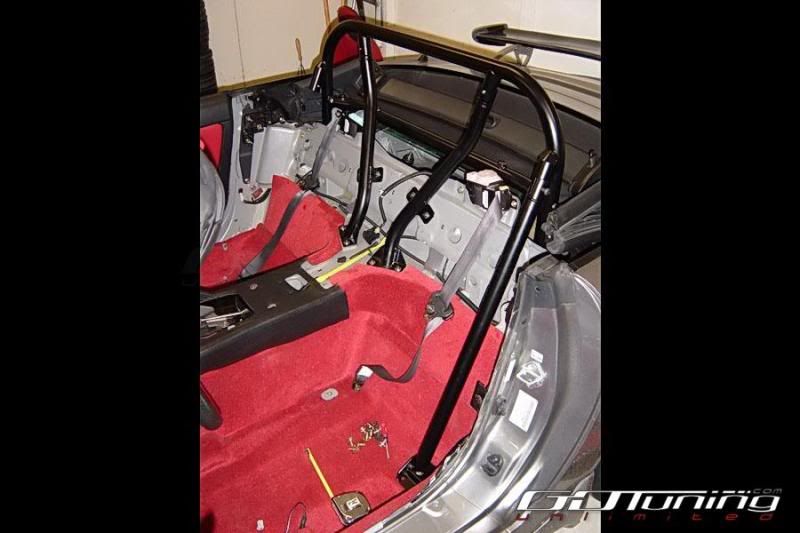
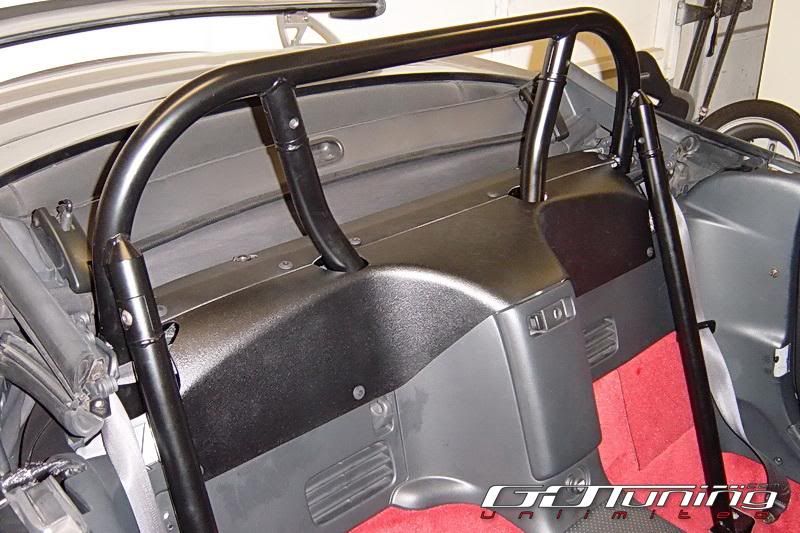
Now i'm pretty much just waiting to decide on seats. I origionally wanted something reclinable and was set on the sparco r505 (or torino 2) but they do not fit. Now i'm thinking bucket seats and have about 20 different brands and models in mind haha. I need to go soemwhere and sit in them to find the one i like and then i can finish this cage. So anyways, i'm waiting to decide on seats because i really want side support/braces for the cage, and the only way to tell if i can make them work or not is to have the seats first. I want to do something like this (first pic is from a customized mugen cage):
And if i can't pull that off with the seats of my choice (all depends on width of the seats) then i will run the cage like the mugen with the downtubes behind the seats. You only lose about 2" with downtubes behind the seats so even for a tall guy like me it's not too bad.
Anyways though, before seats we will be pulling the dash and running the a-pillar downtubes this weekend. This part should be too bad, but it's really going to set it off. It should look something like these:

I will be updating this weekend with more pics of my actual cage.
Worked on the cage a litttle bit last night. Spent a lot of time bullshitting and drinking but that's just fine with me. We ended up getting the rear section done and both pieces bent and knotched with the base plades done also. This has been and will be the hardest part of the entire cage. It is also the smallest part but it's just tricky because it bends in two different planes that are probably about 80degress to one another. I didn't take any pictures last night because we still need to weld this all in but here is pretty much what it looks like minus the downtubes behind the seats:
Now i'm pretty much just waiting to decide on seats. I origionally wanted something reclinable and was set on the sparco r505 (or torino 2) but they do not fit. Now i'm thinking bucket seats and have about 20 different brands and models in mind haha. I need to go soemwhere and sit in them to find the one i like and then i can finish this cage. So anyways, i'm waiting to decide on seats because i really want side support/braces for the cage, and the only way to tell if i can make them work or not is to have the seats first. I want to do something like this (first pic is from a customized mugen cage):
And if i can't pull that off with the seats of my choice (all depends on width of the seats) then i will run the cage like the mugen with the downtubes behind the seats. You only lose about 2" with downtubes behind the seats so even for a tall guy like me it's not too bad.
Anyways though, before seats we will be pulling the dash and running the a-pillar downtubes this weekend. This part should be too bad, but it's really going to set it off. It should look something like these:
I will be updating this weekend with more pics of my actual cage.
Thread Starter
Joined: Nov 2010
Posts: 6,324
Likes: 206
From: Ballston Spa, NY
2/20/2011
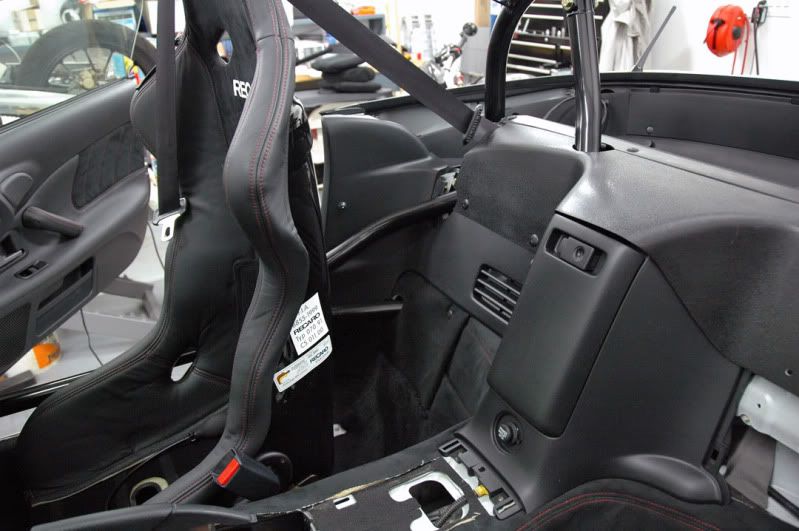
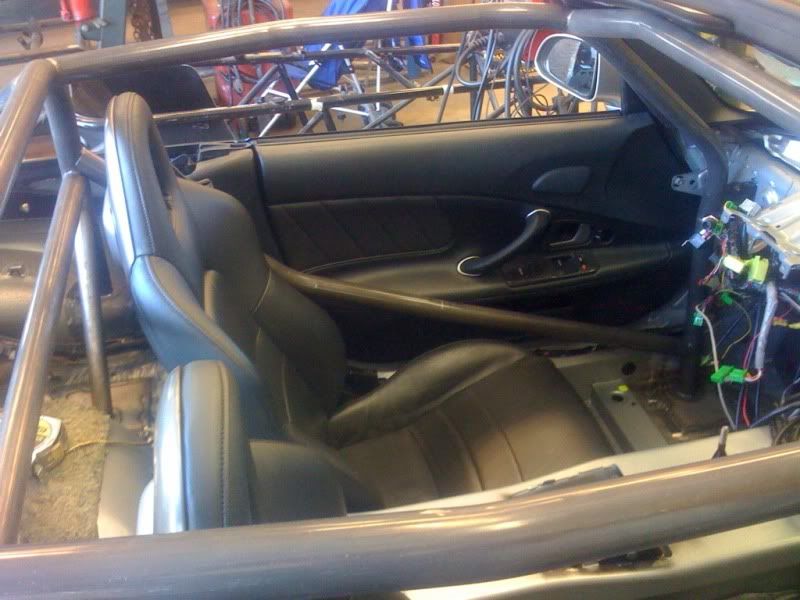
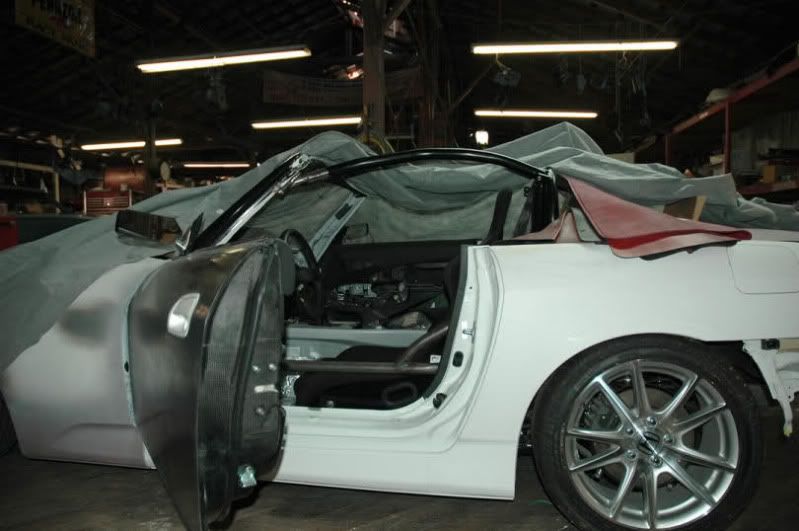
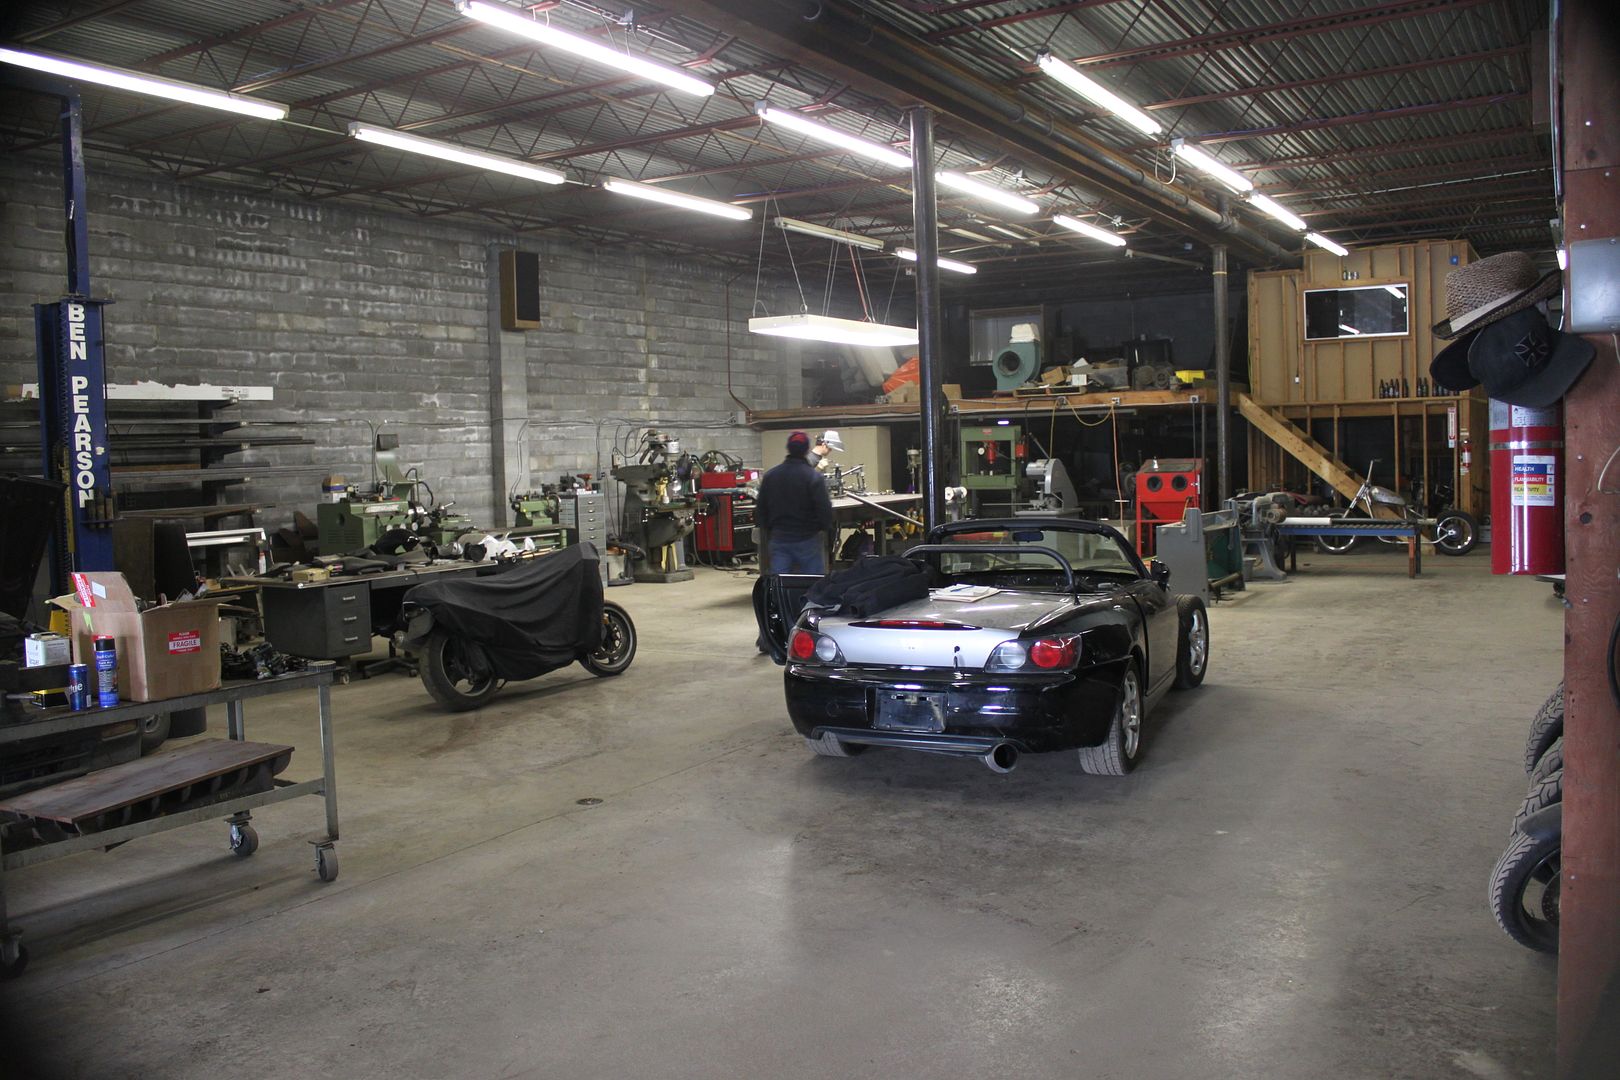
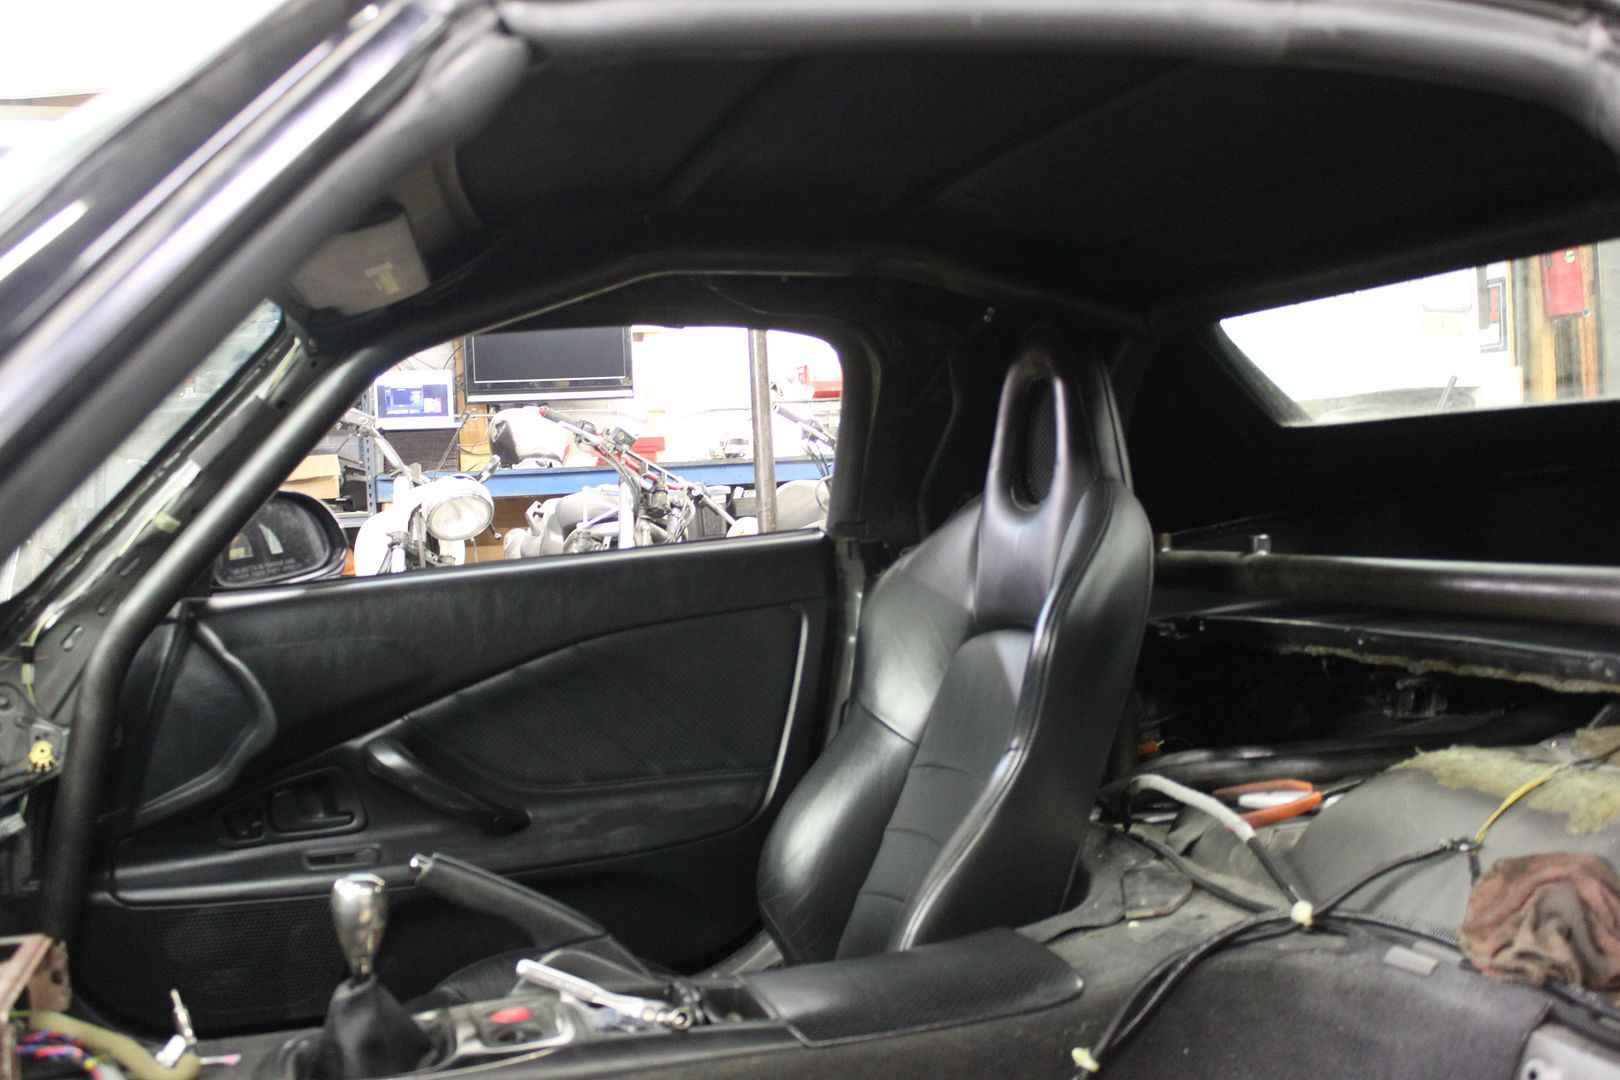
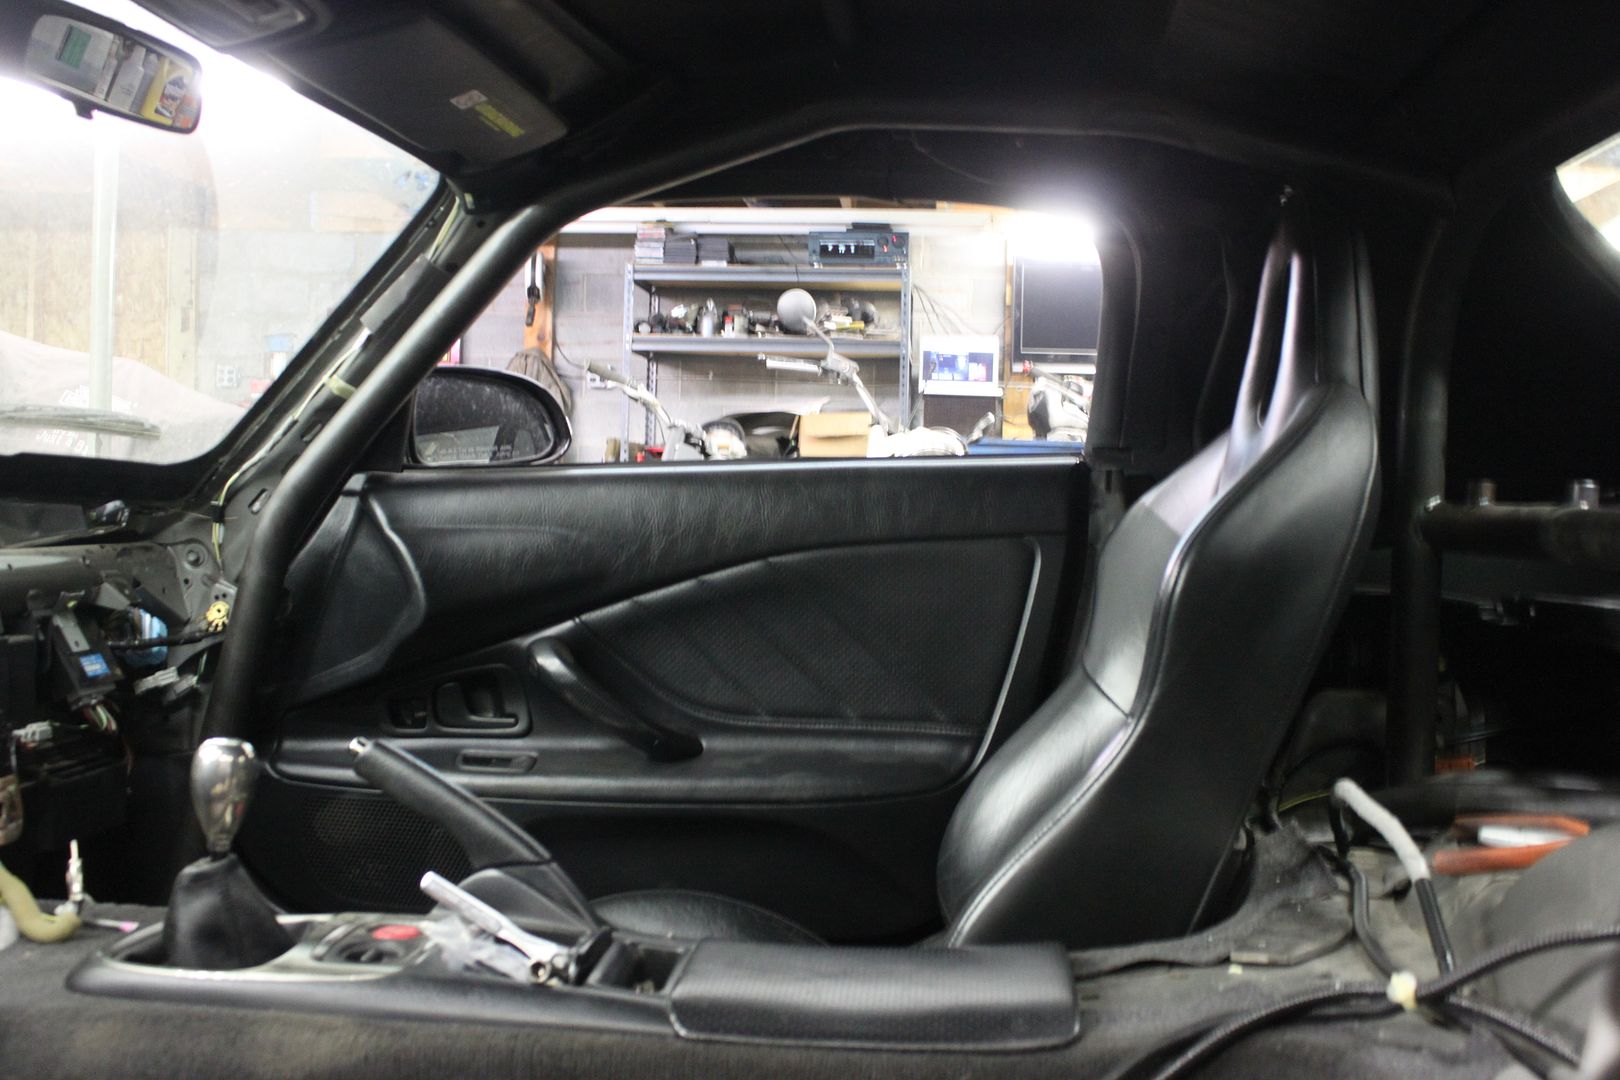
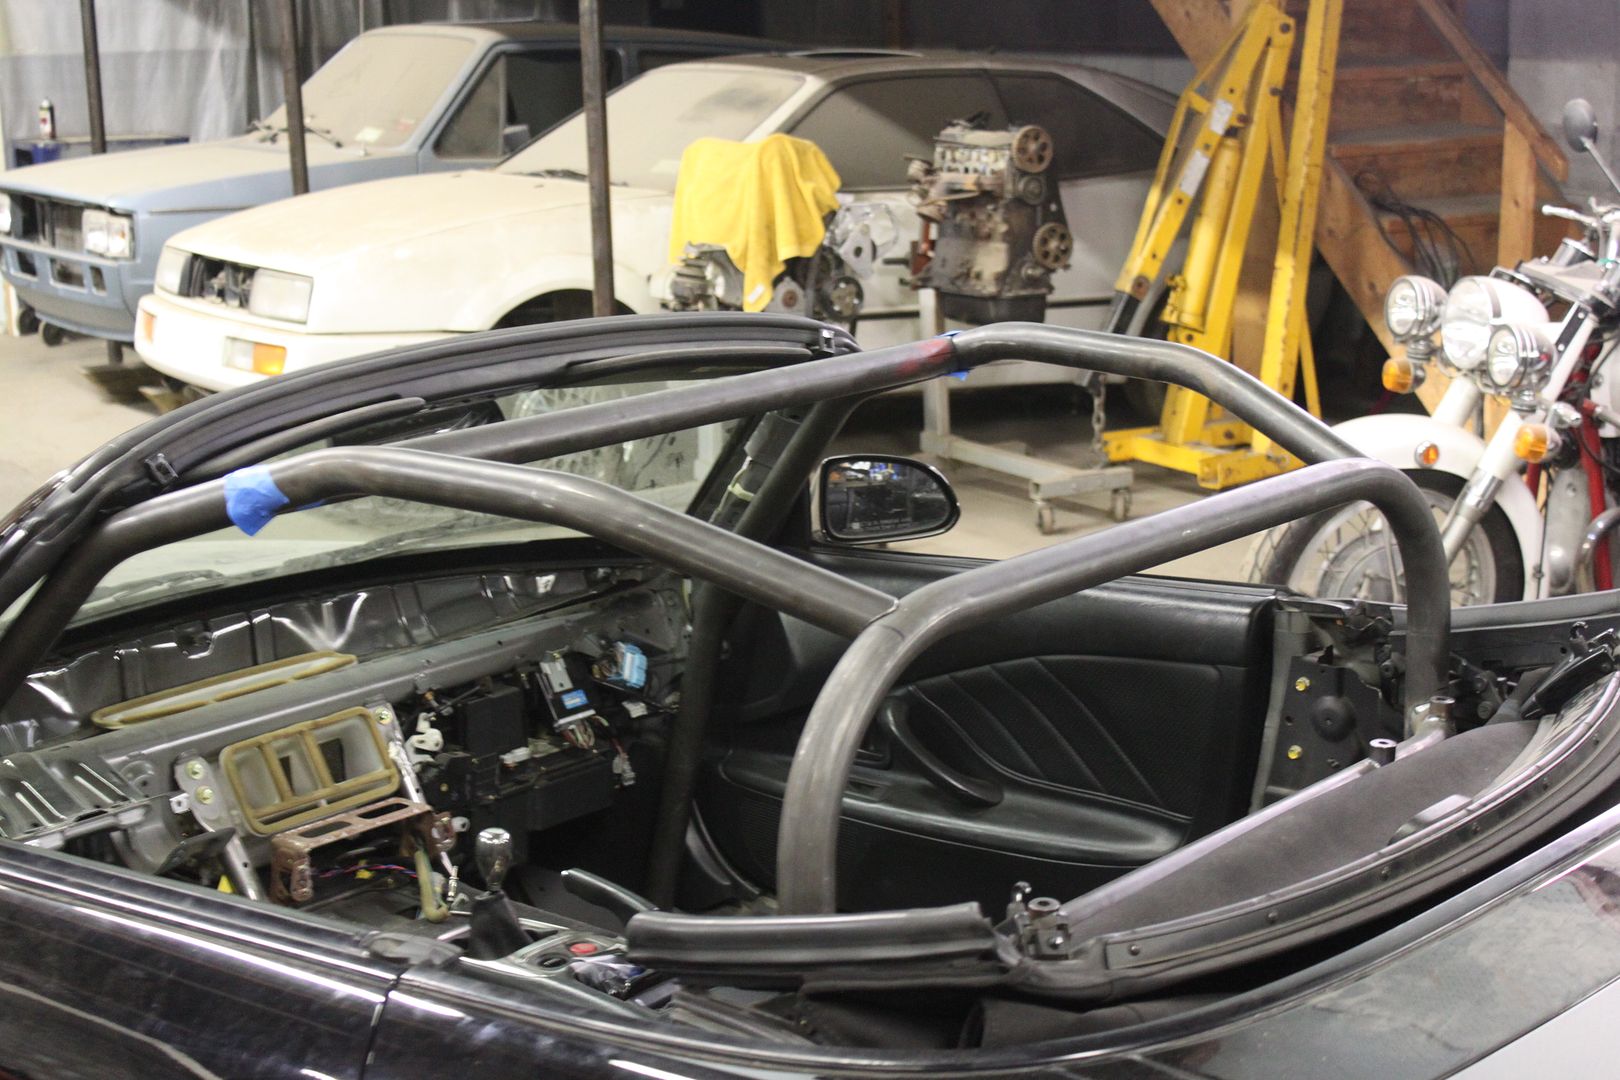
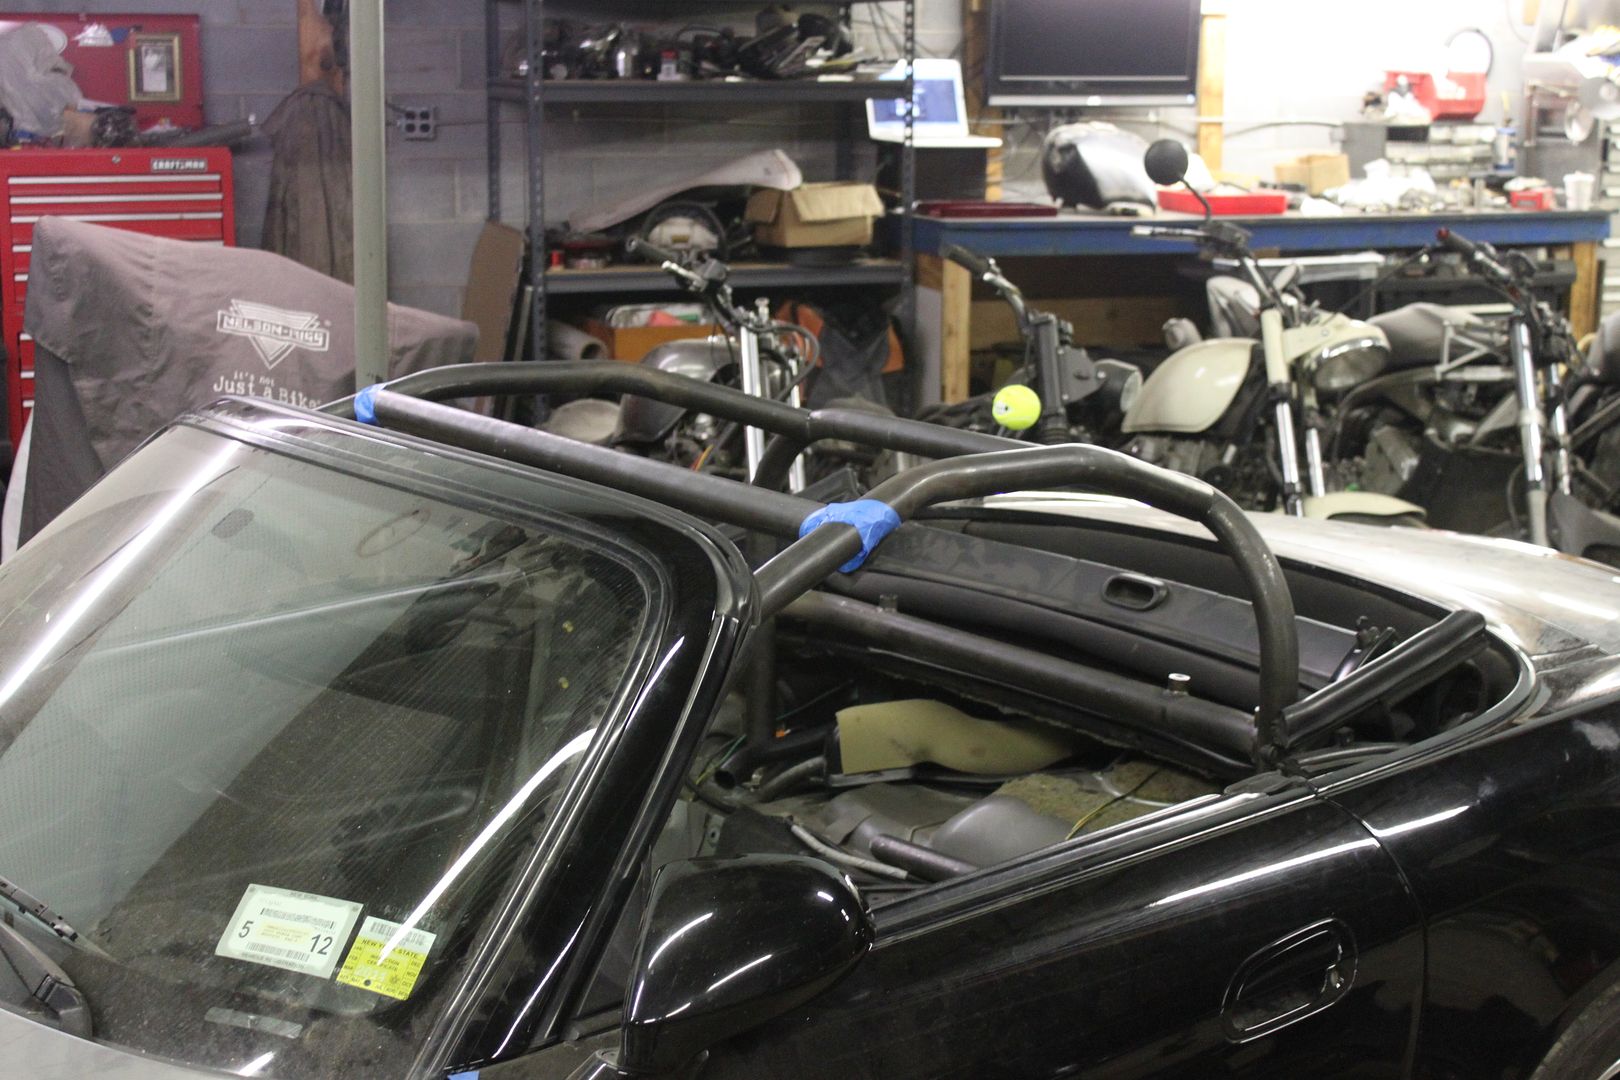
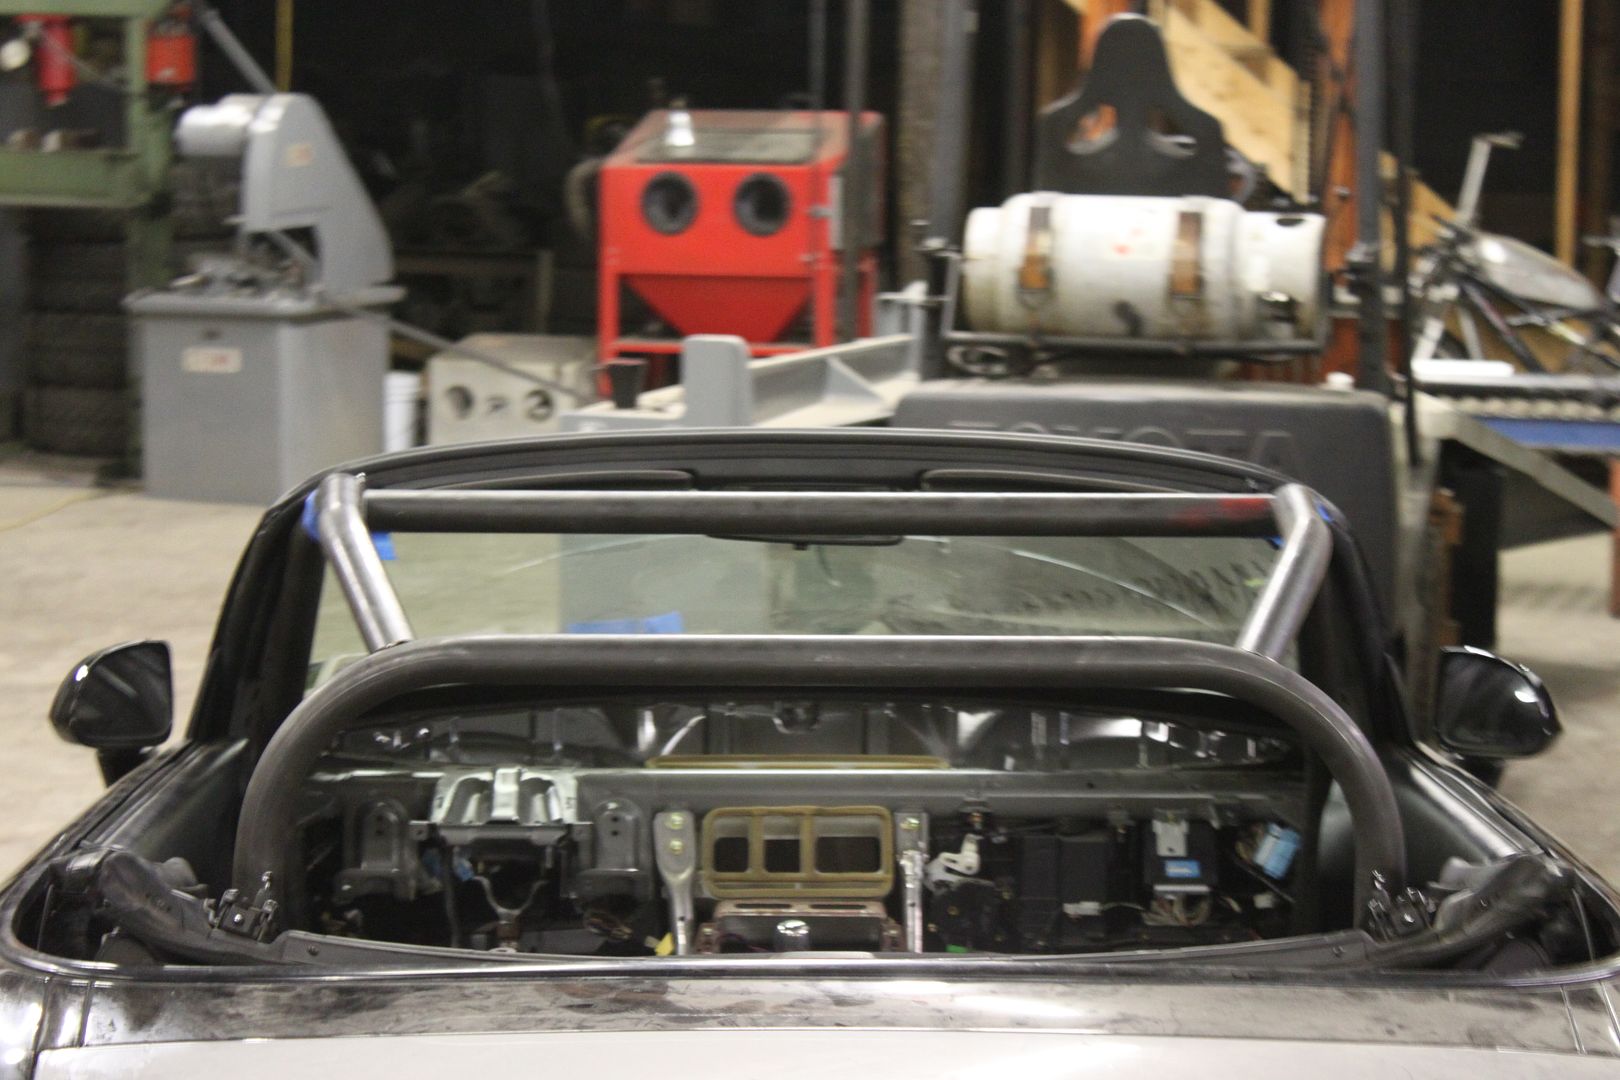
Well, it’s Sunday and I’m writing this on about two hours sleep from last night. Did a lot of work the past couple days and have the cage to a point where I couldn’t be any happier with it. I spent a couple hours Friday pulling the dashboard out of the car. I had trouble finding a diy for it anywhere but it ended up being very simple. I used the qube engineering diy for instructions on pulling the gauges and once that was done I referenced the helms manual for the dash. It’s basically just a dozen connectors that need to be unplugged, about a half dozen bolts and removal of the steering shaft via 1 splined bolt. Then it pops right out pretty easily. I already had the quick relese steering wheel and the airbags and airbag harness removed so that helped me a little bit as well. Got the dash all out and called it a day for Friday.
With the car all prep’d and ready to go we started the rest of the cage on Saturday. With the dash pulled and all my electrical connections undone I knew I wasn’t going to be able to use the electric top. I pulled the motors on both sides and turned it into a manual top for the day to make quick use for our measurements. By buddy had the brilliant yet simple idea to use a brake line and mark the outside edge of where we could put the tube with the top up. With the top in place and latched down we fixed the brake line to the top of the a-pillar and the rear roll hoop with zip ties and bent it until we had a solid outline. Then we bent up some steel, drank a couple dozen beers and had the hoops in place. We worked till about 4am until it was all done but when you get so involved in a project it’s just hard to stop and go home, you gotta push through. The front half was tricky but we managed to figure it out. We have 4 different bends in each piece on 3 completely different planes, it doesn’t hit a thing, everything clears perfectly and the top latches are still easy to get to. The top has about ¼” – ½” clearance all the way around, the a pillars match up dead on and with the top up you barely even notice it it’s so seamless. I could not be any happier with it, but buddy is just dead on when it comes to fabrication.
So anyways, this is where the car sits now. Next up is to fab a quick piece at the top of the windshield, then make all the gussets, knotch out the dash and once I get my seats we’ll mount them and get a bar running along the doors and tying into the cage at both ends. Then I’m just going to break the tacs, paint it flat black and weld it all back in. Then I’ll paint the remainder of it in place.
Well enough with my rambling, here are the pics:
With the dash pulled:
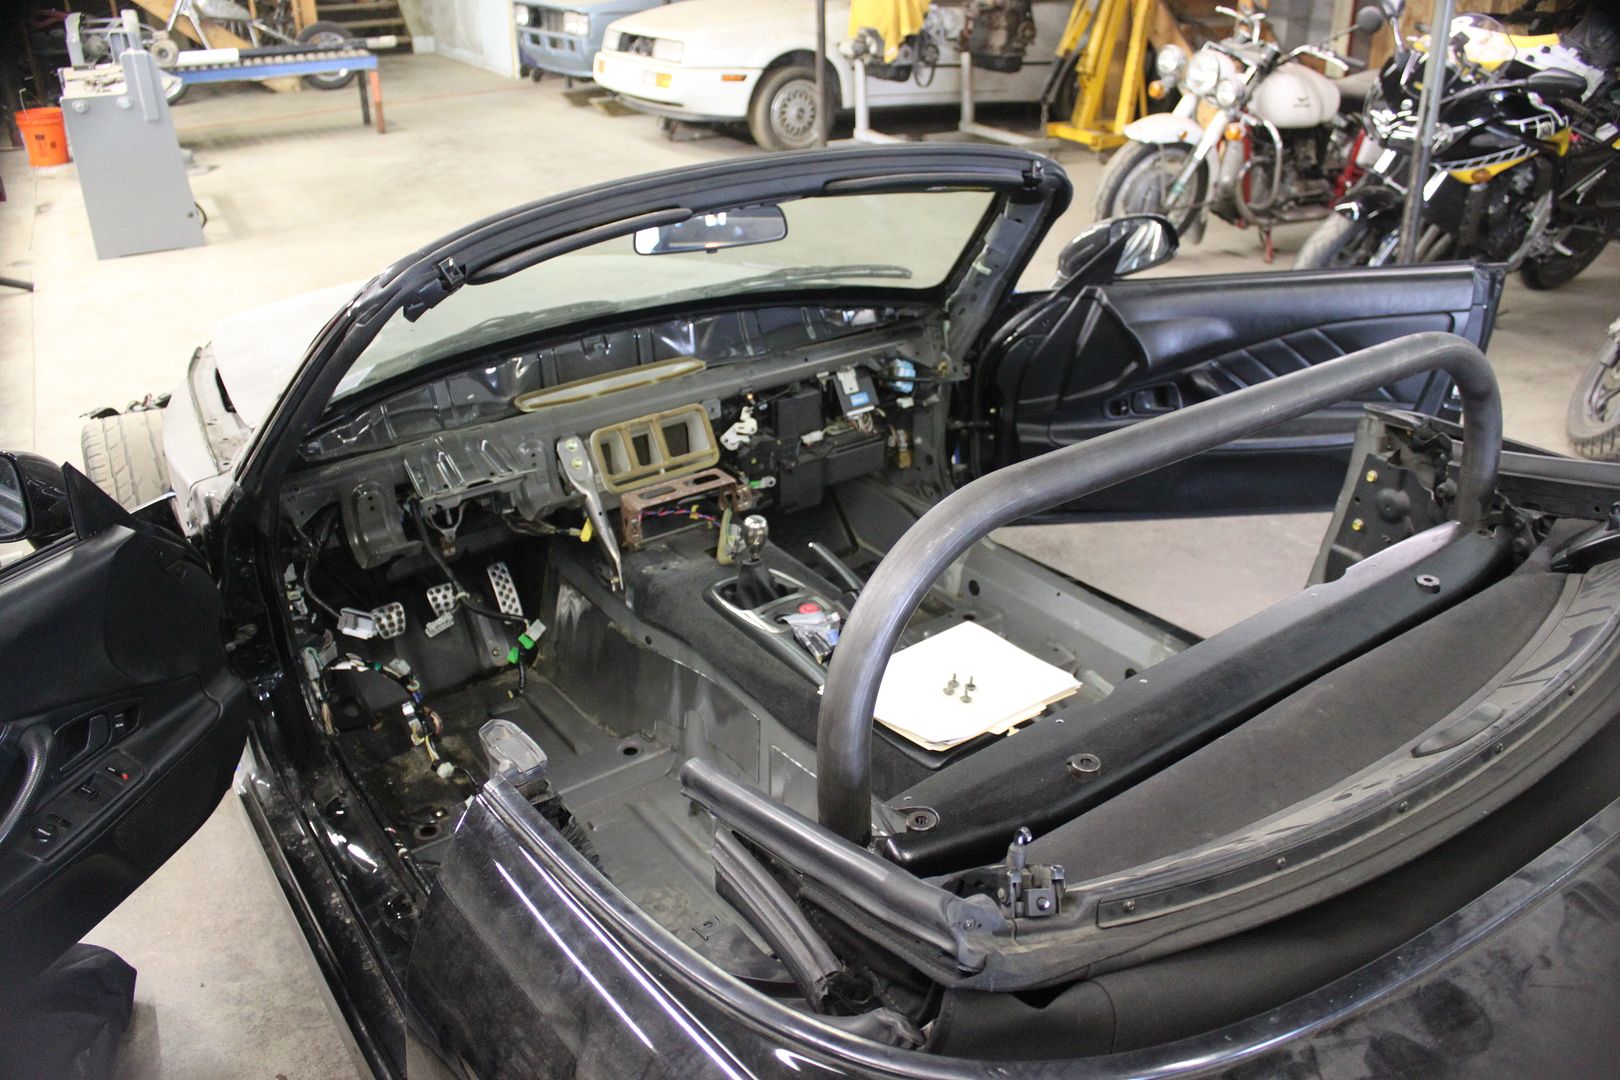
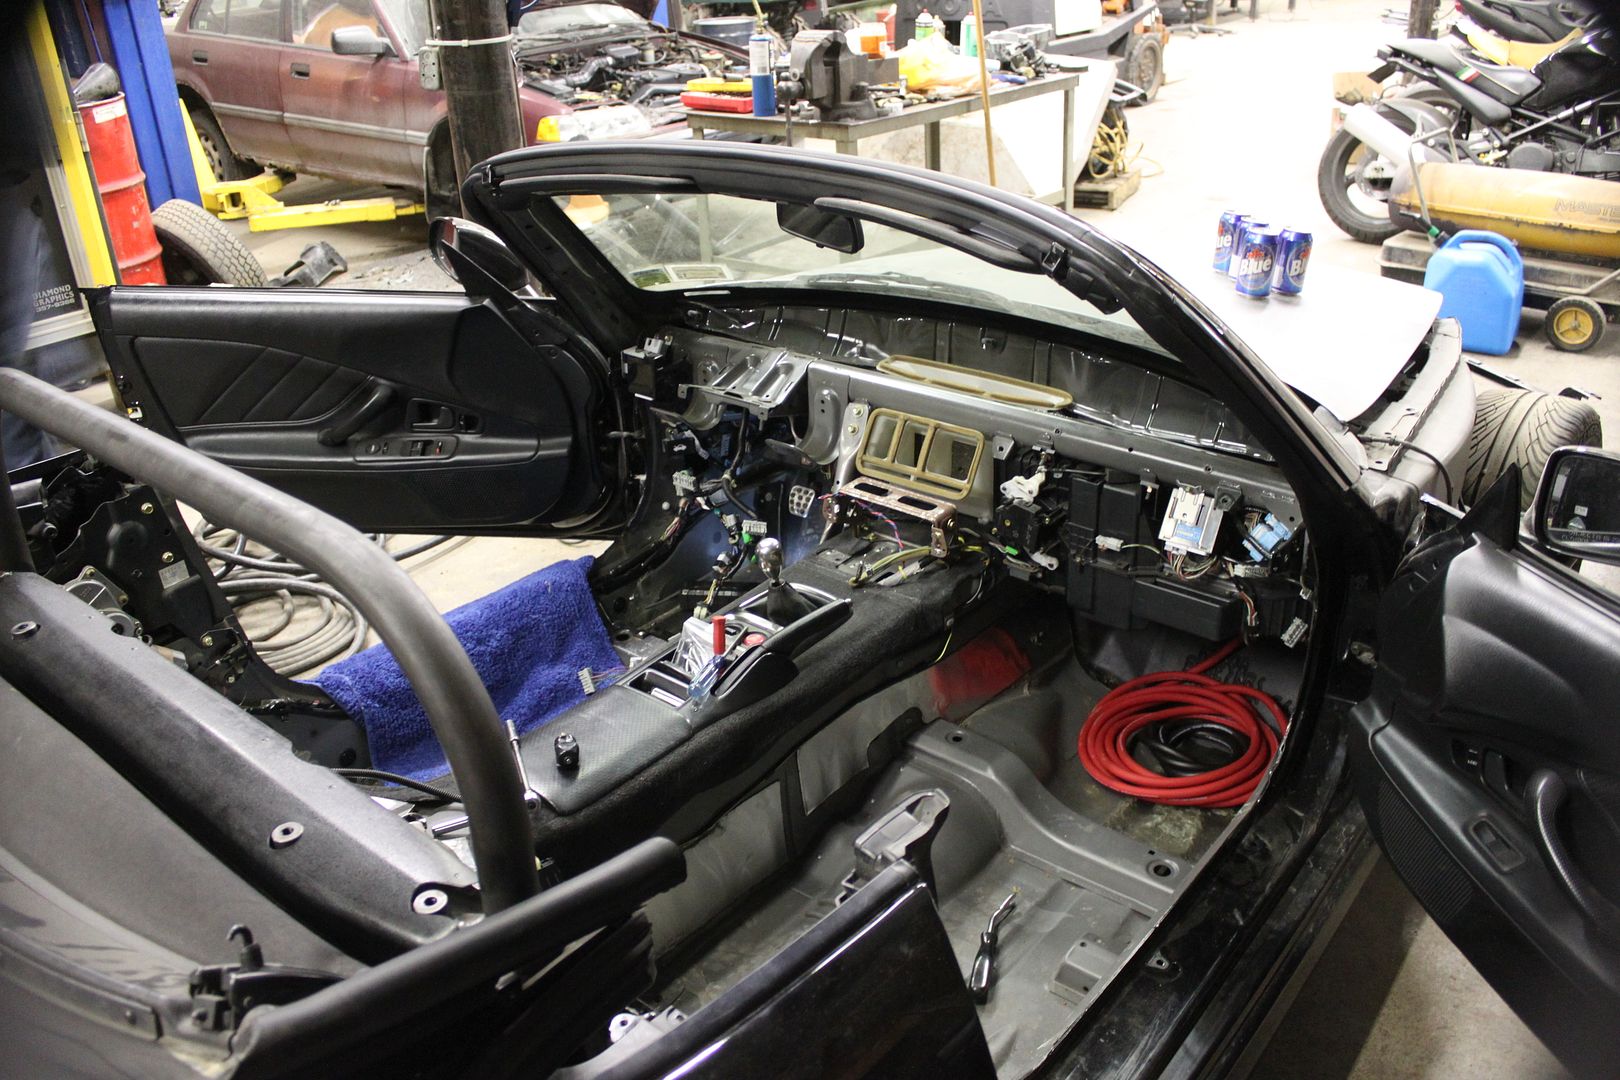
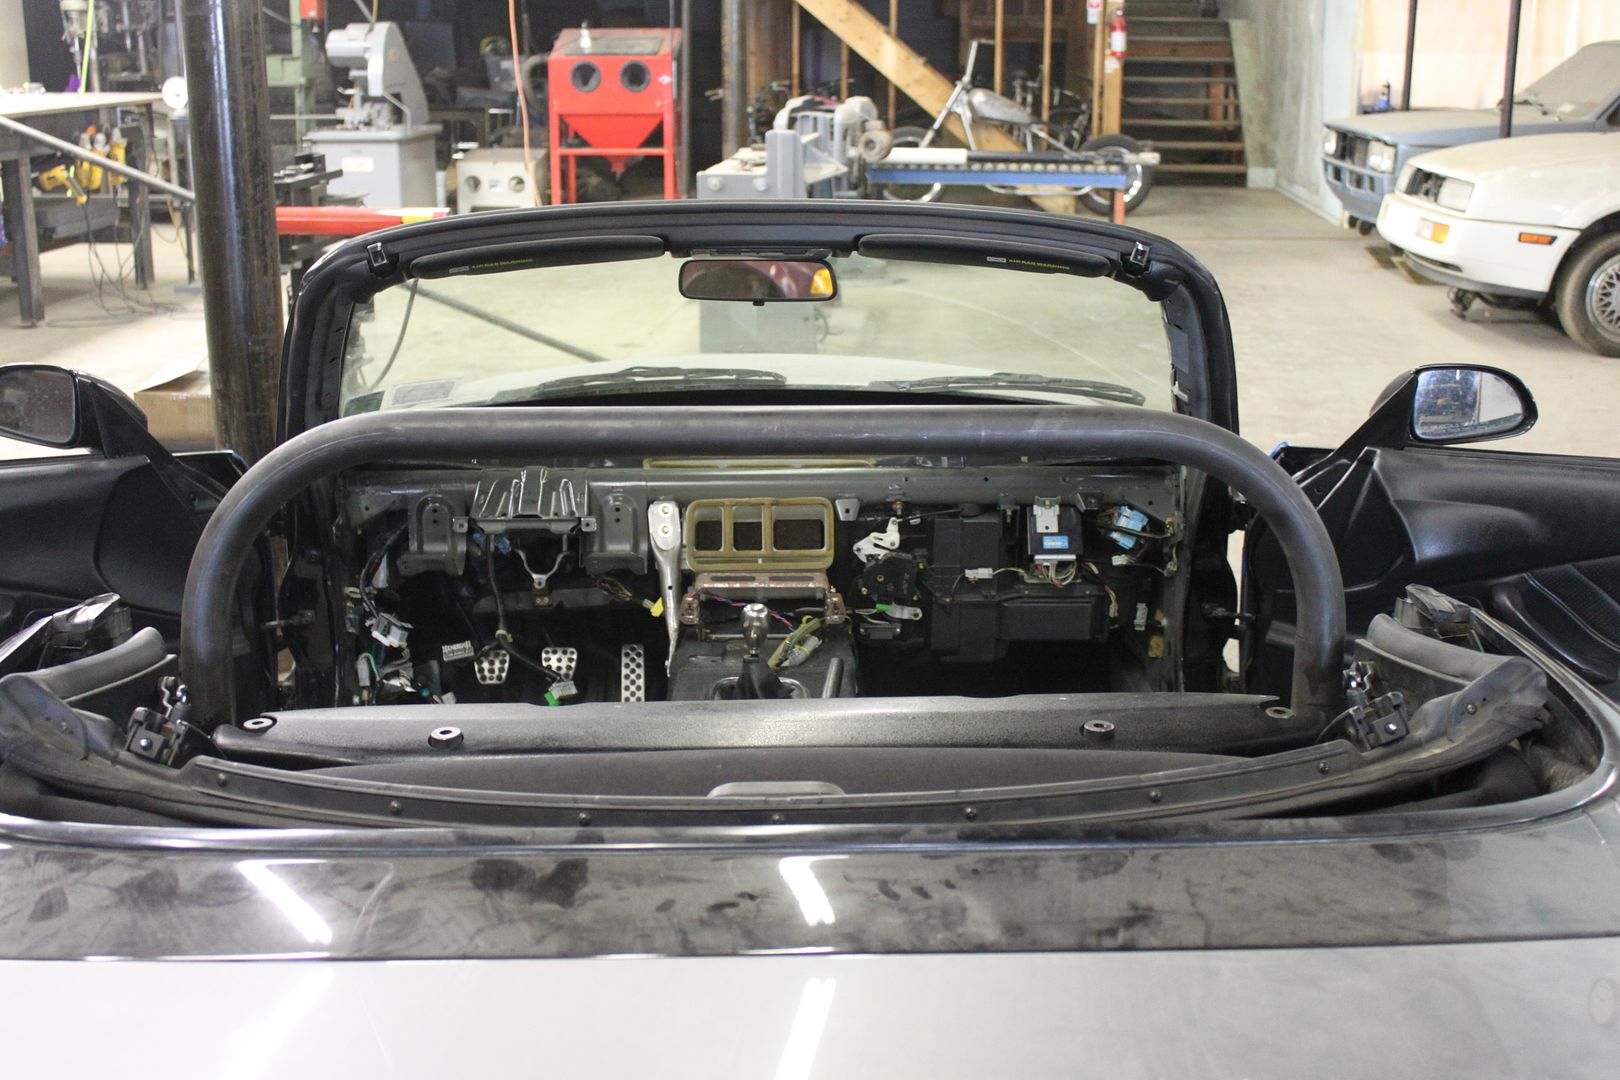
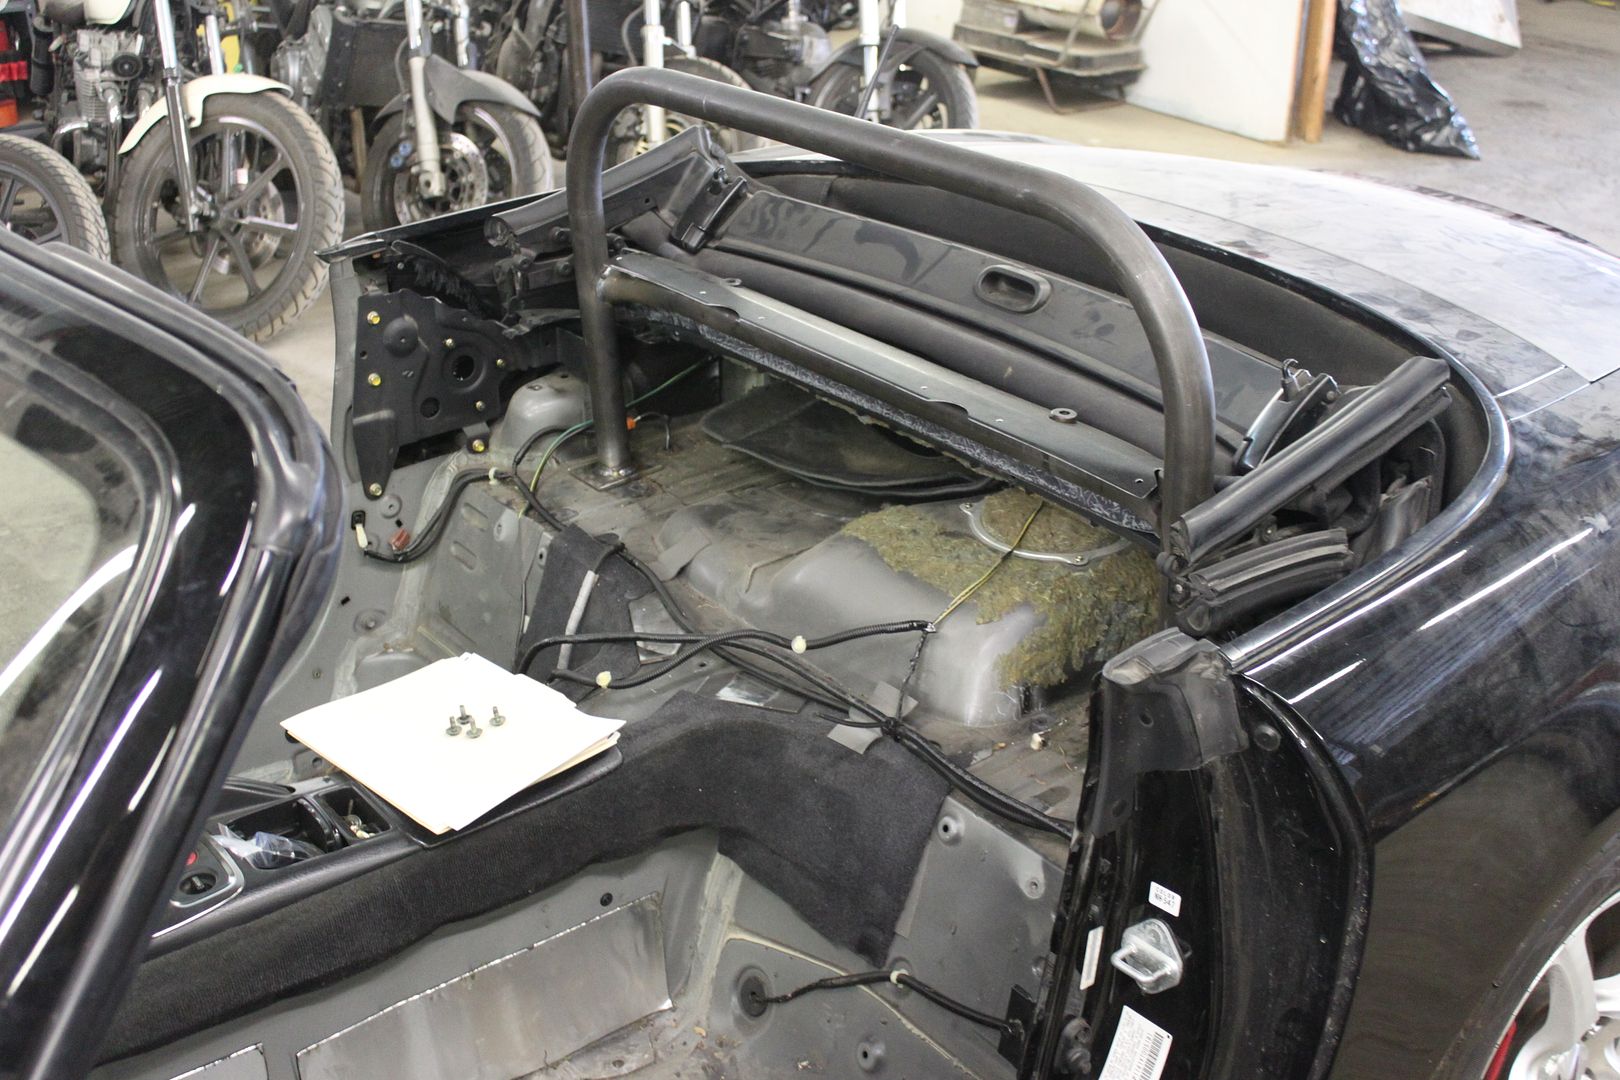

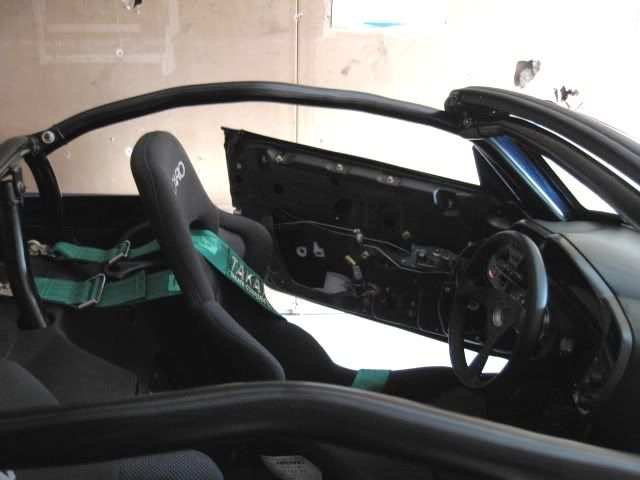
The Cage:
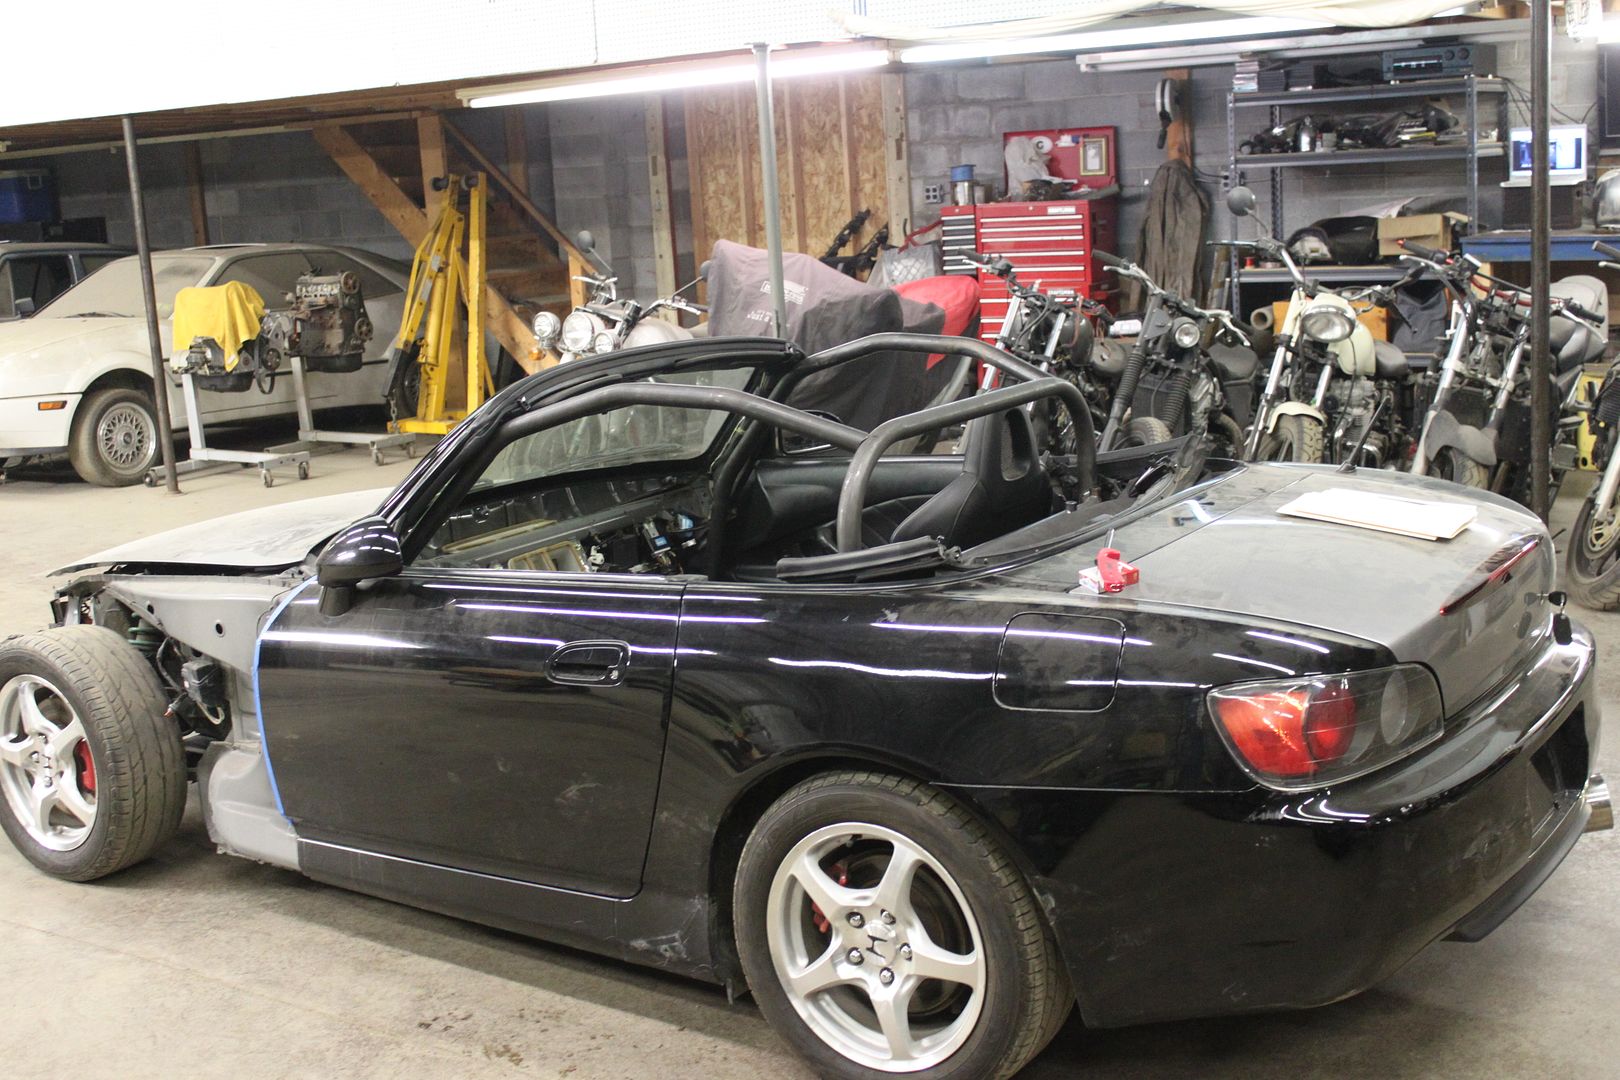
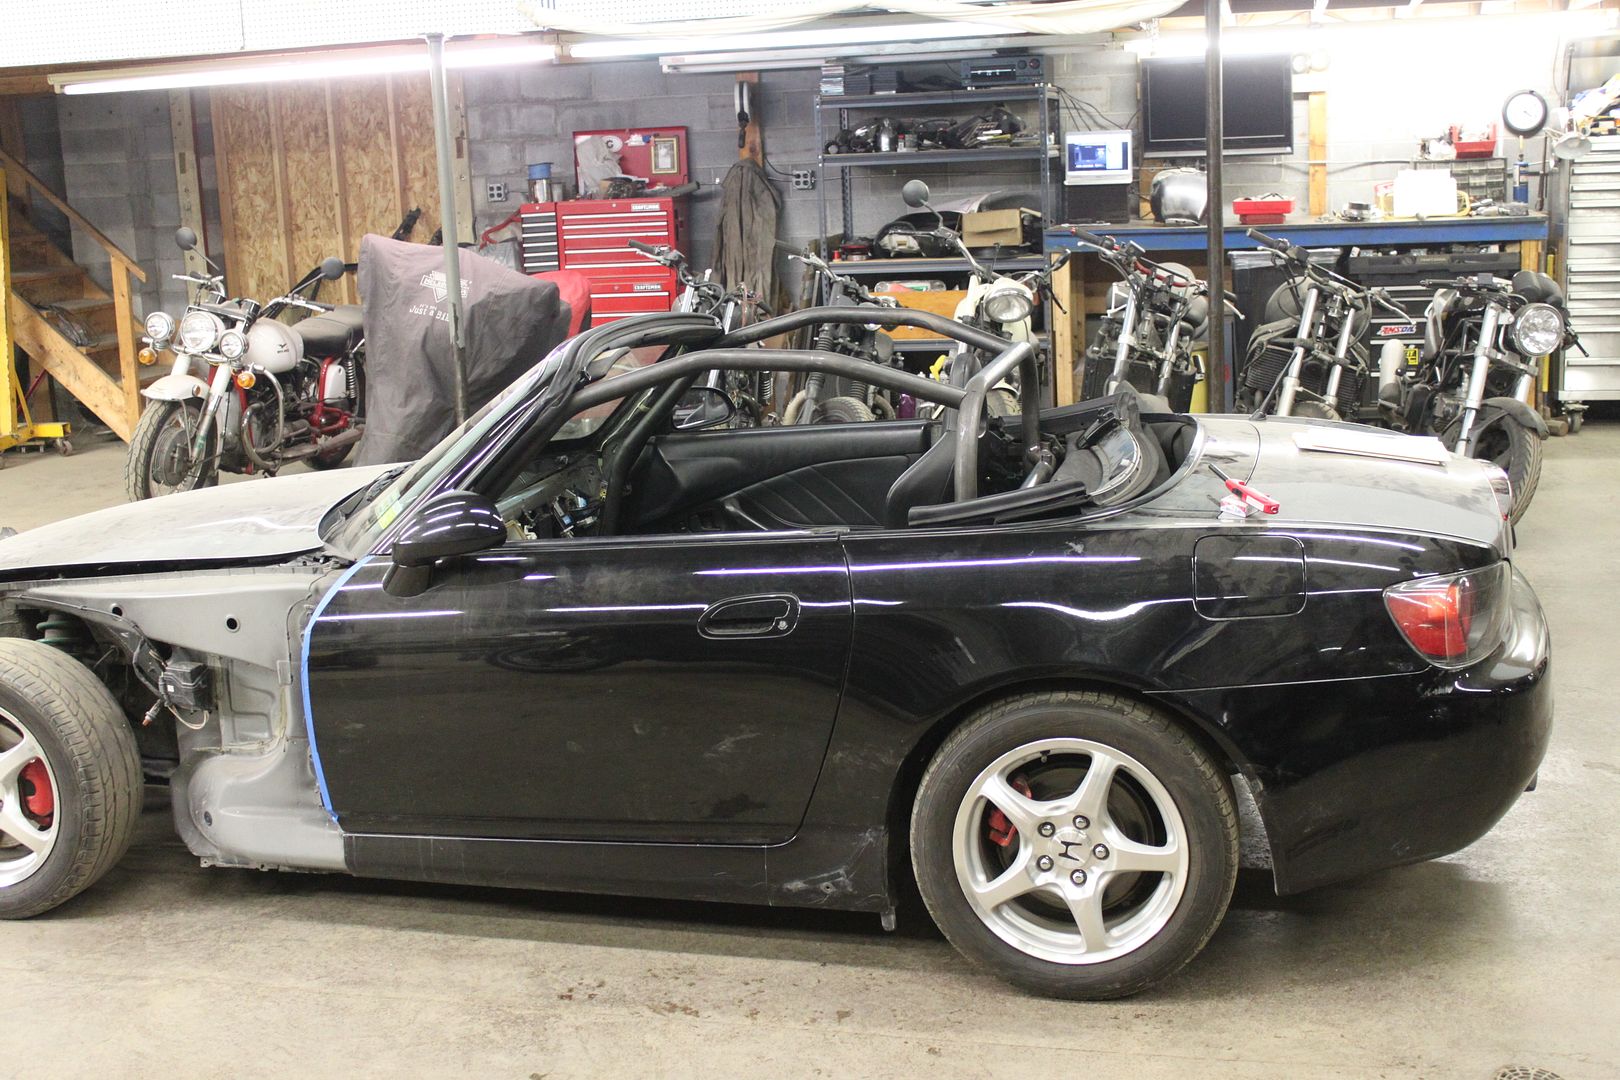
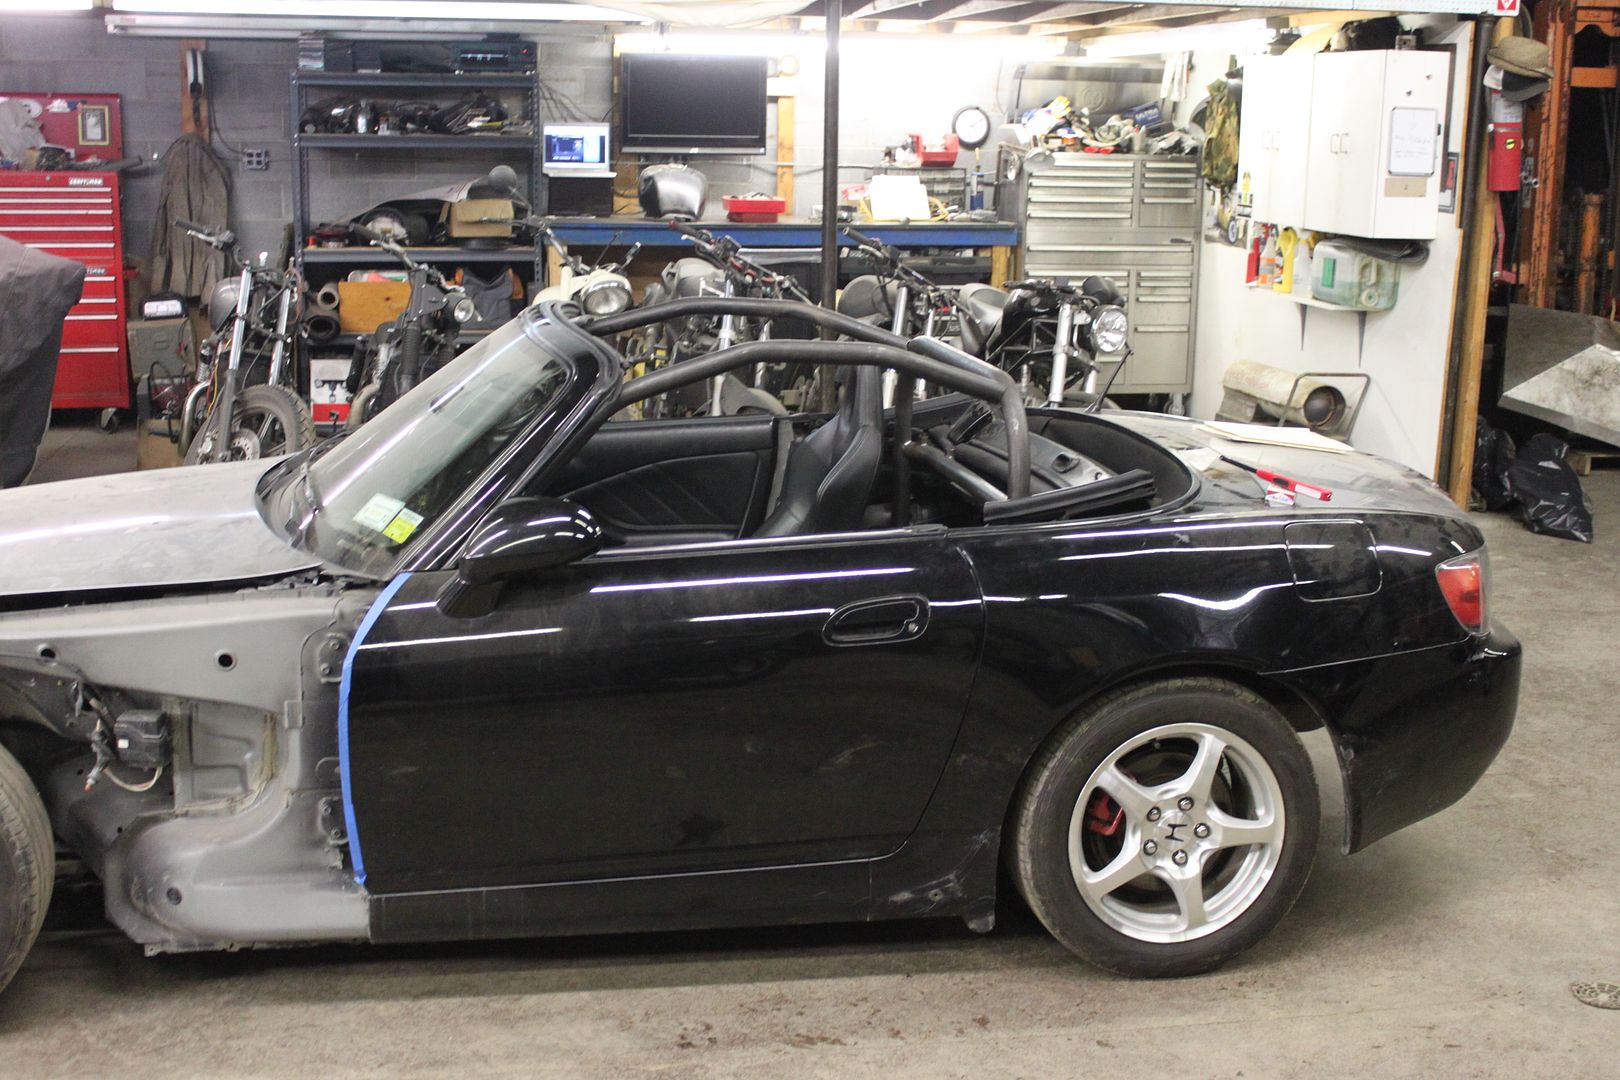

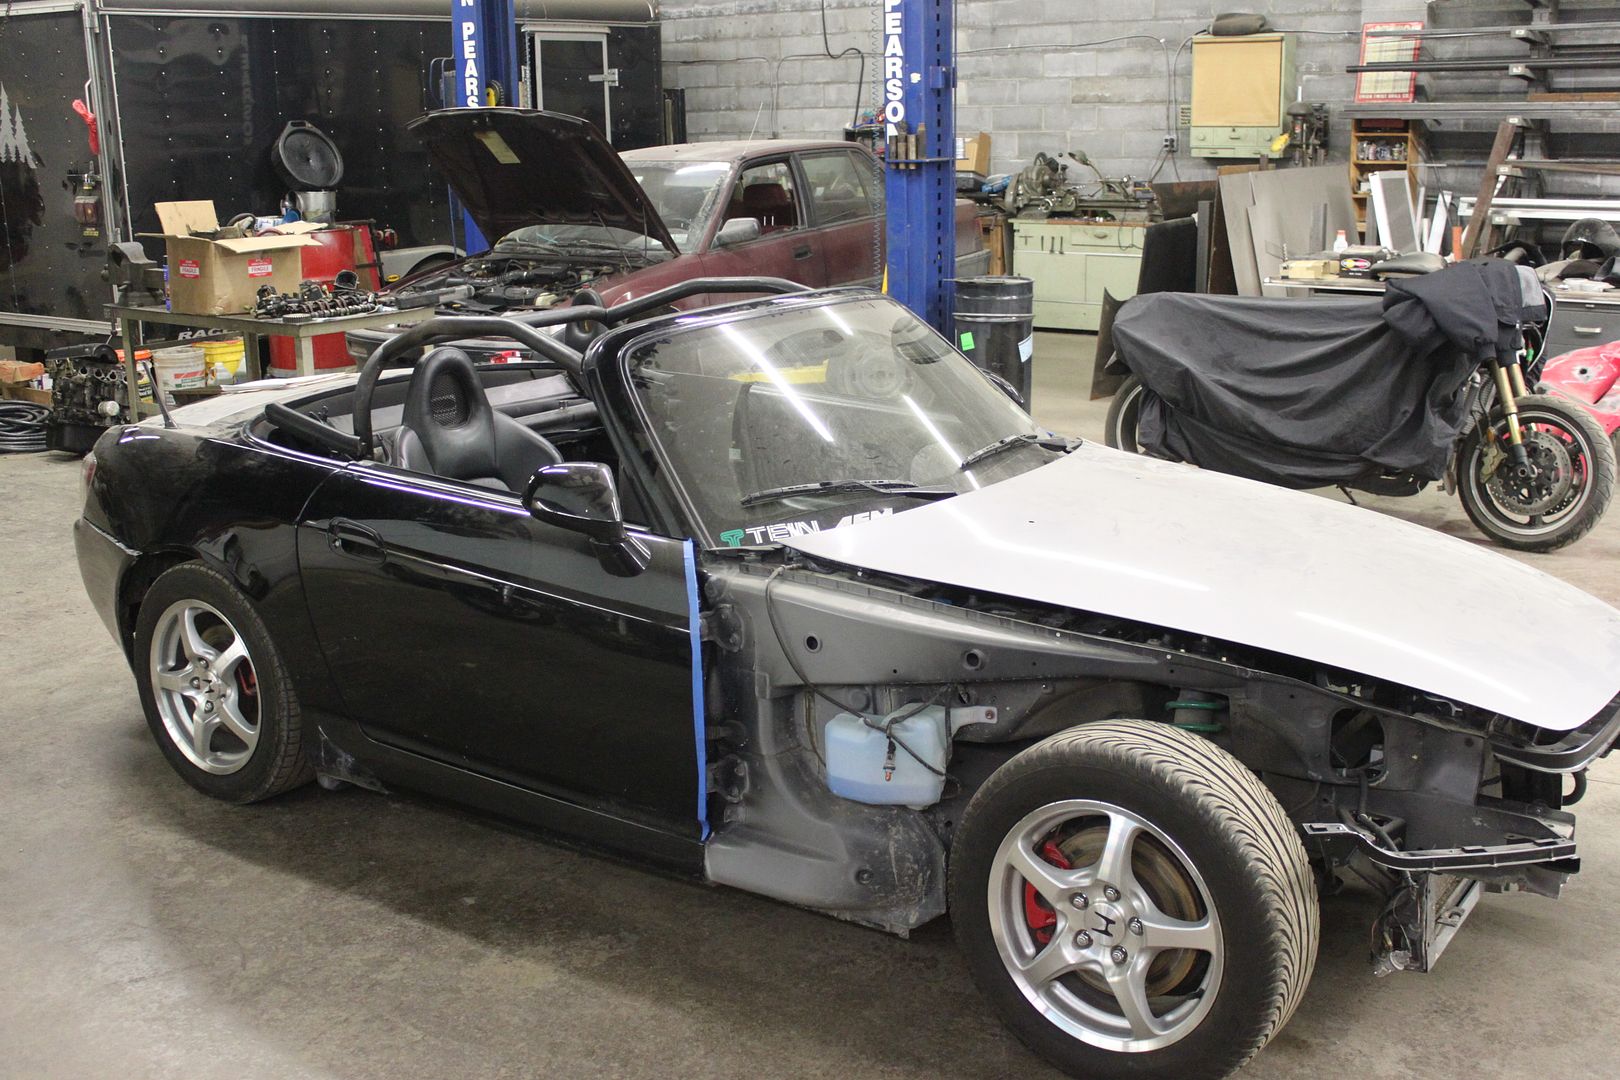
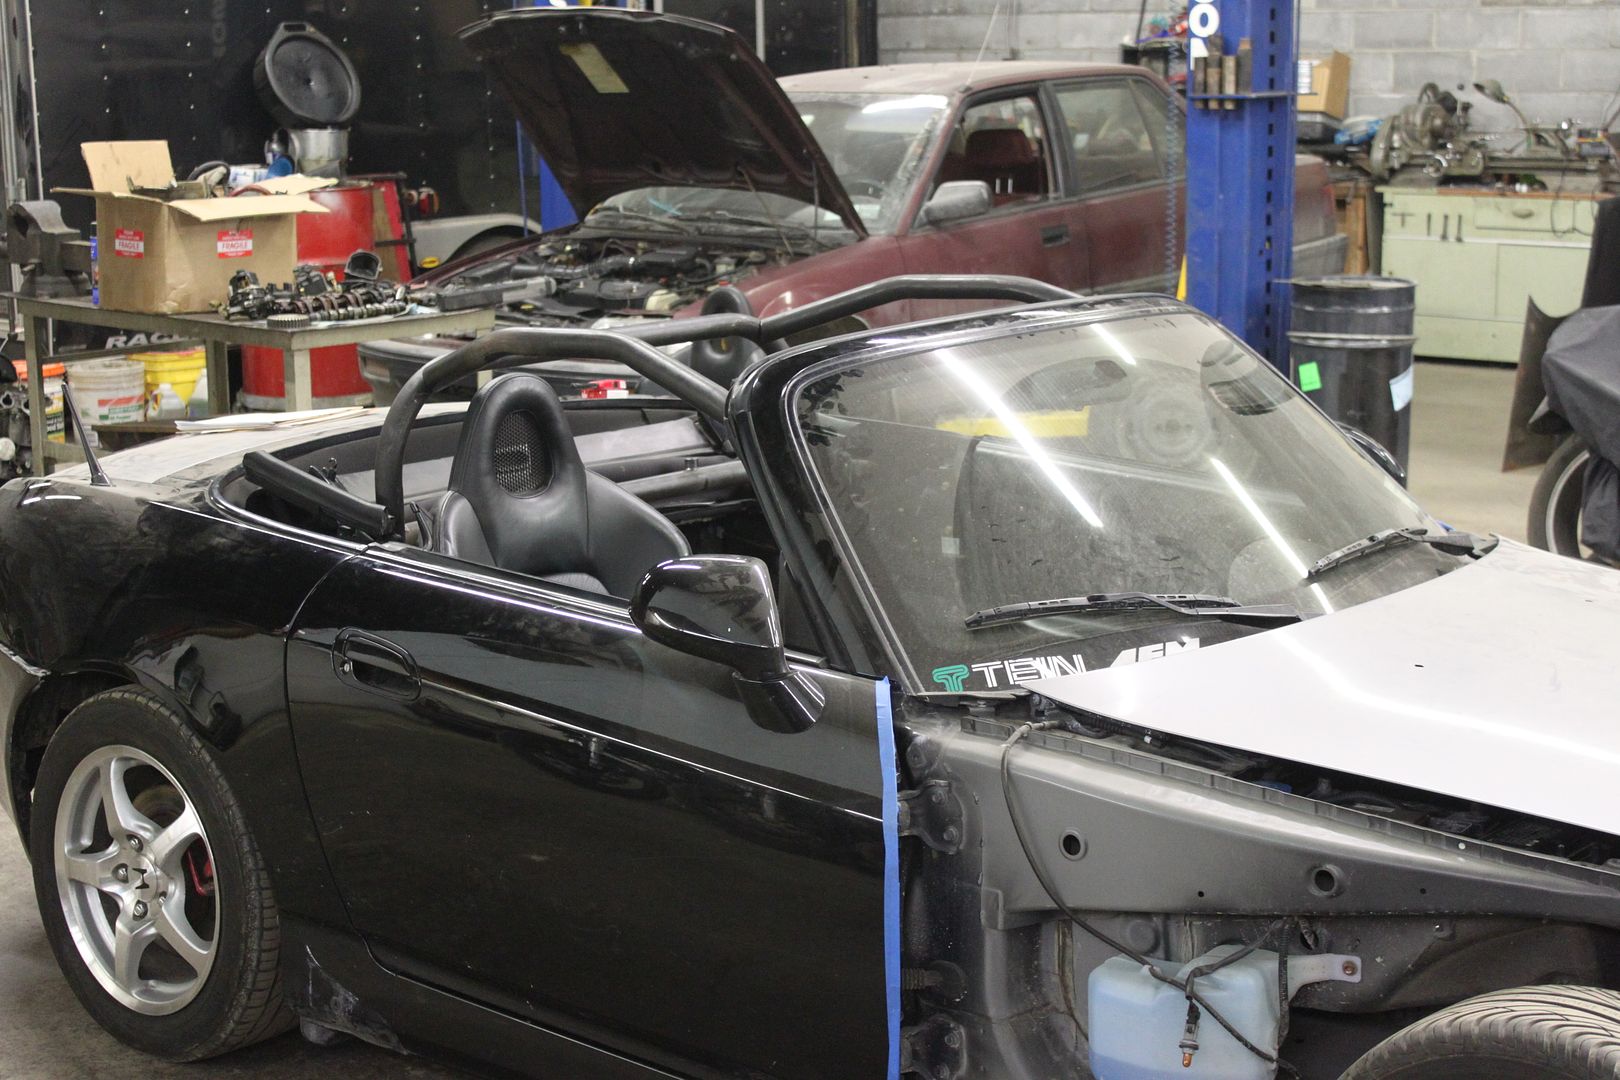
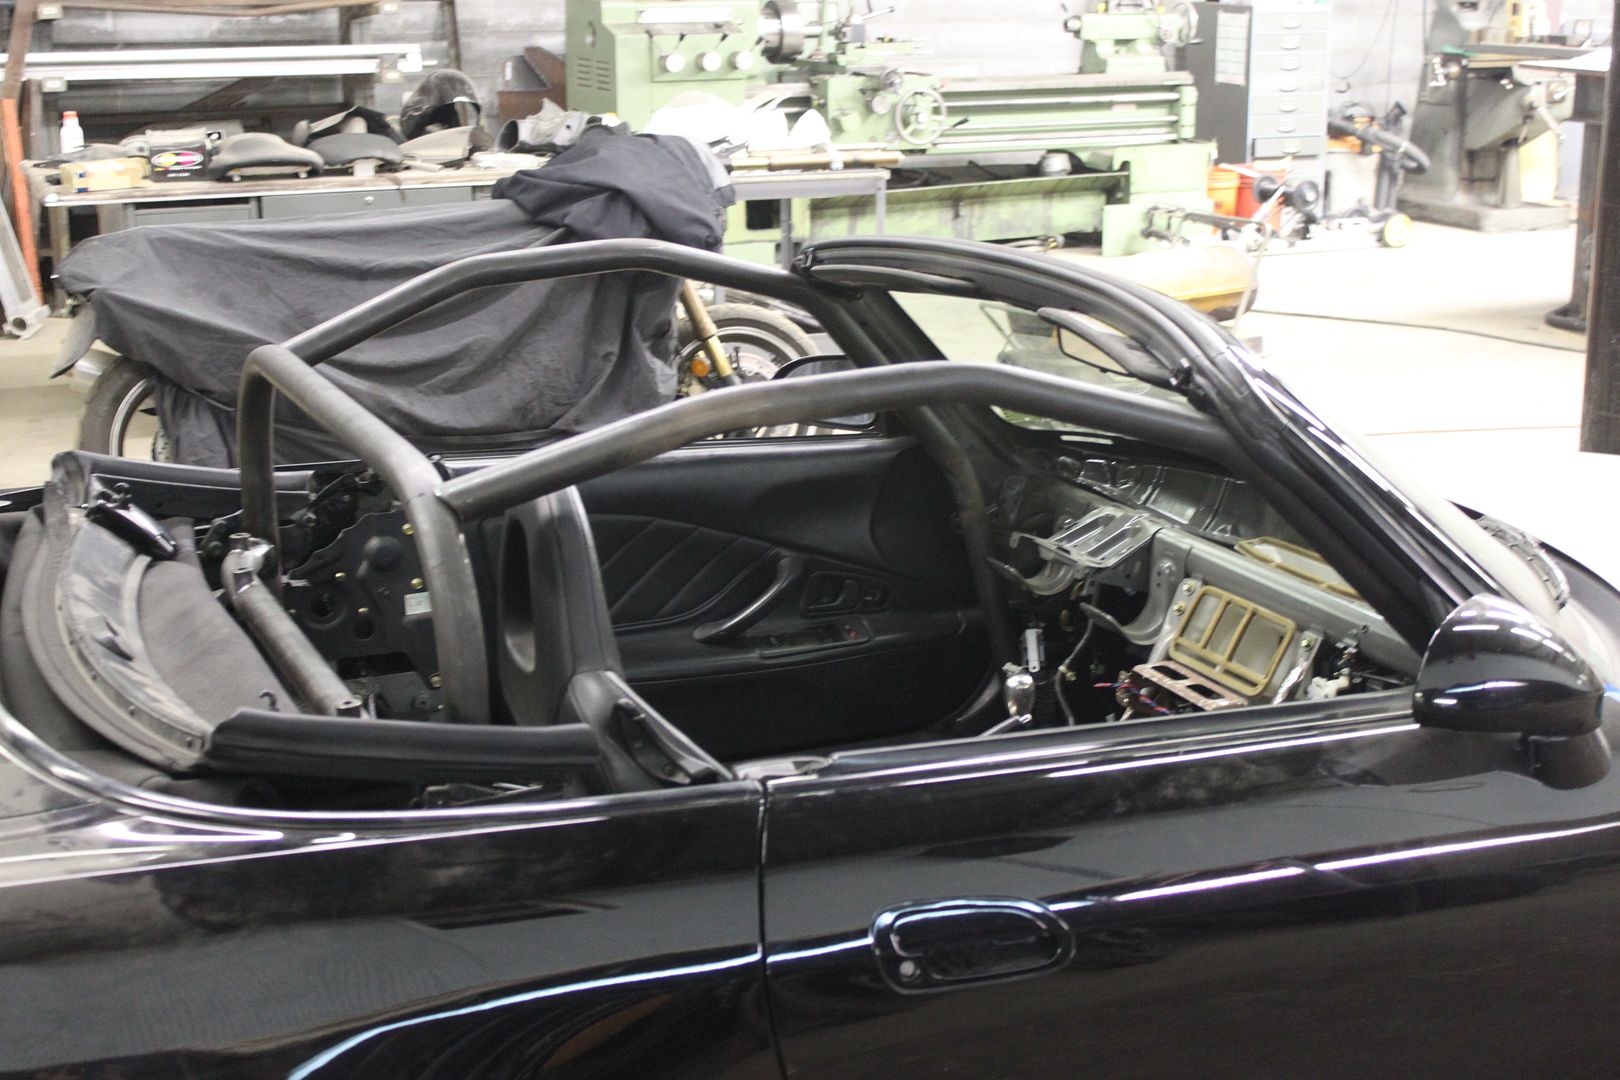

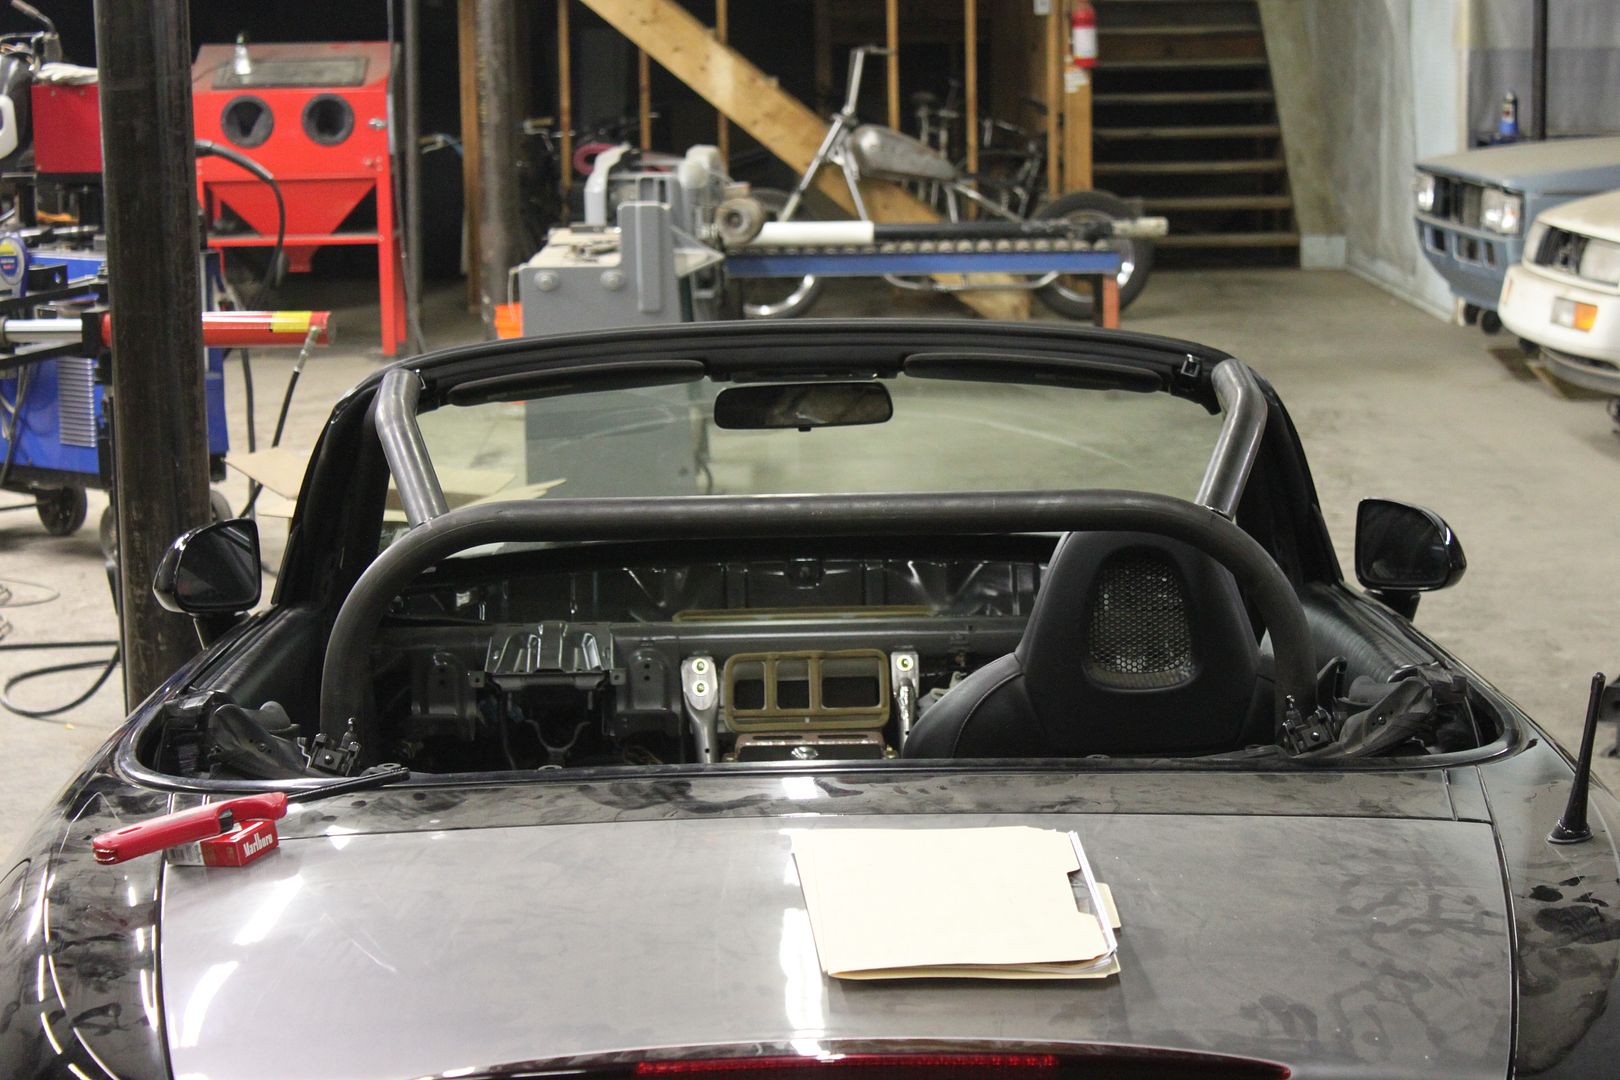
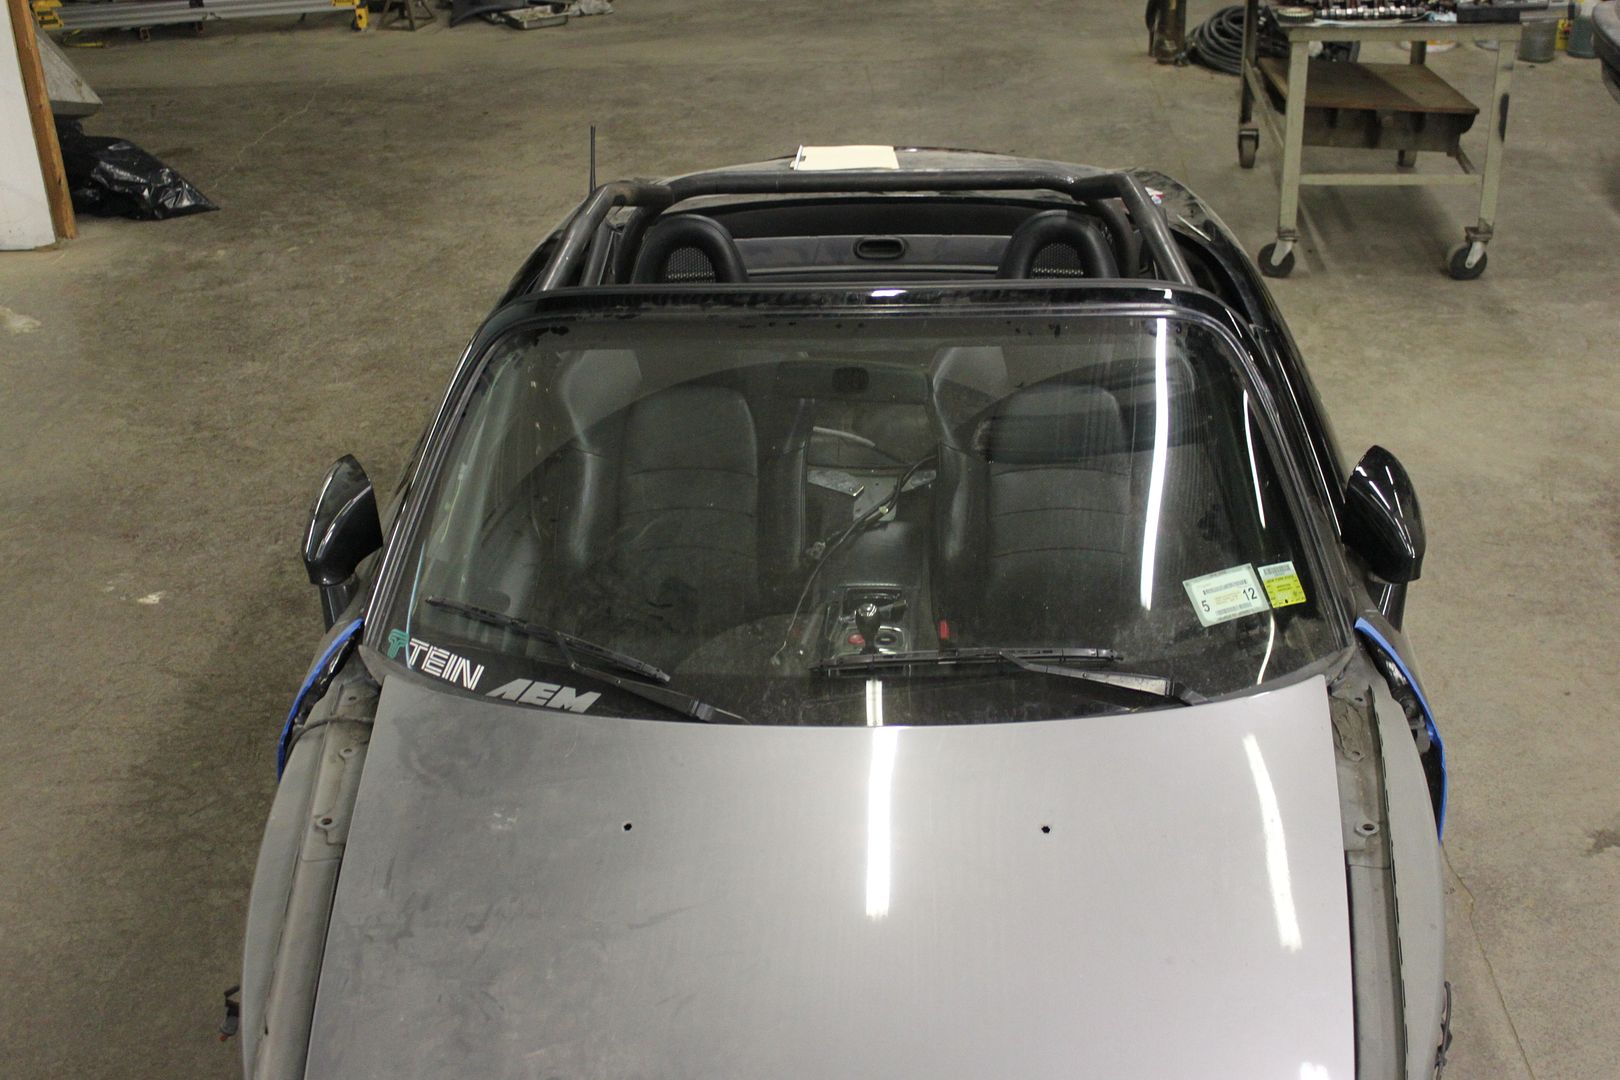
And Inside:
Well, it’s Sunday and I’m writing this on about two hours sleep from last night. Did a lot of work the past couple days and have the cage to a point where I couldn’t be any happier with it. I spent a couple hours Friday pulling the dashboard out of the car. I had trouble finding a diy for it anywhere but it ended up being very simple. I used the qube engineering diy for instructions on pulling the gauges and once that was done I referenced the helms manual for the dash. It’s basically just a dozen connectors that need to be unplugged, about a half dozen bolts and removal of the steering shaft via 1 splined bolt. Then it pops right out pretty easily. I already had the quick relese steering wheel and the airbags and airbag harness removed so that helped me a little bit as well. Got the dash all out and called it a day for Friday.
With the car all prep’d and ready to go we started the rest of the cage on Saturday. With the dash pulled and all my electrical connections undone I knew I wasn’t going to be able to use the electric top. I pulled the motors on both sides and turned it into a manual top for the day to make quick use for our measurements. By buddy had the brilliant yet simple idea to use a brake line and mark the outside edge of where we could put the tube with the top up. With the top in place and latched down we fixed the brake line to the top of the a-pillar and the rear roll hoop with zip ties and bent it until we had a solid outline. Then we bent up some steel, drank a couple dozen beers and had the hoops in place. We worked till about 4am until it was all done but when you get so involved in a project it’s just hard to stop and go home, you gotta push through. The front half was tricky but we managed to figure it out. We have 4 different bends in each piece on 3 completely different planes, it doesn’t hit a thing, everything clears perfectly and the top latches are still easy to get to. The top has about ¼” – ½” clearance all the way around, the a pillars match up dead on and with the top up you barely even notice it it’s so seamless. I could not be any happier with it, but buddy is just dead on when it comes to fabrication.
So anyways, this is where the car sits now. Next up is to fab a quick piece at the top of the windshield, then make all the gussets, knotch out the dash and once I get my seats we’ll mount them and get a bar running along the doors and tying into the cage at both ends. Then I’m just going to break the tacs, paint it flat black and weld it all back in. Then I’ll paint the remainder of it in place.
Well enough with my rambling, here are the pics:
With the dash pulled:
The Cage:
And Inside:
Thread Starter
Joined: Nov 2010
Posts: 6,324
Likes: 206
From: Ballston Spa, NY
2/21/2011
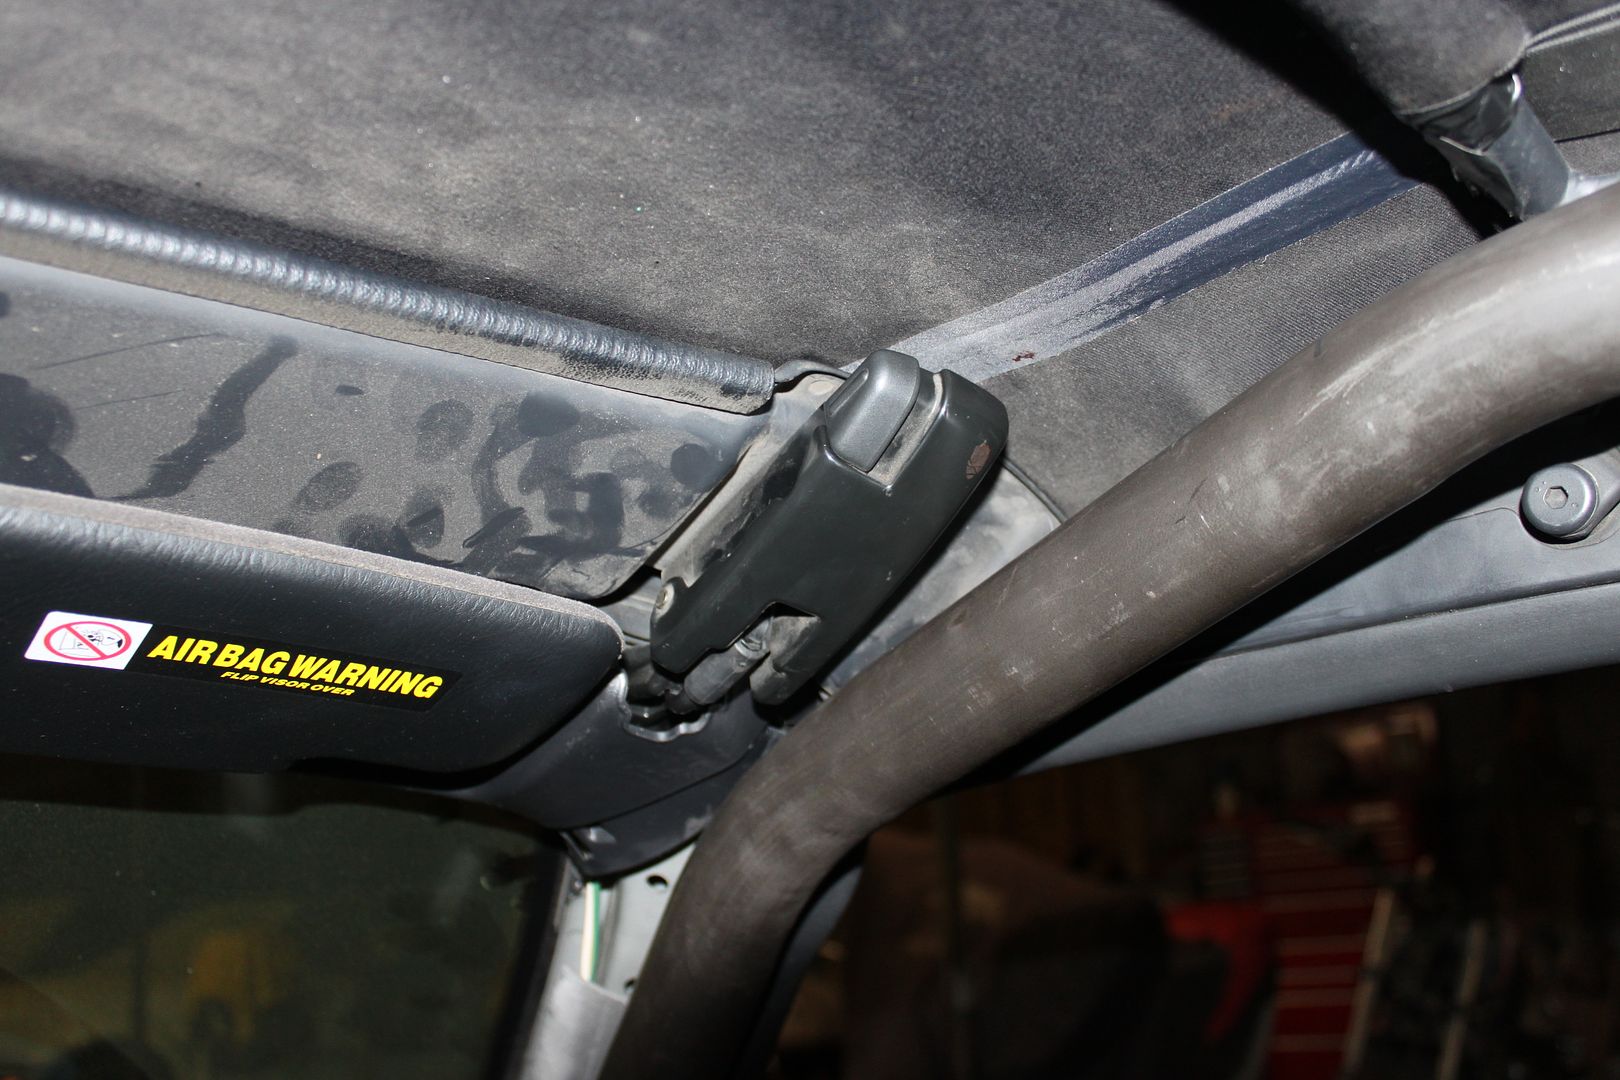
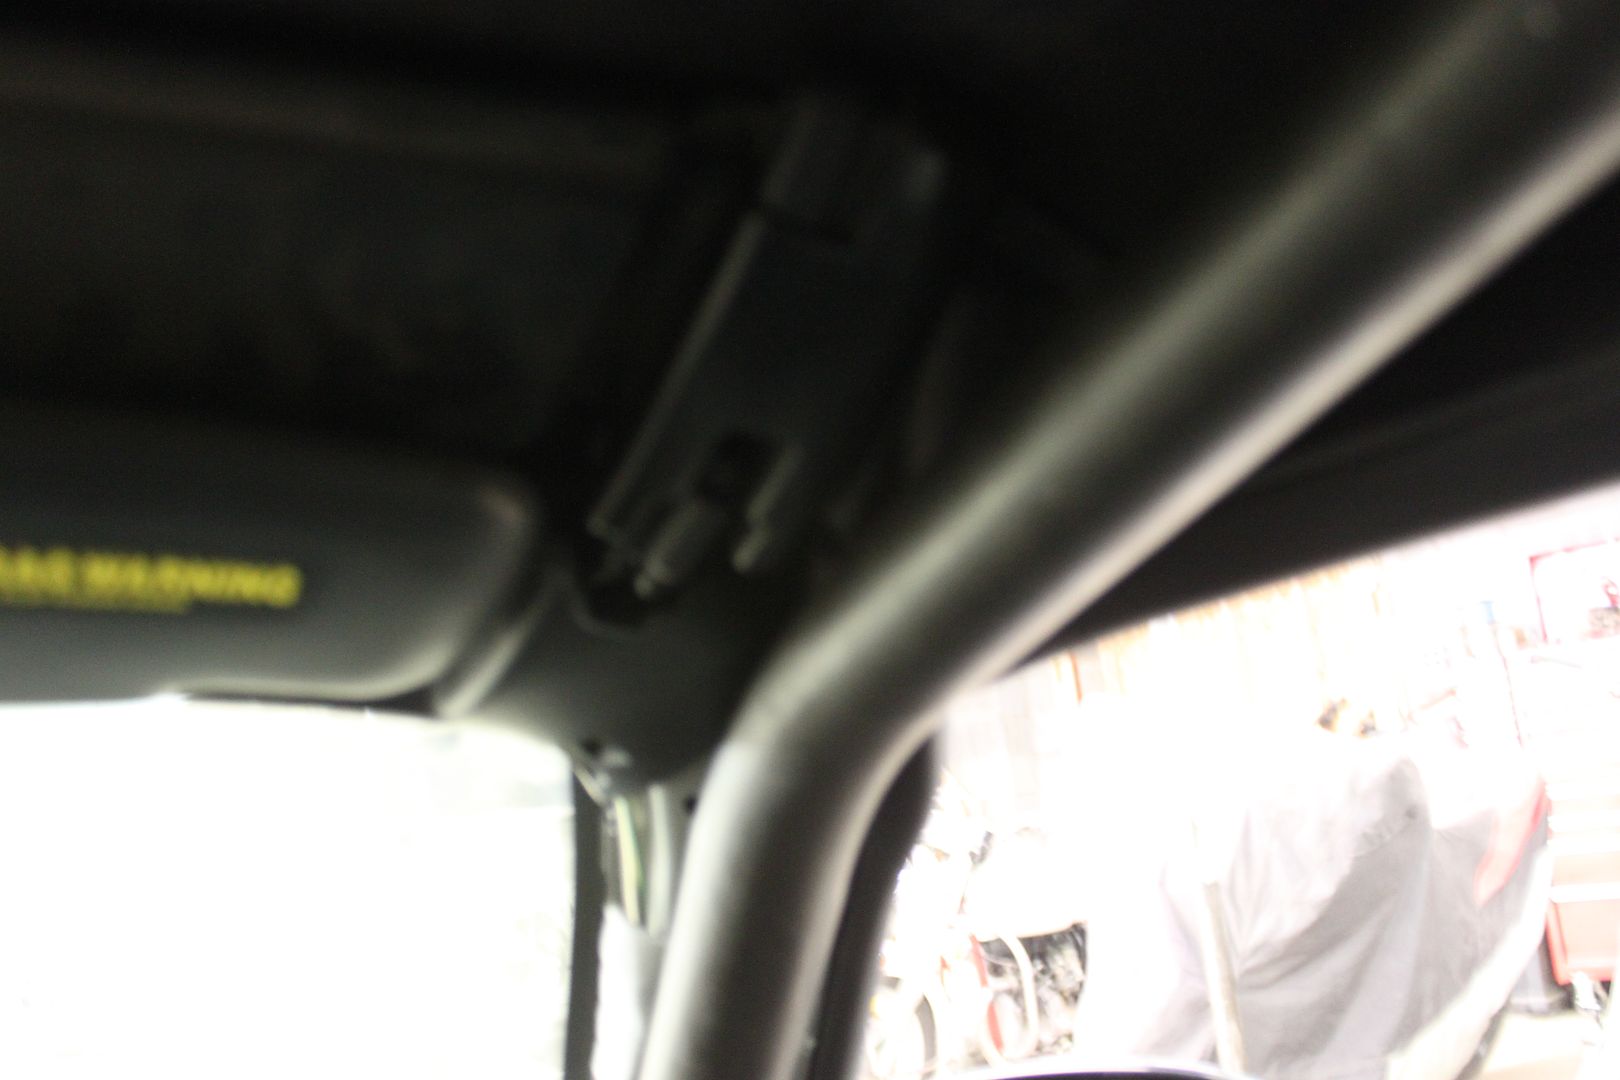
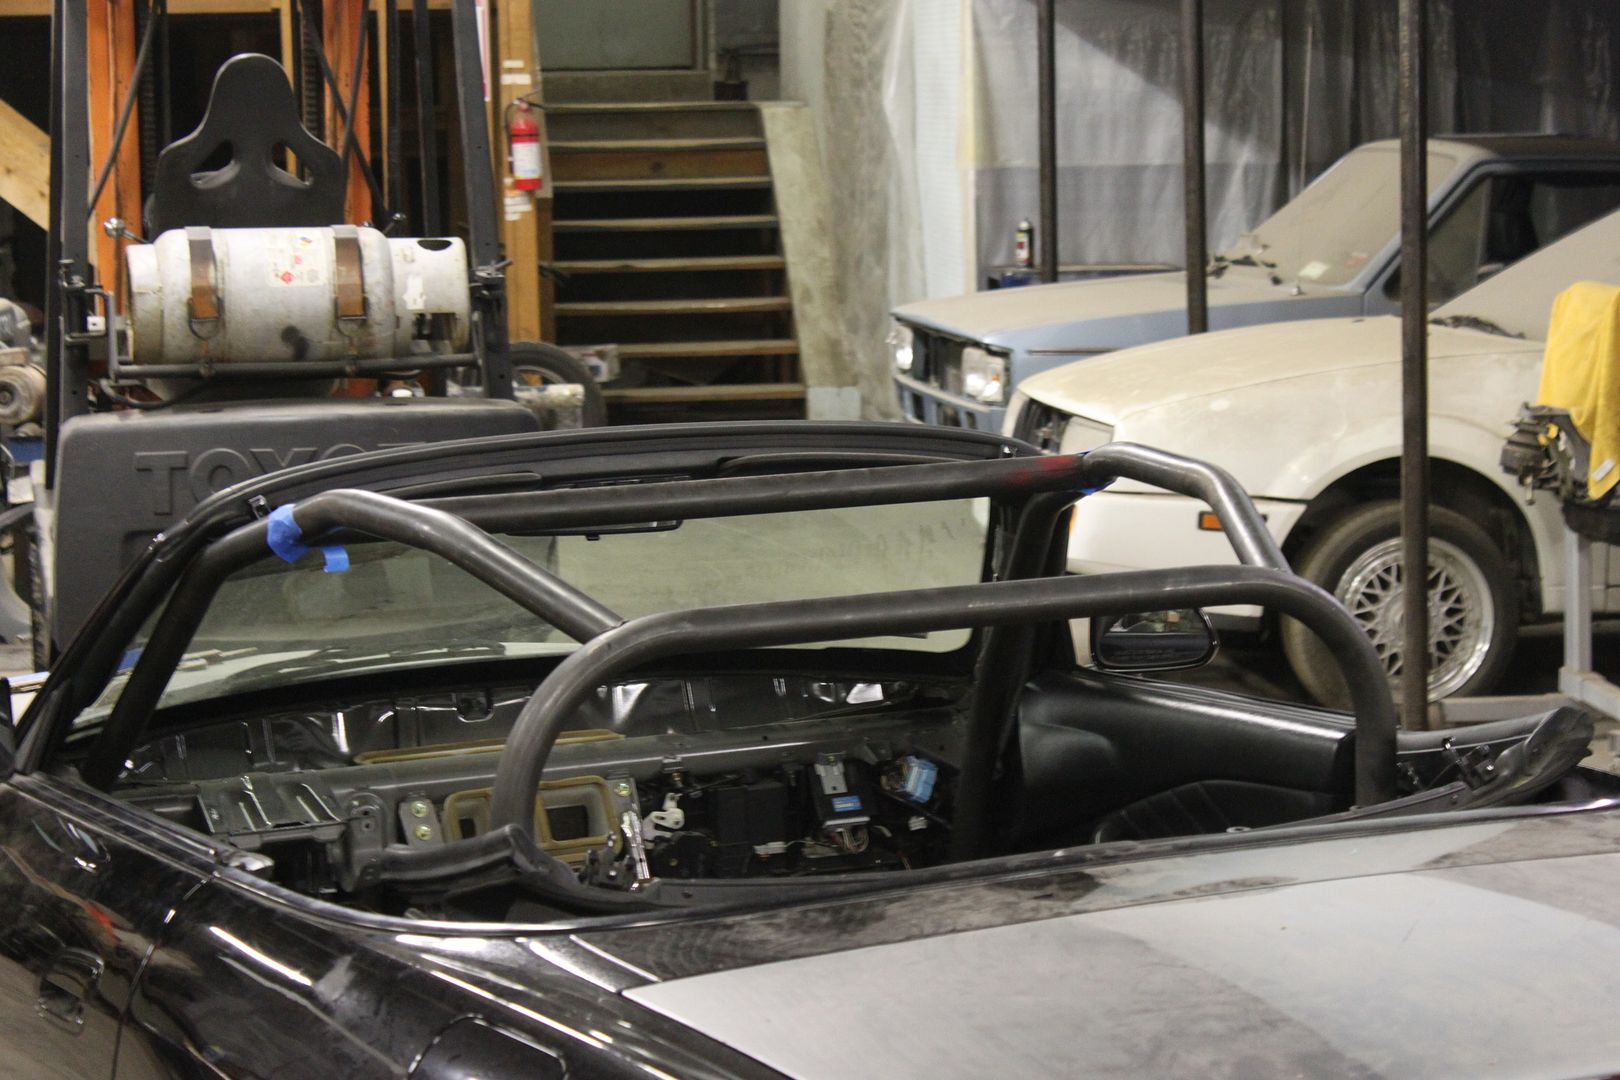
Did a little more work last night on the roll cage. Stripped the floor where the a-pillars come down and then welded on the mounting plates. Because of the way the floor sits in that location we used 4"x5" plates and we will make the floor flush when it gets welded in place. We also coped the tubes to make them 100%. Next step is to put a tube about 6" up from the windshiled on the top of the cage. This way it will not interfere with the soft top latches. I'm also going to get some pvc caps from the hardware store today and cap off the hvac vents in the a pillars (underneath the dash) since the cage will be interfering with them.
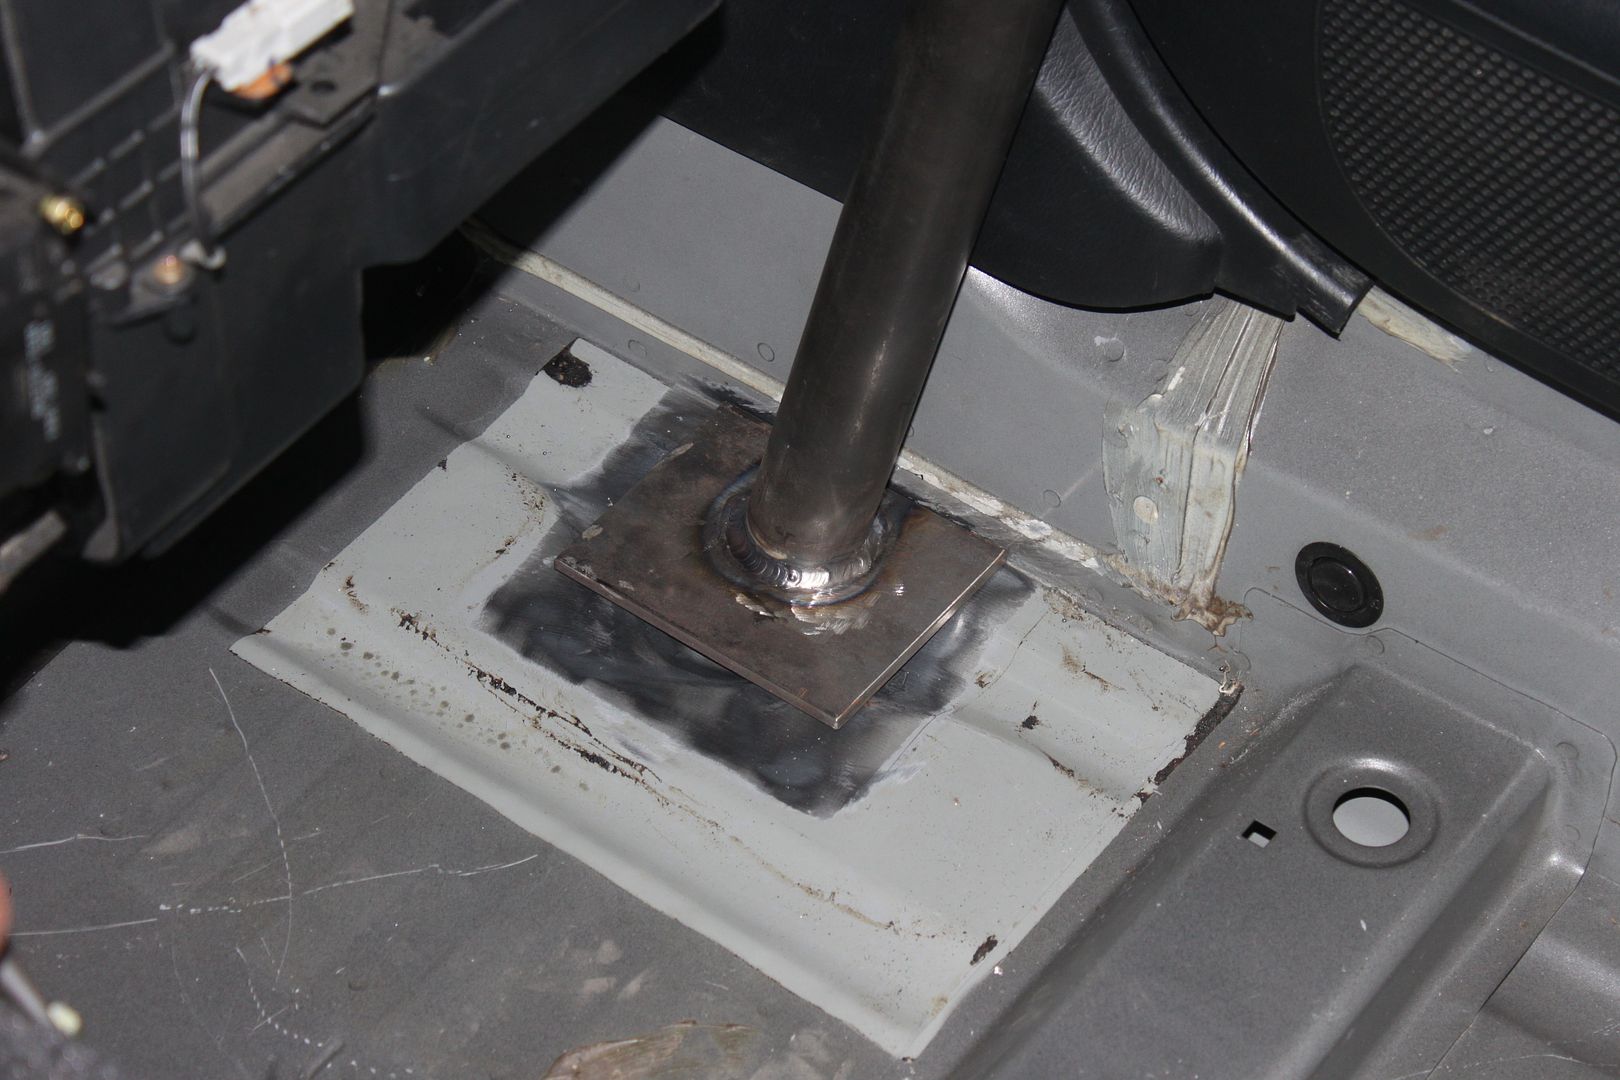
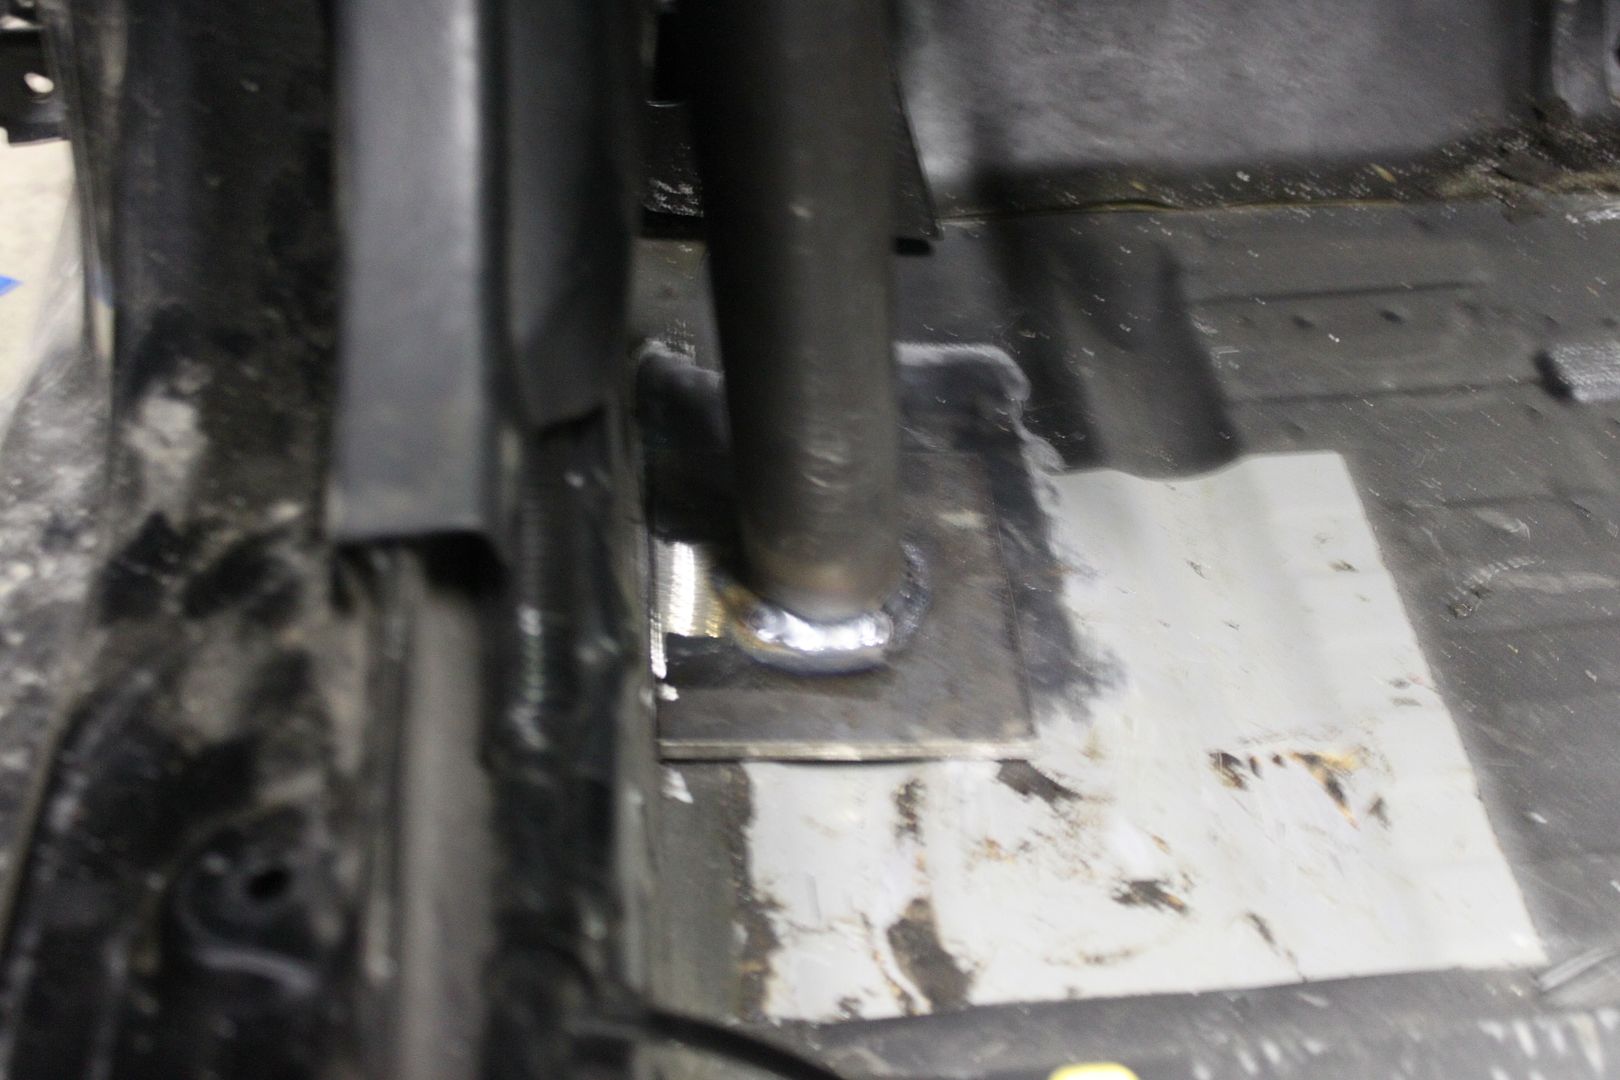
Did a little more work last night on the roll cage. Stripped the floor where the a-pillars come down and then welded on the mounting plates. Because of the way the floor sits in that location we used 4"x5" plates and we will make the floor flush when it gets welded in place. We also coped the tubes to make them 100%. Next step is to put a tube about 6" up from the windshiled on the top of the cage. This way it will not interfere with the soft top latches. I'm also going to get some pvc caps from the hardware store today and cap off the hvac vents in the a pillars (underneath the dash) since the cage will be interfering with them.


Thread Starter
Joined: Nov 2010
Posts: 6,324
Likes: 206
From: Ballston Spa, NY
3/1/2011
Did a little more work this weekend. Tacked everything in place, now all i need to do is trim the dash, make sure it fits then pull it all out and paint it and weld it back in place. I made some cardboard templates yesterday and marked where the dash has to be cut but i didn't have a 2" holesaw at the shop so i'll be cutting it friday. Anyways, here is some pictures with the top bar taped in place:
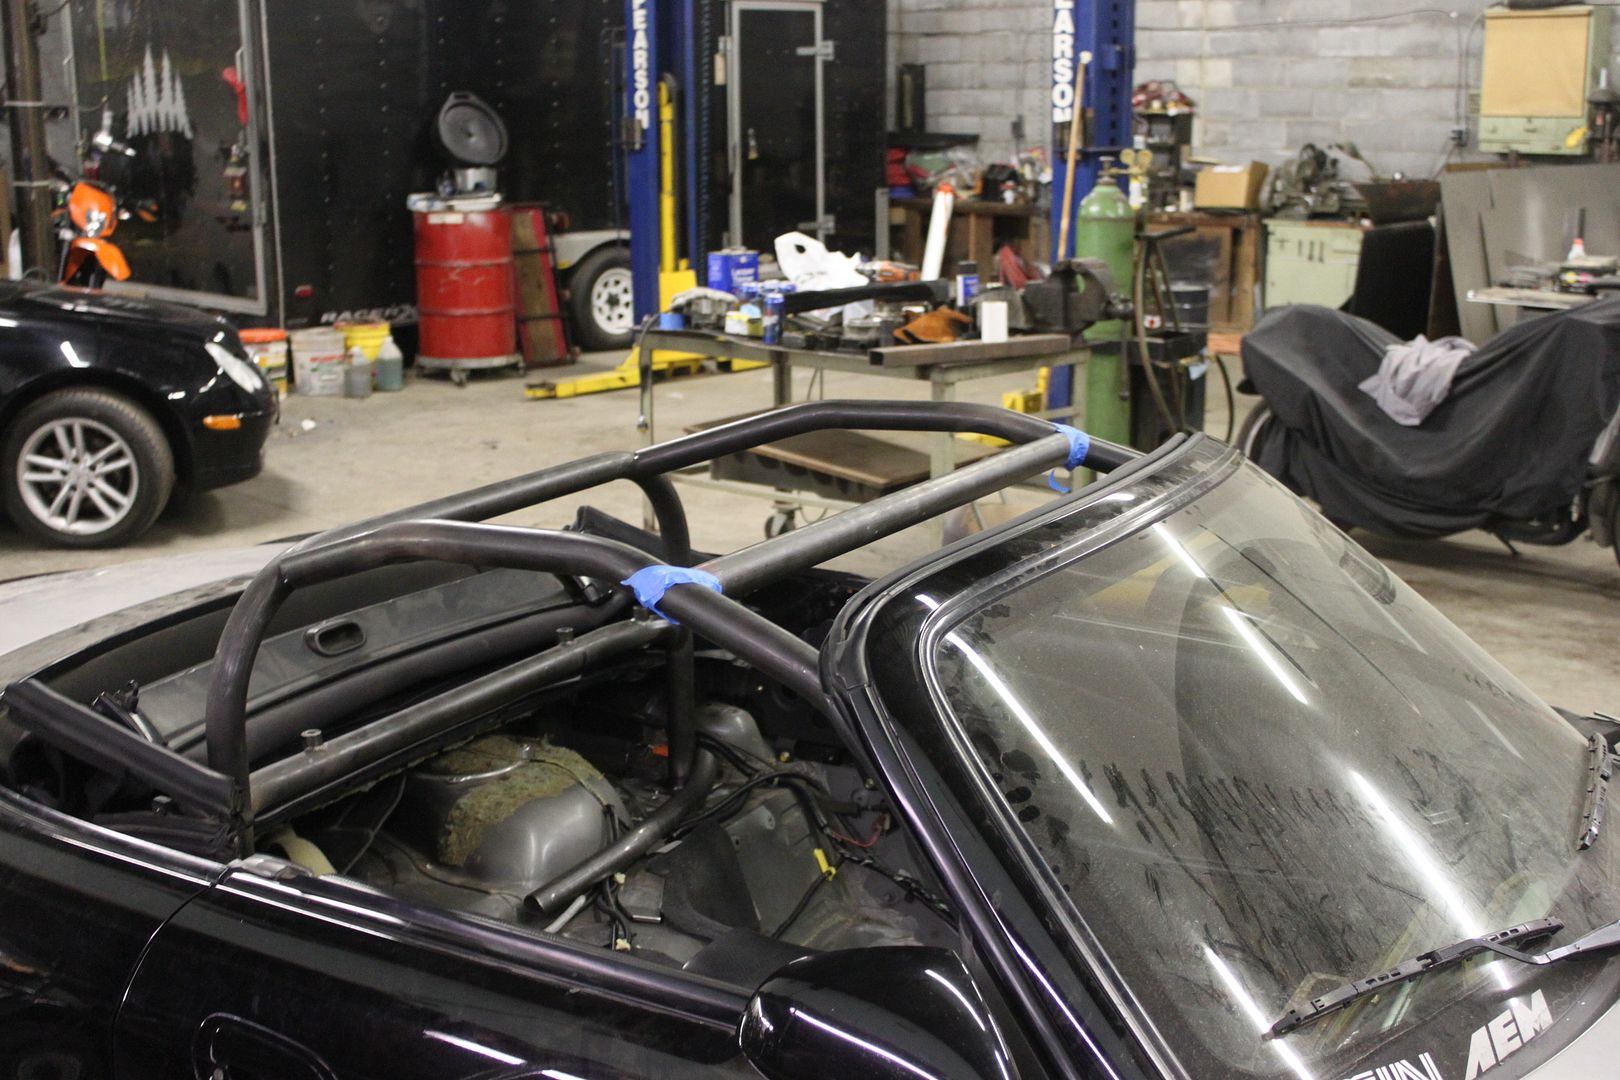
Did a little more work this weekend. Tacked everything in place, now all i need to do is trim the dash, make sure it fits then pull it all out and paint it and weld it back in place. I made some cardboard templates yesterday and marked where the dash has to be cut but i didn't have a 2" holesaw at the shop so i'll be cutting it friday. Anyways, here is some pictures with the top bar taped in place:

Registered User
Joined: Oct 2007
Posts: 1,199
Likes: 0
From: PA
nice restoration, I love the mugen rollbar cover. where did you get it from?
i have some BB front fenders that i'll sell as well... you have email (since this new site layout isnt working that well)
i have some BB front fenders that i'll sell as well... you have email (since this new site layout isnt working that well)
Thread Starter
Joined: Nov 2010
Posts: 6,324
Likes: 206
From: Ballston Spa, NY
Thread Starter
Joined: Nov 2010
Posts: 6,324
Likes: 206
From: Ballston Spa, NY
3/11/2011
Picked this up yesterday from my buddy who works at a dealership. Z06 came in with it installed and they removed it, i got an amazing deal. I think i'm gonna use it for an intercoller sprayer when i get the turbo on this thing.


I also ordered a Sparco evo seat and i'll have it here Wednesday.

ordering buddy club rails today and new ends for the T1R rear anti-bumpsteer kit
Picked this up yesterday from my buddy who works at a dealership. Z06 came in with it installed and they removed it, i got an amazing deal. I think i'm gonna use it for an intercoller sprayer when i get the turbo on this thing.
I also ordered a Sparco evo seat and i'll have it here Wednesday.
ordering buddy club rails today and new ends for the T1R rear anti-bumpsteer kit