
Operation Garage Renovation!


Thread Starter

Joined: Jun 2006
Posts: 6,041
Likes: 0
From: Cincinnati, OH
This week, my garage has been completely transformed. I took some pictures along the way since I thought y'all might want to see. The changes were:
- Rustoleum Epoxy floor coating with Key Resin Commercial Grade urethane 1/4" topcoat
- Robbe 4" Vinyl wall base
- DIY 12' work bench with 2" and 4" pine trim, and 3/4" birch veneer plywood top (had this leftover from other projects around the house).
First things first, gotta clean out the garage!

Finally clean, we can start doing the prep for the floor now. We used a 7" hand grinder and did the entire floor. My garage is 24'x20', with a full loft above the entire garage that we use for long-term storage. The guy in pics doing some of the work is a Product Rep of my dad for a commercial epoxy/urethane floor coating company that uses their product in commercial/industrial applications.

We're getting there! I did about 25% of the prep and it was a LOT of work. Hands down the best method of prepping the floor.

The prep of the floor took 3.5 hours, and the epoxy coating took 30 minutes. Since the epoxy was such a quick process, I wasn't able to step back and take a pic. Here's the floor freshly coated with the epoxy down and the color chips sprinkled in.
Close up of the floor color. Blue, white, black, grey, and light blue chips over grey epoxy.

Had to let the floor dry for 24 hours before we could install the topcoat. The product rep provided me his industrial-grade urethane coating for no charge, and it makes this floor nearly bulletproof! Once the floor was down, we installed the top coat.

Top coat completely installed! The topcoat is a high-gloss, but we mixed in 1/2 cup of anti-skid granules to prevent the floor from becoming an ice rink when wet. Works really well!

After I let the topcoat cure for 48 hours, I installed my 4" black vinyl wall base molding. Gotta let it sit out overnight to let the wrinkles relax!

Installed! Very VERY easy to do. Has a commercial-grade self-adhesive on the back. Just peel and stick!

Next up was building a workbench for the back of the garage! I used to have this awful hand-me-down kitchen table that I just stored crap on. Looked awful and wasn't even stable. Total material cost of this came to $78.xx as I had the top and trim pieces leftover from other projects.
Here it is all framed up.

And today I just finished up installing all of the trim around the edges. Here's the rest of the bench!

1/2" lip across the back and left side to prevent stuff from rolling off the back and getting lost.

All finished!

Now I gotta go find wifey to help me move into place! Ahh, much better!

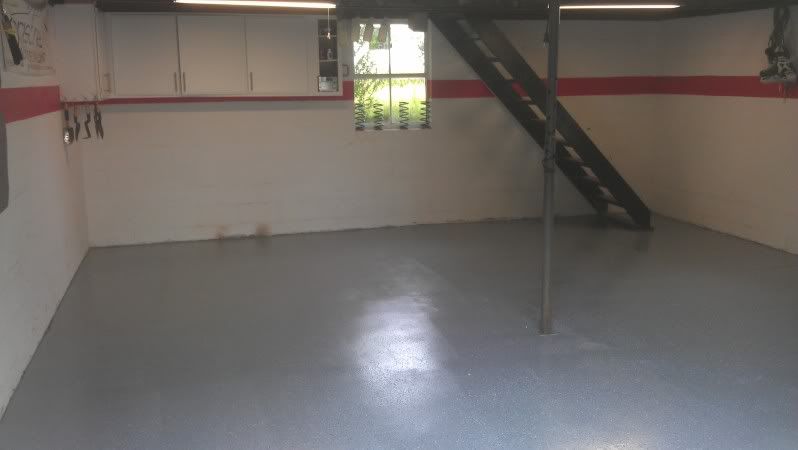
Thanks for looking! Now I just have to move stuff back into their places and get all organized. All of my detailing stuff is in the white cabinets. I also have a nice little sound system setup in there for while Im working.
One last Before/After:
Before:
After:
CN: I love my garage! <3
-Matt
- Rustoleum Epoxy floor coating with Key Resin Commercial Grade urethane 1/4" topcoat
- Robbe 4" Vinyl wall base
- DIY 12' work bench with 2" and 4" pine trim, and 3/4" birch veneer plywood top (had this leftover from other projects around the house).
First things first, gotta clean out the garage!
Finally clean, we can start doing the prep for the floor now. We used a 7" hand grinder and did the entire floor. My garage is 24'x20', with a full loft above the entire garage that we use for long-term storage. The guy in pics doing some of the work is a Product Rep of my dad for a commercial epoxy/urethane floor coating company that uses their product in commercial/industrial applications.
We're getting there! I did about 25% of the prep and it was a LOT of work. Hands down the best method of prepping the floor.
The prep of the floor took 3.5 hours, and the epoxy coating took 30 minutes. Since the epoxy was such a quick process, I wasn't able to step back and take a pic. Here's the floor freshly coated with the epoxy down and the color chips sprinkled in.
Close up of the floor color. Blue, white, black, grey, and light blue chips over grey epoxy.
Had to let the floor dry for 24 hours before we could install the topcoat. The product rep provided me his industrial-grade urethane coating for no charge, and it makes this floor nearly bulletproof! Once the floor was down, we installed the top coat.
Top coat completely installed! The topcoat is a high-gloss, but we mixed in 1/2 cup of anti-skid granules to prevent the floor from becoming an ice rink when wet. Works really well!
After I let the topcoat cure for 48 hours, I installed my 4" black vinyl wall base molding. Gotta let it sit out overnight to let the wrinkles relax!
Installed! Very VERY easy to do. Has a commercial-grade self-adhesive on the back. Just peel and stick!
Next up was building a workbench for the back of the garage! I used to have this awful hand-me-down kitchen table that I just stored crap on. Looked awful and wasn't even stable. Total material cost of this came to $78.xx as I had the top and trim pieces leftover from other projects.
Here it is all framed up.
And today I just finished up installing all of the trim around the edges. Here's the rest of the bench!
1/2" lip across the back and left side to prevent stuff from rolling off the back and getting lost.
All finished!
Now I gotta go find wifey to help me move into place! Ahh, much better!
Thanks for looking! Now I just have to move stuff back into their places and get all organized. All of my detailing stuff is in the white cabinets. I also have a nice little sound system setup in there for while Im working.
One last Before/After:
Before:
After:
CN: I love my garage! <3
-Matt


Joined: Jan 2008
Posts: 9,570
Likes: 3
From: New Jersey
AWESOME JOB MATT!, I did the Epoxy this time last year, best upgrade to the S to date!. I love hanging out in the garage, lol
EPOxy Floor FTW! (Oil spills, easily wipe right up, it's killer)
http://www.flickr.com/photos/joeycostanza/6808154072/http://www.flickr.com/photos/joeycostanza/6808154072/ by http://www.flickr.com/people/joeycostanza/, on Flickr
EPOxy Floor FTW! (Oil spills, easily wipe right up, it's killer)
http://www.flickr.com/photos/joeycostanza/6808154072/http://www.flickr.com/photos/joeycostanza/6808154072/ by http://www.flickr.com/people/joeycostanza/, on Flickr

