

Ohlins DFV Coilover Kit


Thread Starter
Former Sponsor
Joined: Mar 2002
Posts: 15,526
Likes: 19
After 2.5 years of daily driving, autocrossing, and tracking my '08 AP2 on Koni Yellows with Koni adjustable spring perches and Eibach racing springs (500# front / 450# rear), I decided to upgrade. I thought about the KW V3 or Clubsports and AST 5100s, but eventually decided on the Ohlins DFV's. The biggest reason why I chose them is because they were single adjustable for rebound AND compression (not just rebound). I didn't want double adjustable, since I knew I would spend way too much effort trying to get them adjusted "right". Since Ohlins requires all their distributors to sell at the same price, there really wasn't much price hunting. I ordered them from Urge Designs, who had them drop shipped directly from Ohlins.
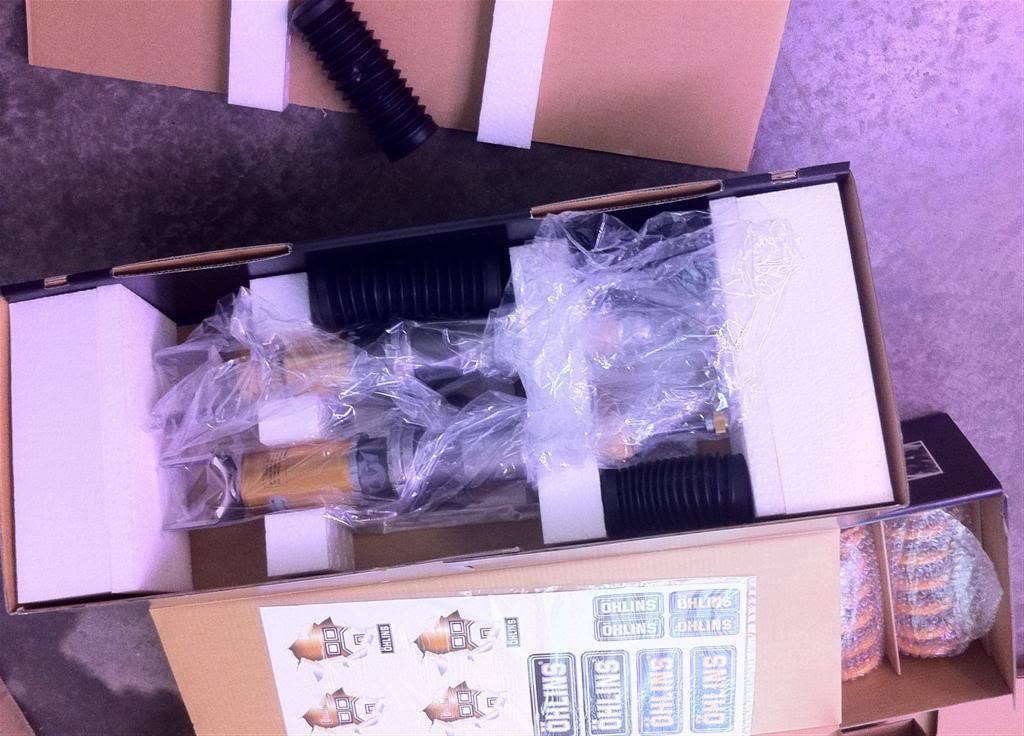
As soon as I opened the outer box, I was overwhelmed by the quality of their packaging! Inside the first box was 2 more beatiful boxes that were each wrapped in bubble wrap. Inside those boxes were all the coilover components neatly arranged and protected in a very well engineered system.


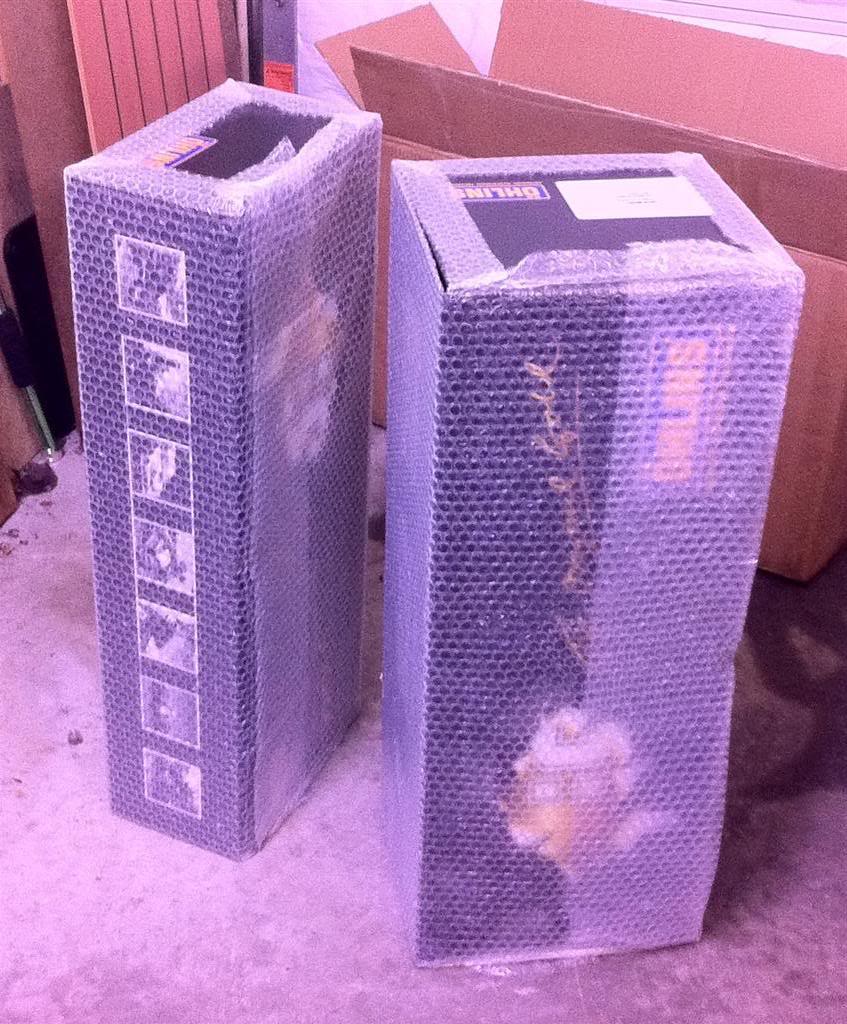


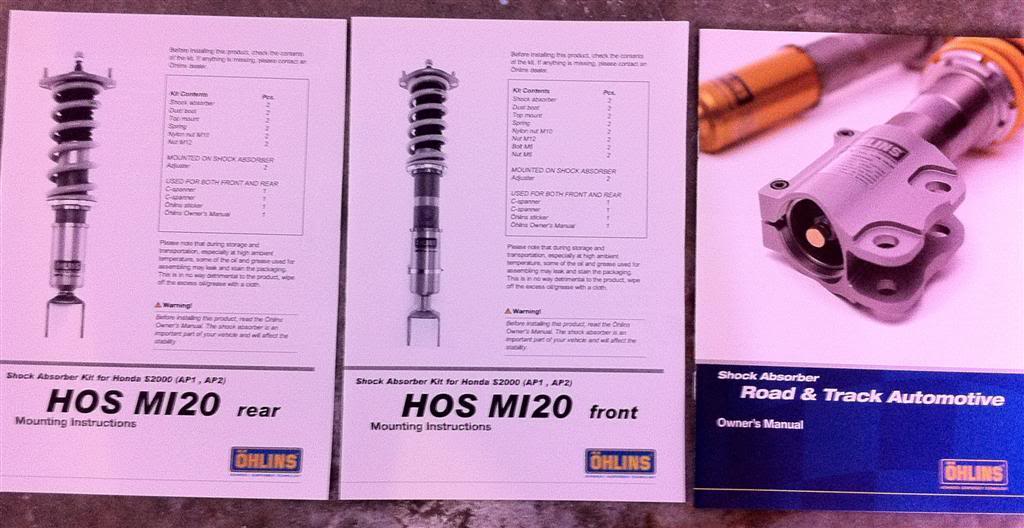
I was equally impressed by the documentation that accompanied the kit. There was a very detailed booklet that covered the Ohlins design, adjustments, basic suspension setup, etc., and there was also a detailed pamphlet for the front shocks AND a separate one for the rear. The pamphlets were not generic at all, and covered the details that were specific to each.
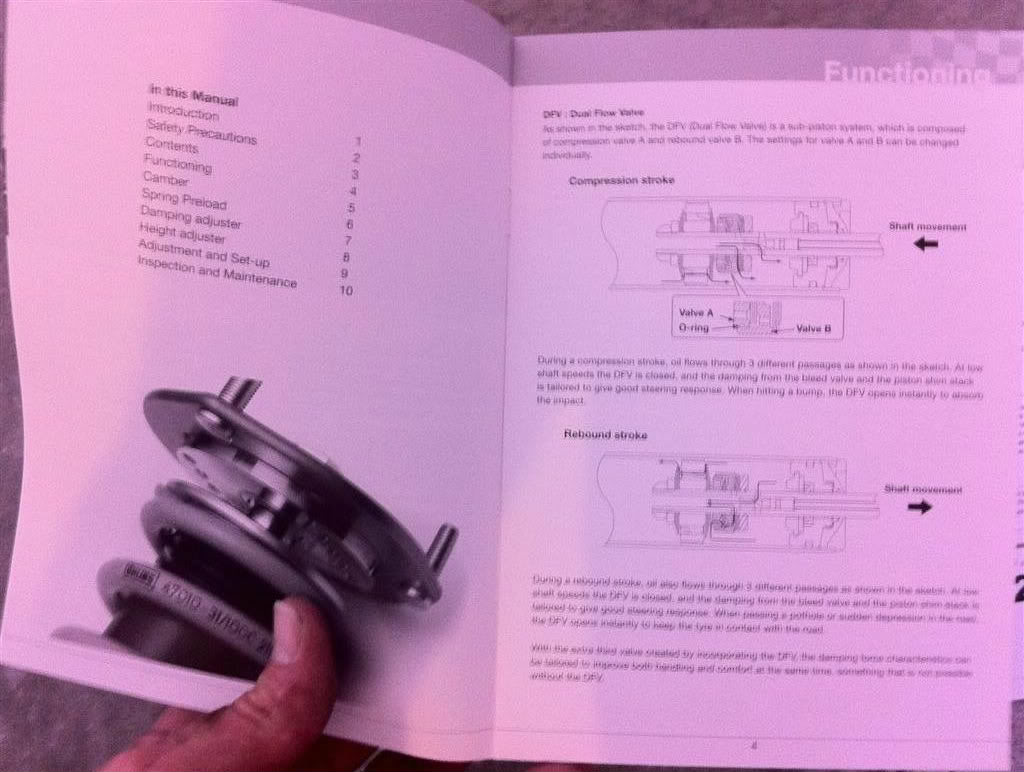
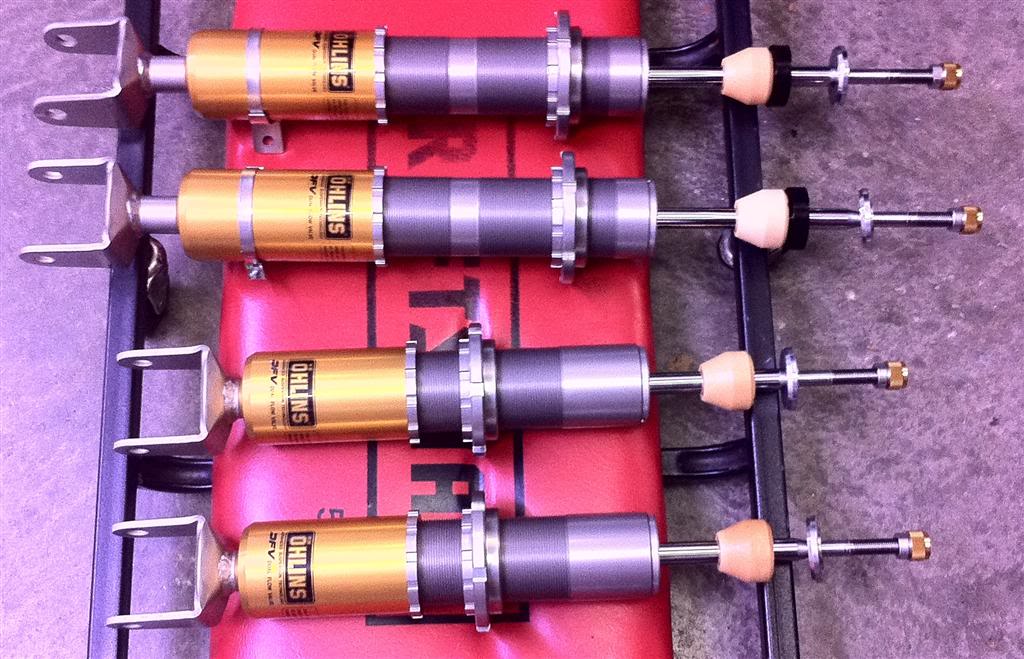
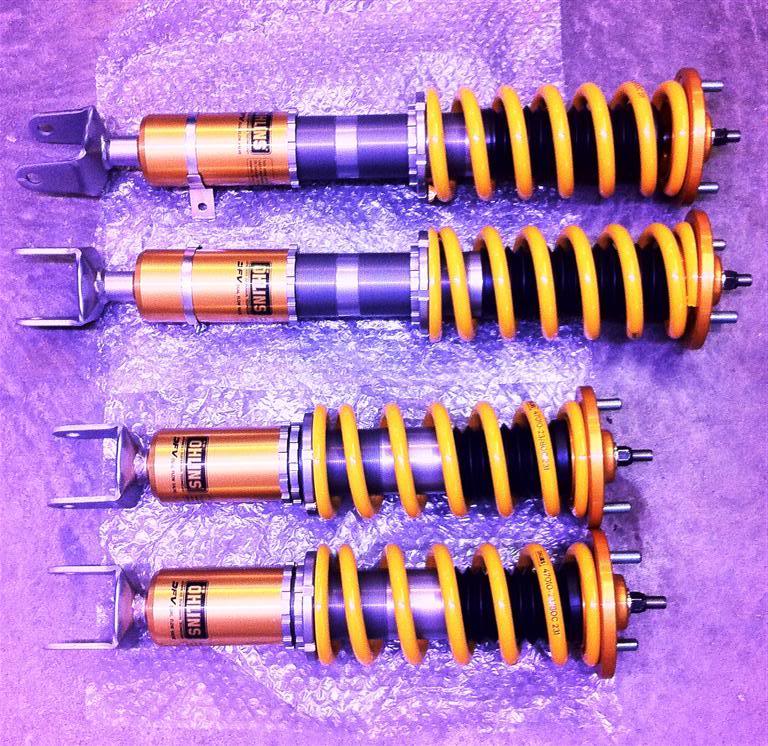
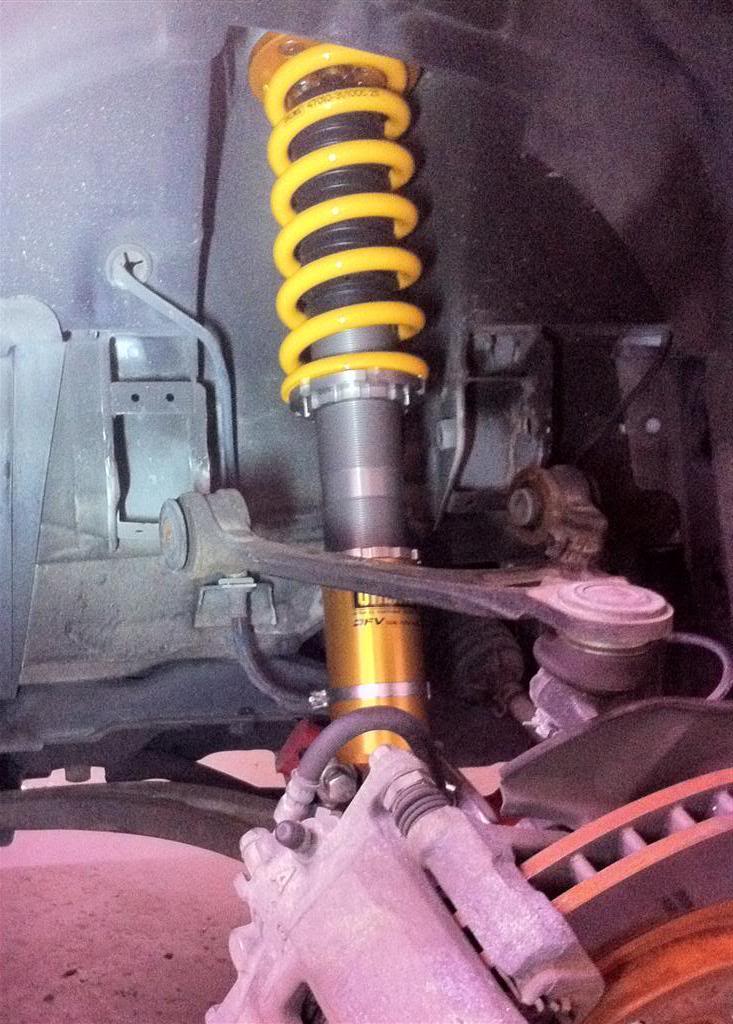
When I removed the components from the box, I was very pleased to see that the quality didn't stop with the packaging or documentation. These things are beautiful! I actually felt guilty putting them on my car, where they would get dirty! Looking past the appearance, all the components are just so "precise"! I wish I would have taken more pictures of the damper bodies and pillow ball top hats, since they are really, really nice. Unfortunately, I forgot...
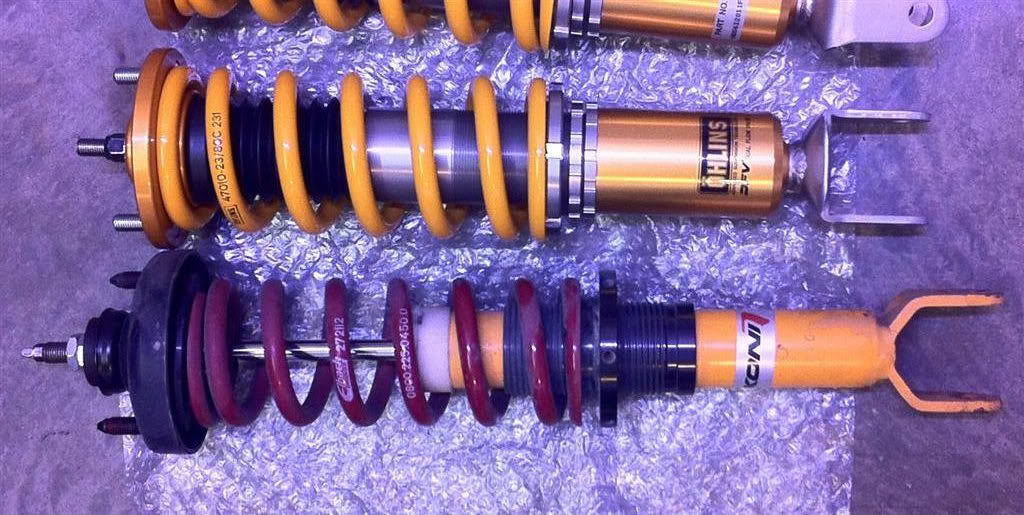
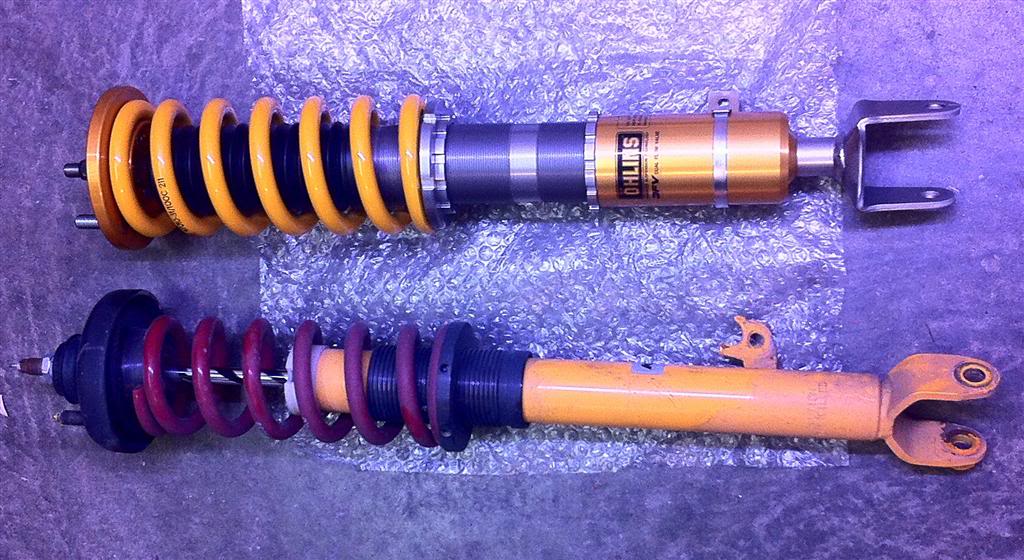
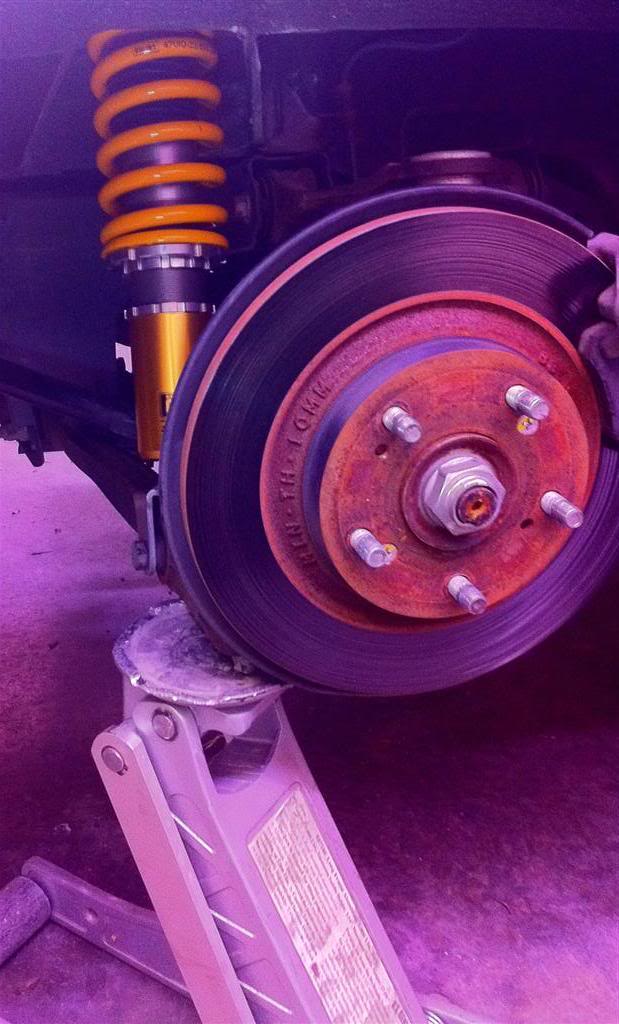
Here they are next to my Konis. They are a bit shorter, but they can be adjusted longer. Unfortunately, since the rear dampers have to be so short, I was disappointed to find how short Ohlins went with this one. With the rear damper having to be so short, damper travel becomes very limited, and the size of the oil reservoir also decreases. I was surprised to find that the Koni rear shock actually has more damper travel than the Ohlins. It's also clear that Ohlins could have increased the damper travel if they would have designed the lower mount a little better. Hopefully, the larger diameter damper body will make better use of the reduced travel...
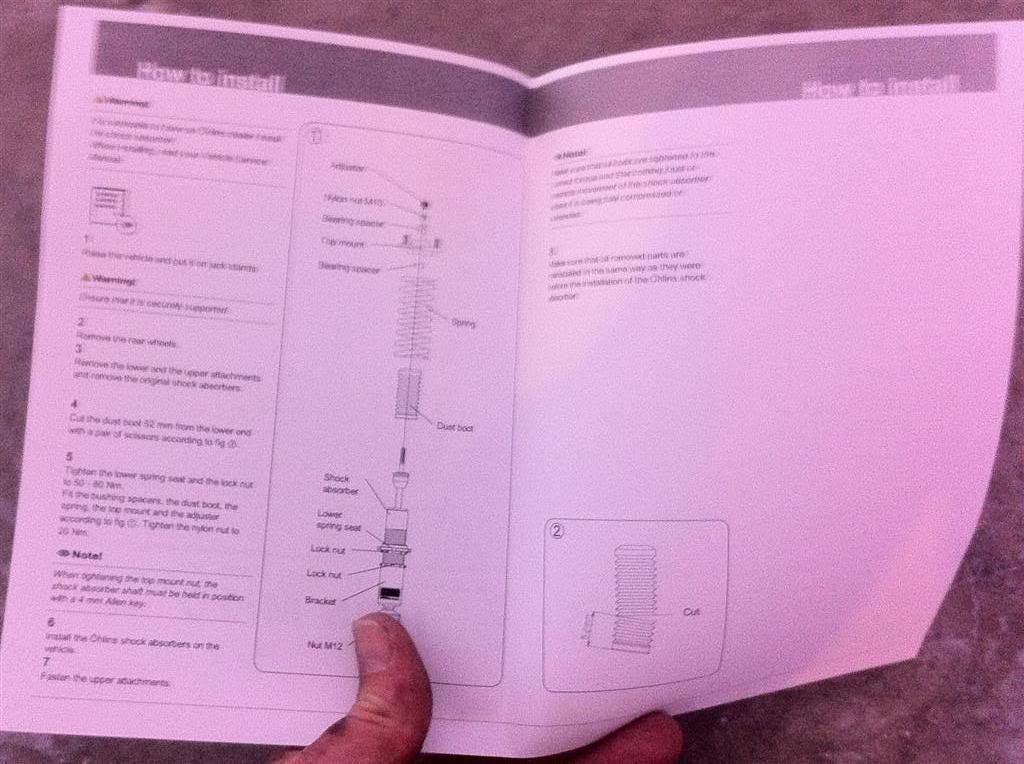
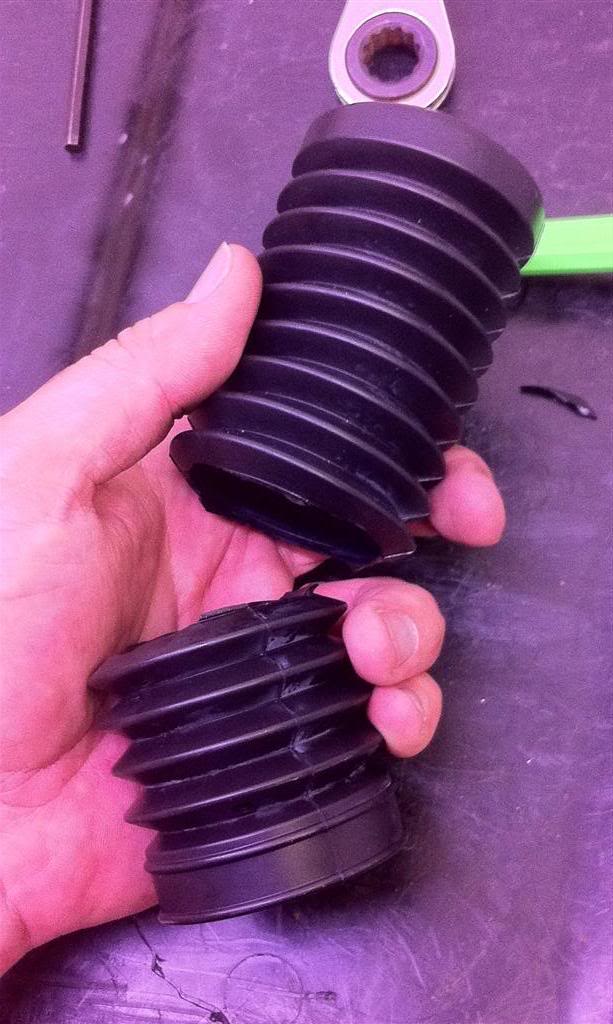
Another mildly disappointing thing is that Ohlins didn't send a dust boot that is correctly sized for the rear damper. The instructions tell you to cut 52mm off of the dust boots for the rear in order to make it fit. This isn't a big deal, but it doesn't wind up fitting as nicely as the front boots.
Most people might have gone straight to the install, and bolted everything up, but I decided to spend some time measuring and calculating in order to reduce "tweaking" later. I wanted to keep the same ride height that I had with the Konis, and wanted to make some effort improve the corner balance.
I started off by calculating the mechanical advantage that the wheel has over the damper. I think this is called "motion ratio", or something. I measured this to be 1.4 for the front and 1.45 for the rear. Since the front damper has about 3.25" total damper travel before the bump stop is engaged, I want the damper to only be compressed by about 1.63" when the car is at rest. If each front wheel has 700 lbs to support, then the spring will have 980 lbs acting on it at rest (1.4 * 700). This means that the 572 lbs/in front springs will be compressed 1.71" while at rest. The difference between the 1.71" and 1.63" is the amount that I will need to preload the front springs in order to have the damper in the middle of its stroke while at rest. That's a very small amount of preload, which is good.
However, the rear dampers are another story. If the rear wheels will also support about 700 lbs, then the 458 lbs/in rear springs will be compressed 2.22" when the car is at rest. Since the rear dampers only have 2.125" total damper travel before engaging the bump stop, that means it will need to be preloaded by a whopping 1.16"! Unfortunately, after calculating the total damper body length that would give me the correct ride height, I found that I would only be able to preload the rear spring by 0.6". Any more preload than that would raise my ride height, since the damper body would be adjusted as low as it would go. So the result is that my ride height would be where I want it, but I will have slightly less compression travel than I wanted.
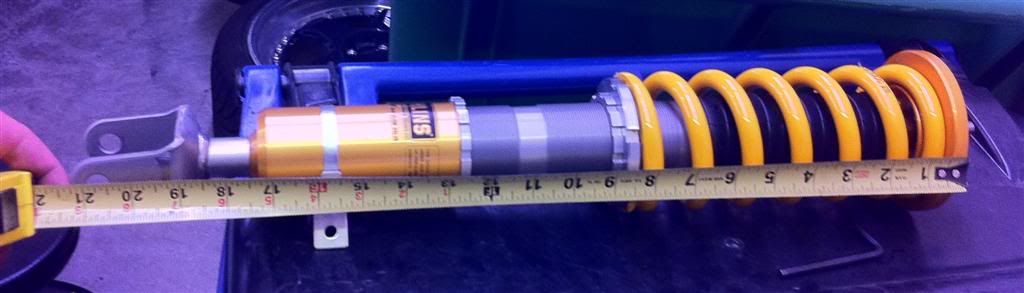
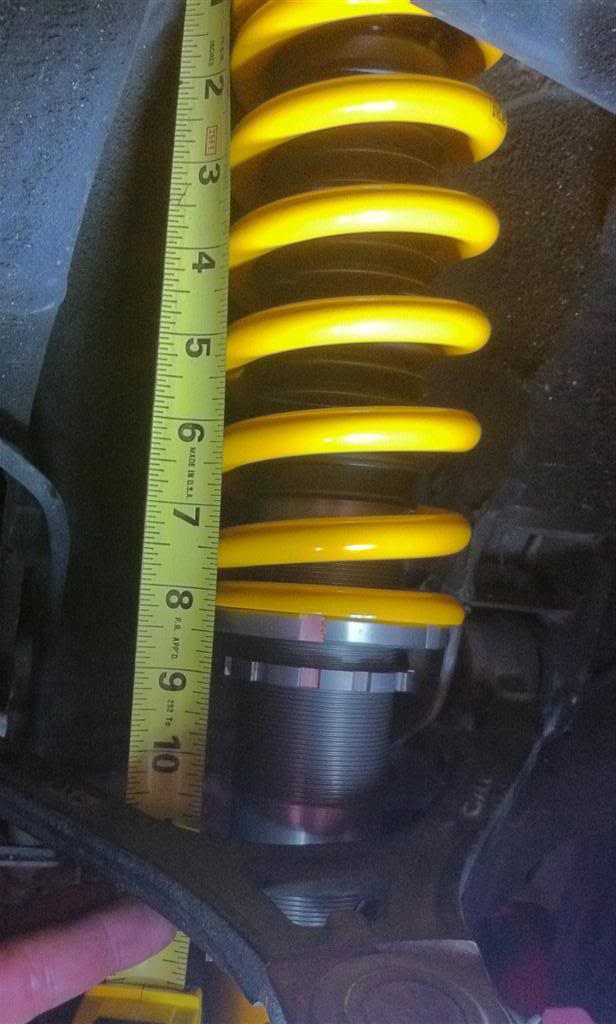
I determined that the total damper length for the front should be 20.75" from the top hat to the center of the lower mount holes, and the rear should be 15.75" (actually should have been 15.2", but 15.75" is as short as it would go). By adjusting the damper length to these values AND setting the spring preload as descibed above, my front and rear ride height should be the same as it was before. I will wait to actually set the preload until AFTER I have the damper assembly bolted into the car.
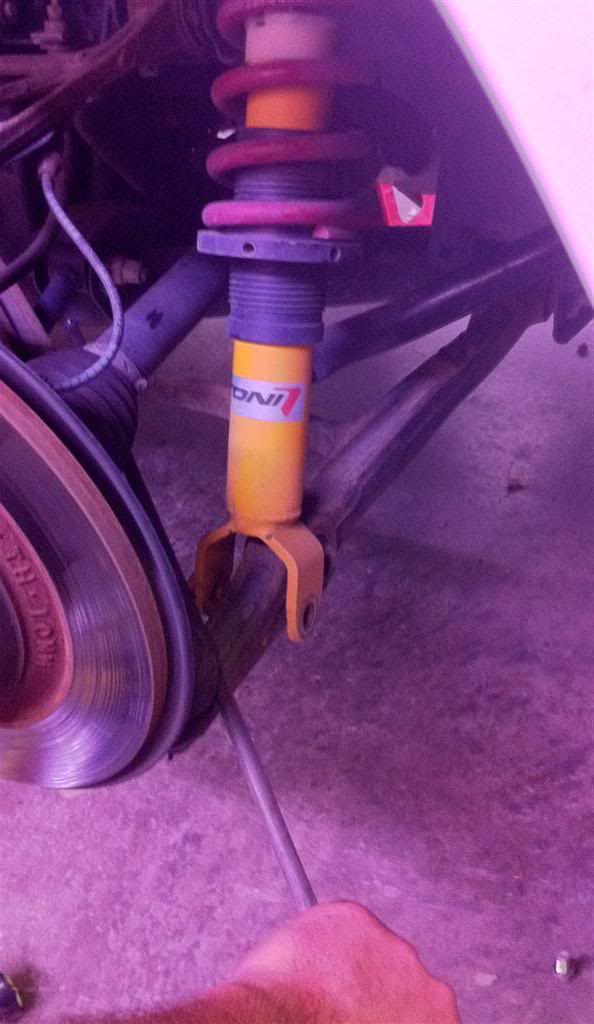
There are many DIY's for installing suspensions, so I'm just going to cover a few points. First, some instructions say that you need to pop ball joints to install them, but you don't need to do that! You should disconnect the sway bar end links on all corners. When removing the rear dampers, you just need some sort of lever (breaker bar, etc.) to force the suspension down enough to free the damper. Since the Ohlins dampers are so short, they go in super easy! The fronts are also easy if you simply remove the 2 bolts attaching the upper A arm to the body.
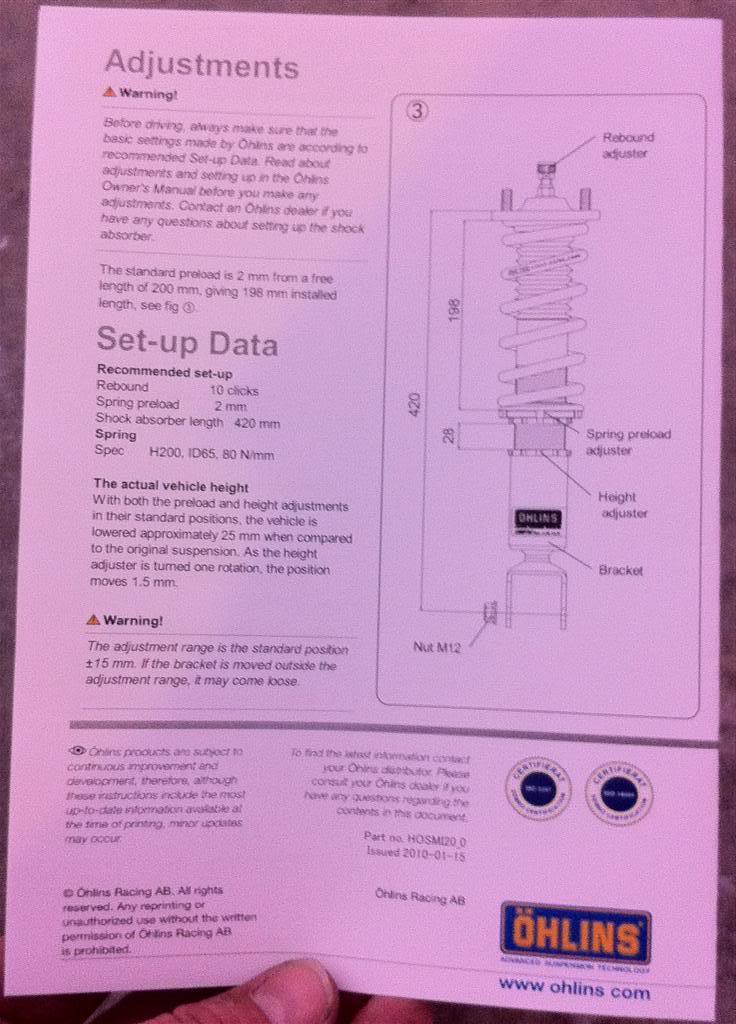
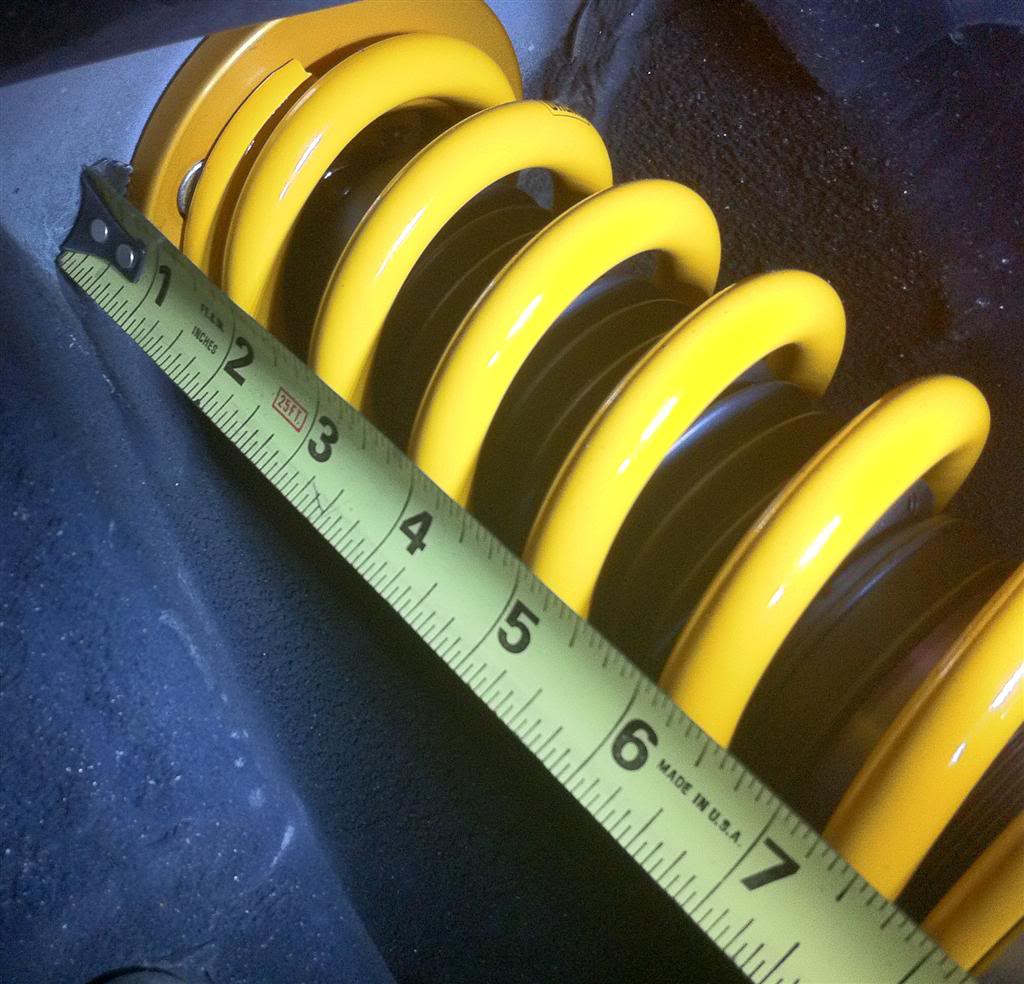
After getting the coilover bolted up, you need to screw the lower spring perch UP using your fingers until the spring is no longer loose or free to move around. Now take a measurement from the top of the damper to the bottom of the spring as shown below. This is the ZERO preload point. Now use the spring perch wrench (provided in the kit) to screw the lower perch further up to preload the spring. If the starting measurement was 8 3/8", then it should be about 8 1/4" after adding .125" of preload. Once you have added the correct amount of preload, tighten the locking ring.
Now you just need to preload the bushings before tighting the bolts. On the front and rear suspension, the lower damper bolt should be tightened ONLY while the suspension is under load. However, on the front suspension, the upper A arm bolts also need to be tightened while the suspension is under load. It's important to get this right, or the car will have horrible corner balance and the ride heights will be jacked up.
You don't want too much or too little preload on the bushings. It would be best to go to a good alignment shop, and have the bushing bolts loosened and re-tightened again while it sat on the alignment rack. However, I think my approach is almost as good. I simply jack one end of the car up from the center jack point (differential or front cross-member under engine), and put the other end of the car on 2 jack stands. So now the car is being supported at 3 points like a tri-pod. Then I use another jack to lift one of the hubs at the jack stand end until that corner lifts off the jack stand about 1/4". At this point, I push down on the car a few times, then tighten the bushing bolts with a torque wrench. Then I move the jack to the other wheel to do the same, then move the jack stands to the opposite end of the car and repeat.
The last thing to do is to reconnect the sway bar end links. I took the opportunity to also lubricate the sway bar bushings.
When I put the wheels back on, and put the car back on the ground, I rolled it back and forth a few feet and bounced on it a couple times at each corner before measuring my ride heights again. The rear was PERFECT, and actually better than before, since they weren't exactly equal before. However, the front was almost 1/2" lower than before.
I went out for a drive, and really liked the way it felt. I'm very opposed to giving subjective opinions about things, since the placebo effect is so strong. However, I can say that the car is quieter, and definitely doesn't feel any stiffer. I was also very impressed with the car's behavior around tight corners at speed. My car used to require quite a bit of car control (which I actually enjoy), but the Ohlins really cut that down a LOT (I may miss it). I took several of my favorite fast corners last night and this morning in a "spirited manner", and the car just STUCK!
I reviewed all my measurements and math again this morning, and can't come up with any explanation for the 1/2" drop in the front, except that maybe the front spring rates are less than 572 ft-lbs OR I wound up with too much preload on the bushings OR the front of my car weighs significantly more than 1400 lbs. I will reset the front bushing preload again this evening.
I'll post reviews from my next autocross in a couple weeks, and from my next track event some time after that...
As soon as I opened the outer box, I was overwhelmed by the quality of their packaging! Inside the first box was 2 more beatiful boxes that were each wrapped in bubble wrap. Inside those boxes were all the coilover components neatly arranged and protected in a very well engineered system.
I was equally impressed by the documentation that accompanied the kit. There was a very detailed booklet that covered the Ohlins design, adjustments, basic suspension setup, etc., and there was also a detailed pamphlet for the front shocks AND a separate one for the rear. The pamphlets were not generic at all, and covered the details that were specific to each.
When I removed the components from the box, I was very pleased to see that the quality didn't stop with the packaging or documentation. These things are beautiful! I actually felt guilty putting them on my car, where they would get dirty! Looking past the appearance, all the components are just so "precise"! I wish I would have taken more pictures of the damper bodies and pillow ball top hats, since they are really, really nice. Unfortunately, I forgot...
Here they are next to my Konis. They are a bit shorter, but they can be adjusted longer. Unfortunately, since the rear dampers have to be so short, I was disappointed to find how short Ohlins went with this one. With the rear damper having to be so short, damper travel becomes very limited, and the size of the oil reservoir also decreases. I was surprised to find that the Koni rear shock actually has more damper travel than the Ohlins. It's also clear that Ohlins could have increased the damper travel if they would have designed the lower mount a little better. Hopefully, the larger diameter damper body will make better use of the reduced travel...
Another mildly disappointing thing is that Ohlins didn't send a dust boot that is correctly sized for the rear damper. The instructions tell you to cut 52mm off of the dust boots for the rear in order to make it fit. This isn't a big deal, but it doesn't wind up fitting as nicely as the front boots.
Most people might have gone straight to the install, and bolted everything up, but I decided to spend some time measuring and calculating in order to reduce "tweaking" later. I wanted to keep the same ride height that I had with the Konis, and wanted to make some effort improve the corner balance.
I started off by calculating the mechanical advantage that the wheel has over the damper. I think this is called "motion ratio", or something. I measured this to be 1.4 for the front and 1.45 for the rear. Since the front damper has about 3.25" total damper travel before the bump stop is engaged, I want the damper to only be compressed by about 1.63" when the car is at rest. If each front wheel has 700 lbs to support, then the spring will have 980 lbs acting on it at rest (1.4 * 700). This means that the 572 lbs/in front springs will be compressed 1.71" while at rest. The difference between the 1.71" and 1.63" is the amount that I will need to preload the front springs in order to have the damper in the middle of its stroke while at rest. That's a very small amount of preload, which is good.
However, the rear dampers are another story. If the rear wheels will also support about 700 lbs, then the 458 lbs/in rear springs will be compressed 2.22" when the car is at rest. Since the rear dampers only have 2.125" total damper travel before engaging the bump stop, that means it will need to be preloaded by a whopping 1.16"! Unfortunately, after calculating the total damper body length that would give me the correct ride height, I found that I would only be able to preload the rear spring by 0.6". Any more preload than that would raise my ride height, since the damper body would be adjusted as low as it would go. So the result is that my ride height would be where I want it, but I will have slightly less compression travel than I wanted.
I determined that the total damper length for the front should be 20.75" from the top hat to the center of the lower mount holes, and the rear should be 15.75" (actually should have been 15.2", but 15.75" is as short as it would go). By adjusting the damper length to these values AND setting the spring preload as descibed above, my front and rear ride height should be the same as it was before. I will wait to actually set the preload until AFTER I have the damper assembly bolted into the car.
There are many DIY's for installing suspensions, so I'm just going to cover a few points. First, some instructions say that you need to pop ball joints to install them, but you don't need to do that! You should disconnect the sway bar end links on all corners. When removing the rear dampers, you just need some sort of lever (breaker bar, etc.) to force the suspension down enough to free the damper. Since the Ohlins dampers are so short, they go in super easy! The fronts are also easy if you simply remove the 2 bolts attaching the upper A arm to the body.
After getting the coilover bolted up, you need to screw the lower spring perch UP using your fingers until the spring is no longer loose or free to move around. Now take a measurement from the top of the damper to the bottom of the spring as shown below. This is the ZERO preload point. Now use the spring perch wrench (provided in the kit) to screw the lower perch further up to preload the spring. If the starting measurement was 8 3/8", then it should be about 8 1/4" after adding .125" of preload. Once you have added the correct amount of preload, tighten the locking ring.
Now you just need to preload the bushings before tighting the bolts. On the front and rear suspension, the lower damper bolt should be tightened ONLY while the suspension is under load. However, on the front suspension, the upper A arm bolts also need to be tightened while the suspension is under load. It's important to get this right, or the car will have horrible corner balance and the ride heights will be jacked up.
You don't want too much or too little preload on the bushings. It would be best to go to a good alignment shop, and have the bushing bolts loosened and re-tightened again while it sat on the alignment rack. However, I think my approach is almost as good. I simply jack one end of the car up from the center jack point (differential or front cross-member under engine), and put the other end of the car on 2 jack stands. So now the car is being supported at 3 points like a tri-pod. Then I use another jack to lift one of the hubs at the jack stand end until that corner lifts off the jack stand about 1/4". At this point, I push down on the car a few times, then tighten the bushing bolts with a torque wrench. Then I move the jack to the other wheel to do the same, then move the jack stands to the opposite end of the car and repeat.
The last thing to do is to reconnect the sway bar end links. I took the opportunity to also lubricate the sway bar bushings.
When I put the wheels back on, and put the car back on the ground, I rolled it back and forth a few feet and bounced on it a couple times at each corner before measuring my ride heights again. The rear was PERFECT, and actually better than before, since they weren't exactly equal before. However, the front was almost 1/2" lower than before.
I went out for a drive, and really liked the way it felt. I'm very opposed to giving subjective opinions about things, since the placebo effect is so strong. However, I can say that the car is quieter, and definitely doesn't feel any stiffer. I was also very impressed with the car's behavior around tight corners at speed. My car used to require quite a bit of car control (which I actually enjoy), but the Ohlins really cut that down a LOT (I may miss it). I took several of my favorite fast corners last night and this morning in a "spirited manner", and the car just STUCK!
I reviewed all my measurements and math again this morning, and can't come up with any explanation for the 1/2" drop in the front, except that maybe the front spring rates are less than 572 ft-lbs OR I wound up with too much preload on the bushings OR the front of my car weighs significantly more than 1400 lbs. I will reset the front bushing preload again this evening.
I'll post reviews from my next autocross in a couple weeks, and from my next track event some time after that...
Thread Starter
Former Sponsor
Joined: Mar 2002
Posts: 15,526
Likes: 19
Update: Autocross Review!
I have great news to report about how this coilover setup performed at my first autocross! One of the clubs I autocross with is the Lone Star Chapter of the BMW Car Club of America (LSCBMWCCA), and they host most of their events at an old / retired helicopter pilot training facility in Mineral Wells, TX. It is a large asphault tarmac that has been decaying for decades. As far as I know, the only thing this tarmac is used for is autocrossing, so there is very little maintenance done to it. The entire surface is covered in cracks and gravel, but there are also many areas where the pavement changes "types". I've been autocrossing out there on and off since 2002. I would consider this surface to be the most challenging surface possible for a good suspension setup.
If this was an SCCA event, there would be many, many cars attending that would blow the doors off my mildly modified S2000 on street tires (square 255/40-17 Hankook RS-3s), but the BMW events don't get that kind of participation. It's pretty common for there to be only 30-50 cars, so we will get 8-10 runs each. It's also common for "regular cars" to get FTD, but I haven't gotten FTD since 2003. However, I did get FTD yesterday on the Ohlins!
Before I talk about how the Ohlins did, I should explain that I am not serious enough about the technical aspect of autocrossing to be a "great driver". All serious autocrossers I know will walk the course before the event to analyze every corner for the optimal line, but I don't. If I walk the course at all (about 50% of the time), I just walk it so I don't get lost. When I drive the course, I just drive by the seat of my pants for the most part, and don't put too much thought into strategy. Basically, I'm just there for a good time driving my car, and consider the "competition" to be an added bonus.
One of the things that I find fun about driving out at Mineral Wells is that the rough surface makes the car very challenging to drive. You're always right on the edge of spinning off the course, and your fastest run is the one where you managed to keep the car under control for the whole course. That makes it hard to get consistant runs, but it is a lot of fun! However, the Ohlins reduce that part of the fun, by making the car very easy to drive consistently. I was blown away by how close I could take the car to the edge, and don't remember a single occasion where i had to engage "car control mode" to prevent a spin. I was even more blown away at how early I was able to go full throttle in a corner. There was also no issue with understeer that I noticed.
Below is a video of my BEST RUN from a BMW event at this same location last October. I was on relatively fresh tires, and was happy with my performance. Take note of how much counter-steering I had to do, and also how late I applied throttle on corner exits. I suggest watching this video a couple times (in full screen 720P).
This is a video from my old setup.
[media]http://www.youtube.com/watch?v=IFYWH22Lw_g&hd=1[/media]
Below are 2 videos showing all my runs from yesterday. The first video includes 3 runs from the afternoon, and the first run in that video was my fastest (FTD by 1.49 seconds). I included all of my runs so that you could see that there wasn't a single occasion where the car required the level of car control exhibited in the video from last year. I had 1 DNF, when I blew past a slalom cone on my first run of the day, but didn't hit a single cone all day. I believe I had 4-5 runs that were fast enough to be FTD, but won't know for sure until the official results are posted online. EDIT: The final results were posted, and I see that I actually had 6 runs that could have been FTD, but I was also shorted a run, so I believe there would have been a 7th potential FTD run...
This is from yesterday afternoon.
[media]http://www.youtube.com/watch?v=SXPc2KHU5KY&hd=1[/media]
This is from yesterday morning.
http://www.youtube.c...XqWmu9MHIs&hd=1
Thread Starter
Former Sponsor
Joined: Mar 2002
Posts: 15,526
Likes: 19
Update: Track Review!
I did my first track day on the Ohlins on 9/22, and they didn't disappoint me at all! It started out pretty cool outside, but into the mid 90's by the end of the day. They performed absolutely consistent all day long, through 6 sessions that were 20 minutes each. I had them set to 7 clicks from full stiff for the first session, which resulted in a bit of a twitchy back end, so I softened them up to 8 clicks in the front and 10 clicks in the rear. The car felt awesome for the rest of the day.
I wish I would have gotten my instructor to do some laps in my car to see what kind of lap times he could get, but it just didn't work out. I've just been on this track for 2 single day events, with 9 years between them, so I know the car would have been much faster in someone else's hands. Anyway, there wasn't any point in the day that I felt like I could have benefitted from different coilovers...
BTW, I suggest clicking the "Watch on Youtube" button, since viewing this directly from this site degrades the video performance.
[media]http://www.youtube.com/watch?v=EG9qmpQ0EhU&hd=1[/media]


Trending Topics
Thread Starter
Former Sponsor
Joined: Mar 2002
Posts: 15,526
Likes: 19
I readjusted my front coilovers a bit this evening, then drove down to Mexico for a quick road test. I recorded a video of the test. I didn't record the video to show anything about my driving skills, or even how fast I could go around the "course". I just wanted to show how much these coilovers "forgive" mistakes. Even though I haven't even had an aligment, and am on my street tires (Sumitomo HTRZ2), which are not performance oriented tires at all, I felt more confident near the limit than ever before! Every time I've tested in this area before, I was much more afraid of those wheel-eating curbs, and spent MUCH more time correcting for driving mistakes. I don't know how to describe the difference, since the results are so different from what I expected. I never really thought the "better" coilovers would be faster in this way. I thought they would be faster by being stiffer or more adjustable, or lighter, or more consistent, or whatever. These just seem to allow me to get closer to the limit without punishing me for exceeding it.
Damn, I hate sounding stupid...
[media]http://www.youtube.com/watch?v=xWQrvc7pXQI&hd=1[/media]
Damn, I hate sounding stupid...
[media]http://www.youtube.com/watch?v=xWQrvc7pXQI&hd=1[/media]


Joined: Sep 2006
Posts: 10,465
Likes: 52
From: ATL
My only complaint on these is that the rates aren't a little higher. I know they are right around 10k front/8k rear but I'd prefer something closer to 12/10 which they should be more than capable of handling. Next time I need to replace shocks these might be on my list. Now you did say the rears are as low as they'll go? What does your right height look like?