
My homemade alignment string setup


Registered User
Joined: Jul 2006
Posts: 635
Likes: 0
Yes, the hub center doesn't change regardless of what wheel you have mounted on the car. Also, since you are hitting the middle of the wheel, the alignment won't affect the setup of the strings. The goal is repeatable setups, so you want to minimize the variables.

Registered User
Joined: Sep 2009
Posts: 558
Likes: 24
From: littleton, CO
however you do it, just make sure your string box is square and level with the hubs. If your like me with upper and lower camber adjustment via spc or similar offset ball joints. your hubs can move in and out which makes getting your string box square even harder. Good write up though! a nice easy solution to getting things really close.
Registered User
Joined: Dec 2011
Posts: 144
Likes: 0
From: Portland, OR
Everyone is correct about the wheel hubs and it's worth making sure you don't base it off of front to rear and the hubs as indicated.
the reason - just about every car on the road today has a wider front track than rear - if you set your rear toe based on an 'equal' front to rear dimension you'll end up with rear toe out - a VERY unstable condition at the limit and just downright weird to drive hard on.
measure your track widths front & rear and make certain your string box is square. When in doubt you can always get under the car and measure from the center of pickup points on suspension. it's not too bad to figure out the middle of the lower control arms from the outer ball joints and you can usually measure through the wheels from the lower ball joint as well.
the other thing to watch out for - when you jack up the car and make your changes - be sure to resettle everything - roll the car around and bump the suspension so it settles back down, otherwise you'll be chasing the settings and seemingly never figuring out why they aren't repeatable.
Former Moderator


Joined: Jul 2005
Posts: 4,634
Likes: 28
From: West Virginia
From my website's alignment page:
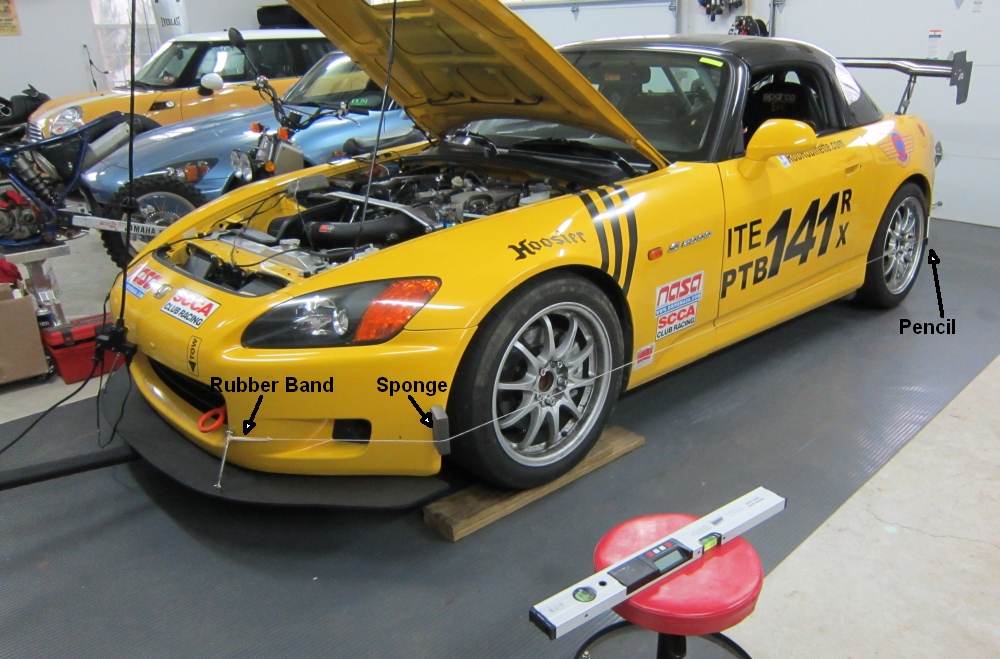
The 2.25" is measured at the wheel mating surface with the brake disks in place. If you're running staggered wheels you can do the math to figure out the difference between the front and rear outside rim edges.
The AP1 S2000's rear end is 2.25" wider than the front (measured at the wheel mating surface) so the string in the front must be moved 1.125" farther off the front wheel to compensate [using Andrew's updated measurement]. You can use a dry sponge or sanding block on the front bumper to get this spacing. Move the sponge on the bumper to get the correct spacing off the front wheel.
In the rear place a pencil under the string to get it out away from the tire sidewall then measure from the rim edge to the string. The distance the pencil holds the string off (average of leading & trailing edge of rim) needs to be added to the front 1.125" sponge hold off. With 0 toe the measurement at the front and rear of the rim will be equal. If the measurement at the rear of the wheel is larger then there is toe out. If the measurement at the rear of the wheel is smaller it has toe in.
In the rear place a pencil under the string to get it out away from the tire sidewall then measure from the rim edge to the string. The distance the pencil holds the string off (average of leading & trailing edge of rim) needs to be added to the front 1.125" sponge hold off. With 0 toe the measurement at the front and rear of the rim will be equal. If the measurement at the rear of the wheel is larger then there is toe out. If the measurement at the rear of the wheel is smaller it has toe in.
The 2.25" is measured at the wheel mating surface with the brake disks in place. If you're running staggered wheels you can do the math to figure out the difference between the front and rear outside rim edges.

Joined: May 2008
Posts: 369
Likes: 3
From: Central Ar.
At the last national event I went to I made sure that my alignment was dead on before hand by visiting a local autocrossers tire shop for an alignment. He gives me a great deal and I help him out on his stl club race car. After several runs on the practice I noticed that the steering wheel was several degrees off (at least 30*)!? The guy who aligned it was there competing in a different class. We put the car on jack stands and used our iPhones to check for camber at least which turned out to be of 2* in the front from one side to the other. Also found the rear to be different. At this point it was obvious something was loose. We got it as close as possible and finished the event.
Fast foreword to this winter. Get the car back on the rack and find a rear toe arm had moved and the front camber was impossible to get closer than 2* at the extreme negative. So I realized that the front cradle had shifted towards the passenger side. Fml. He didn't have time to let me fix it on the rack so...
Plan B.
This season I am getting everything needed to do home alignments. Still will have it checked out by him usually but for a problem that he doesnt have time to let me fix I will use my stuff.
First thing I wanted was a set of Smart Strings but there is no way I will pay $400 for a set so after looking at the directions I just decided to build my own. Total cost $35.
Then after pricing store bought ones (holy cow?!) I built wheel casters out of some scrap steel plate, four pieces of lexan and some 1/4" ball bearings off fleabay. Total cost $80 (also heard great things about floor tiles and salt FYI)
Next was a camber gauge. Total cost $50. This one looks like the triangular one I believe long acre sells that contacts the wheel arount the perimeter only I attached half of an old otter box iPhone case to it for my 4gs along with other areas that I can stick a magnetic digital harbor freight angle finder along with a dial style analog angle finder. All these are redundancy personified but if I average all their numbers I feel that will work better than the iffy black magic of the cheap consumer grade accelerometers. Plus with the availability of an app called ialign ($4? In the App Store) I will be able to check my math on caster calculation.
Oh also, first thing I did was put the car on jack stands and used a plumb bob to check and correct the 1/4" out of square front cradle. My wife doesn't know yet about all the permanent marker on the garage floor but rest assured my days are numbered. Duct tape would also work for this btw.
Former Moderator
Joined: Jul 2005
Posts: 4,634
Likes: 28
From: West Virginia
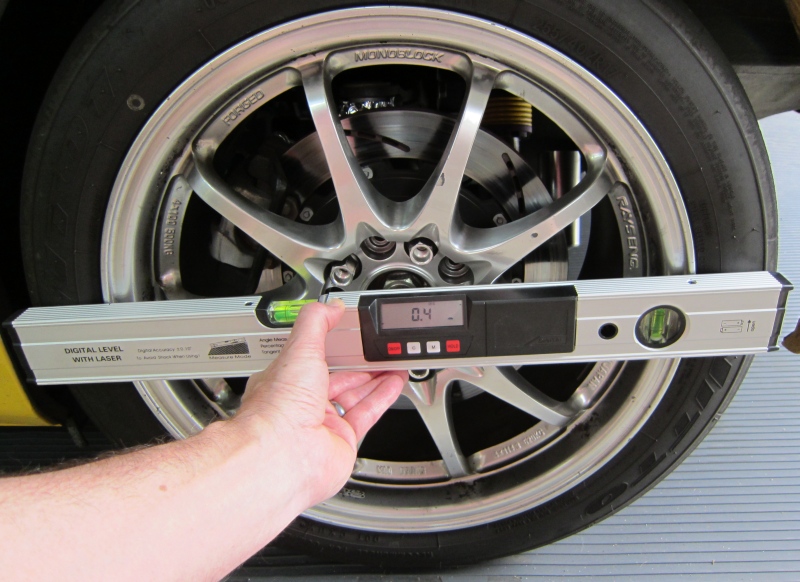
I found this 24" digital laser level on ebay or Amazon for about $55. I compared it to my SmartCamber camber gauge and it was within 1/10 of a degree. The laser projection (out the left end) can be used to set toe.
Former Moderator
Joined: Jul 2005
Posts: 4,634
Likes: 28
From: West Virginia
eb, because of your post I went out and checked my subframe bolts, front and rear. On the front subframe I checked the alignment holes and it appears the front subframe is pretty much centered but the two rearmost 17mm bolts were almost finger tight. I put a bunch of Locktite on them and torqued them to spec + 10%. All four of the big 19mm bolts were tight.
All six of my rear subframe bolts were loose. I verified the subframe alignment then removed the four 17mm bolts,one at a time, put a lot of Locktite on them then torqued them to spec + 10%. I made the mistake of removing one of the big 19mm bolts because it was a bitch to re-install. The shop manual says to replace the subframe bolts when you loosen them, I guess that's why. I simply torqued the other big 19mm bolt.
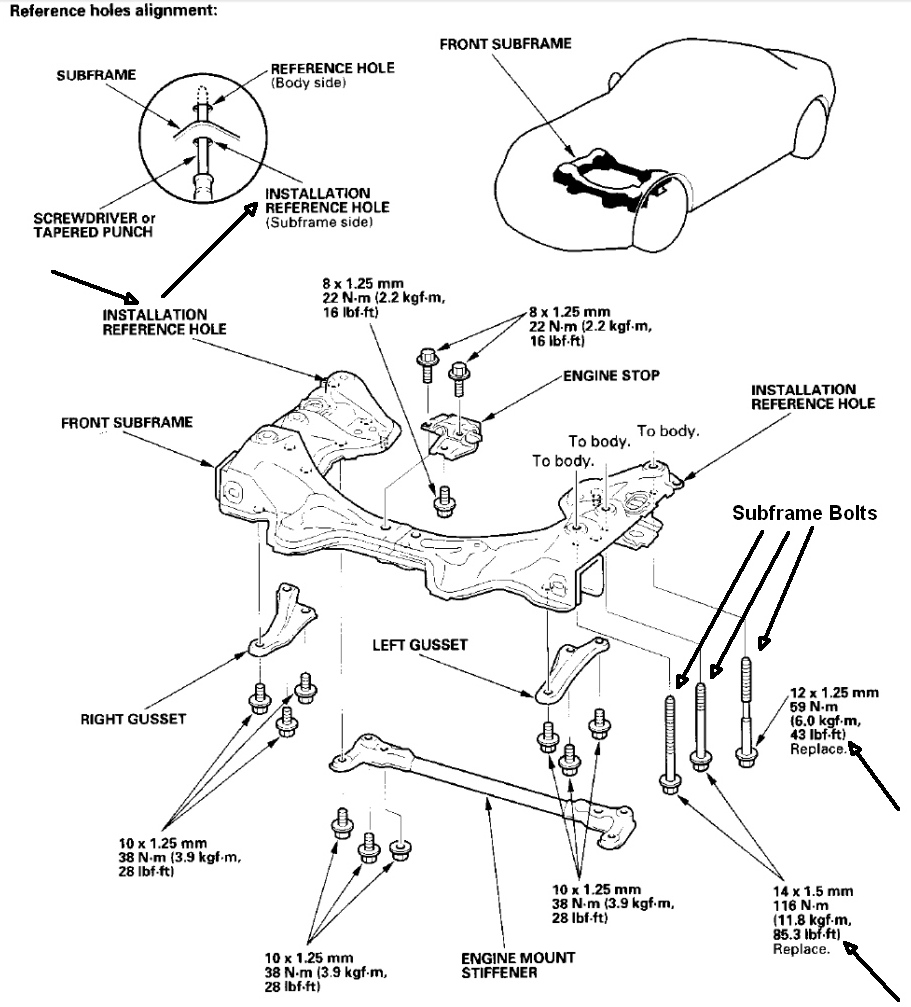

All six of my rear subframe bolts were loose. I verified the subframe alignment then removed the four 17mm bolts,one at a time, put a lot of Locktite on them then torqued them to spec + 10%. I made the mistake of removing one of the big 19mm bolts because it was a bitch to re-install. The shop manual says to replace the subframe bolts when you loosen them, I guess that's why. I simply torqued the other big 19mm bolt.
Registered User
Joined: Oct 2008
Posts: 315
Likes: 0
From: Sparta NJ
I found this DIY alignment calculator a while ago and figured it might be helpful to share it here. I have never used it because i have not done my own alignment yet, so i cannot vouch if it is correct. After getting all these ideas on how to DIY i might try it soon.
http://cerient.net/alignment/index.html
http://cerient.net/alignment/index.html

Registered User
Joined: Mar 2013
Posts: 22
Likes: 1
First of all thanks for the great write-up. I went out this morning and made the exact same thing based on these designs.
As to the string spacing, I thought I'd post my results for those people with stock AP2 wheels.
Assuming a 1.5" track difference (measured, I hope, at the wheel mounting surface- if this isn't true all of the following is bunk. The 2 3/8 from an AP1 car led to crazy measurements):
I have rounded to the nearest 32nd of an inch.
The rear wheels are 2 1/4" from the hub face to the outer rim. They are 1 1/16" from the outer rim to the middle of the center cap. Result: 1 3/16" from the hub surface to the center cap.
The front wheels are 1 15/16" from the hub face to the outer rim. They are 13/16" from the outer rim to the middle of the center cap. Result: 1 1/8" from the hub surface to the center cap.
The difference is 1/16".
Taking into account the 1 1/2" track difference (3/4" per side): set the strings 13/16" further off the rear center cap than the front.
The car strung (stringed?) true based on a two-week old alignment using these settings. Hope that helps anyone that is running stock wheels on an AP2. Tomorrow I'll drop some plumb bobs to verify the 1 1/2" assumption is correct.