Spun Connecting Rod Bearings Question *UPDATE ON POST #21 W/ PICTURES*
 01-27-2013, 09:50 PM
#21
Registered User

Thread Starter

Join Date: Jun 2011
Posts: 105
Likes: 0
Received 0 Likes
on
0 Posts
UPDATE WITH PICTURES
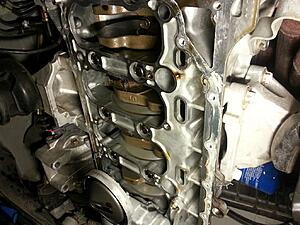
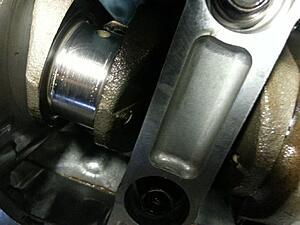
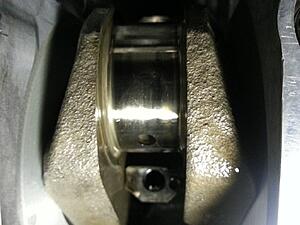
Below is a picture of cylinders 1 - 4 (crankshaft). We will say that cylinder #1 is the cylinder furthest from the oil pump and cylinder #4 is the cylinder closest to it.
cylinder #1 and cylinder #2 are scored.
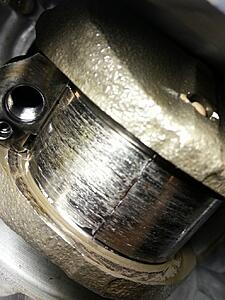
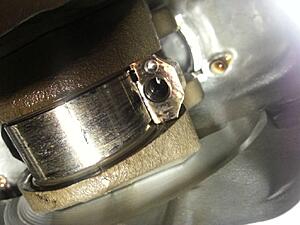
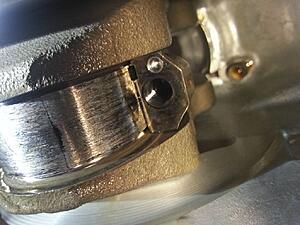
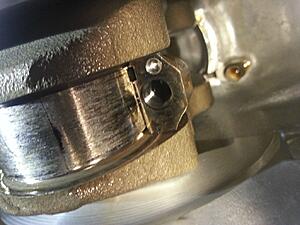
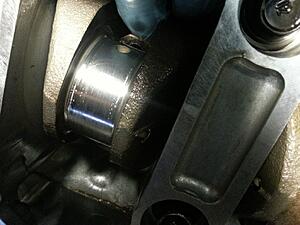
Below are 3 pictures of the bottom connecting rod bearing for cylinder #1

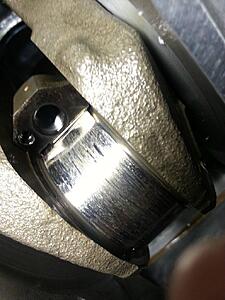
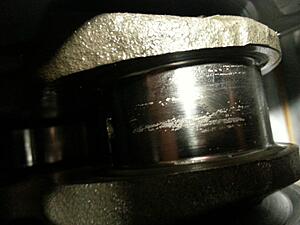
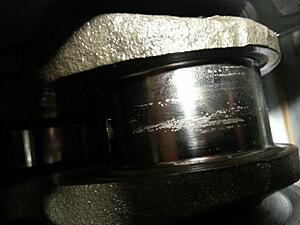
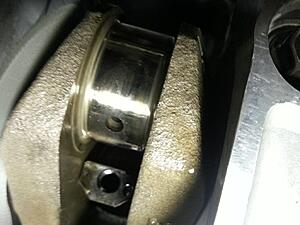
Below are 5 pictures of the crankshaft for cylinder #1
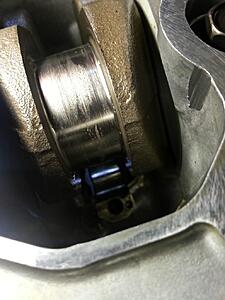
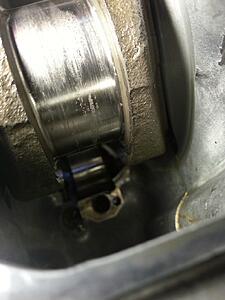
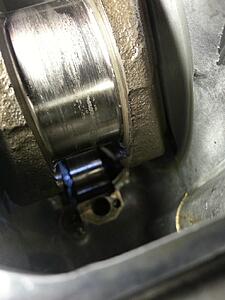
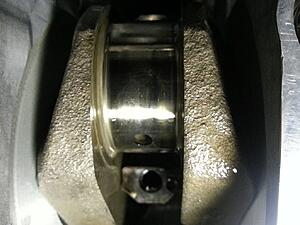
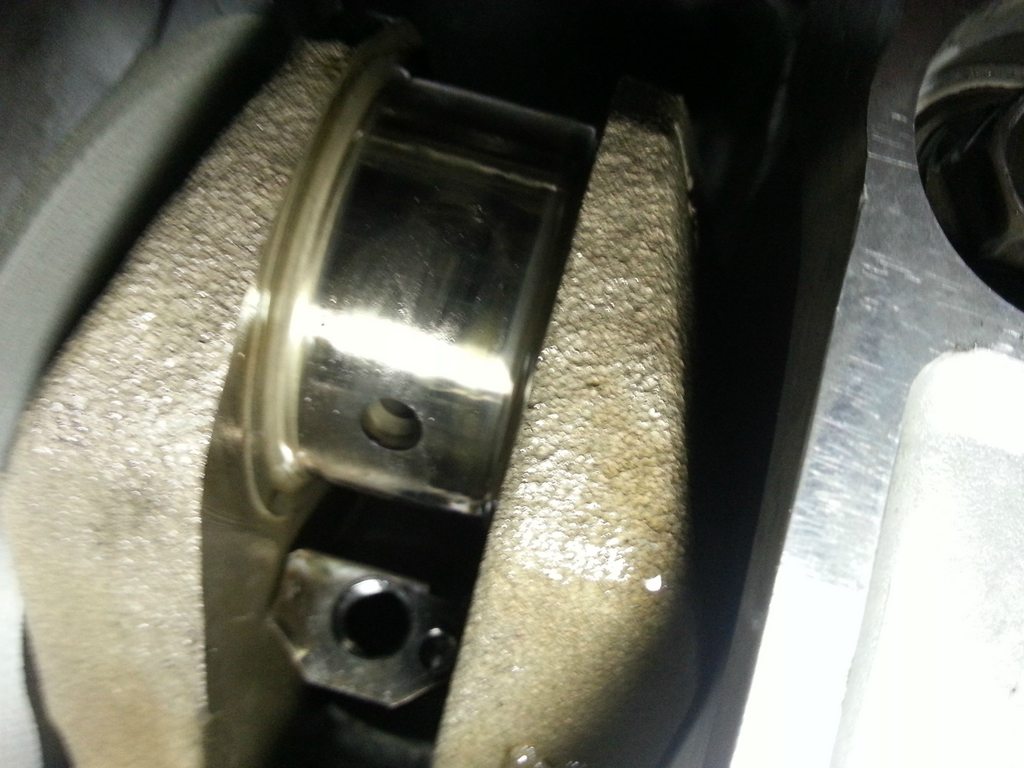
Below are 3 pictures of the bottom connecting rod bearing for cylinder #2
Below are 3 pictures of the crankshaft for cylinder #2
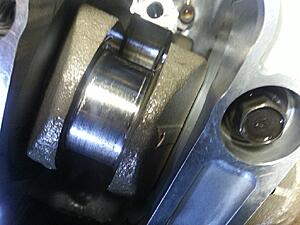
Below are 3 pictures of the crankshaft for cylinder #3
cylinder #4?????
Apparently, my friend didn't send me those pictures, but the crankshaft and bearing looked like cylinder #3
Here are my two potential solutions at this point:
1.
Install new connecting rod bearings on all of the cylinders.
Get a compression test to make sure that everything is operating in order.
Do an oil change every week for the first month. Do an oil change every two weeks for the second month. Taper off to regular oil changes (this is to see if there is any metal in the pan.)
Send oil samples to BlackStone Laboratories monthly for the rest of the car's life.
2.
Find an expert that will polish the crankshaft. (I don't care about location)
Get the crankshaft polished.
Replace all of the connecting rod bearings
Do an oil change every week for the first month. Do an oil change every two weeks for the second month. Taper off to regular oil changes (this is to see if there is any metal in the pan.)
Send oil samples to BlackStone Laboratories monthly for the rest of the car's life.
--------------
Ok, what do you guys think about the extent of the damage to the crankshaft? Also, what do you think about my solutions? I find it extremely hard to believe that the connecting rods are damaged and the walls of the block are completely fine too. If anybody knows an expert that I can send my crankshaft to then please inform me as well!
Thank you.
Below is a picture of cylinders 1 - 4 (crankshaft). We will say that cylinder #1 is the cylinder furthest from the oil pump and cylinder #4 is the cylinder closest to it.
cylinder #1 and cylinder #2 are scored.

Below are 3 pictures of the bottom connecting rod bearing for cylinder #1
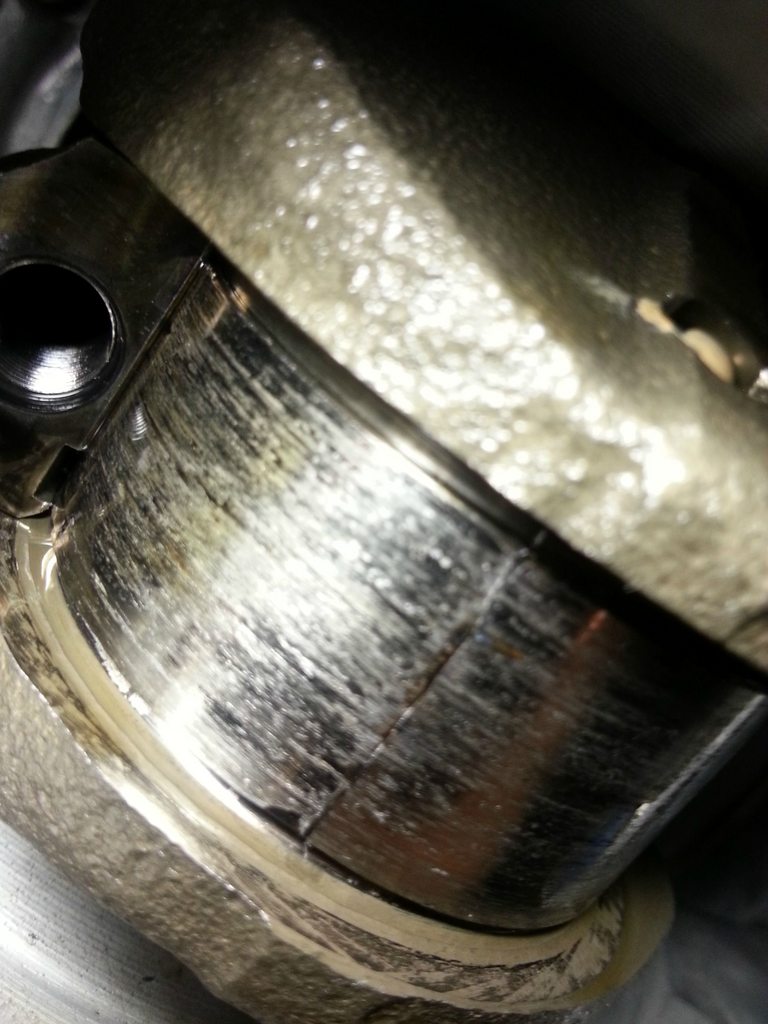


Below are 5 pictures of the crankshaft for cylinder #1


Below are 3 pictures of the bottom connecting rod bearing for cylinder #2


Below are 3 pictures of the crankshaft for cylinder #2


Below are 3 pictures of the crankshaft for cylinder #3


cylinder #4?????
Apparently, my friend didn't send me those pictures, but the crankshaft and bearing looked like cylinder #3
Here are my two potential solutions at this point:
1.
Install new connecting rod bearings on all of the cylinders.
Get a compression test to make sure that everything is operating in order.
Do an oil change every week for the first month. Do an oil change every two weeks for the second month. Taper off to regular oil changes (this is to see if there is any metal in the pan.)
Send oil samples to BlackStone Laboratories monthly for the rest of the car's life.
2.
Find an expert that will polish the crankshaft. (I don't care about location)
Get the crankshaft polished.
Replace all of the connecting rod bearings
Do an oil change every week for the first month. Do an oil change every two weeks for the second month. Taper off to regular oil changes (this is to see if there is any metal in the pan.)
Send oil samples to BlackStone Laboratories monthly for the rest of the car's life.
--------------
Ok, what do you guys think about the extent of the damage to the crankshaft? Also, what do you think about my solutions? I find it extremely hard to believe that the connecting rods are damaged and the walls of the block are completely fine too. If anybody knows an expert that I can send my crankshaft to then please inform me as well!
Thank you.
 01-27-2013, 10:10 PM
#22

You already know my opinion on the crank. However, you'll want to check for it being out of round before having it micropolished.
What do the rod caps look like that spun the bearings? What does the upper side of the rod look like (still on the big end)? It it discolored from heat?
Those don't look like the "bottom" rod bearings. It looks like you can see both the top and bottom from being spun. Judging on the condition of the of the back side of the bearing, I'd think the rod saddles took some damage too.
For your options, I'd do the initial oil change at a short interval, but after that, let it run its course, assuming that the motor makes it past a first oil change.
If it were me... Toss the crank, toss the rods with the spun bearing, and rebuild with a new/used crank and rods (have balanced and polished).
01-28-2013, 05:36 AM
#23
Registered User
Join Date: Feb 2005
Location: Dallas, Tx
Posts: 166
Likes: 0
Received 0 Likes
on
0 Posts
Originally Posted by SouthDakotaS2K' timestamp='1359296437' post='22295908
Normally if you can see wear it's already too much. You're talking about clearances between 0.0007 - 0.002".
01-28-2013, 06:37 AM
#24

Ouch.. sorry to hear about this man.
My opinion as well is that the bearings look pretty rough, and popping in new rod bearings is going to result in a spun bearing sooner than later. What you want to check that yamaha already mentioned is how the rod caps look as well. If the rod caps are out of round and rough (which is very likely because you spun the bearings) then just dropping the crank and having the journals machined and polished isn't going to fix the problem of your rods.
As others said, the best approach I'd say is to just get another crank and replace the rods that are damaged. It's hard to tell by the pics but if the crank's journals have decent scores in them, then they'll need to be machined a little vs. just a micropolish.
01-28-2013, 06:44 AM
#25
Registered User
Thread Starter
Join Date: Jun 2011
Posts: 105
Likes: 0
Received 0 Likes
on
0 Posts
Ouch, looking pretty grim! I checked prices again and it seems pretty pricy (to be expected). $300 per rod and $1400-$1700 for a crankshaft. Perhaps, I could find some good condition used ones, but for that price couldn't I buy a stroker kit like such:
http://www.inlinepro.com/s1/p-257-s2...roker-kit.aspx
and bore it out?
Most likely I will go the OEM route, but I am just curious. Thanks guys.
*edit*
For a stroker I would need EMS / quite a bit of work which could cost a lot, but how much?
http://www.inlinepro.com/s1/p-257-s2...roker-kit.aspx
and bore it out?
Most likely I will go the OEM route, but I am just curious. Thanks guys.
*edit*
For a stroker I would need EMS / quite a bit of work which could cost a lot, but how much?
01-28-2013, 06:55 AM
#26

Ouch, looking pretty grim! I checked prices again and it seems pretty pricy (to be expected). $300 per rod and $1400-$1700 for a crankshaft. Perhaps, I could find some good condition used ones, but for that price couldn't I buy a stroker kit like such:
http://www.inlinepro.com/s1/p-257-s2...roker-kit.aspx
and bore it out?
Most likely I will go the OEM route, but I am just curious. Thanks guys.
*edit*
Need EMS / quite a bit of work which could cost a lot, but how much?
http://www.inlinepro.com/s1/p-257-s2...roker-kit.aspx
and bore it out?
Most likely I will go the OEM route, but I am just curious. Thanks guys.
*edit*
Need EMS / quite a bit of work which could cost a lot, but how much?
01-28-2013, 07:27 AM
#28
Registered User
Thread Starter
Join Date: Jun 2011
Posts: 105
Likes: 0
Received 0 Likes
on
0 Posts
Haha, I will look into it.
Wow, that sounds much much more reasonable for my poor self. May I please have a link? I am not sure why, but I couldn't find that information.
*edit*
Found the website and the prices are very very nice. $34 for shipping... Wow.
*edit*
Found the website and the prices are very very nice. $34 for shipping... Wow.
01-28-2013, 02:11 PM
#29

Is it possible to have this crank ground down and use oversize bearings? That was something we did back in the day. Not sure if there is some surface treatment on our cranks that would preclude something like this?
Check if someone sells oversize rod bearings for F20, that should tell you if this is possible. Would be much cheaper than buying a new crank.
- Professional grind/polish crank
- new oversize rod bearings
- new main bearings (just because)
- 2 new rods
Check if someone sells oversize rod bearings for F20, that should tell you if this is possible. Would be much cheaper than buying a new crank.
- Professional grind/polish crank
- new oversize rod bearings
- new main bearings (just because)
- 2 new rods
01-28-2013, 02:21 PM
#30
A quick google search shows at least one place that sells oversize rod bearings for F20c. Not an endorsement of this place, it was just the first link I clicked on.
http://www.cnc-motorsports.com/acl-r...f20c-f22c.html
But this seems like the cheapest route to a fix. Find a real good machine shop to grind down your crank, use the oversize bearings, be sure to carefully measure everything on assembly, and use plenty of assembly lube. Assemble dry first using plastigauge (plastic thread that measures clearances by how much it is crushed), once sure of the clearances, final lube and assembly.