3M Headlight Restoring System
 10-14-2009, 08:05 PM
#1
Registered User
Thread Starter
Join Date: Apr 2008
Location: Greenville, SC
Posts: 3,124
Likes: 0
Received 0 Likes
on
0 Posts
Thought I'd do a review of the 3M headlight restoring system since I just used it on my car, and I'm sure plenty of people have seen it and wondered if it actually works. Well I can tell you it does  . Well worth the $17 I paid for it.
Just like many fellow S2000 owners, I've been getting tired of my slightly hazy headlights and wanted to make them clear and shiny again. I do not own a buffer or have any sort of polishing compounds. I also didn't want to spend a ton of money on all these things for a number of reasons. For the price, this kit was perfect for my needs.
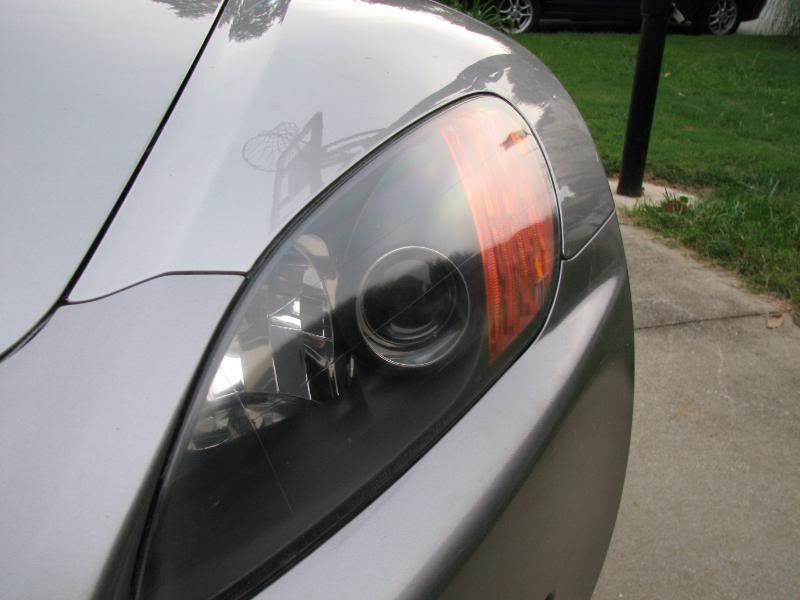
Heres one of my headlights before the kit. As you can see they definitely needed some resurfacing. That line down the middle of it is from eyelids I had on there. The double sided tape scuffed the lens somehow . Needless to say, they were an eyesore.

Here is a picture I got off Google of the kit.
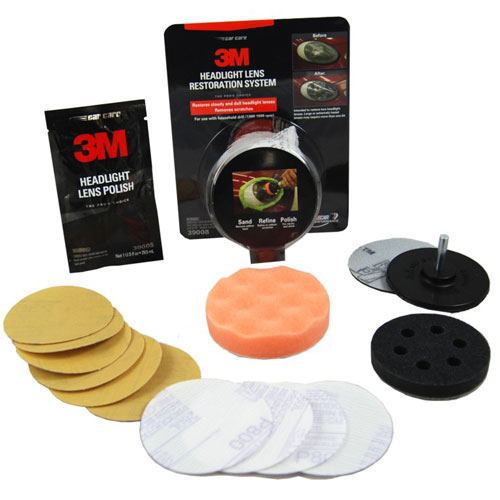
It comes with 500 grit sanding disks, 800 grit sanding disks, a 3000 grit wet-sanding disk, a foam polishing disk, a drill attachment, and a packet of polishing compound. Its meant to be used with an electric drill, either corded or battery powered, thats rated somewhere around 1200-1600 rpms.
The first step is to tape up the area around the headlights. Heres my car all taped up. Be sure to use plenty of tape and a few layers of it. It tends to peel away and get scratched up from the disk, which can lead to the disk scratching your paint

Second step is to attach a 500 grit disk to the drill and go at it. This is to get rid of all the surface imperfections that make the headlights hazy and ugly. Heres my car after sanding one headlight with the 500 grit disk. At this point I was worried it was going to kill my headlights

Now with both headlights sanded with the 500 disk.

Next step is to sand down the 500 grit scratches to 800 grit scratches. Heres a picture after sanding the left headlight with the 800 grit disk. You can tell its starting to get a little bit clearer.

Fourth step is to wet-sand the headlights with the 3000 grit disk. In this picture it shows the left headlight after the 3000 grit wet-sanding and the right headlight has only been done with the 500 and 800. Don't be stingy with the wet sanding. I didn't do it quite long enough so I'm going to have to go back and do this step and the polishing again. You can tell the wet-sanding step is done when you can't see any defined microscratches in the headlights.

Last step is to put some polish on the foam polishing disk and clear those babies up . The left headlight in this picture has been polished compared to the wetsanded right headlight. Came out good! To be honest I was surprised it came out so clear.

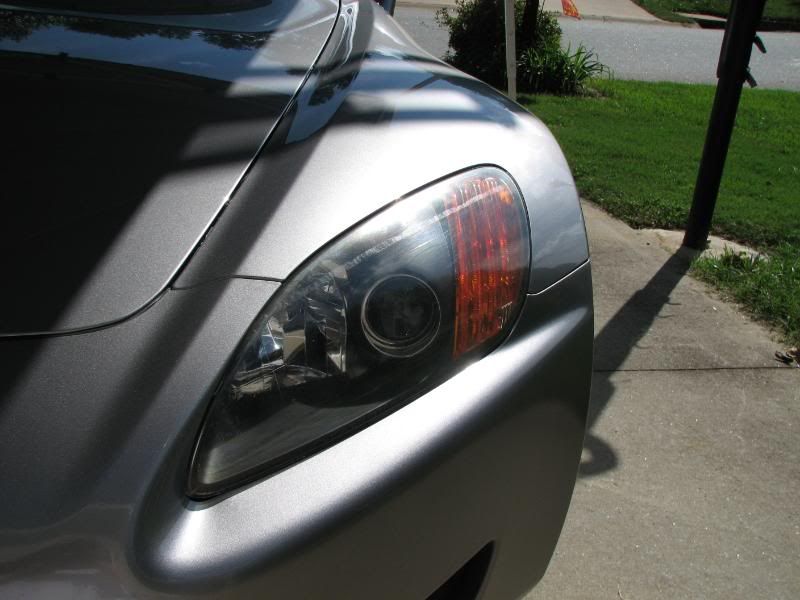
Heres a couple pictures of the finished product. I'm very happy with the results

Hope this helps some people that wanted to use this kit. There may be some people out there like me that don't want to go all out on a buffer, yet want to get the job done right. This kit does just that and comes at a very reasonable price
. Well worth the $17 I paid for it.Just like many fellow S2000 owners, I've been getting tired of my slightly hazy headlights and wanted to make them clear and shiny again. I do not own a buffer or have any sort of polishing compounds. I also didn't want to spend a ton of money on all these things for a number of reasons. For the price, this kit was perfect for my needs.
Heres one of my headlights before the kit. As you can see they definitely needed some resurfacing. That line down the middle of it is from eyelids I had on there. The double sided tape scuffed the lens somehow
. Needless to say, they were an eyesore.Here is a picture I got off Google of the kit.
It comes with 500 grit sanding disks, 800 grit sanding disks, a 3000 grit wet-sanding disk, a foam polishing disk, a drill attachment, and a packet of polishing compound. Its meant to be used with an electric drill, either corded or battery powered, thats rated somewhere around 1200-1600 rpms.
The first step is to tape up the area around the headlights. Heres my car all taped up. Be sure to use plenty of tape and a few layers of it. It tends to peel away and get scratched up from the disk, which can lead to the disk scratching your paint
Second step is to attach a 500 grit disk to the drill and go at it. This is to get rid of all the surface imperfections that make the headlights hazy and ugly. Heres my car after sanding one headlight with the 500 grit disk. At this point I was worried it was going to kill my headlights
Now with both headlights sanded with the 500 disk.
Next step is to sand down the 500 grit scratches to 800 grit scratches. Heres a picture after sanding the left headlight with the 800 grit disk. You can tell its starting to get a little bit clearer.
Fourth step is to wet-sand the headlights with the 3000 grit disk. In this picture it shows the left headlight after the 3000 grit wet-sanding and the right headlight has only been done with the 500 and 800. Don't be stingy with the wet sanding. I didn't do it quite long enough so I'm going to have to go back and do this step and the polishing again. You can tell the wet-sanding step is done when you can't see any defined microscratches in the headlights.
Last step is to put some polish on the foam polishing disk and clear those babies up
. The left headlight in this picture has been polished compared to the wetsanded right headlight. Came out good! To be honest I was surprised it came out so clear. Heres a couple pictures of the finished product. I'm very happy with the results
Hope this helps some people that wanted to use this kit. There may be some people out there like me that don't want to go all out on a buffer, yet want to get the job done right. This kit does just that and comes at a very reasonable price


 10-15-2009, 04:07 AM
#5
Registered User
Thread Starter
Join Date: Apr 2008
Location: Greenville, SC
Posts: 3,124
Likes: 0
Received 0 Likes
on
0 Posts
Originally Posted by Millenion LTD,Oct 14 2009, 11:22 PM
technically, you are still buffing, just not the same tool was used.
 10-15-2009, 05:16 AM
#6
Moderator


Originally Posted by slanguage,Oct 15 2009, 07:14 AM
Nice review and write-up. thanks. I might have to add this to my arsenal of detailing supplies!
10-15-2009, 01:04 PM
#7

Originally Posted by Gigdy,Oct 15 2009, 08:16 AM
Just buy Plastix and some 2 or 3000 grit sand paper.
If you get Plastix and sand paper, that is all you have. You'll need a lot of elbow grease to get the results your looking for.
The 3m kit allows you to get very good results with a lot less hassle.
Trending Topics
10-15-2009, 01:50 PM
#8
Registered User
Thread Starter
Join Date: Apr 2008
Location: Greenville, SC
Posts: 3,124
Likes: 0
Received 0 Likes
on
0 Posts
Originally Posted by RUGBY,Oct 15 2009, 01:04 PM
IMO, for $17, this kit seems like a no-brainer....especially if you don't have a PC.
If you get Plastix and sand paper, that is all you have. You'll need a lot of elbow grease to get the results your looking for.
The 3m kit allows you to get very good results with a lot less hassle.
If you get Plastix and sand paper, that is all you have. You'll need a lot of elbow grease to get the results your looking for.
The 3m kit allows you to get very good results with a lot less hassle.
That was my reasoning for buying the kit. By using a drill, it makes it a lot less work. Work smart, not hard
10-15-2009, 03:25 PM
#9

I'm curious - do you think a cordless drill would be up to the task, or does the drill spin for a long enough period of time that you'd just kill the battery before completing the job?
If a cordless drill would work, it might be something cool to bring to a meet.
If a cordless drill would work, it might be something cool to bring to a meet.