
Is there a DIY headunit install guide for the AP2?


Joined: Feb 2012
Posts: 1,554
Likes: 4
From: South FL
I didn't solder, I used crimp caps instead. I think I'm going to remove all the crimps and splice the wires again, but this time using butt connectors instead. The crimp caps were a pain to shove behind the headunit. I think they might have gotten loose or something when I was trying to shove them in lol


Joined: Nov 2010
Posts: 62
Likes: 1
From: South Meriden, CT
My thoughts after doing this just now:
-i needed to use the strength of thor to get those oem bracket screws out.. Why on earth did honda torque them so much?
-that radio trim was in there mighty tight... Really had to put some muscle in it
-how haven't ppl had more issues with the lack of room behind the head unit?? Holy wow. I'm actually not all that confident that the wiring will be okay forever being that smooshed back there. I think I may shorten the harness next tonne I'm back there.
Big big thanks for the instructions
Joined: Feb 2012
Posts: 1,554
Likes: 4
From: South FL
My thoughts after doing this just now:
-i needed to use the strength of thor to get those oem bracket screws out.. Why on earth did honda torque them so much?
-that radio trim was in there mighty tight... Really had to put some muscle in it
-how haven't ppl had more issues with the lack of room behind the head unit?? Holy wow. I'm actually not all that confident that the wiring will be okay forever being that smooshed back there. I think I may shorten the harness next tonne I'm back there.
Big big thanks for the instructions
-i needed to use the strength of thor to get those oem bracket screws out.. Why on earth did honda torque them so much?
-that radio trim was in there mighty tight... Really had to put some muscle in it
-how haven't ppl had more issues with the lack of room behind the head unit?? Holy wow. I'm actually not all that confident that the wiring will be okay forever being that smooshed back there. I think I may shorten the harness next tonne I'm back there.
Big big thanks for the instructions

You have to be patient with shoving all the wires back in there. After I soldered them and put on the heat shrink tubing I taped all the wires together. I had to carefully move the wires slowly while I pushed the headunit in. Here's a pic of my setup:

It would have been easy but what made it worse was that I had these wires sticking out of the back of the headunit lol. Was a real pain but I finally managed


Registered User
Joined: Dec 2010
Posts: 7
Likes: 0
Hey guys - does anyone have still have the pics for removing the glove compartment?
Can't seem to find anywhere.
Mine broke and I'm trying to replace it.
I've gotten past all of the visible screws and the screws from removing the panels behind the seats and lifting up the center console trim - can't seem to find the top panel pushpins Dave described in step 14 back on page 2 of this thread.
Any help you can provide would be really appreciated. Thanks!

Registered User
Joined: Aug 2007
Posts: 4,359
Likes: 3
From: Houston, TX
Hey guys - does anyone have still have the pics for removing the glove compartment?
Can't seem to find anywhere.
Mine broke and I'm trying to replace it.
I've gotten past all of the visible screws and the screws from removing the panels behind the seats and lifting up the center console trim - can't seem to find the top panel pushpins Dave described in step 14 back on page 2 of this thread.
Any help you can provide would be really appreciated. Thanks!
Can't seem to find anywhere.
Mine broke and I'm trying to replace it.
I've gotten past all of the visible screws and the screws from removing the panels behind the seats and lifting up the center console trim - can't seem to find the top panel pushpins Dave described in step 14 back on page 2 of this thread.
Any help you can provide would be really appreciated. Thanks!
They have. Look around in this subforum.


Registered User
Joined: Apr 2004
Posts: 2,029
Likes: 1
From: Tampa
Reposting these pics.. I stopped using the site the were posted on.. so reposting the entire posts but breaking them for new rules (which is why I didn't just edit them).
Post 1:
That's for an AP1, you can crack/break stuff if you attempt that on an AP2 as you are missing one important step.
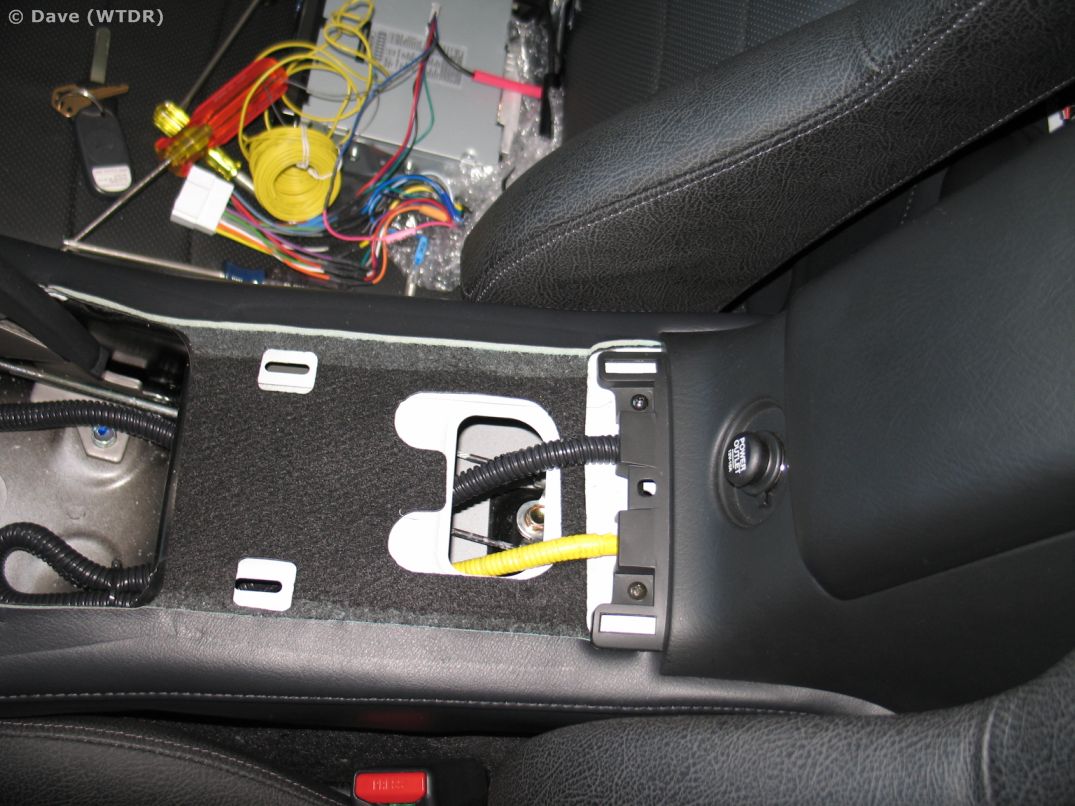
You need to remove the center console piece that holds the roof, hazard and (depending on year) defog switches, cupholder thing, etc. to do so, put your fingers (or something else that is fairly soft, screwdriver with a rag/tape around it, etc) under the perferated (sp?) leather portion near the rear of the part and lift. Do NOT lift the main piece that has leather from the front to the back, you just want to lift on the piece at the top. Once you remove one side, switch to the other side, then go back to the other side but move forward about 8" or so (you'll feel where the snaps are), lift, other side, lift, then just work your way forward one more set of snaps that are closer to the middle of the console. once all 6 things are unsnapped/removed unplug the harness and more the console out of the way. I removed the shift know to make it easy.
Here's a couple of pics of my car with the center console removed, you can see the back holes where the snaps go here.
here's where the next set are (right where the cupholder is)
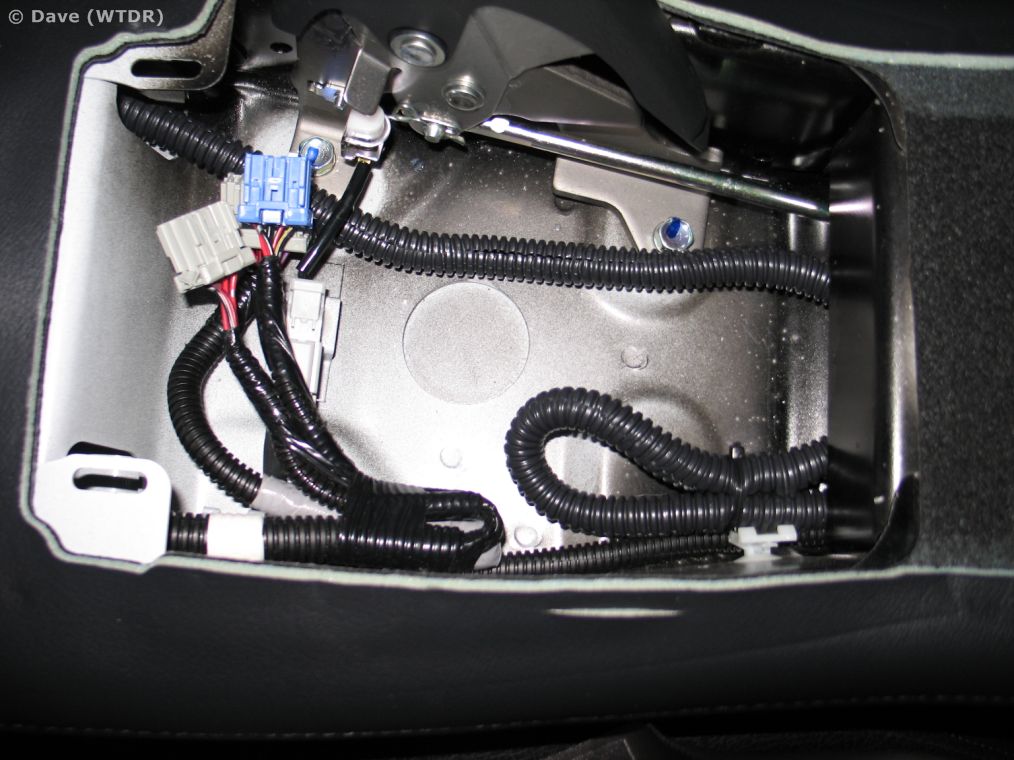
you can't really see it, but the snaps go in that hole (well one of them does) at the very bottom of this pic
Here it is with the center console installed, the part you need to remove is just the very top part of the console, with the switches, shift boot, etc, leave the big bottom piece alone.
I have step by step pics at home. If you need them, let me know.
Post 1:
Originally Posted by golfpro,Jul 14 2006, 08:53 AM
Check the FAQ's posted at the top of this forum.
To remove the head unit:
Put theshifter in reverse (to get it out of the way)
Carefully pry out the vent/door cover. Start at the top. When that's loose, open the door and gently, but firmy, work the cover loose and off.
Undo two screws at each side of the head unit.
Done
To remove the head unit:
Put theshifter in reverse (to get it out of the way)
Carefully pry out the vent/door cover. Start at the top. When that's loose, open the door and gently, but firmy, work the cover loose and off.
Undo two screws at each side of the head unit.
Done
You need to remove the center console piece that holds the roof, hazard and (depending on year) defog switches, cupholder thing, etc. to do so, put your fingers (or something else that is fairly soft, screwdriver with a rag/tape around it, etc) under the perferated (sp?) leather portion near the rear of the part and lift. Do NOT lift the main piece that has leather from the front to the back, you just want to lift on the piece at the top. Once you remove one side, switch to the other side, then go back to the other side but move forward about 8" or so (you'll feel where the snaps are), lift, other side, lift, then just work your way forward one more set of snaps that are closer to the middle of the console. once all 6 things are unsnapped/removed unplug the harness and more the console out of the way. I removed the shift know to make it easy.
Here's a couple of pics of my car with the center console removed, you can see the back holes where the snaps go here.
here's where the next set are (right where the cupholder is)
you can't really see it, but the snaps go in that hole (well one of them does) at the very bottom of this pic
Here it is with the center console installed, the part you need to remove is just the very top part of the console, with the switches, shift boot, etc, leave the big bottom piece alone.
I have step by step pics at home. If you need them, let me know.