
Hybrid Audio Imagine v2 Install and Intial Impression


Thread Starter
Registered User
Joined: Jan 2013
Posts: 47
Likes: 0
From: Jersey
What's up, y'all?
I got my HAT Imagine I61-2v2 coax/component speakers installed today along with the Alpine Power Pack in a 90x2 bridged configuration and 13 sq. ft of Second Skin Damplifier Pro.
The pics are weird because they are cell phone shots and it was REALLY sunny today. A great day to install new door speakers (but a better day for a drive with those new door speakers. Anyway on with the show.
Install
I ran new speaker wire to the doors using the tried-and-true coat hanger but took it a level further with silicone spray as recommended by someone here on s2ki (I forget who.) Worked like a charm - got the passenger side first try (1 minute total) and driver side second try (3 minutes?)
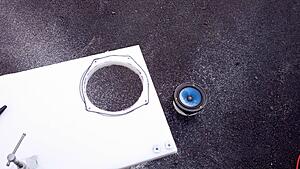
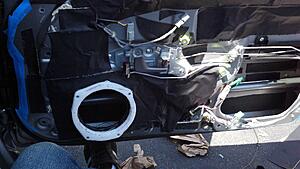
I made custom baffles/spacers from a 3/4" sheet of HDPE by tracing the stock speakers. I used 10-32 threaded inserts for the 4 speaker mounting holes.
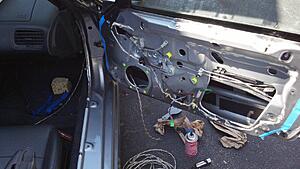
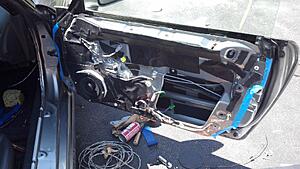
I installed a shitload of Damplifier Pro on the outer door skin, the inner door skin, and the back of the door panel.
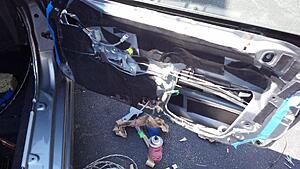
The gaping hole left me sort of stumped so I left it open for now. I might try to seal that up somehow in the future. The door lock mechanism threw me off.
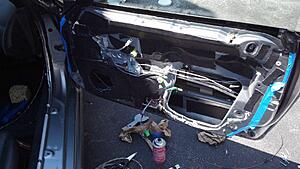
I covered the back of the baffle with Damplifier Pro, screwed it into the door (baffle is countersunk) with #10 x 1-1/2" sheet metal screws
(same as stock just way longer,) then covered the front face with another layer of Damplifier and screwed the speaker into the baffle with 10-32 x 1" stainless machine screws.
Then I did the same on the driver's side! Quite the effort.
Initial Impressions (2 hours and counting)
Hybrid Audio Technology Imagine I61-2v2
The speakers sound very good. They are not broken in at all and still they sound great. The midbass coming from these drivers is very impressive and unlike anything I've ever heard from a 6.5" component speaker (though I admittedly don't get to listen to high end car audio equipment often.)
I do not have a sub in this car (and do not really intend to install one) so I was specifically looking for drivers with strong midbass. While they absolutely do not replace a subwoofer, they do provide really loud, clean, accurate bass that can be felt and heard.
I can't wait to get these things broken in - guess I'll need to go put some miles on my s
Damplifier Pro
The doors have 4 lb. each of Damplifier Pro and I think that is plenty. You could probably put 2-3 times as much - There is lots of room in there and I had no problem getting the door panels back on at all, even with a layer on the inside of them. They sound really solid when closed with the roof/windows up. With the top down, the window still rattles when you close the door. I didn't bother with any of the fancy road noise treatments since it's a roadster.
Alpine KTP-445U Power Pack - Bridged
The Power Pack is sounding pretty good so far. I have the gain at maybe 4/10.
I had intended to run a dedicated 12ga power wire from the battery but it was getting late in the day so I just spliced it into the head unit wiring harness. This turned out to be a bad idea because I do not think the head unit harness can provide sufficient power for the Head Unit, Power Pack, and DCI (although I imagine the DCI uses almost nothing.) The head unit cuts out intermittently at high volume, leading me to the believe that the amp is robbing the head unit of power. I'm going to run a line to the battery in the next few days.
I will update in a few days.
I regret not holding off on the Damplifier Pro for a week or two - it would have been interesting to see how much of the awesome midbass is made possible by the sound deadening.
I got my HAT Imagine I61-2v2 coax/component speakers installed today along with the Alpine Power Pack in a 90x2 bridged configuration and 13 sq. ft of Second Skin Damplifier Pro.
The pics are weird because they are cell phone shots and it was REALLY sunny today. A great day to install new door speakers (but a better day for a drive with those new door speakers. Anyway on with the show.
Install
I ran new speaker wire to the doors using the tried-and-true coat hanger but took it a level further with silicone spray as recommended by someone here on s2ki (I forget who.) Worked like a charm - got the passenger side first try (1 minute total) and driver side second try (3 minutes?)

I made custom baffles/spacers from a 3/4" sheet of HDPE by tracing the stock speakers. I used 10-32 threaded inserts for the 4 speaker mounting holes.

I installed a shitload of Damplifier Pro on the outer door skin, the inner door skin, and the back of the door panel.


The gaping hole left me sort of stumped so I left it open for now. I might try to seal that up somehow in the future. The door lock mechanism threw me off.
I covered the back of the baffle with Damplifier Pro, screwed it into the door (baffle is countersunk) with #10 x 1-1/2" sheet metal screws
(same as stock just way longer,) then covered the front face with another layer of Damplifier and screwed the speaker into the baffle with 10-32 x 1" stainless machine screws.


Then I did the same on the driver's side! Quite the effort.
Initial Impressions (2 hours and counting)
Hybrid Audio Technology Imagine I61-2v2
The speakers sound very good. They are not broken in at all and still they sound great. The midbass coming from these drivers is very impressive and unlike anything I've ever heard from a 6.5" component speaker (though I admittedly don't get to listen to high end car audio equipment often.)
I do not have a sub in this car (and do not really intend to install one) so I was specifically looking for drivers with strong midbass. While they absolutely do not replace a subwoofer, they do provide really loud, clean, accurate bass that can be felt and heard.
I can't wait to get these things broken in - guess I'll need to go put some miles on my s
Damplifier Pro
The doors have 4 lb. each of Damplifier Pro and I think that is plenty. You could probably put 2-3 times as much - There is lots of room in there and I had no problem getting the door panels back on at all, even with a layer on the inside of them. They sound really solid when closed with the roof/windows up. With the top down, the window still rattles when you close the door. I didn't bother with any of the fancy road noise treatments since it's a roadster.
Alpine KTP-445U Power Pack - Bridged
The Power Pack is sounding pretty good so far. I have the gain at maybe 4/10.
I had intended to run a dedicated 12ga power wire from the battery but it was getting late in the day so I just spliced it into the head unit wiring harness. This turned out to be a bad idea because I do not think the head unit harness can provide sufficient power for the Head Unit, Power Pack, and DCI (although I imagine the DCI uses almost nothing.) The head unit cuts out intermittently at high volume, leading me to the believe that the amp is robbing the head unit of power. I'm going to run a line to the battery in the next few days.
I will update in a few days.
I regret not holding off on the Damplifier Pro for a week or two - it would have been interesting to see how much of the awesome midbass is made possible by the sound deadening.
Registered User
Joined: May 2006
Posts: 441
Likes: 0
From: Anderson, S.C.
Nice install! I just got the HAT Clarus set and I'm wondering if I went overboard. Being a convertible, I'm not sure if all the noise is going to ruin the sound that these put out, and should I have just gotten the Imagines? Also really not looking forward to installing them, I hate wiring with a passion.
Thread Starter
Registered User
Joined: Jan 2013
Posts: 47
Likes: 0
From: Jersey
Nice install! I just got the HAT Clarus set and I'm wondering if I went overboard. Being a convertible, I'm not sure if all the noise is going to ruin the sound that these put out, and should I have just gotten the Imagines? Also really not looking forward to installing them, I hate wiring with a passion.
I tried to justify more expensive speakers but I think we're definitely talking about diminishing returns once we get up above this price point.
Keep in mind that the sound from your door speakers is at least 50% dependent on your install. So take your time and do it right the first time and you will be very happy you did! And don't cheap out on sound deadening! Lol
Note the Clarus are 10mm deeper than the Imagines. I didn't check how much additional depth I have behind the speaker with the 3/4" spacer but you may need a thicker one, which could pose a challenge when putting the door panel back on... Good Luck!

Joined: Jan 2013
Posts: 99
Likes: 0
Very nice install. My next round of upgrades is almost certainly going to include these speakers.

Registered User
Joined: Oct 2009
Posts: 936
Likes: 1
From: SoCal/Norcal
Originally Posted by rtm5003' timestamp='1367146206' post='22504590
Note the Clarus are 10mm deeper than the Imagines. I didn't check how much additional depth I have behind the speaker with the 3/4" spacer but you may need a thicker one, which could pose a challenge when putting the door panel back on... Good Luck!
Very nice install. My next round of upgrades is almost certainly going to include these speakers.
I also used silicone spray to fish the wire through the doors but I wasn't able to fish them through in minutes. The driver side door took me a couple really frustrating hours and cuss words. Passenger door wasn't too bad though. A few minutes and it was fairly easy.
Thread Starter
Registered User
Joined: Jan 2013
Posts: 47
Likes: 0
From: Jersey
Originally Posted by JD NC' timestamp='1367160261' post='22504777
[quote name='rtm5003' timestamp='1367146206' post='22504590']
Note the Clarus are 10mm deeper than the Imagines. I didn't check how much additional depth I have behind the speaker with the 3/4" spacer but you may need a thicker one, which could pose a challenge when putting the door panel back on... Good Luck!
Note the Clarus are 10mm deeper than the Imagines. I didn't check how much additional depth I have behind the speaker with the 3/4" spacer but you may need a thicker one, which could pose a challenge when putting the door panel back on... Good Luck!
Very nice install. My next round of upgrades is almost certainly going to include these speakers.
I also used silicone spray to fish the wire through the doors but I wasn't able to fish them through in minutes. The driver side door took me a couple really frustrating hours and cuss words. Passenger door wasn't too bad though. A few minutes and it was fairly easy.
[/quote]
Right. Per the diagram that can be found at http://users.rcn.com/dhintz/Michelle/Audio/audio.html, you should have about 2.5" - I just found this now, after my install of course!
If that is true, I think you should just be able to get away with a 3/4" spacer on the Clarus.
See here for more Clarus info:
https://www.s2ki.com/s2000/topic/845...audio-install/
Edit: And yes, I got my door panel back on over the 3/4" spacers and Damp Pro with no trimming or clearance issues
Trending Topics
Thread Starter
Registered User
Joined: Jan 2013
Posts: 47
Likes: 0
From: Jersey
I scraped off as much as I could with a number of different putty knives (some visible in my pics) plus my fingers. I'd say I got like 70% of it off.
I didn't have any trouble getting the Damp Pro to stick to the areas where the remnants were. Maybe different production years used different goop?

Thread
Thread Starter
Forum
Replies
Last Post
skhalid7
Southern Ontario S2000 Owners
4
Apr 21, 2010 07:15 PM