
System installed...lessons learned

Thread Starter

Joined: Sep 2004
Posts: 4,894
Likes: 9
From: Tampa, FL
*ALL PICS ARE CLICKABLE FOR SLIGHTLY HIGHER RES!!!*
Let me first say that this post is a long time coming. I began this installation close to a year ago where I installed the HU, components and amp. Just this past weekend, I finally got around to installing the Infinity Basslink II that I bought a two months ago. Setup is as follows:
- Pioneer 880PRS (who doesn't have one of these lol)
- Focal 165v.2's (well not quite, i'll explain)
- eD Nine.2
- Infinity Basslink II
- DICE ipod dock
- Installer.com pioneer to ipod cable
I think when I finished the first part of this last year I started to type out a lessons learned but I never got around to finishing it. Whatever I did write, I can't find it so I'll just start from scratch and abbreviate some of the more obvious parts.
I have an MY01, and I didn't feel like trying to go custom hack a shaq on my door panels to fit in the tweets so I ended up trading panels plus a tad bit of cash on my part with a local s2k'r that had just had his seats stolen (poor guy). I adapted the stock tweeter location to fit the Focal tweeter by unscrewing the stock one from the bracket and super glueing the new tweeter in its place (if any of you reading this would like a set of stock tweets, I still have and my old 01 paper 2ways, but you don't want those. trust me) I snapped a quick picture of it the other week when I had the door panels off to swap my woofers:

If I had to do it all over again, I would have done something more custom. The stock location is NOT the greatest location as far as imaging is concerned. But it is tolerable.
Why did I have the door panels off you ask? One of the original woofers installed on the driver side developed a very bad rattle after about 6-7 months of use (my guess may be overdriving due to improper crossover settings on my part) which became very very annoying. I bought the set originally from Sound Advice (Tweeter to some of you) but I didn't have the extended warranty through them so I went directly to Focal for help. To my surprise, I was still fully under the manufacturer's 2 year warranty (or 1 year I can't remember) and they RMA'd it with no problem. I was emailed the form same day and instructed to send in both woofers because I was going to be upgraded to a current model for FREE! So the door panel being off the other week was to reinstall my new 165 VR 6.5' mids. Kudos to Focal.
Pics:

BEEFY!


Installed:

Few caveats on these...I pretty much left the EQ settings the same as they were set for the old ones. I have played with them since installed the new mids, but haven't noticed any huge difference as far as power handling or SQ goes. Also, the mudslide looking stuff on my door panel is the liquid eDead I applied to both doors and the passenger side flooring. Great investment there...you can really tell the difference depending on where you apply it. On the doors I can definitely tell the matting made a difference from the resounding "thud" I now get when I close the doors. Applying it on the passenger flooring seriously quieted down the cabin from outside noises like tires and exhaust drone. I can't recommend the stuff enough. If you have questions on it, post up and I'll do my best to answer them.
While I'm on the subject of the mids and highs, I'd like to make a suggestion to anyone buying a set of these Focals in the Polyglass line.
In this thing:

On the tweeter selection, be sure to choose the the lowest option which this case was -3. If you're using the stock location like I am, any other setting may just be too bright for your taste as it was mine. I had the entire right side of my EQ in the 880PRS looking like an Aspen downward slope and it was still too bright so beware. The crossover itself is mounted in the inside of the door panel in that pocket looking thing. If you choose this location, be sure to extend your wires far enough out so you don't have to fight the panel+crossover everytime you take the panel off like I have to. No bueno.
During the first install last year, I acquired a very annoying ground loop. I tried a few things to fix it, but I ignored it for the most part because once you have everything cranked you can't hear it anyway. Well I decided to stop being lazy and track it down. The culprit was what most ground loops problems are in car audio, a bad ground somewhere. In my case it was most definitely the HU. See, I thought I was being smart when I didn't use the harness grounding point and making my own. Foolish me. Here's the deal - when you pull the folding door off and expose the HU, there's three screws on each side right? Two to hold the radio in place with the factory bracket (one bracket on each side). What about those ones in the middle? AH HA I told myself. I'll just be smart and use that one! To get even smarter, I did some googling and ran across a technique that further helps us 880PRS owners out:
http://www.icixsound.com/vb/showthread.php...ighlight=880PRS
Preview of link above:

If you have this HU, or any fairly new Pioneer HU for that matter, I highly recommend this mod. Back on topic...so what was wrong with that spot? Ummm, how about the fact that your ground's first contact is with PLASTIC and then with the car's frame. Poor, lazy location indeed. Hey, I get points for trying right? Anyway, here's the new, trouble free grounding site:
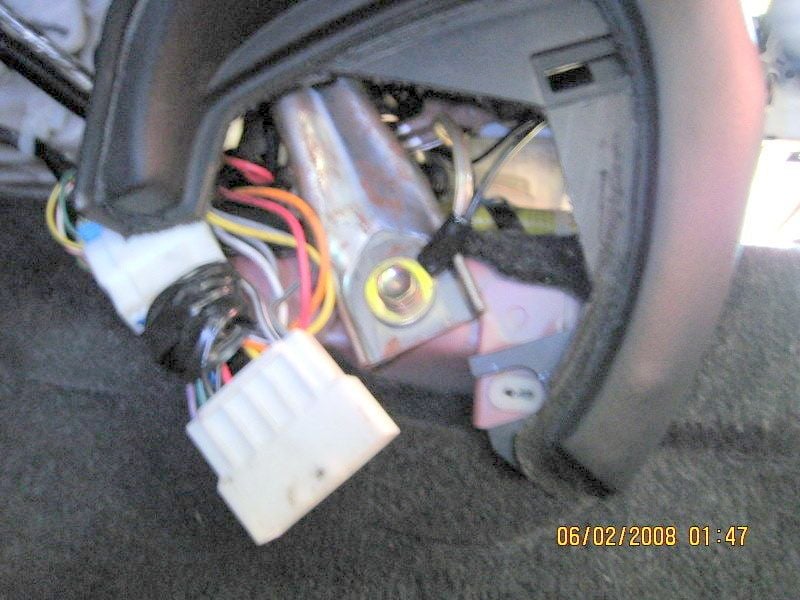


Sorry for the not so good pictures here but that's a hard to photograph spot for whatever reason. I used an 8ga ring terminal and crimped in my HU ground, iPod cable ground, and the RCA fix I linked to above. Worked like a charm. I still have a small bit of noise, but you really have to listen for it to notice it. Before, it sounded like I had a pair of Vortech's in the doors lol. The connector you see in the pictures is a part of the car to radio harness I tucked away to the side to get more clearance behind the radio.
Speaking of iPod's and HU's, here's some eye candy:


In case you're wondering, in these pictures the car is off which is why the voltage is so "low". With the motor running I get a full 14.4v with all accessories running. No lights dimming, no hiccups whatsoever. Stock alternator, discount auto $39.95 battery

Cool huh? About that iPod cable I mentioned earlier...its a little more 'complicated' than that. Again, I researched the forums looking for iPod setups (there's a pretty big thread in the archives somewhere) and no one had quite what I wanted. My requirements were as follows:
1. Must be easily removable/hot swapable (no messing with cables)
2. Must charge while plugged in
3. Must be controllable from the iPOD, NOT the deck (I hate those interfaces with a passion. The do not compare to the ease of the click wheel IMO)
4. Because of #3, must be easily viewable and accessible
After a lot of searching, I ran across installer.com who sells a Pioneer IP-BUS to iPod specific cable that will gives me #2 and #3 (to the HU it looks just like another AUX source) but what about #1 and #4? For that I had to come up with a solution on my own it looks like I succeeded. The bracket extending the iPod out from the folding door I got from Modifry.com and the dock the iPod sits in I got from http://www.diceelectronics.com/ipod_connections.htm I can't say enough for this combo, it just plain works.
Next, I want to make a public service announcement concerning our favorite little gremlin in the trunk...the flap escape air thingy. Can someone please tell me what the hell this thing is for? Anywhoo, I remembered reading about this thing when I did my research prior to tackling this install and during the test run when I hooked everything up, sure enough the infamous rattle reared its ugly head (or in this case, flap). What I didn't see however, were pictures and explanations on how to rid yourself of it. So here goes...
First thing you'll want to do is open your trunk and remove the carpeting panel immediately around the latch. Once removed, look straight down and to your left and you will see the item in question.
Picture of the spot with the flap removed:

Actual piece:


As you can see, I completely removed the flap. I don't know of an easy way to do it unless you remove the bumper and take it out like that. I was able to get it out without removing the bumper but let's just say it was done with less than 'finesse' lol. My tools of choice were a long screwdriver, hammer, lots of choice curse words and a few band aids. YMMV. As I said previously, I did research on this prior and the recommendations I read said to cover the spot with dynamat. I didn't have any laying around so I had to improvise.
I took some cardboard off my Basslink box and some of this stuff that I had laying around:

End result:

Simple yet effective. As odd as it sounds, that's the only rattle I had/have in the car. With the doors closed and the stereo at full tilt with the Basslink kicking and screaming, you can hardly hear anything outside of the cabin. Trunk lid nor license plate holder does not rattle one bit. I know...a lot of you will say the Basslink isn't powerful or loud enough to cause a lot of rattling but either way it is still unbelievable silent. Open the door and step inside the car, and its a WHOLE different story. I read a lot of "reviews" in this forum about the Basslink's output in the S2K and it led me to believe I might not be getting what I wanted but I chose to try it out for myself and I am very glad I took my own advice because it is exactly what I was looking for. Clean, filling bass that carries well into the cabin without overpowering the mids and highs. For my application and wants, it was the perfect choice. I can't speak enough about it. If you're looking to wake the neighbors or vibrate your teeth, you should probably look elsewhere.
Couple pictures of the finished product:

Currently, I don't have it mounted in with screws to secure it from sliding. I installed the mounting feet immediately began having doubts about how hard it would be to remove and get to the tools underneath in the case of a flat or similar situation (yes I do still have the spare installed). I managed to jam the side facing the cabin in between the tool cover and carpeting to keep it from sliding around. I have 'field tested' this setup with some spirited driving and so far its only moved once during an extreme right hand turn and even then, it didn't move very far at all.
Obviously, I've left a few things out the install but the things I left out I feel have been adequately covered in either the FAQ's or in other threads that you can find via the search. If you have any specific questions about anything, feel free to post them up or PM me and I will be more than happy to answer.
- The Spectacle
Let me first say that this post is a long time coming. I began this installation close to a year ago where I installed the HU, components and amp. Just this past weekend, I finally got around to installing the Infinity Basslink II that I bought a two months ago. Setup is as follows:
- Pioneer 880PRS (who doesn't have one of these lol)
- Focal 165v.2's (well not quite, i'll explain)
- eD Nine.2
- Infinity Basslink II
- DICE ipod dock
- Installer.com pioneer to ipod cable
I think when I finished the first part of this last year I started to type out a lessons learned but I never got around to finishing it. Whatever I did write, I can't find it so I'll just start from scratch and abbreviate some of the more obvious parts.
I have an MY01, and I didn't feel like trying to go custom hack a shaq on my door panels to fit in the tweets so I ended up trading panels plus a tad bit of cash on my part with a local s2k'r that had just had his seats stolen (poor guy). I adapted the stock tweeter location to fit the Focal tweeter by unscrewing the stock one from the bracket and super glueing the new tweeter in its place (if any of you reading this would like a set of stock tweets, I still have and my old 01 paper 2ways, but you don't want those. trust me) I snapped a quick picture of it the other week when I had the door panels off to swap my woofers:
If I had to do it all over again, I would have done something more custom. The stock location is NOT the greatest location as far as imaging is concerned. But it is tolerable.
Why did I have the door panels off you ask? One of the original woofers installed on the driver side developed a very bad rattle after about 6-7 months of use (my guess may be overdriving due to improper crossover settings on my part) which became very very annoying. I bought the set originally from Sound Advice (Tweeter to some of you) but I didn't have the extended warranty through them so I went directly to Focal for help. To my surprise, I was still fully under the manufacturer's 2 year warranty (or 1 year I can't remember) and they RMA'd it with no problem. I was emailed the form same day and instructed to send in both woofers because I was going to be upgraded to a current model for FREE! So the door panel being off the other week was to reinstall my new 165 VR 6.5' mids. Kudos to Focal.
Pics:
BEEFY!
Installed:
Few caveats on these...I pretty much left the EQ settings the same as they were set for the old ones. I have played with them since installed the new mids, but haven't noticed any huge difference as far as power handling or SQ goes. Also, the mudslide looking stuff on my door panel is the liquid eDead I applied to both doors and the passenger side flooring. Great investment there...you can really tell the difference depending on where you apply it. On the doors I can definitely tell the matting made a difference from the resounding "thud" I now get when I close the doors. Applying it on the passenger flooring seriously quieted down the cabin from outside noises like tires and exhaust drone. I can't recommend the stuff enough. If you have questions on it, post up and I'll do my best to answer them.
While I'm on the subject of the mids and highs, I'd like to make a suggestion to anyone buying a set of these Focals in the Polyglass line.
In this thing:
On the tweeter selection, be sure to choose the the lowest option which this case was -3. If you're using the stock location like I am, any other setting may just be too bright for your taste as it was mine. I had the entire right side of my EQ in the 880PRS looking like an Aspen downward slope and it was still too bright so beware. The crossover itself is mounted in the inside of the door panel in that pocket looking thing. If you choose this location, be sure to extend your wires far enough out so you don't have to fight the panel+crossover everytime you take the panel off like I have to. No bueno.
During the first install last year, I acquired a very annoying ground loop. I tried a few things to fix it, but I ignored it for the most part because once you have everything cranked you can't hear it anyway. Well I decided to stop being lazy and track it down. The culprit was what most ground loops problems are in car audio, a bad ground somewhere. In my case it was most definitely the HU. See, I thought I was being smart when I didn't use the harness grounding point and making my own. Foolish me. Here's the deal - when you pull the folding door off and expose the HU, there's three screws on each side right? Two to hold the radio in place with the factory bracket (one bracket on each side). What about those ones in the middle? AH HA I told myself. I'll just be smart and use that one! To get even smarter, I did some googling and ran across a technique that further helps us 880PRS owners out:
http://www.icixsound.com/vb/showthread.php...ighlight=880PRS
Preview of link above:
If you have this HU, or any fairly new Pioneer HU for that matter, I highly recommend this mod. Back on topic...so what was wrong with that spot? Ummm, how about the fact that your ground's first contact is with PLASTIC and then with the car's frame. Poor, lazy location indeed. Hey, I get points for trying right? Anyway, here's the new, trouble free grounding site:
Sorry for the not so good pictures here but that's a hard to photograph spot for whatever reason. I used an 8ga ring terminal and crimped in my HU ground, iPod cable ground, and the RCA fix I linked to above. Worked like a charm. I still have a small bit of noise, but you really have to listen for it to notice it. Before, it sounded like I had a pair of Vortech's in the doors lol. The connector you see in the pictures is a part of the car to radio harness I tucked away to the side to get more clearance behind the radio.
Speaking of iPod's and HU's, here's some eye candy:
In case you're wondering, in these pictures the car is off which is why the voltage is so "low". With the motor running I get a full 14.4v with all accessories running. No lights dimming, no hiccups whatsoever. Stock alternator, discount auto $39.95 battery
Cool huh? About that iPod cable I mentioned earlier...its a little more 'complicated' than that. Again, I researched the forums looking for iPod setups (there's a pretty big thread in the archives somewhere) and no one had quite what I wanted. My requirements were as follows:
1. Must be easily removable/hot swapable (no messing with cables)
2. Must charge while plugged in
3. Must be controllable from the iPOD, NOT the deck (I hate those interfaces with a passion. The do not compare to the ease of the click wheel IMO)
4. Because of #3, must be easily viewable and accessible
After a lot of searching, I ran across installer.com who sells a Pioneer IP-BUS to iPod specific cable that will gives me #2 and #3 (to the HU it looks just like another AUX source) but what about #1 and #4? For that I had to come up with a solution on my own it looks like I succeeded. The bracket extending the iPod out from the folding door I got from Modifry.com and the dock the iPod sits in I got from http://www.diceelectronics.com/ipod_connections.htm I can't say enough for this combo, it just plain works.
Next, I want to make a public service announcement concerning our favorite little gremlin in the trunk...the flap escape air thingy. Can someone please tell me what the hell this thing is for? Anywhoo, I remembered reading about this thing when I did my research prior to tackling this install and during the test run when I hooked everything up, sure enough the infamous rattle reared its ugly head (or in this case, flap). What I didn't see however, were pictures and explanations on how to rid yourself of it. So here goes...
First thing you'll want to do is open your trunk and remove the carpeting panel immediately around the latch. Once removed, look straight down and to your left and you will see the item in question.
Picture of the spot with the flap removed:
Actual piece:
As you can see, I completely removed the flap. I don't know of an easy way to do it unless you remove the bumper and take it out like that. I was able to get it out without removing the bumper but let's just say it was done with less than 'finesse' lol. My tools of choice were a long screwdriver, hammer, lots of choice curse words and a few band aids. YMMV. As I said previously, I did research on this prior and the recommendations I read said to cover the spot with dynamat. I didn't have any laying around so I had to improvise.
I took some cardboard off my Basslink box and some of this stuff that I had laying around:
End result:
Simple yet effective. As odd as it sounds, that's the only rattle I had/have in the car. With the doors closed and the stereo at full tilt with the Basslink kicking and screaming, you can hardly hear anything outside of the cabin. Trunk lid nor license plate holder does not rattle one bit. I know...a lot of you will say the Basslink isn't powerful or loud enough to cause a lot of rattling but either way it is still unbelievable silent. Open the door and step inside the car, and its a WHOLE different story. I read a lot of "reviews" in this forum about the Basslink's output in the S2K and it led me to believe I might not be getting what I wanted but I chose to try it out for myself and I am very glad I took my own advice because it is exactly what I was looking for. Clean, filling bass that carries well into the cabin without overpowering the mids and highs. For my application and wants, it was the perfect choice. I can't speak enough about it. If you're looking to wake the neighbors or vibrate your teeth, you should probably look elsewhere.
Couple pictures of the finished product:
Currently, I don't have it mounted in with screws to secure it from sliding. I installed the mounting feet immediately began having doubts about how hard it would be to remove and get to the tools underneath in the case of a flat or similar situation (yes I do still have the spare installed). I managed to jam the side facing the cabin in between the tool cover and carpeting to keep it from sliding around. I have 'field tested' this setup with some spirited driving and so far its only moved once during an extreme right hand turn and even then, it didn't move very far at all.
Obviously, I've left a few things out the install but the things I left out I feel have been adequately covered in either the FAQ's or in other threads that you can find via the search. If you have any specific questions about anything, feel free to post them up or PM me and I will be more than happy to answer.
- The Spectacle
Thread Starter
Joined: Sep 2004
Posts: 4,894
Likes: 9
From: Tampa, FL
Wow 100+ views and no comments? Can I get at least one high five or something?
On a completly different note, car is in the shop now with the head removed. At least two bent exhaust valves. Gotta pay to play I guess.
On a completly different note, car is in the shop now with the head removed. At least two bent exhaust valves. Gotta pay to play I guess.


Thread Starter
Joined: Sep 2004
Posts: 4,894
Likes: 9
From: Tampa, FL
Thank god. NFR FTW. We win, even when we fail.
Also another note I'd like to add. Turn the crossover settings on the Basslink all the way to the right and use your HU's sub crossover settings. This will result in a considerable amount of increased output. If you're still stock I wouldn't recommend doing this as your unit will not blend in well with your mids.
Also another note I'd like to add. Turn the crossover settings on the Basslink all the way to the right and use your HU's sub crossover settings. This will result in a considerable amount of increased output. If you're still stock I wouldn't recommend doing this as your unit will not blend in well with your mids.


Trending Topics

Thread Starter
Joined: Sep 2004
Posts: 4,894
Likes: 9
From: Tampa, FL
Originally Posted by StEVEN_s2k,Jun 20 2008, 08:18 AM
Excellent write up
did you ground the RCA cables to get rid of a speaker buzz?
did you ground the RCA cables to get rid of a speaker buzz?

Thread
Thread Starter
Forum
Replies
Last Post
bookkilla
Texas - North Texas S2000 Owners
10
May 10, 2008 09:07 PM